F5 BIG-IQ Centralized Management Lab > BIG-IQ All Labs > Class 8: BIG-IQ Web Application Security > Module 1: Advanced Web Application Firewall (WAF) on BIG-IQ Source | Edit on
Lab 1.4: Deploy a WAF with BIG-IQ and AS3 using an ASM policy on BIG-IP using Policy Builder
Note
Estimated time to complete: 25 minutes
Lab environment access
If you have not yet visited the page Getting Started, please do so.
Workflow
- Larry creates the ASM policy in transparent mode on the BIG-IQ and deploy on the BIG-IP(s).
- David creates the AS3 template and reference ASM policy created by Larry in the template.
- David assigns the AS3 template to Paula.
- Paula creates her application service using the template given by david.
- After Paula does the necessary testing of her application, she reaches to Larry.
- Larry reviews the ASM learning and deploy the ASM policy changes on the BIG-IP(s) and set the policy to blocking mode.
- They all go for happy hour.
Prerequisites
1. First make sure your device has ASM module discovered and imported for SEA-vBIGIP01.termmarc.com under Devices > BIG-IP DEVICES.
2. Check if the Web Application Security service is Active under System > BIG-IQ DATA COLLECTION > BIG-IQ Data Collection Devices.
ASM Policy and Security Logging Profile creation (Larry)
Let’s first deploy the default Advance WAF policy and Security Logging Profile available in BIG-IQ to SEA-vBIGIP01.termmarc.com.
- Login to BIG-IQ as larry.
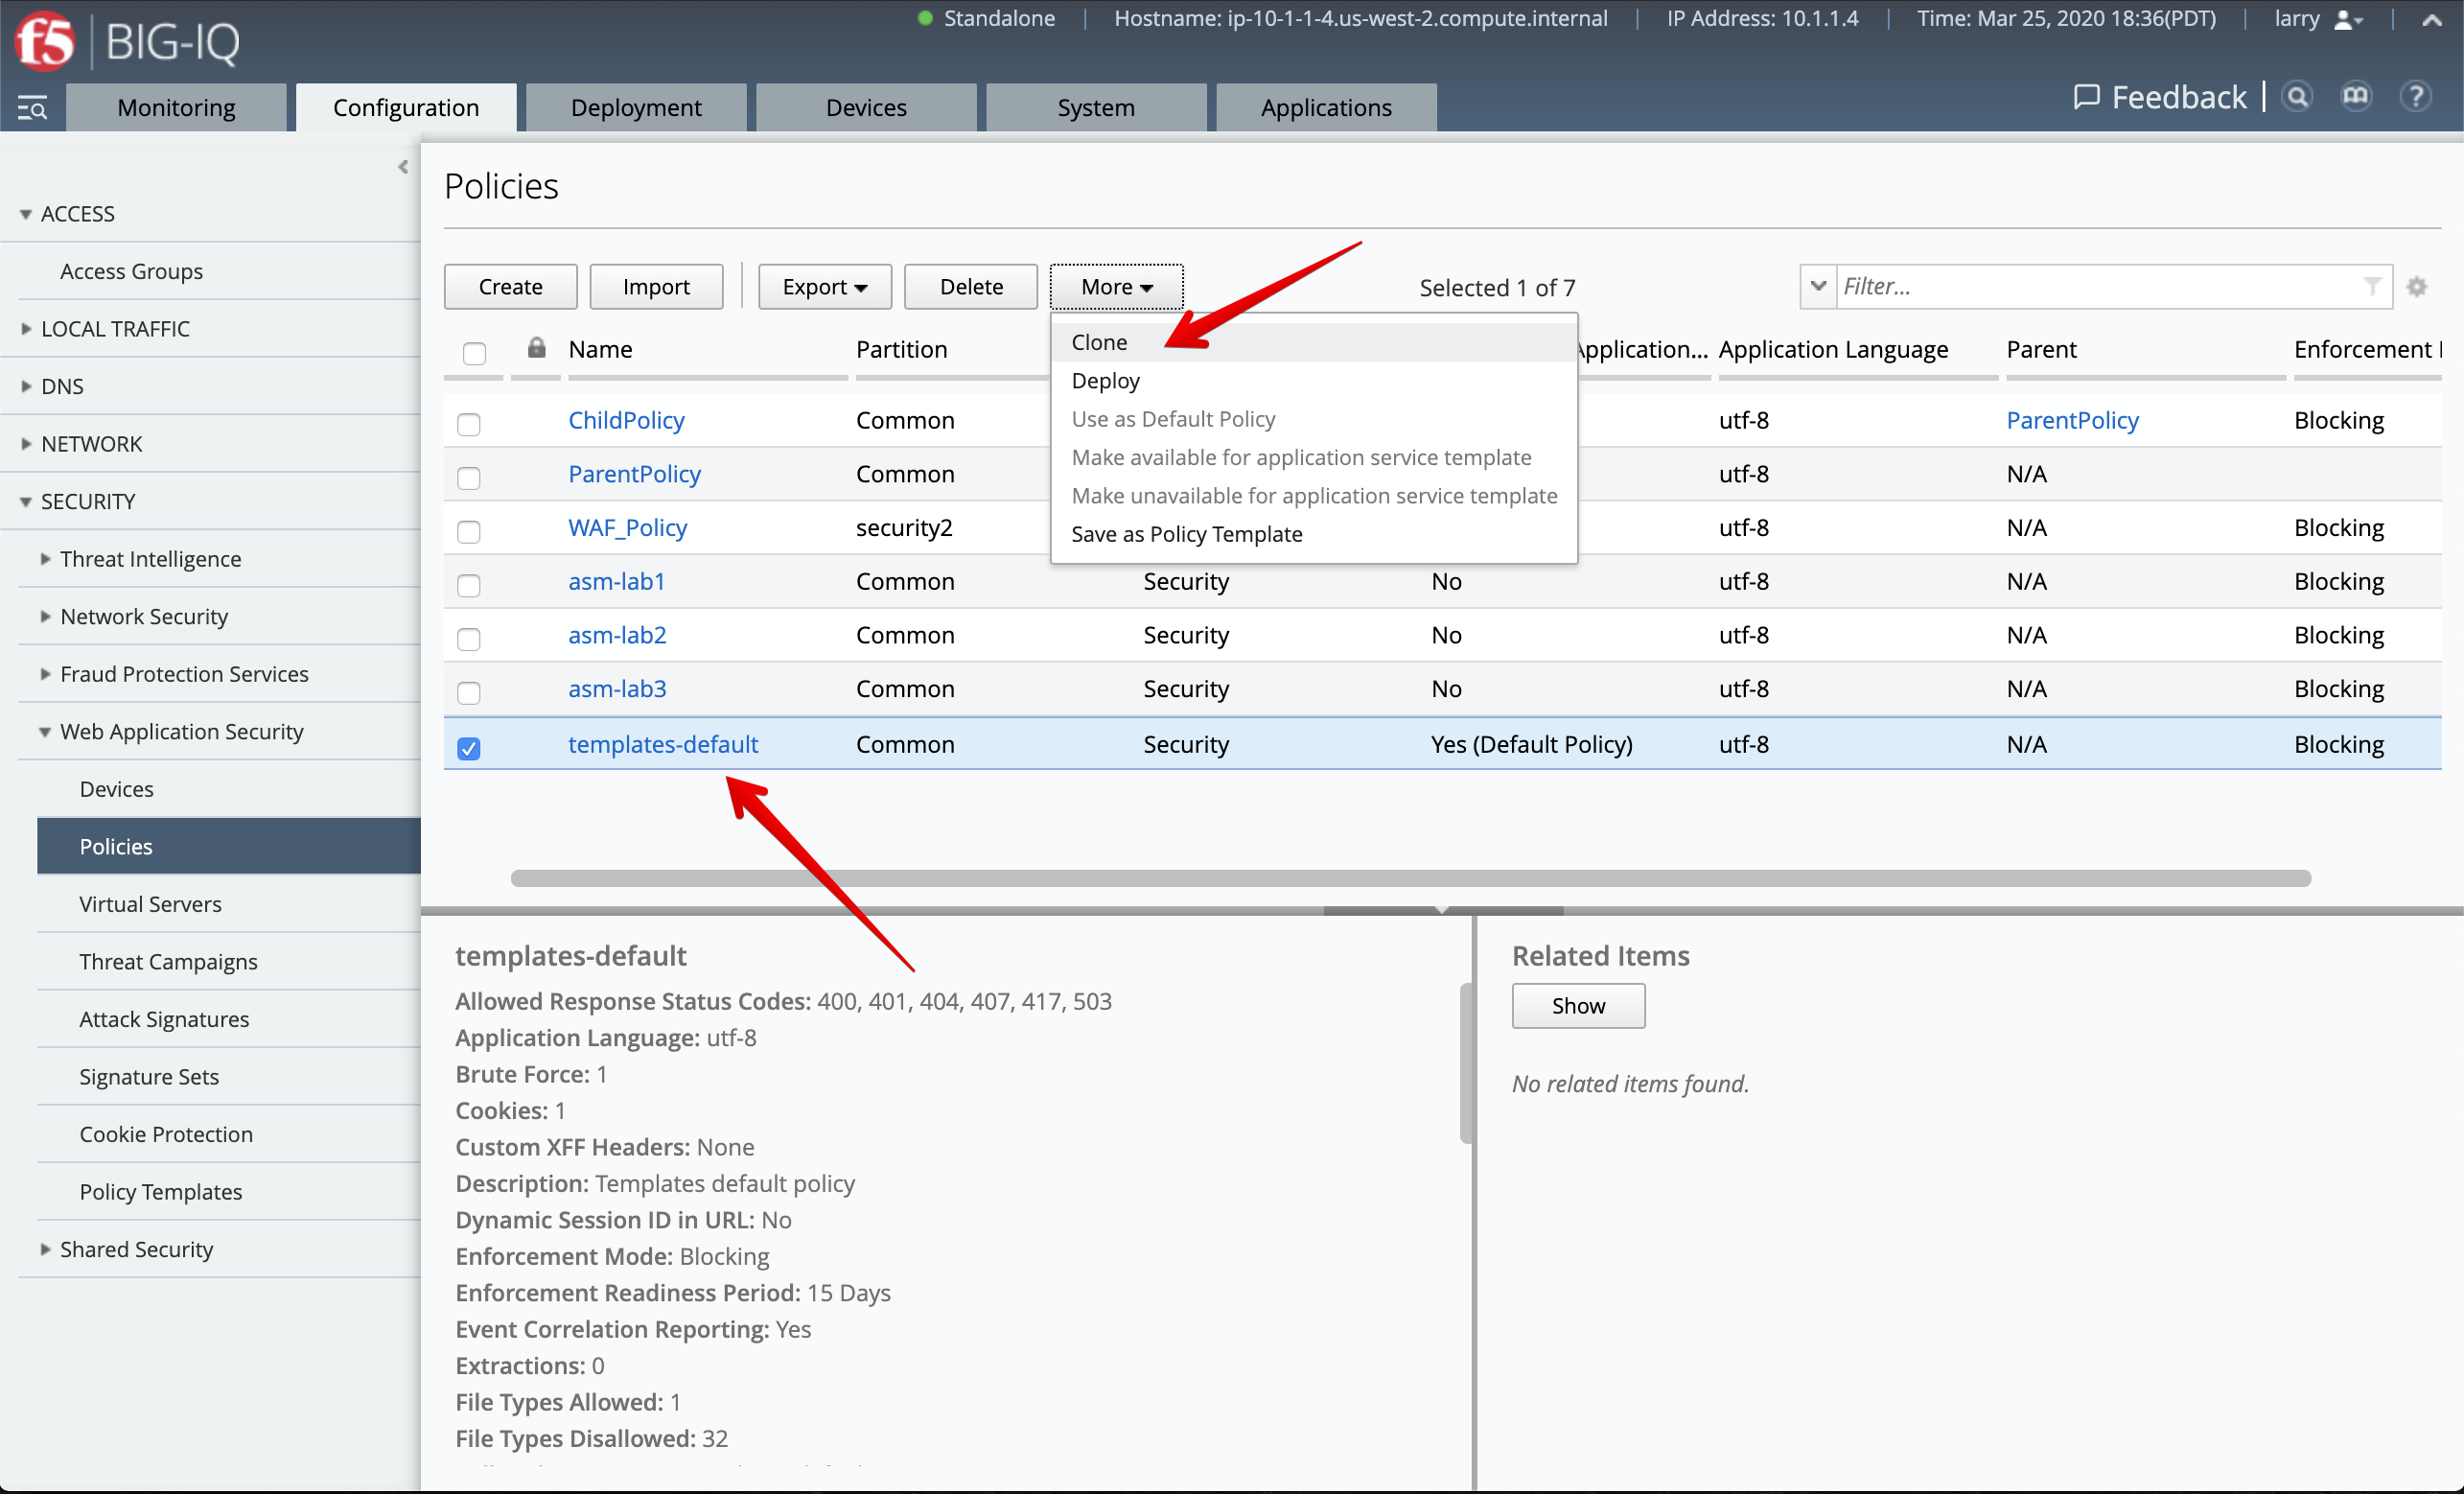
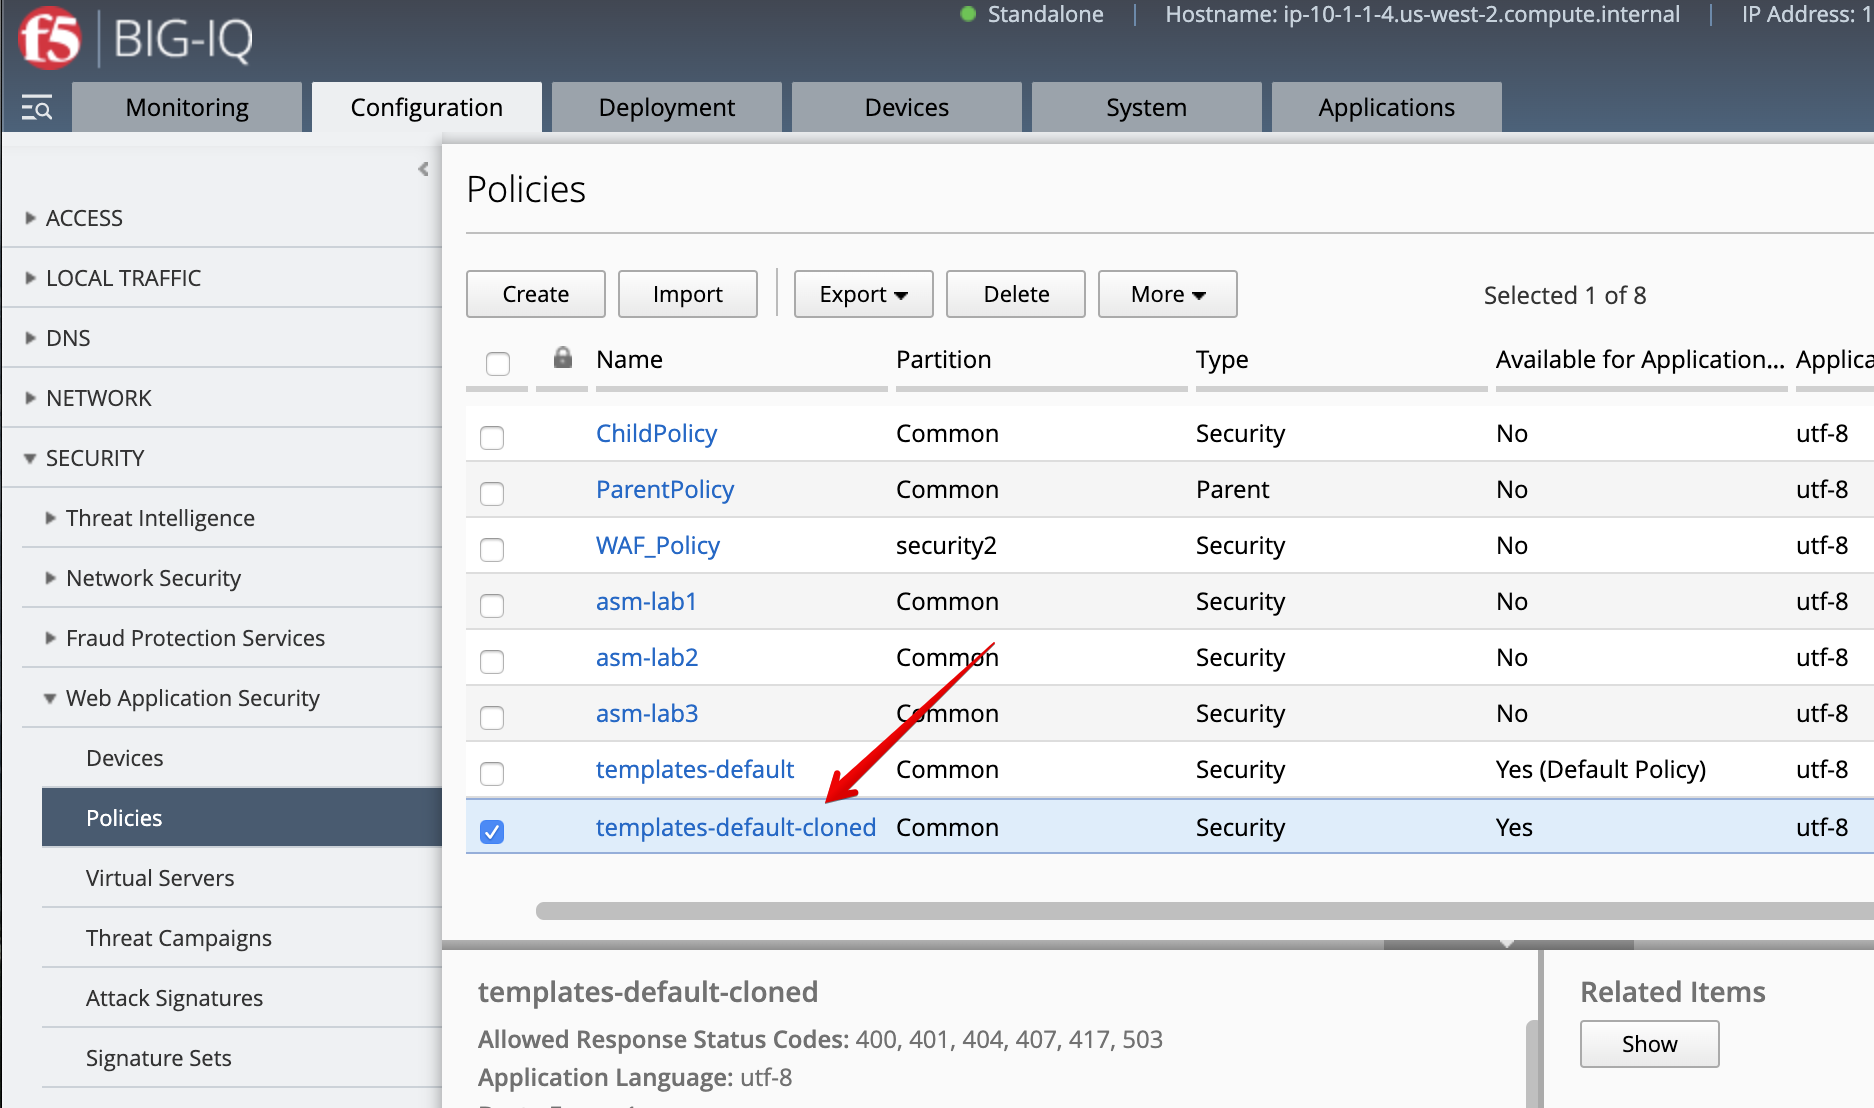
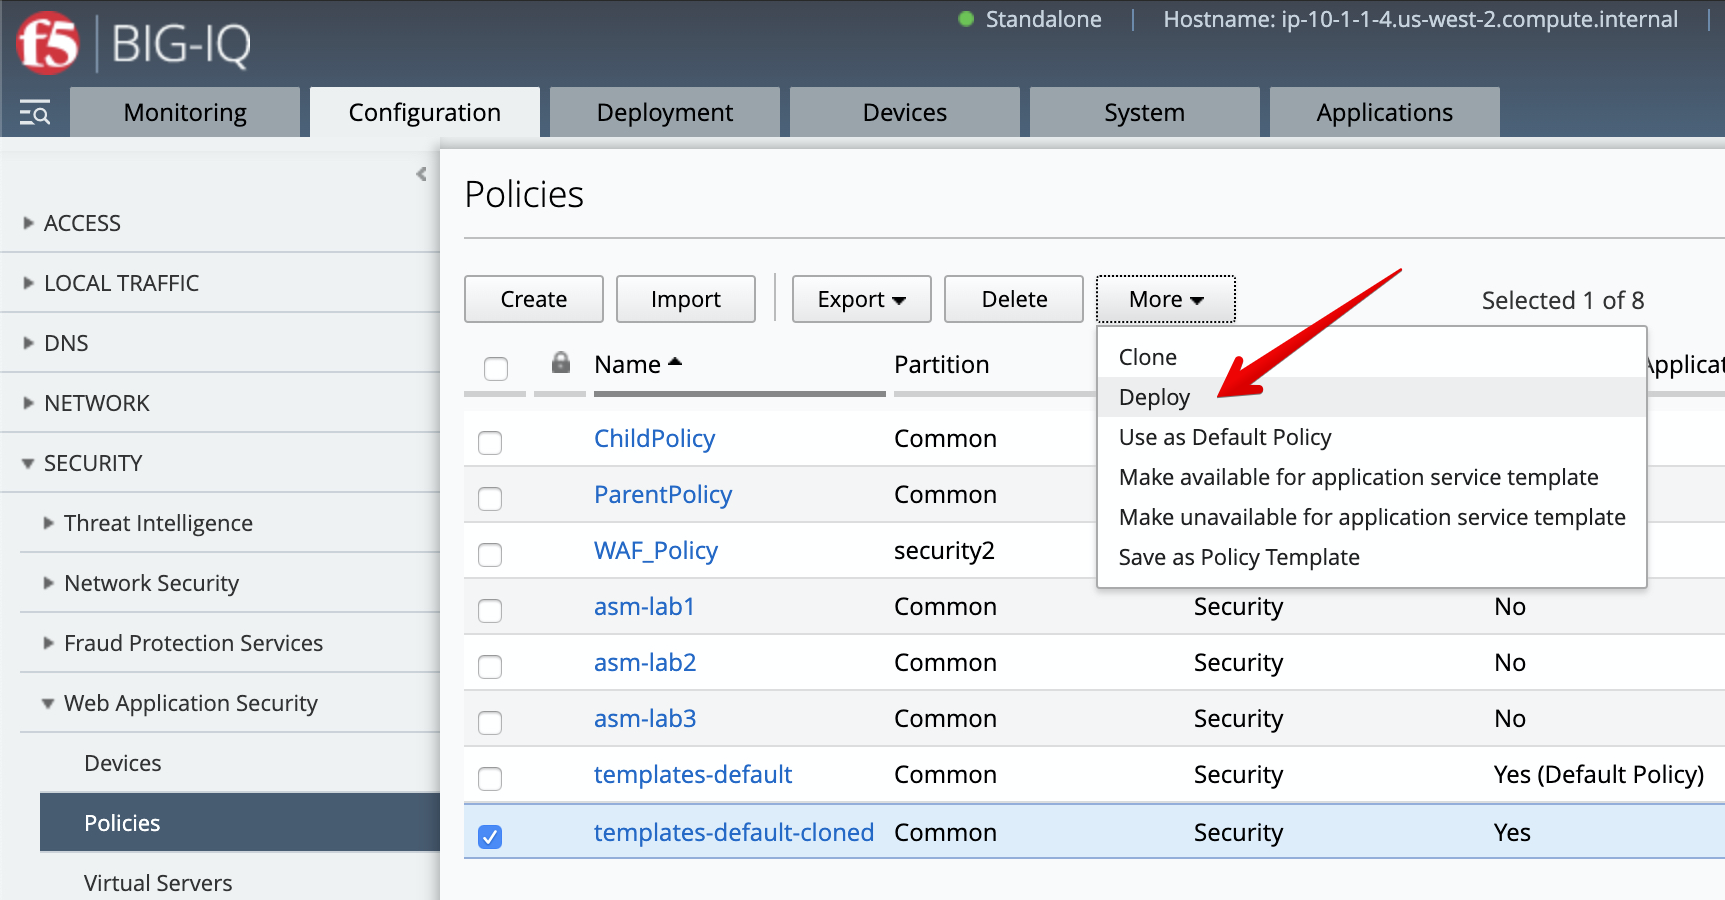
2. Go to Configuration > Security > Web Application Security > Policies and clone the policy called templates-default
and name it as templates-default-cloned.
Note
In this example, we created a clone from an existing policy but you could also create a new policy from one of the default WAF template available in BIG-IQ under Configuration > Security > Web Application Security > Policy Templates.
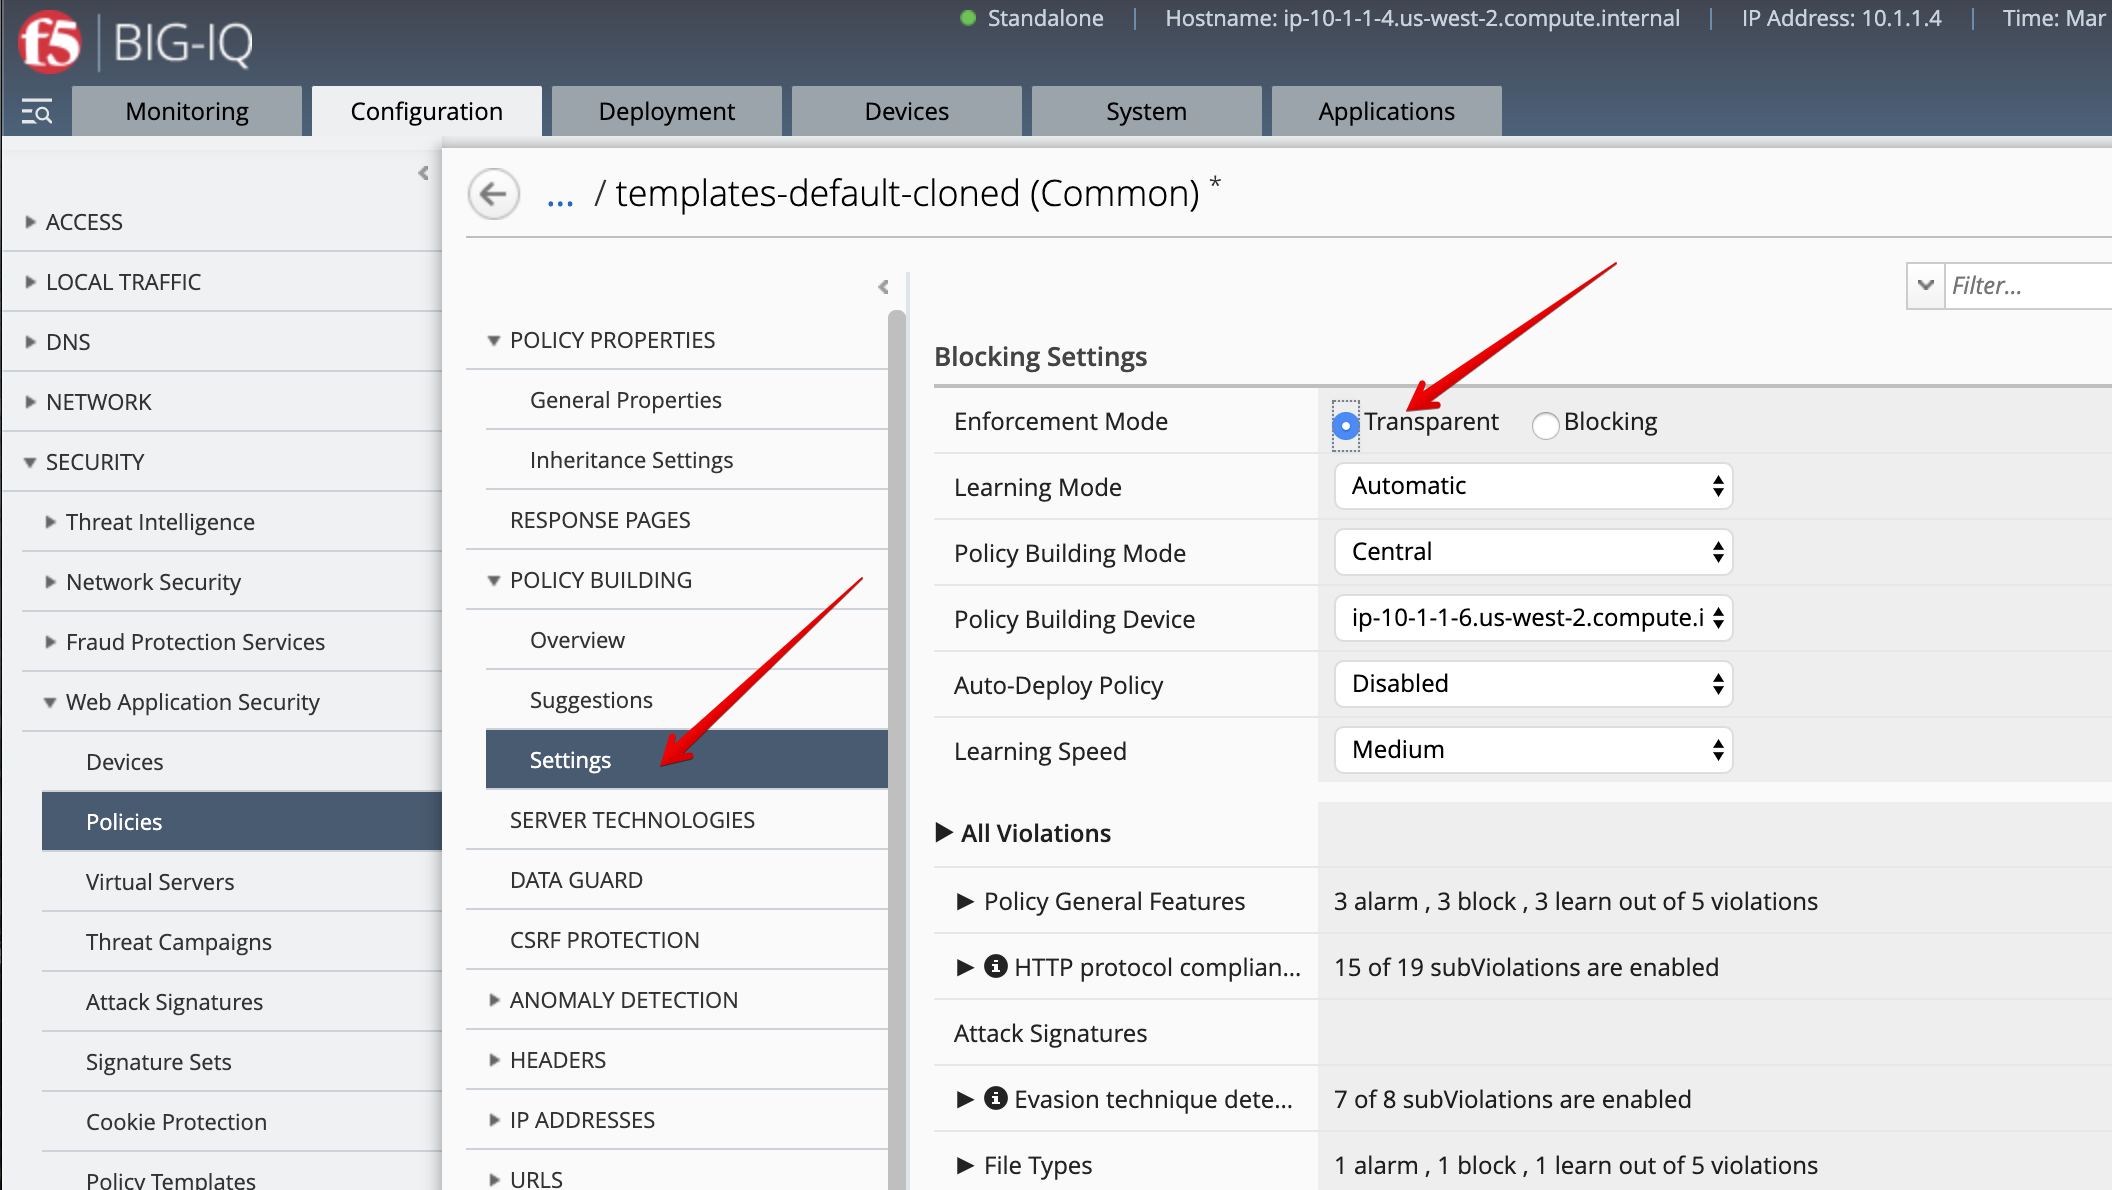
- Select
templates-default-clonedand change Enforcement Mode totransparentunder POLICY BUILDING > Settings, then click on Save & Close.
- Under Virtual Servers, click on the
inactivevirtual server attached to SEA-vBIGIP01.termmarc.com.
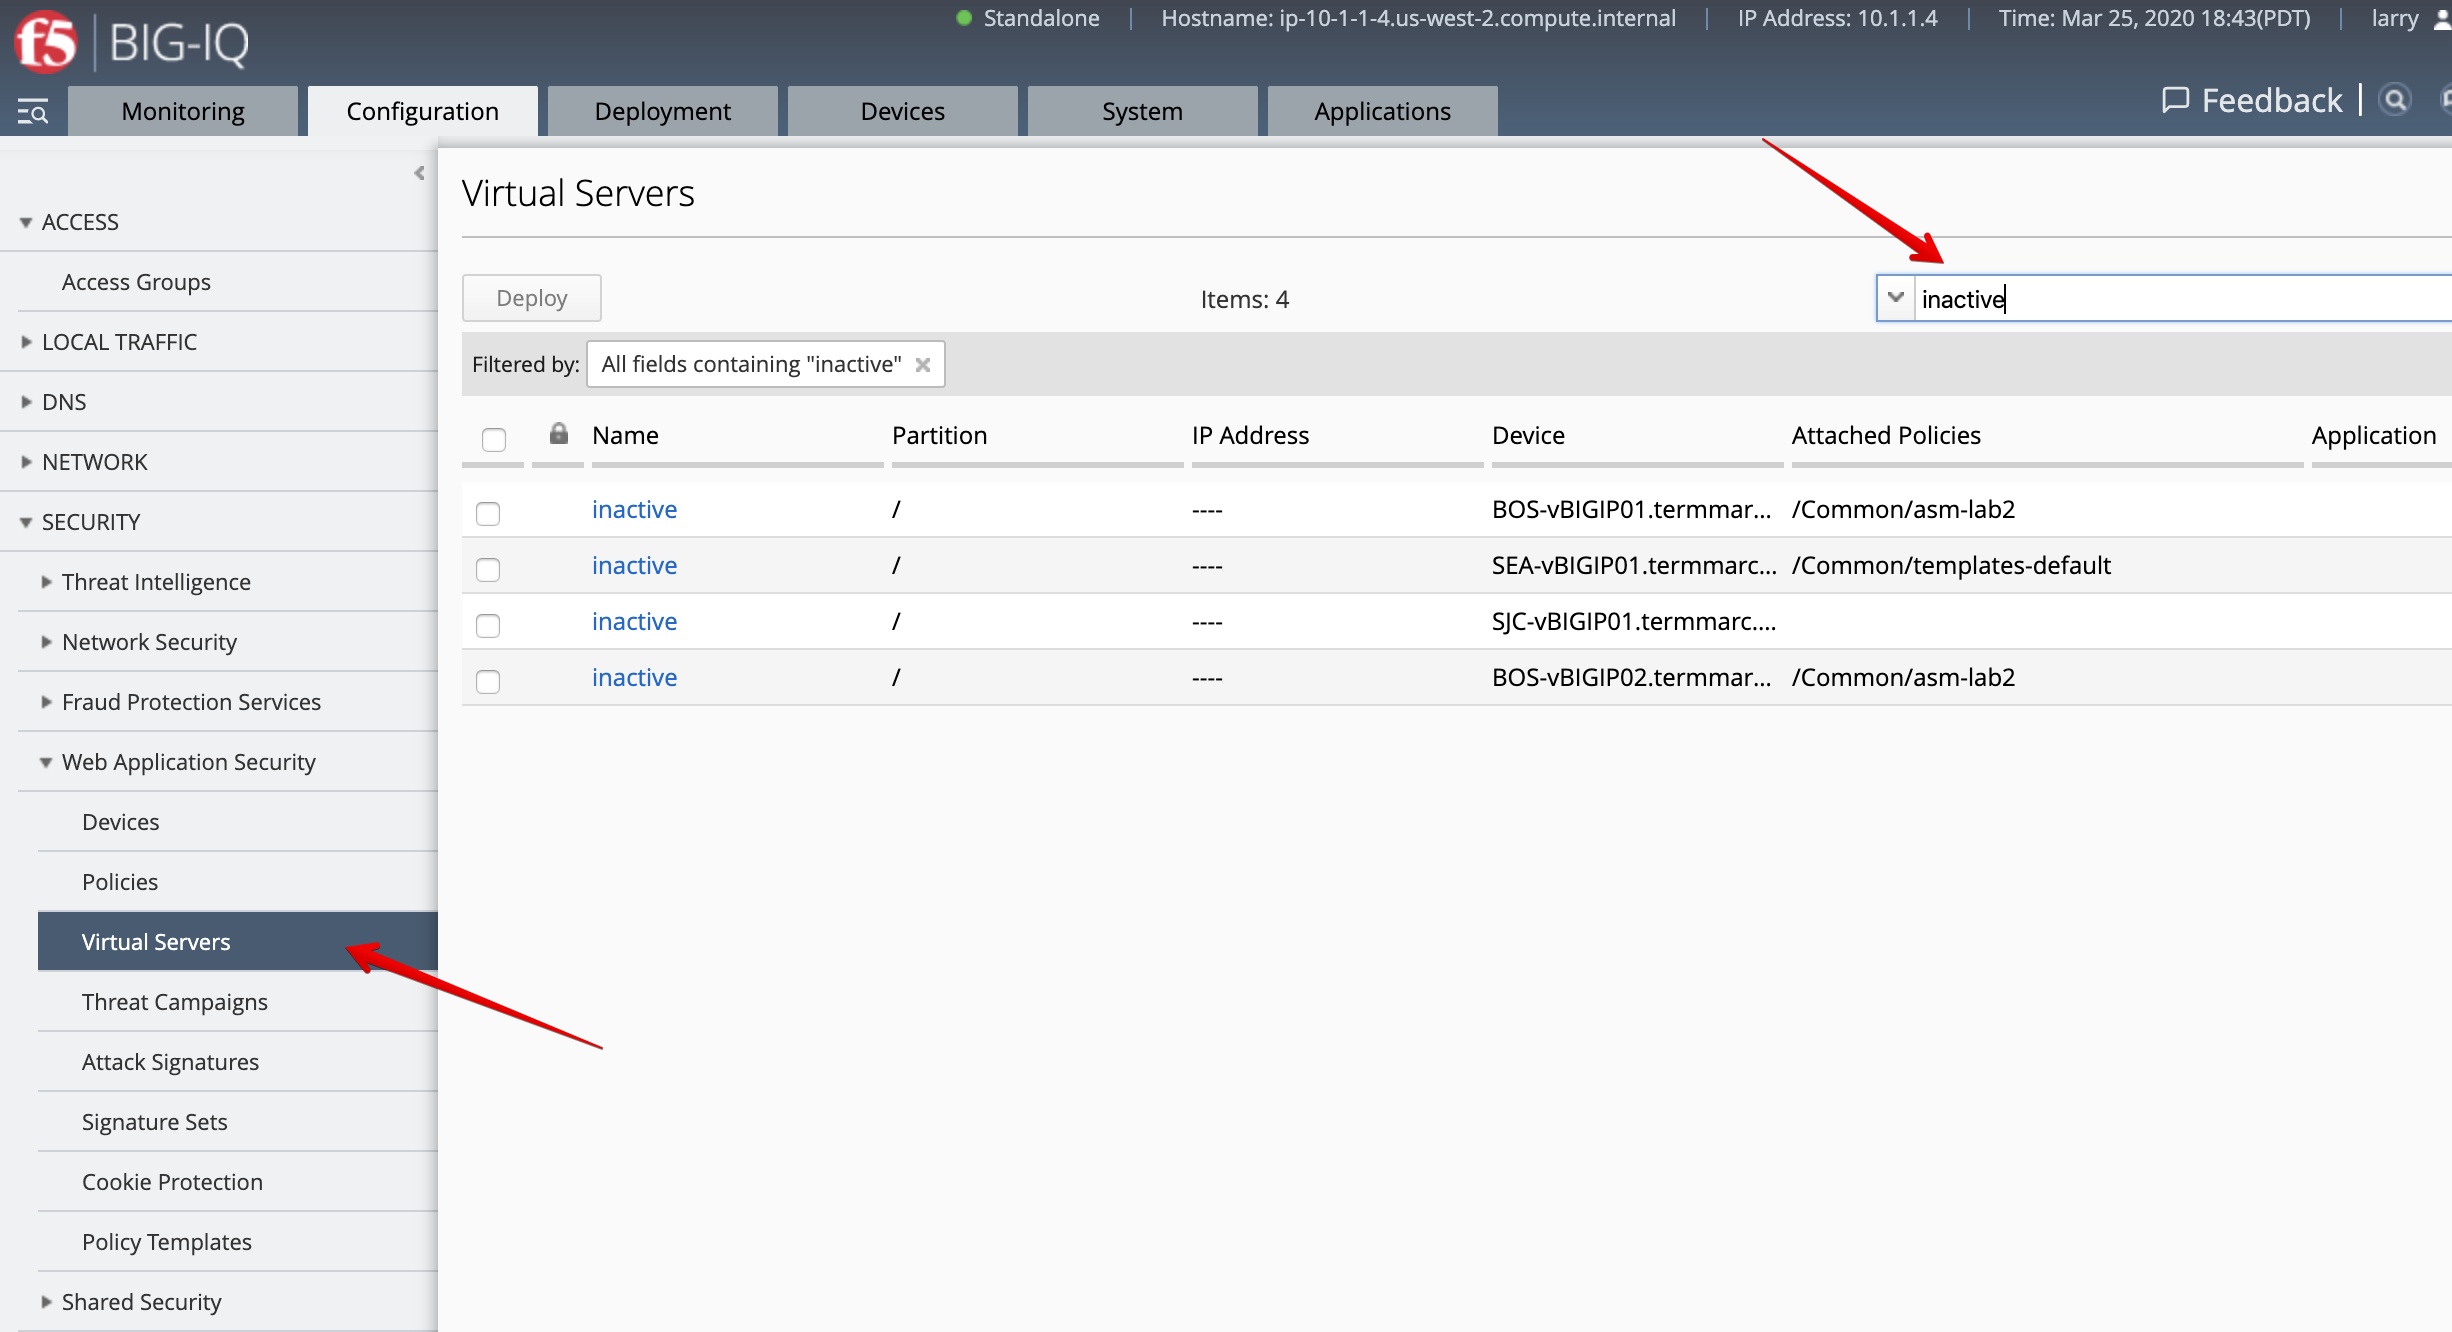
- Select the
/Common/templates-default-cloned, then click on Save & Close.
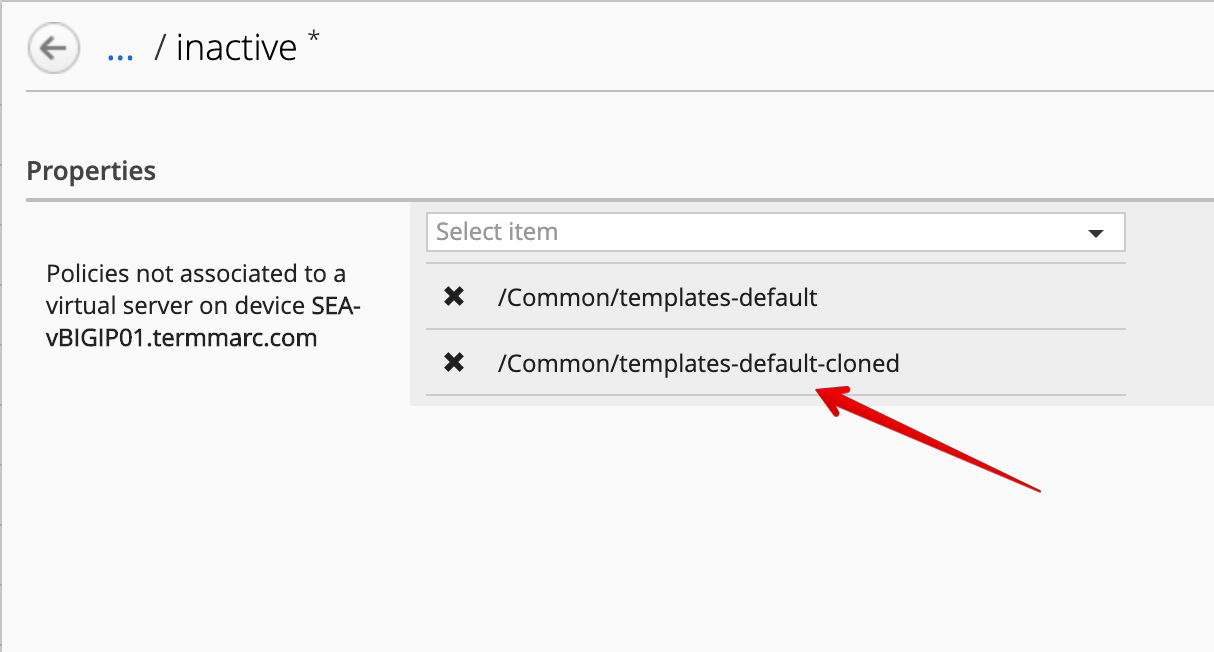
- Notice the policy is now attached to the
inactivevirtual servers.
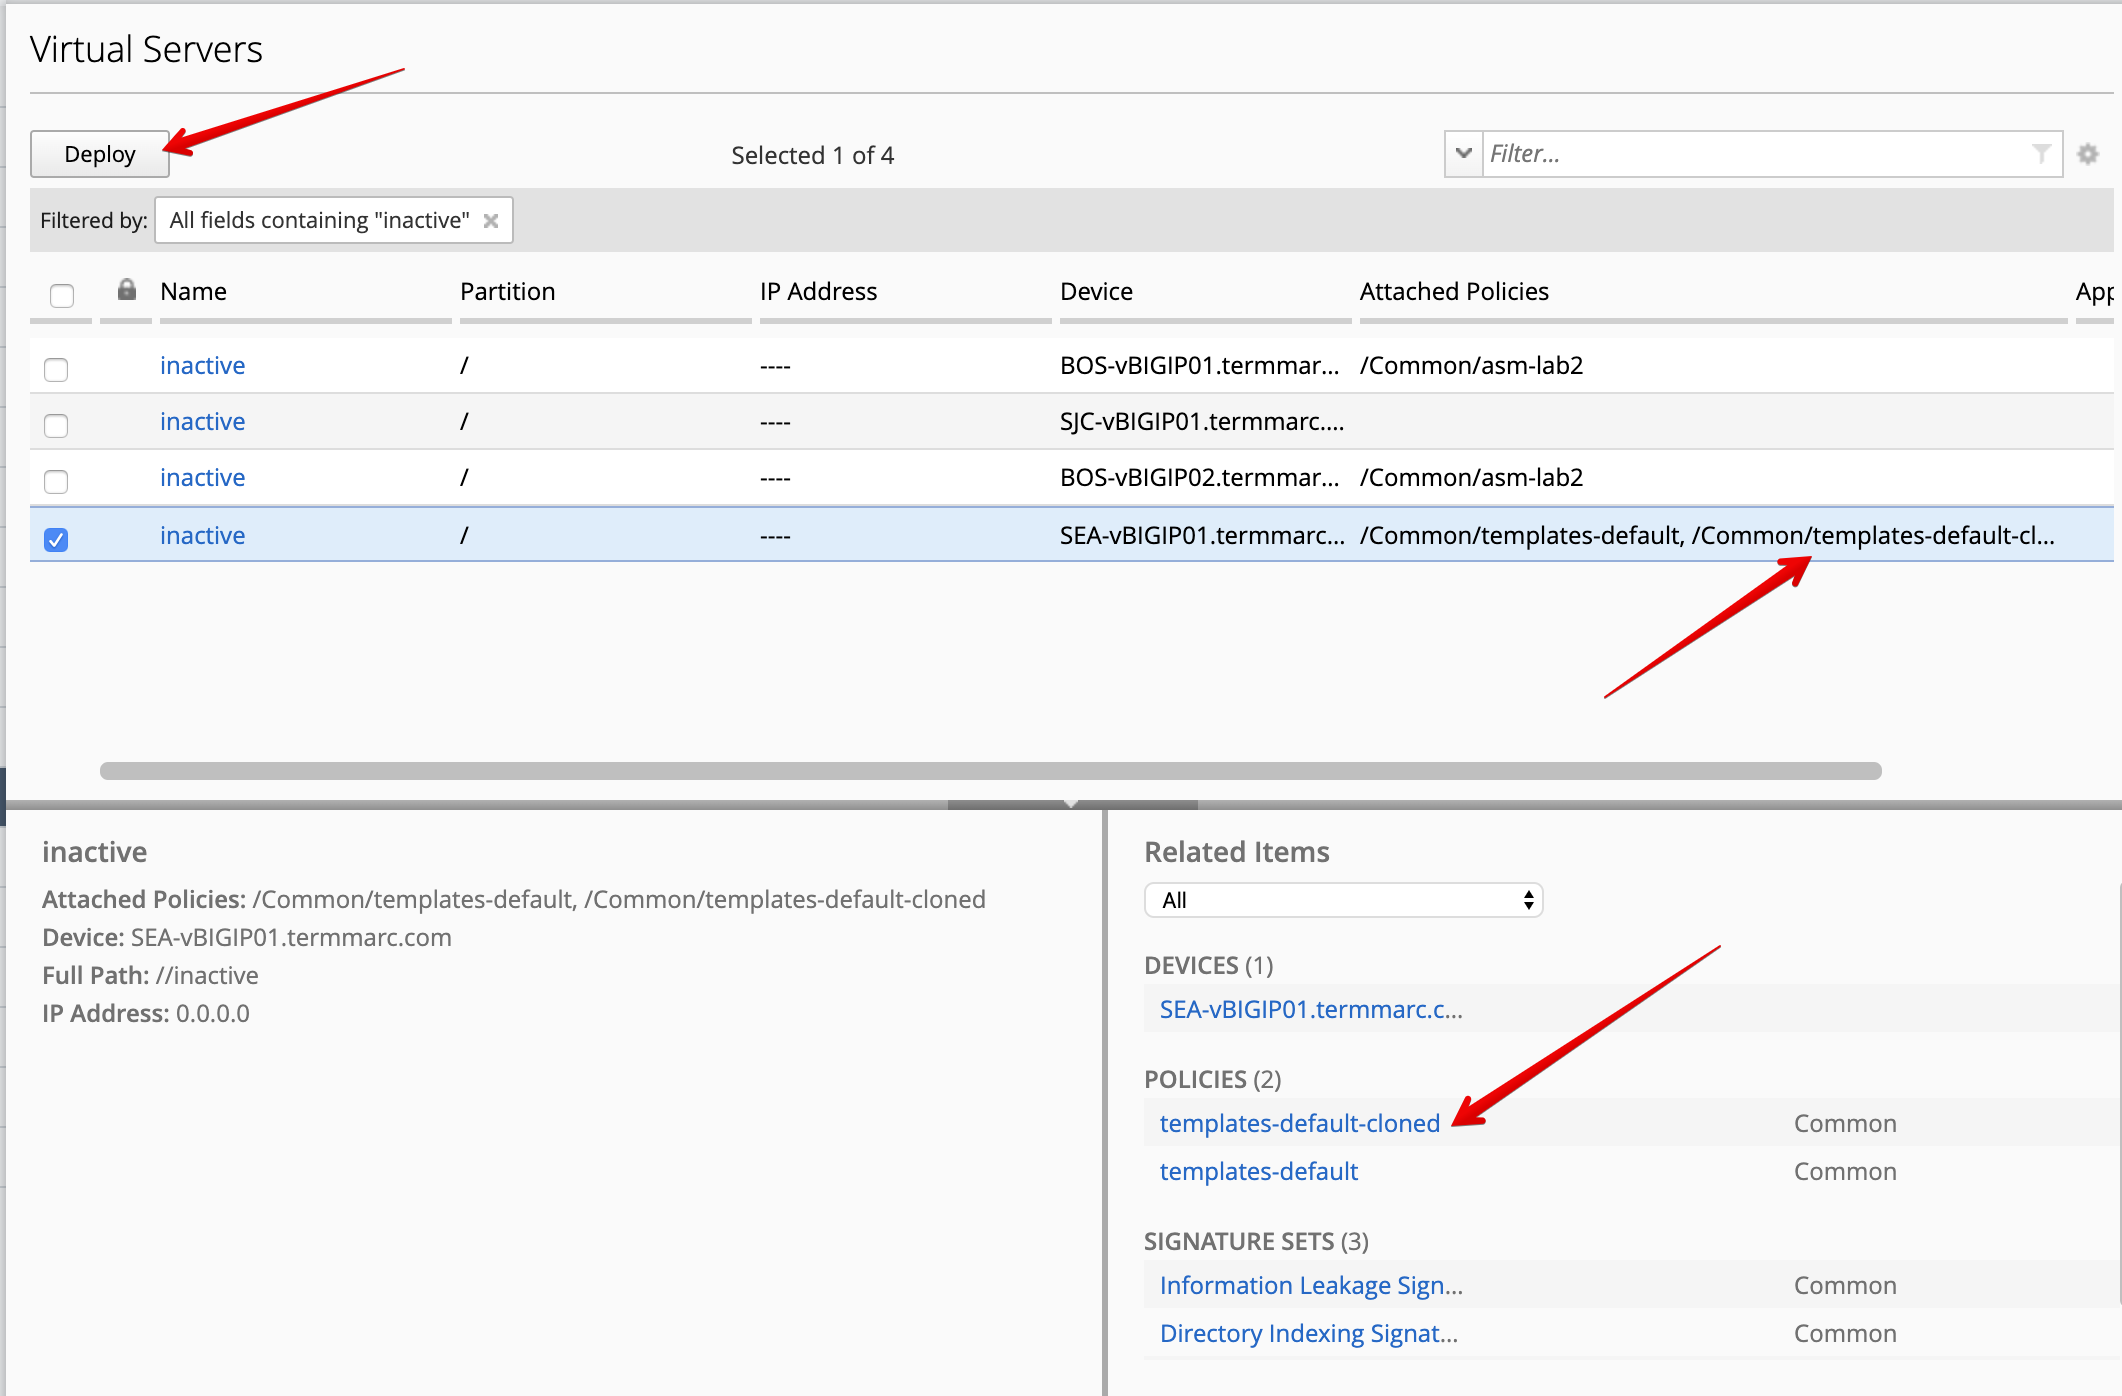
Select the inactive virtual servers attached to SEA-vBIGIP01.termmarc.com, click on Deploy.
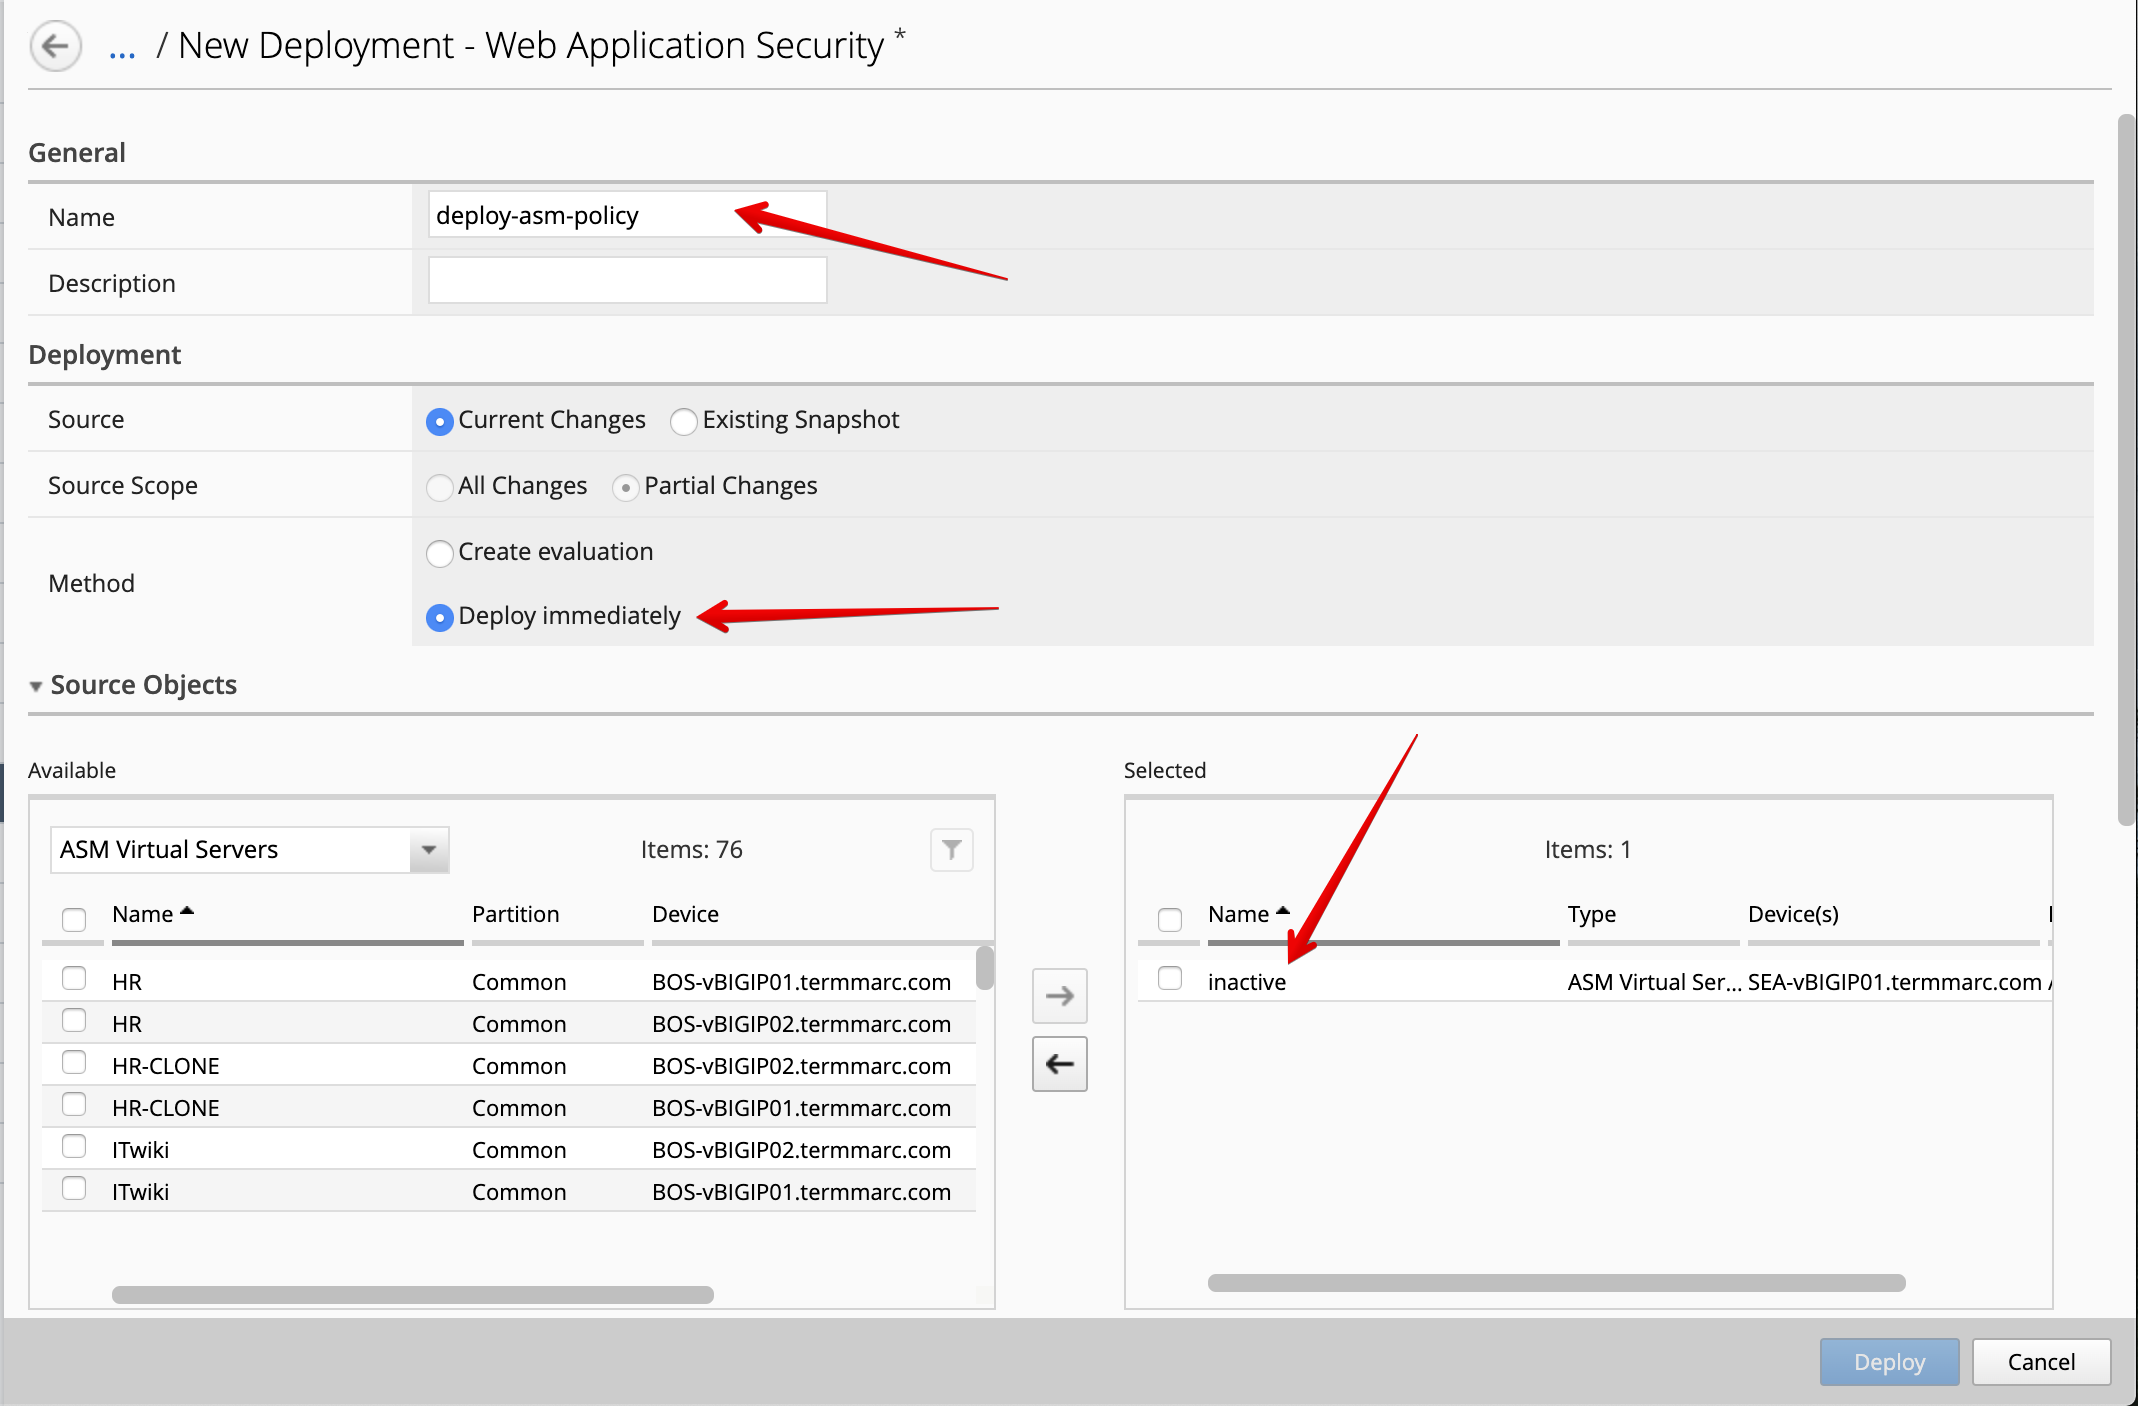
- The deployment window opens. Type a name, select
Deploy immediatelyfor the Method.
Under the Target Device(s) section, click on Find Relevant Devices
and select the SEA-vBIGIP01.termmarc.com. Then, click on Deploy.
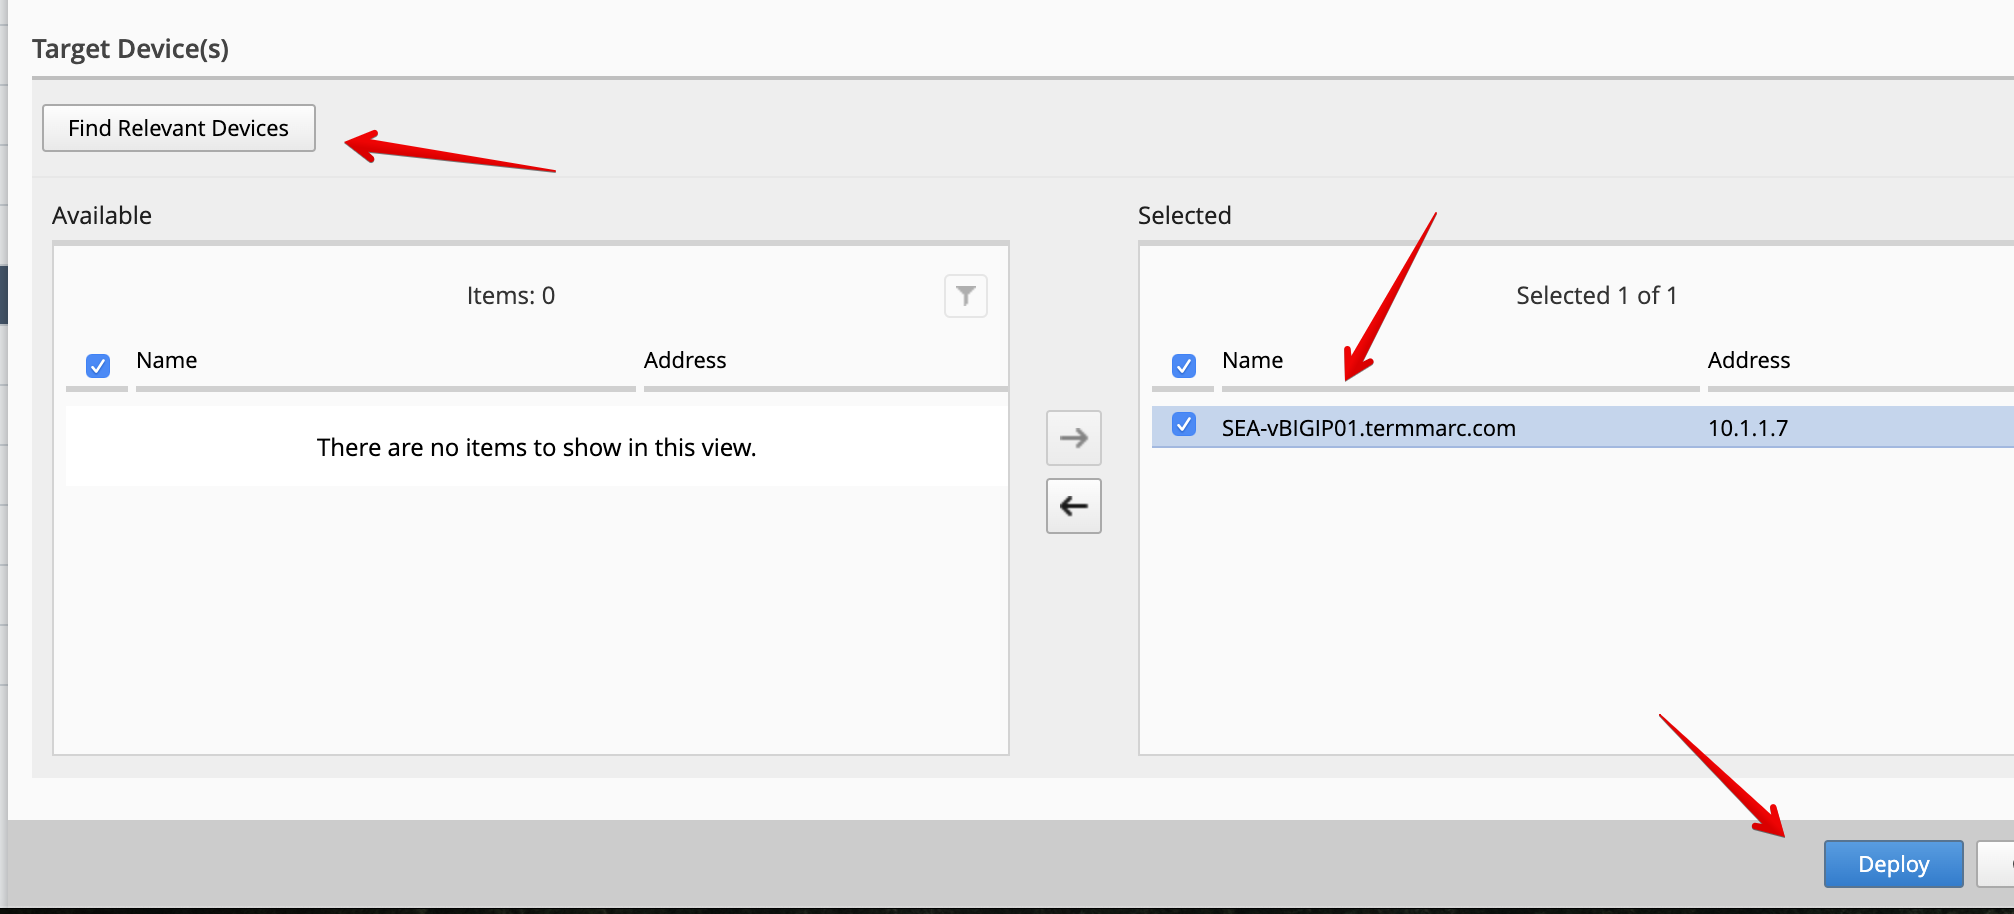
- Confirm the deployment information, click on Deploy.
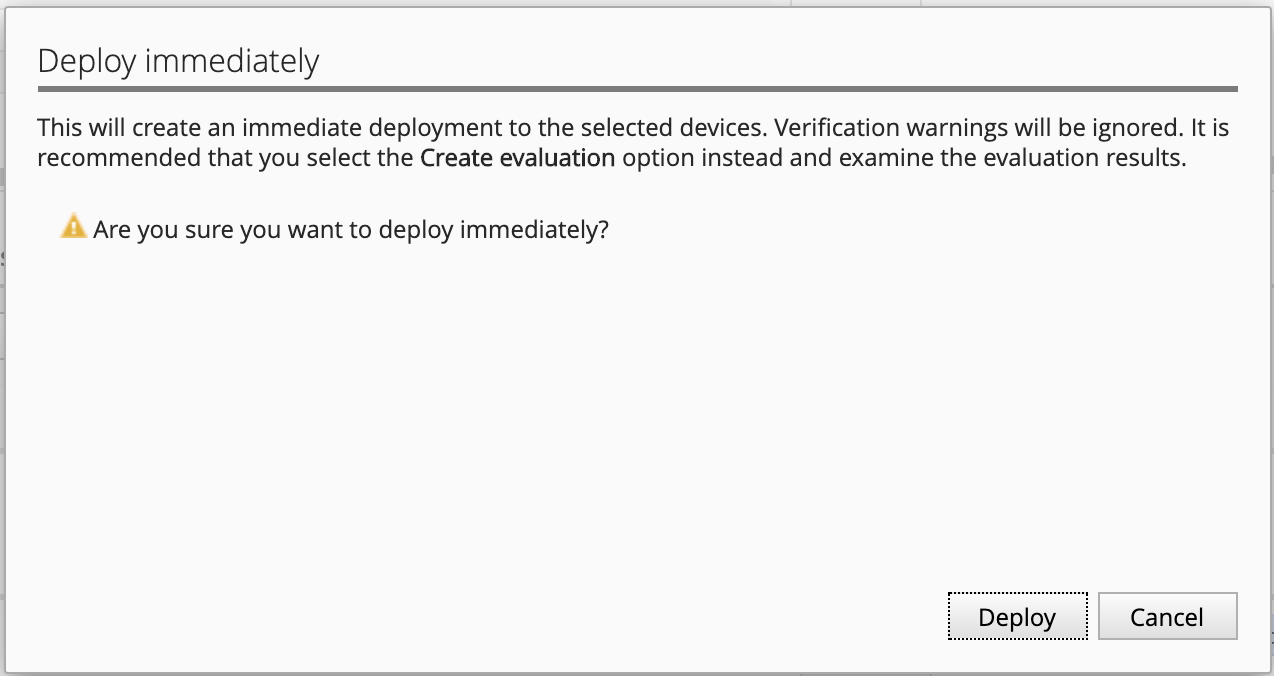
- Wait for the deployment to complete.
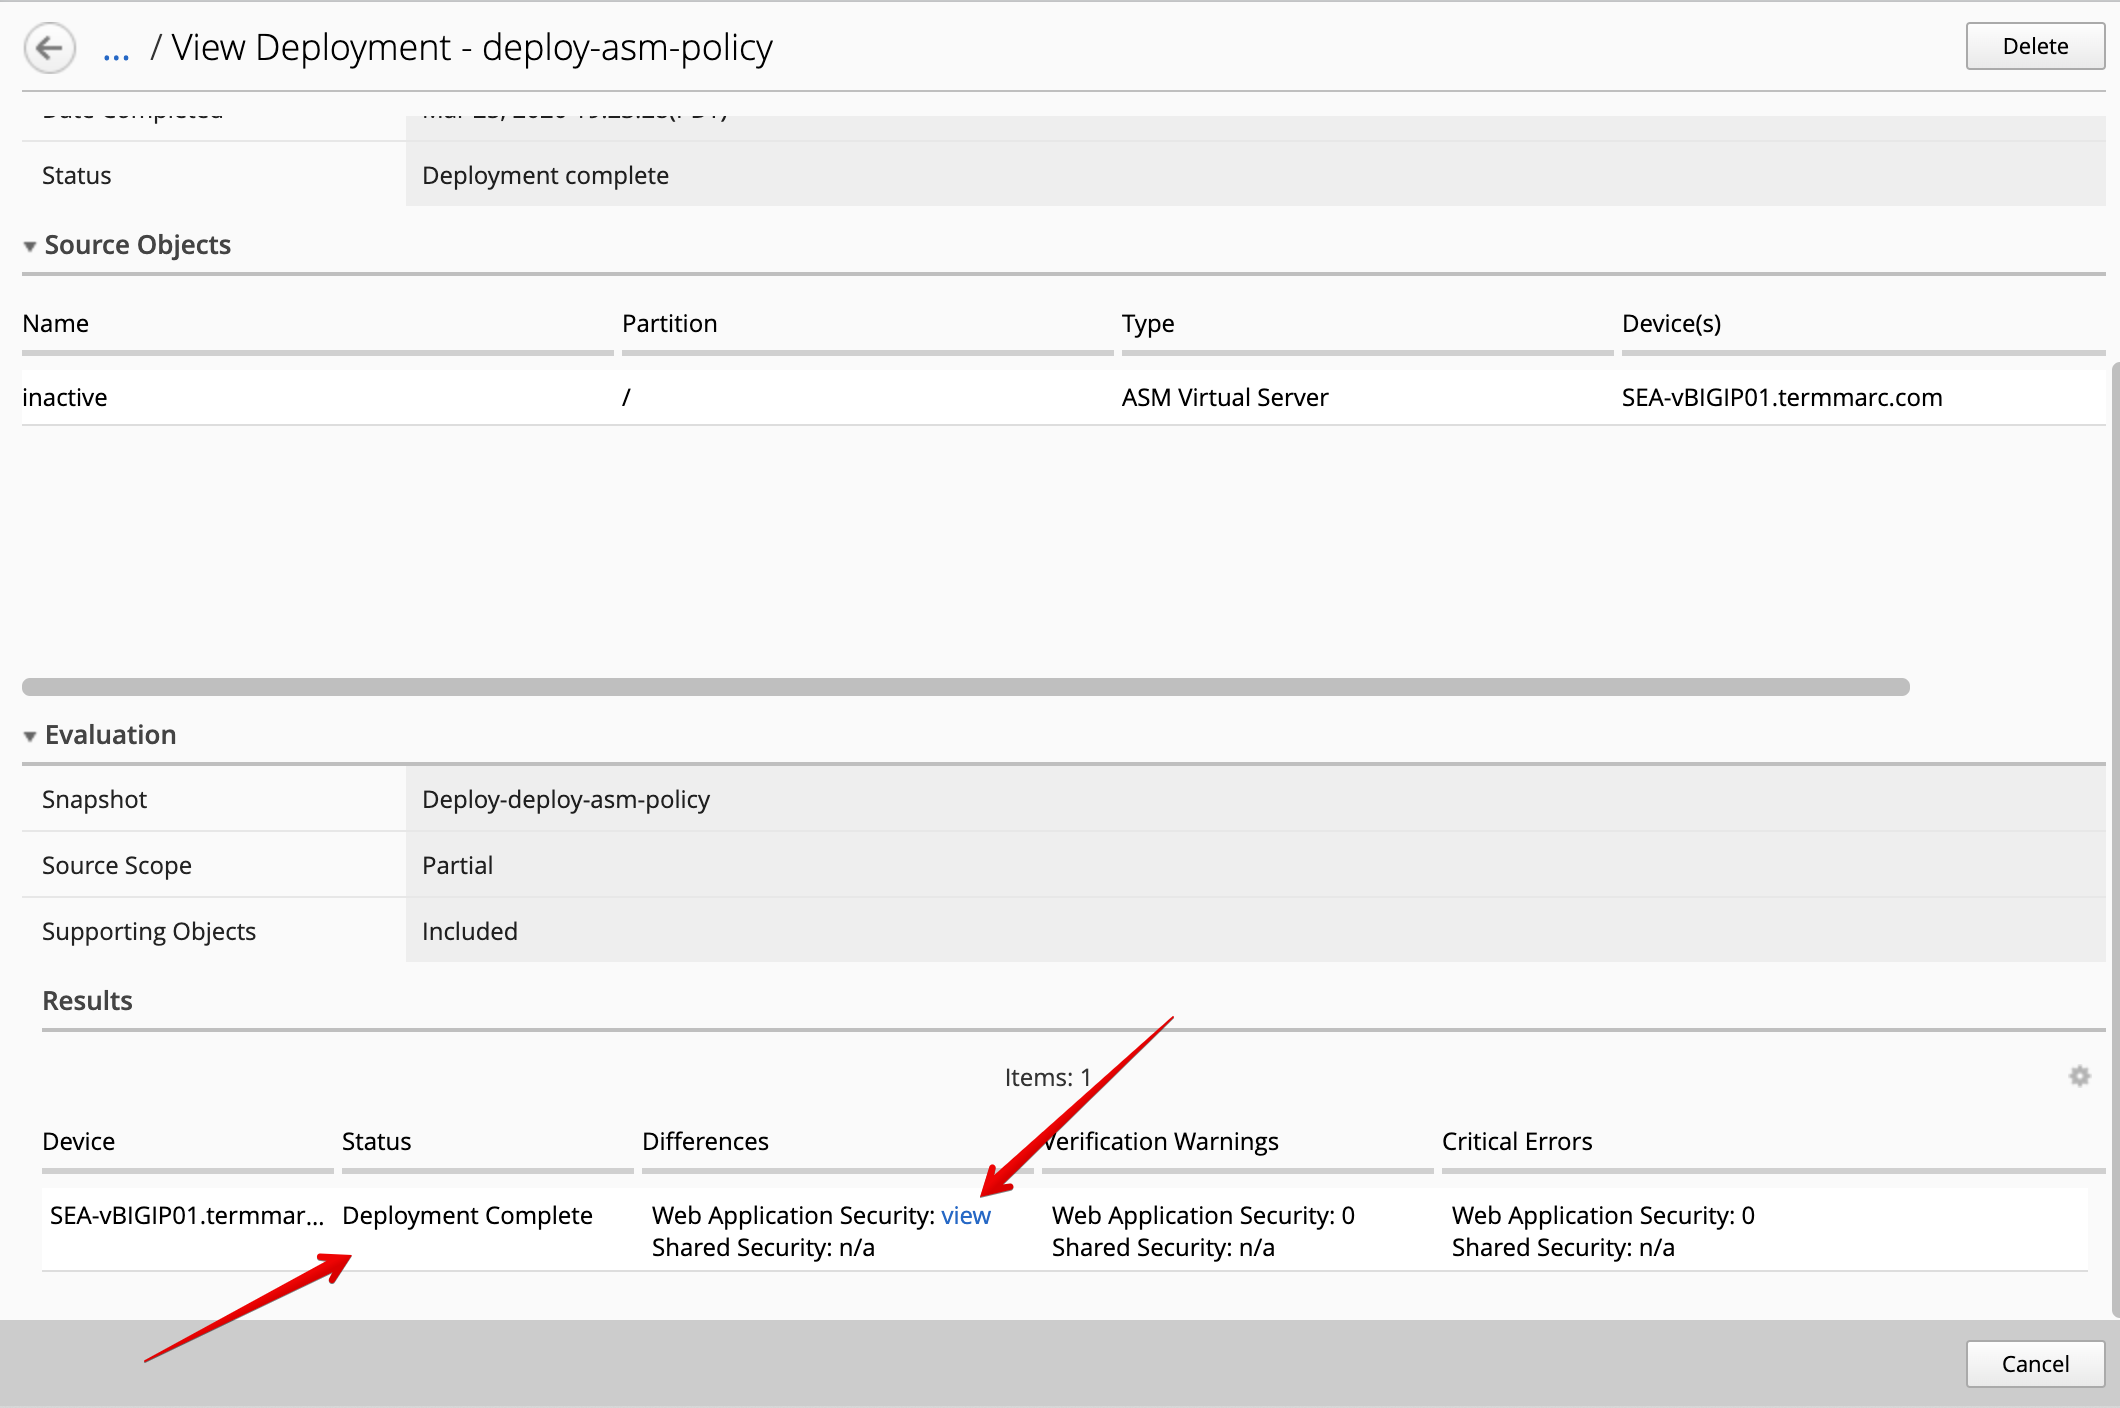
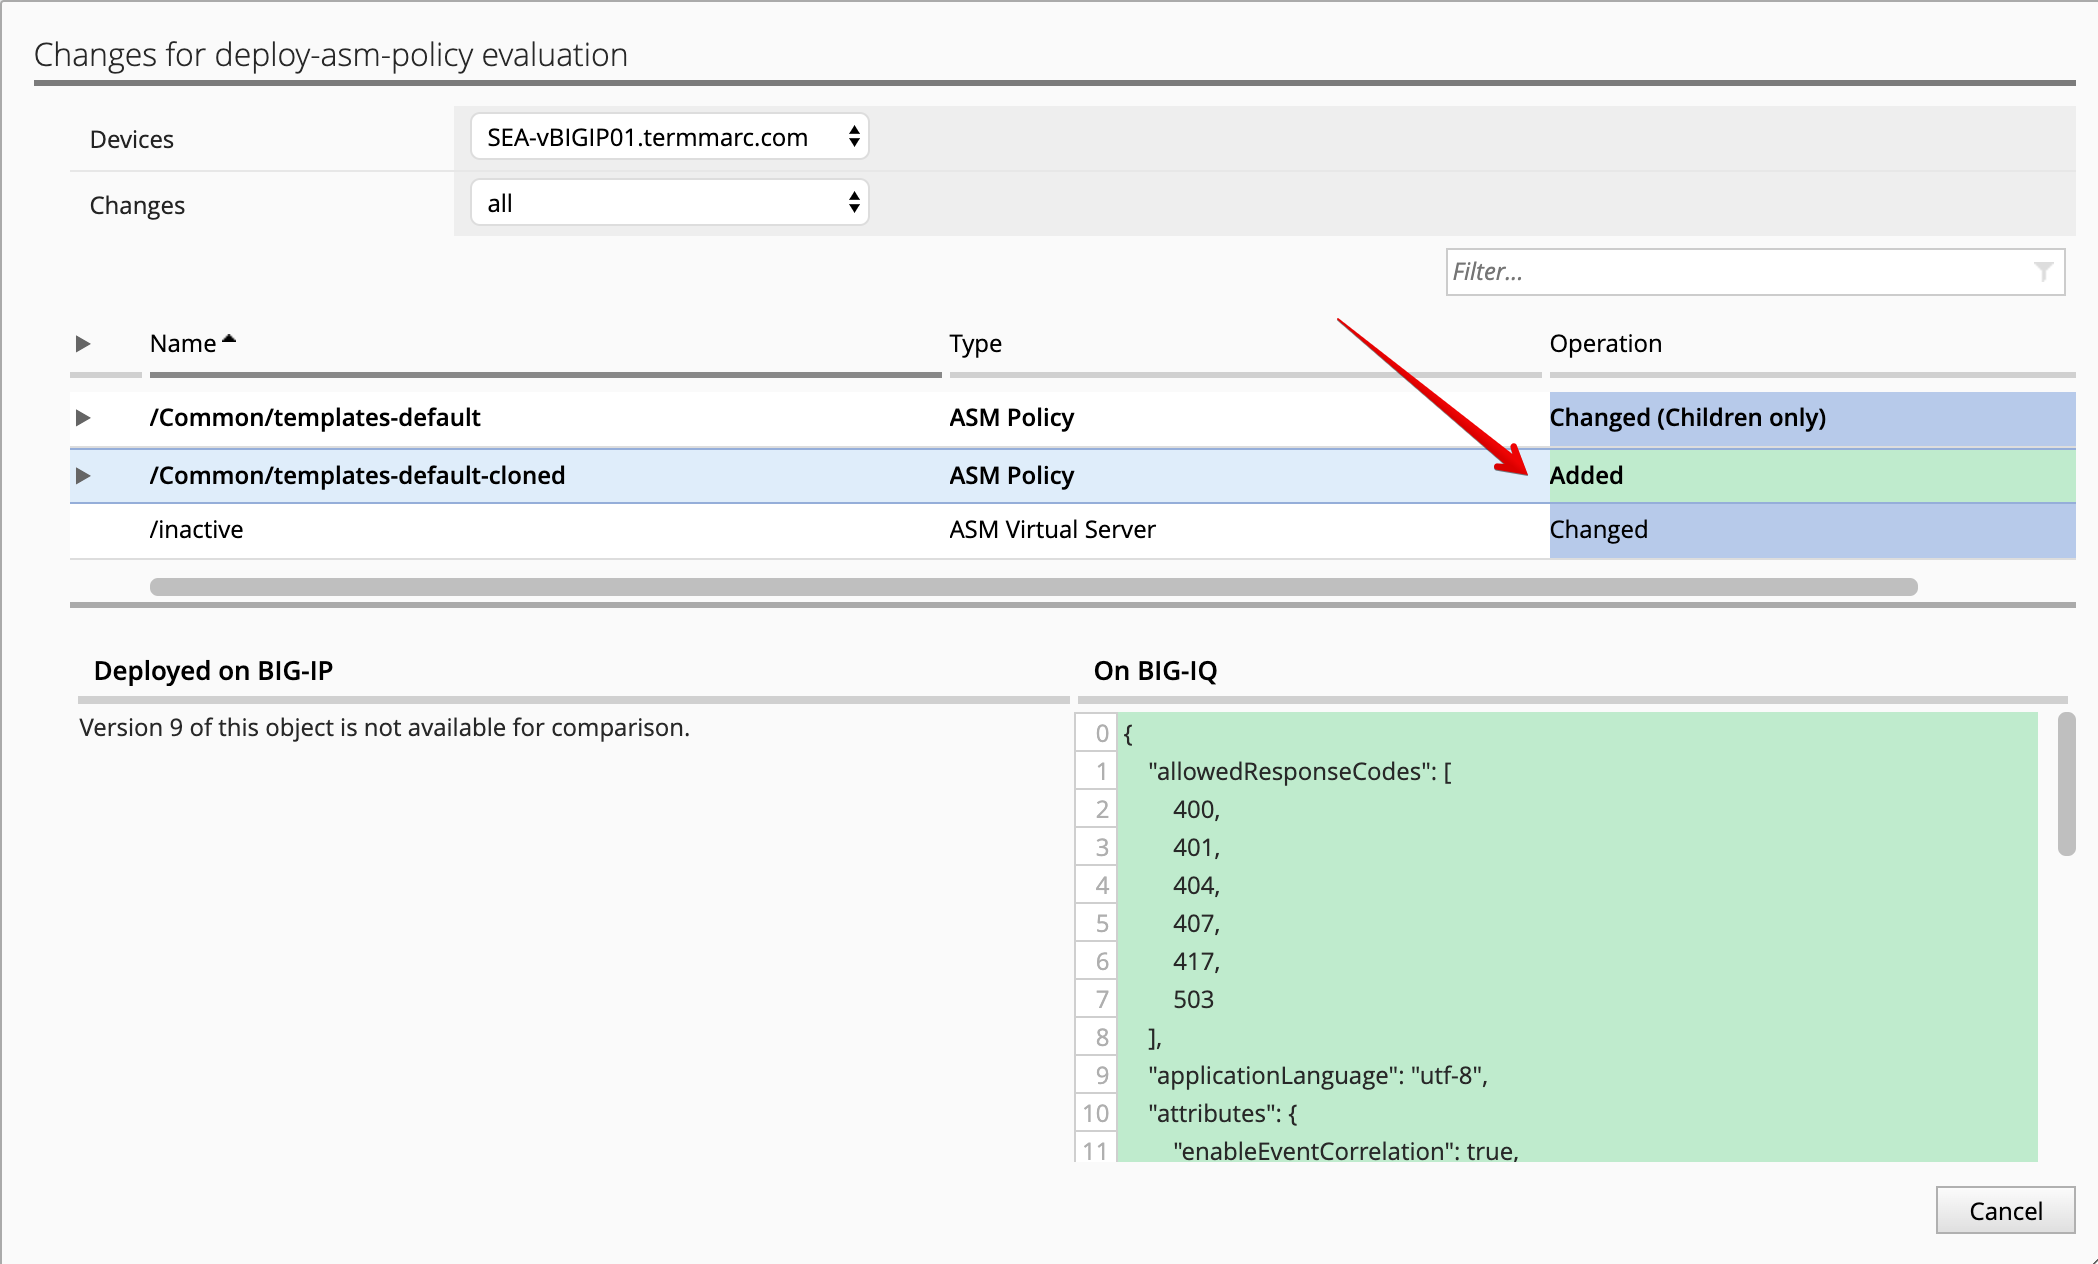
Once the deployment is completed, you confirm the changes by clicking on view*.
- Deploy the default BIG-IQ Security Logging Profile so the ASM events are being sent correctly to BIG-IQ DCD.
Note
This step is only for your information as it’s already perform in this lab.
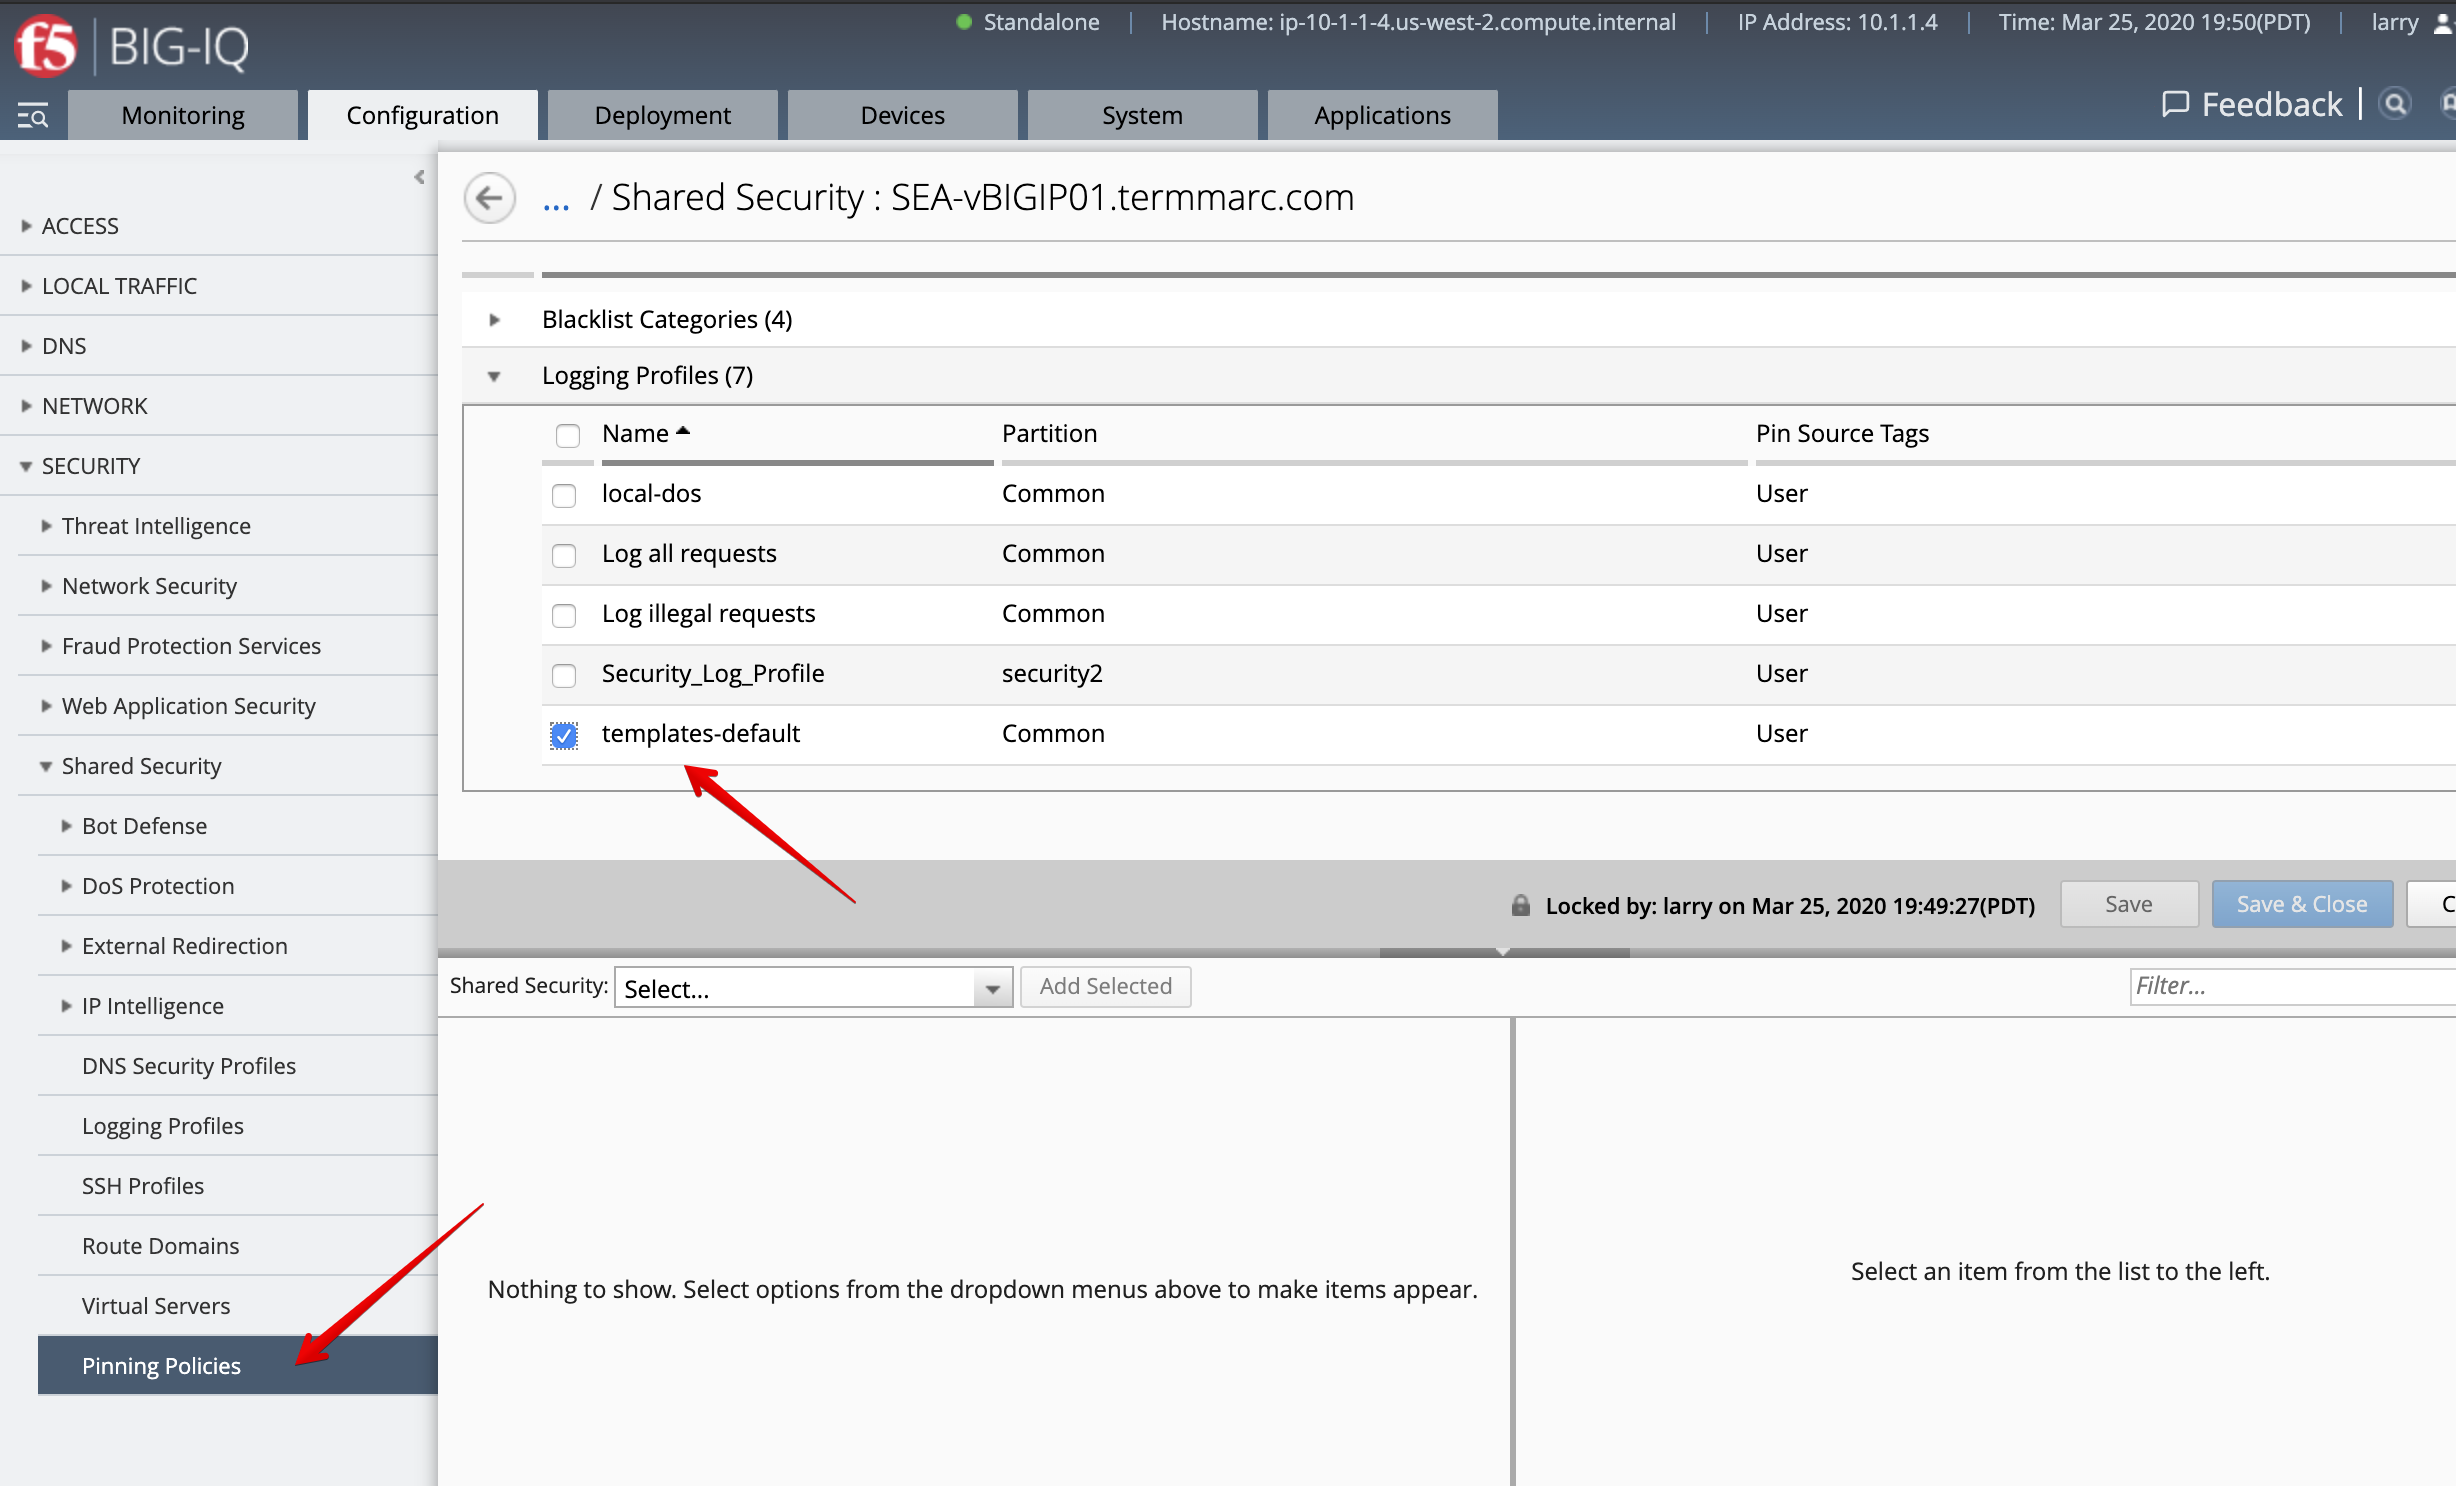
Under configuration tab, SECURITY, Shared Security, Logging Profiles. templates-default
is the default Security Logging Profile available on BIG-IQ.
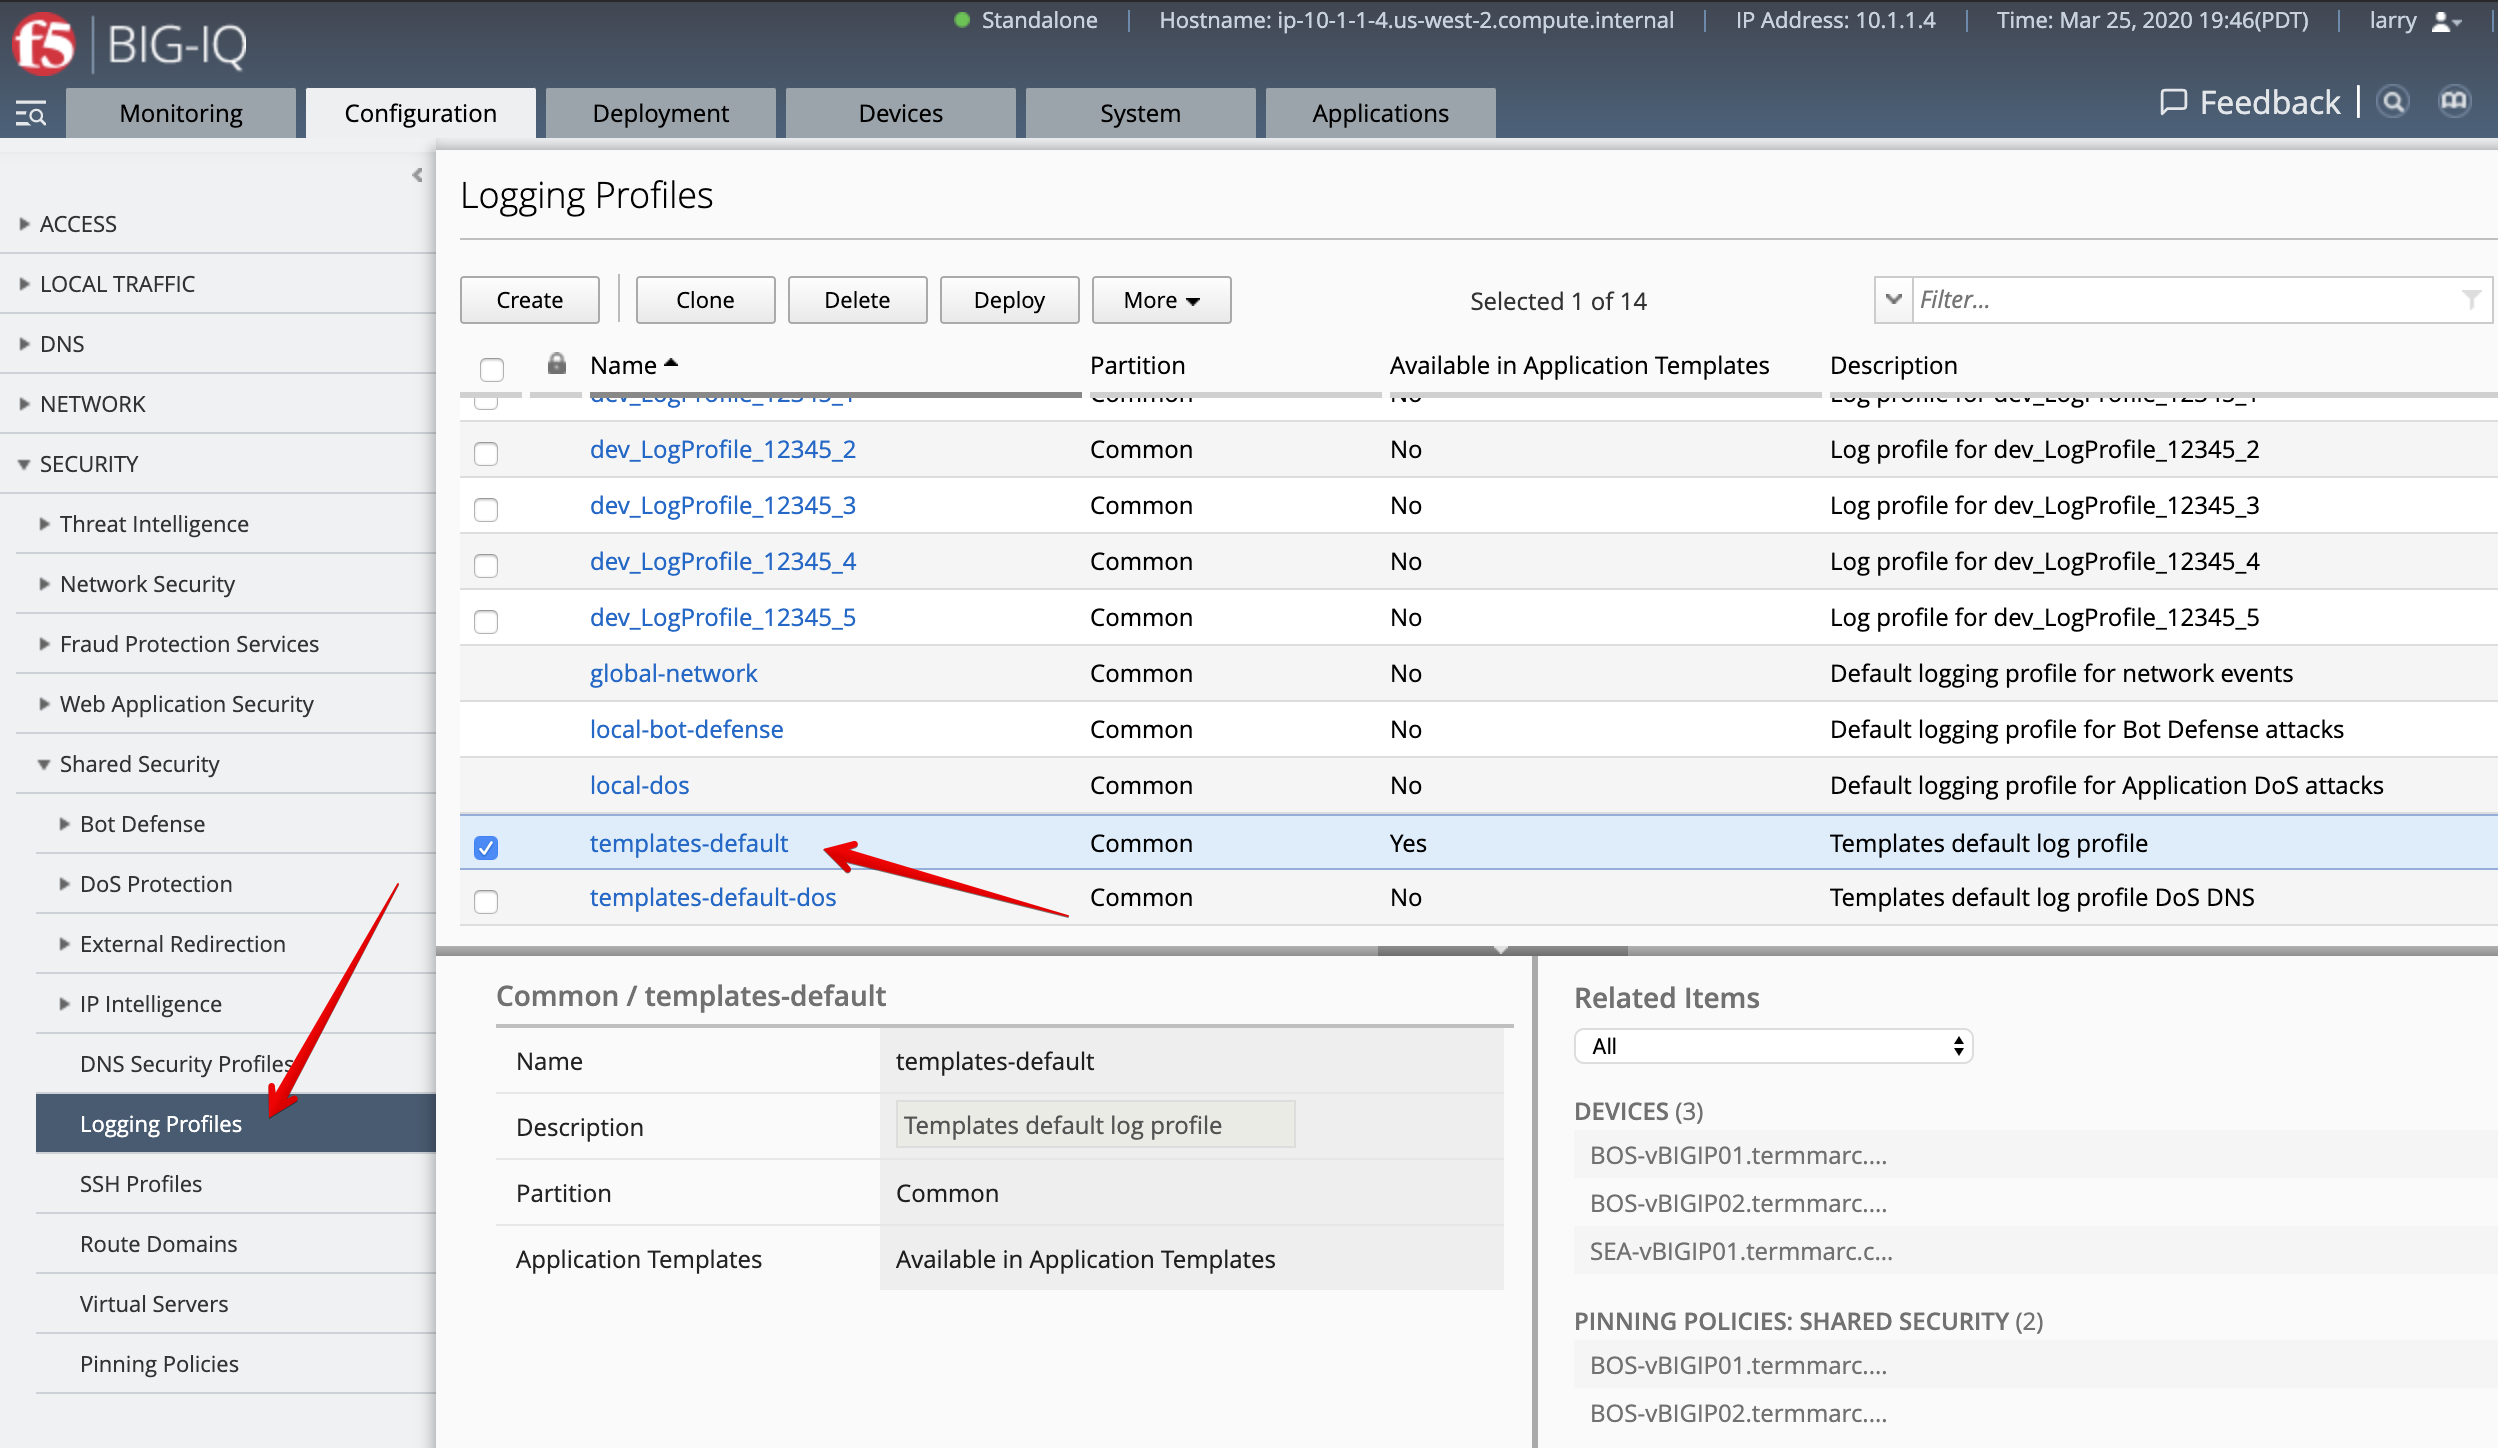
- Under Pinning Policies, click on the SEA-vBIGIP01.termmarc.com device.
Confirm the logging profile has been added under Logging Profiles.
Note
More information Managing Logging Profiles in Shared Security.
AS3 WAF template creation (David)
Until now we used a default AS3 template out-of-the-box (available on https://github.com/f5devcentral/f5-big-iq) for deploying an application service. It is a good practice to clone the default AS3 templates and use them more tailored to your custom needs.
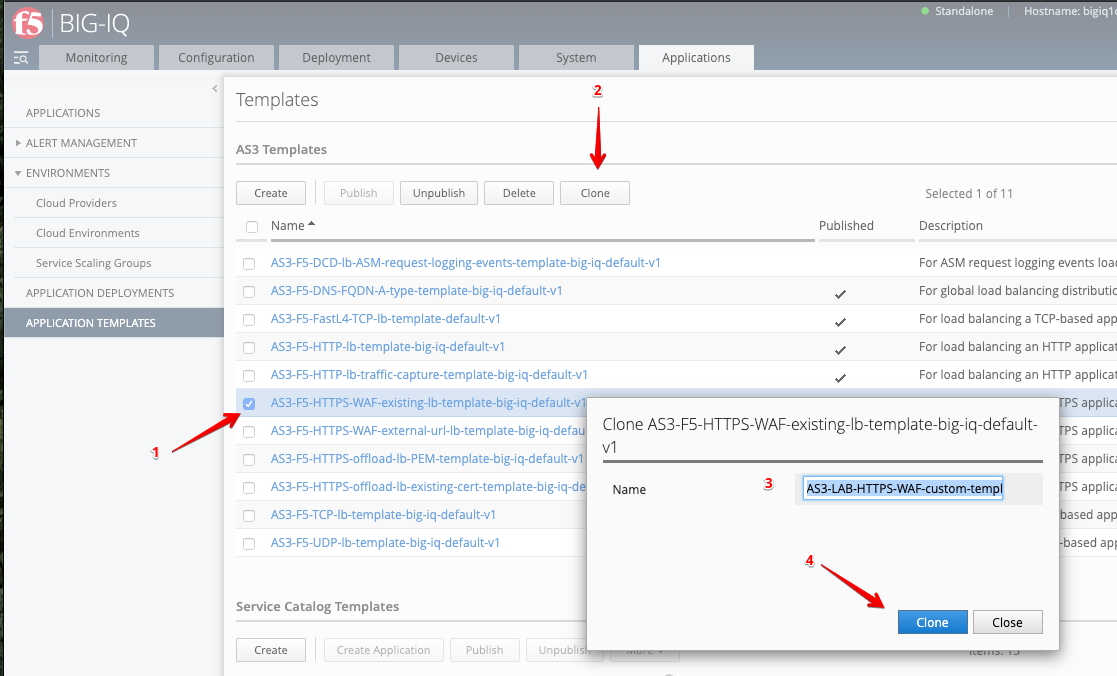
- Login as david and Go to the Applications tab > Applications Templates and
select
AS3-F5-HTTPS-WAF-existing-lb-template-big-iq-default-<version>and press Clone. - Give the cloned template a name:
AS3-LAB-HTTPS-WAF-custom-templateand click Clone.
- Open the template
AS3-LAB-HTTPS-WAF-custom-templateand select theAnalytics_ProfileAS3 class. Change to Override the PropertyCollect Client-Side Statistics, as well asCollect URLandCollect User Agent.
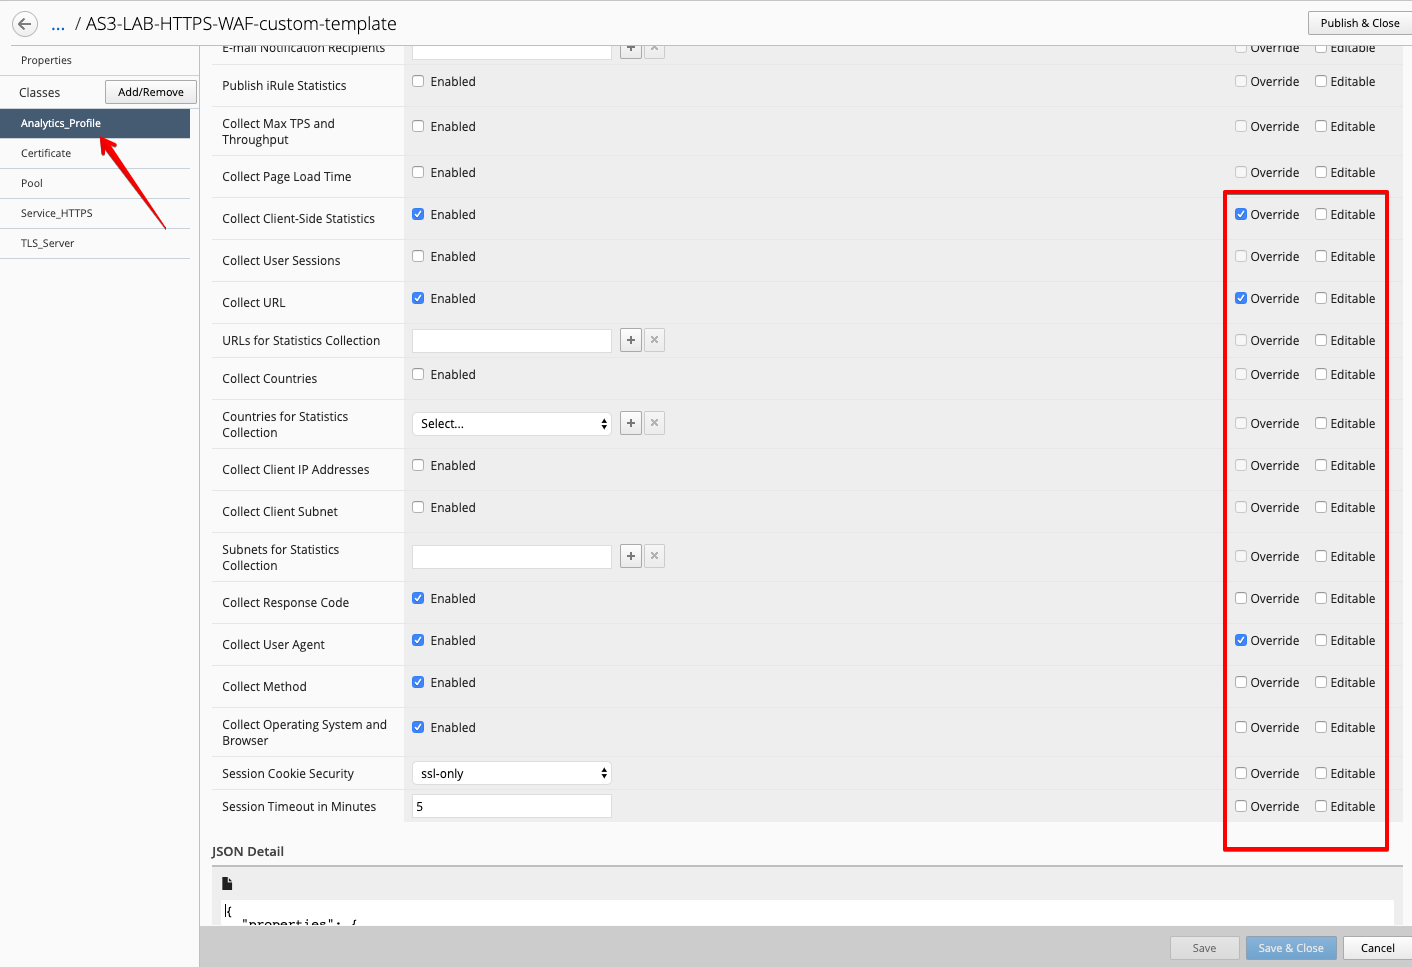
Note
Response Code, User Method and Operating System and Browser are already enabled by default in the AS3 schema.
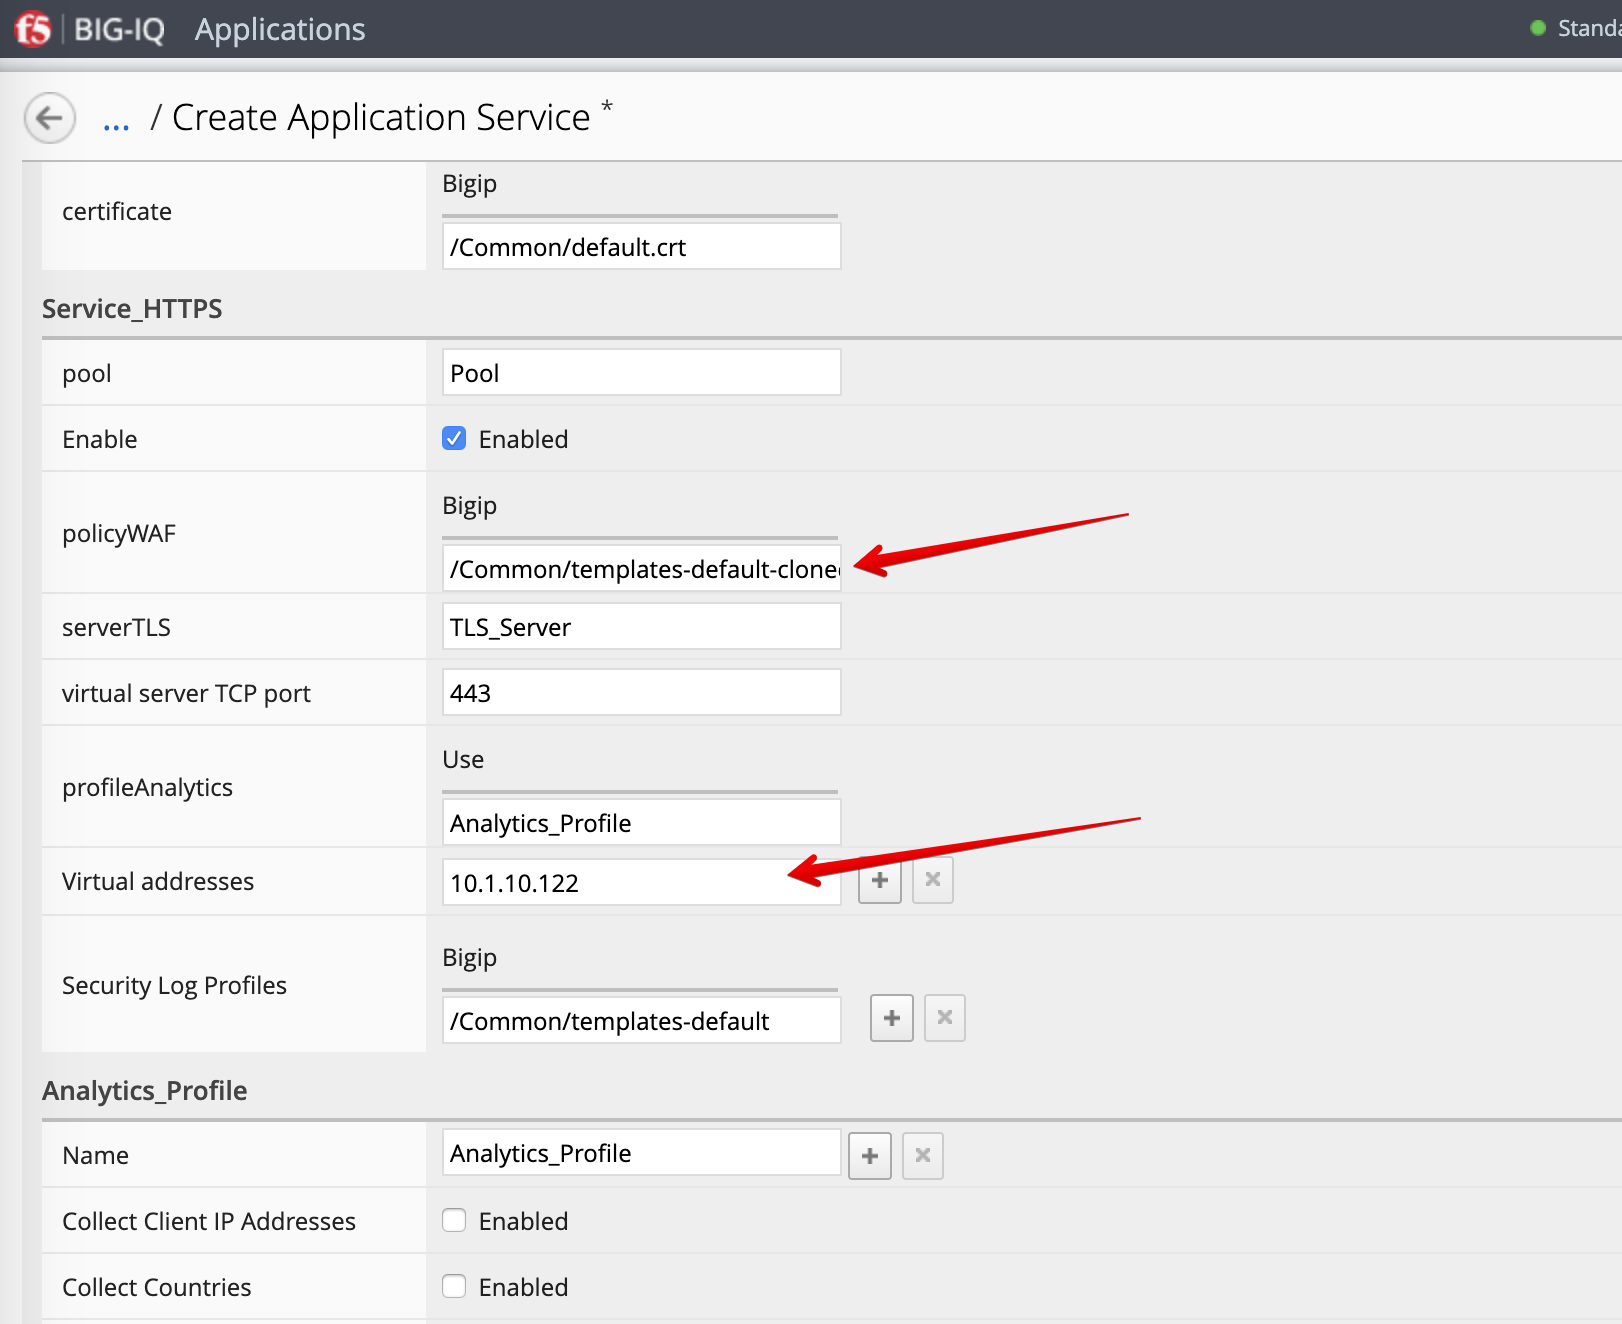
- Now, select the
Service_HTTPSAS3 class. Change to the propertybigipunder policyWAF to/Common/templates-default-cloned. Make sure the property is set to Editable.
Note
If you want to hide the ASM policy in the template, you can set the property to Override (only starting BIG-IQ 7.1, see BIG-IQ 7.0 Release note #811013).
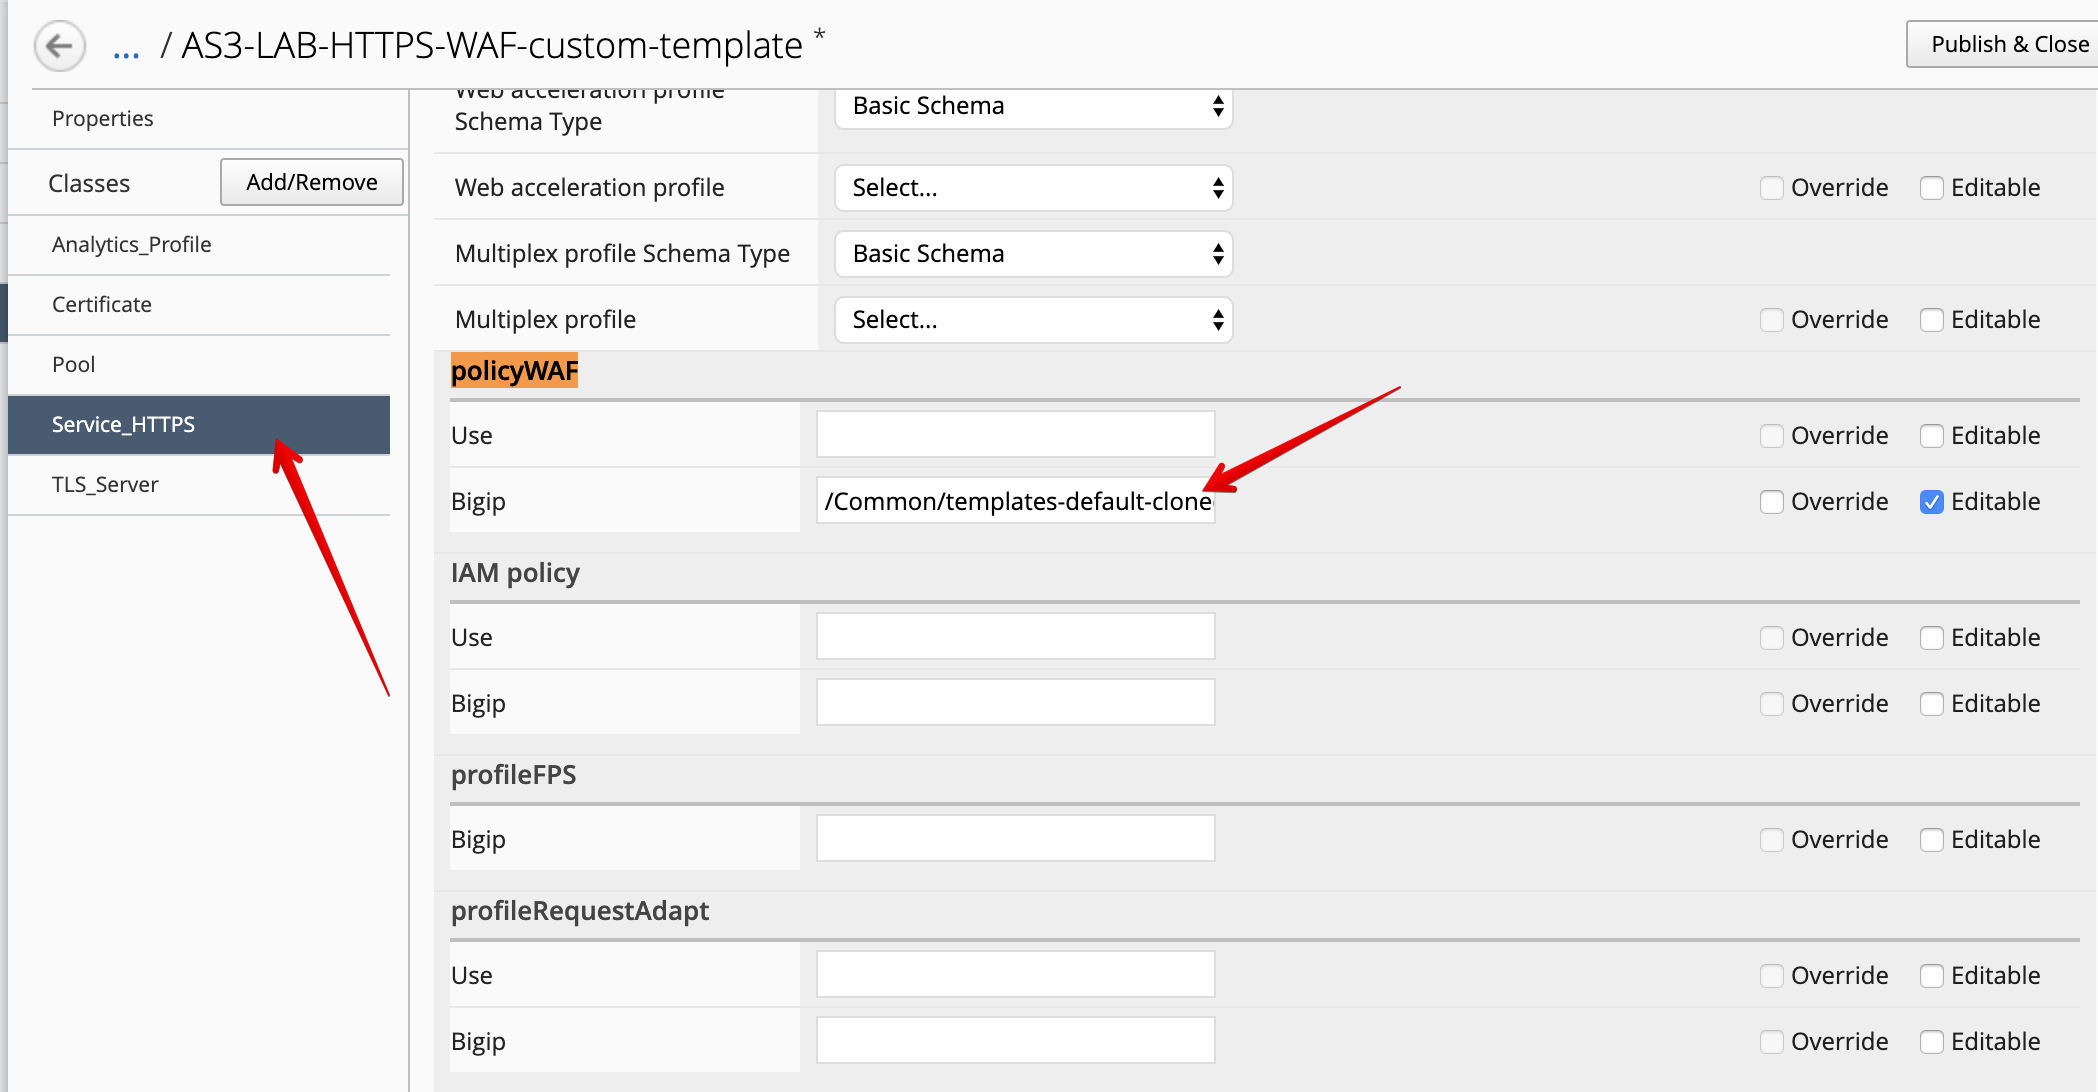
- Click Save & Close.
- Select
AS3-LAB-HTTPS-WAF-custom-templateand click Publish. - Before paula can use this AS3 template, david needs to update her role.
Use the previous steps in Lab 3.2 to add AS3 Template
AS3-LAB-HTTPS-WAF-custom-templatetoApplication Creator VMwarecustom role assigned to paula.
AS3 WAF application service deployment (Paula)
Now both Advance WAF policy and Security Logging Profile are available on BIG-IP and AS3 WAF template available on BIG-IQ, let’s create the WAF application service using AS3 & BIG-IQ.
- Login as paula and select previously created
LAB_module3Application and click Create. - Click Create to create an Application Service:
| Application properties: |
|
| Select an Application Service Template: |
|
| General Properties: |
|
| Analytics_Profile. Keep default. |
| Pool |
|
| Service_HTTPS |
|
| Certificate. Keep default. |
| TLS_Server. Keep default. |
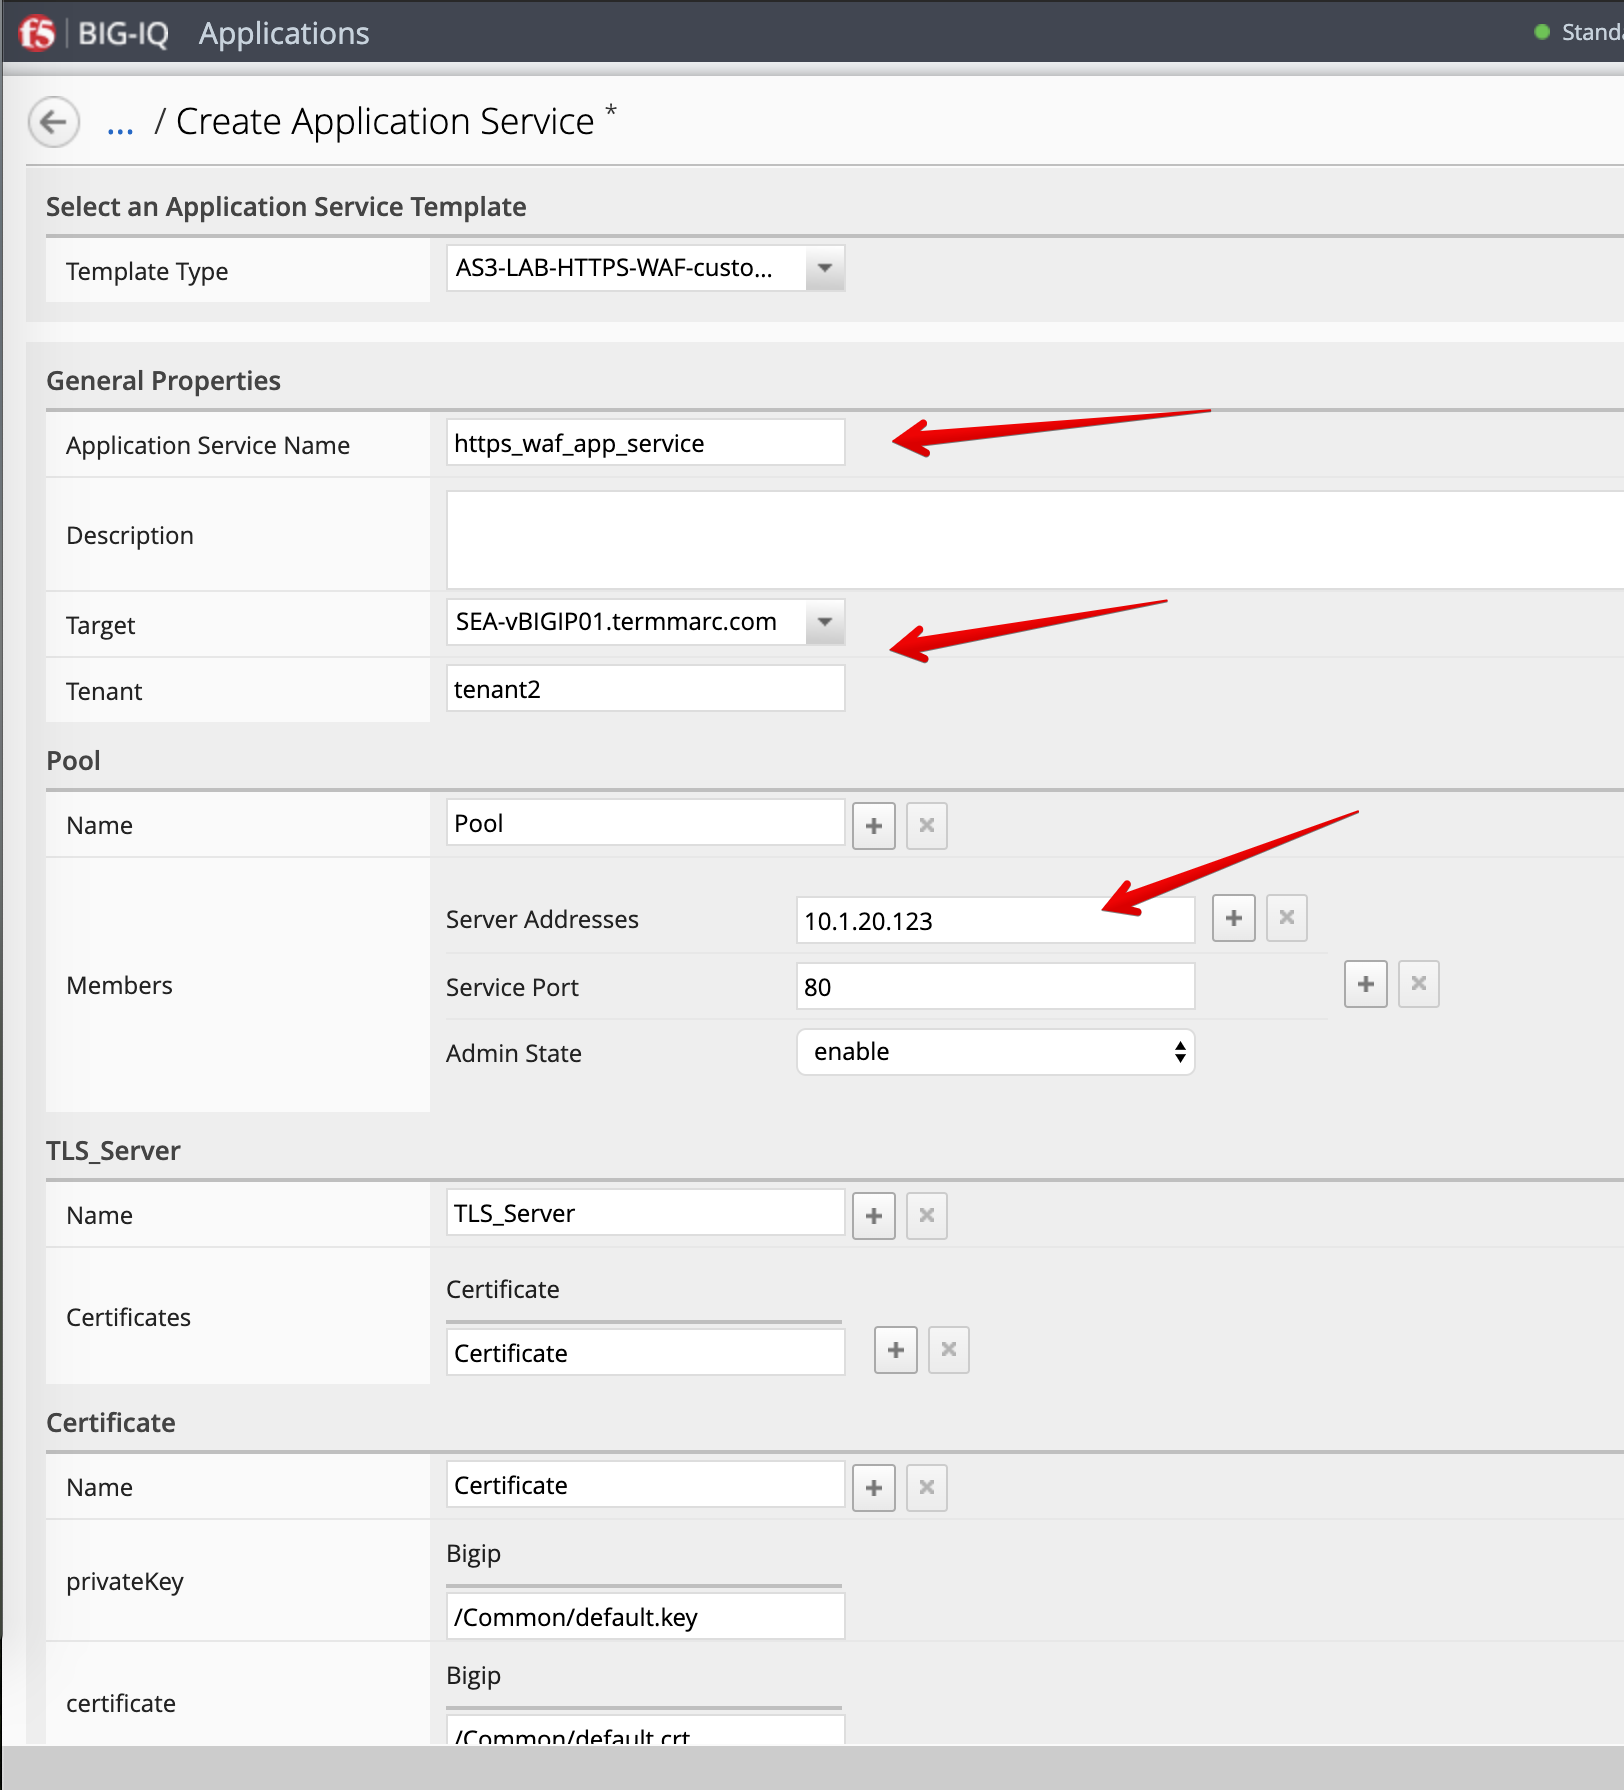
- Click Create.
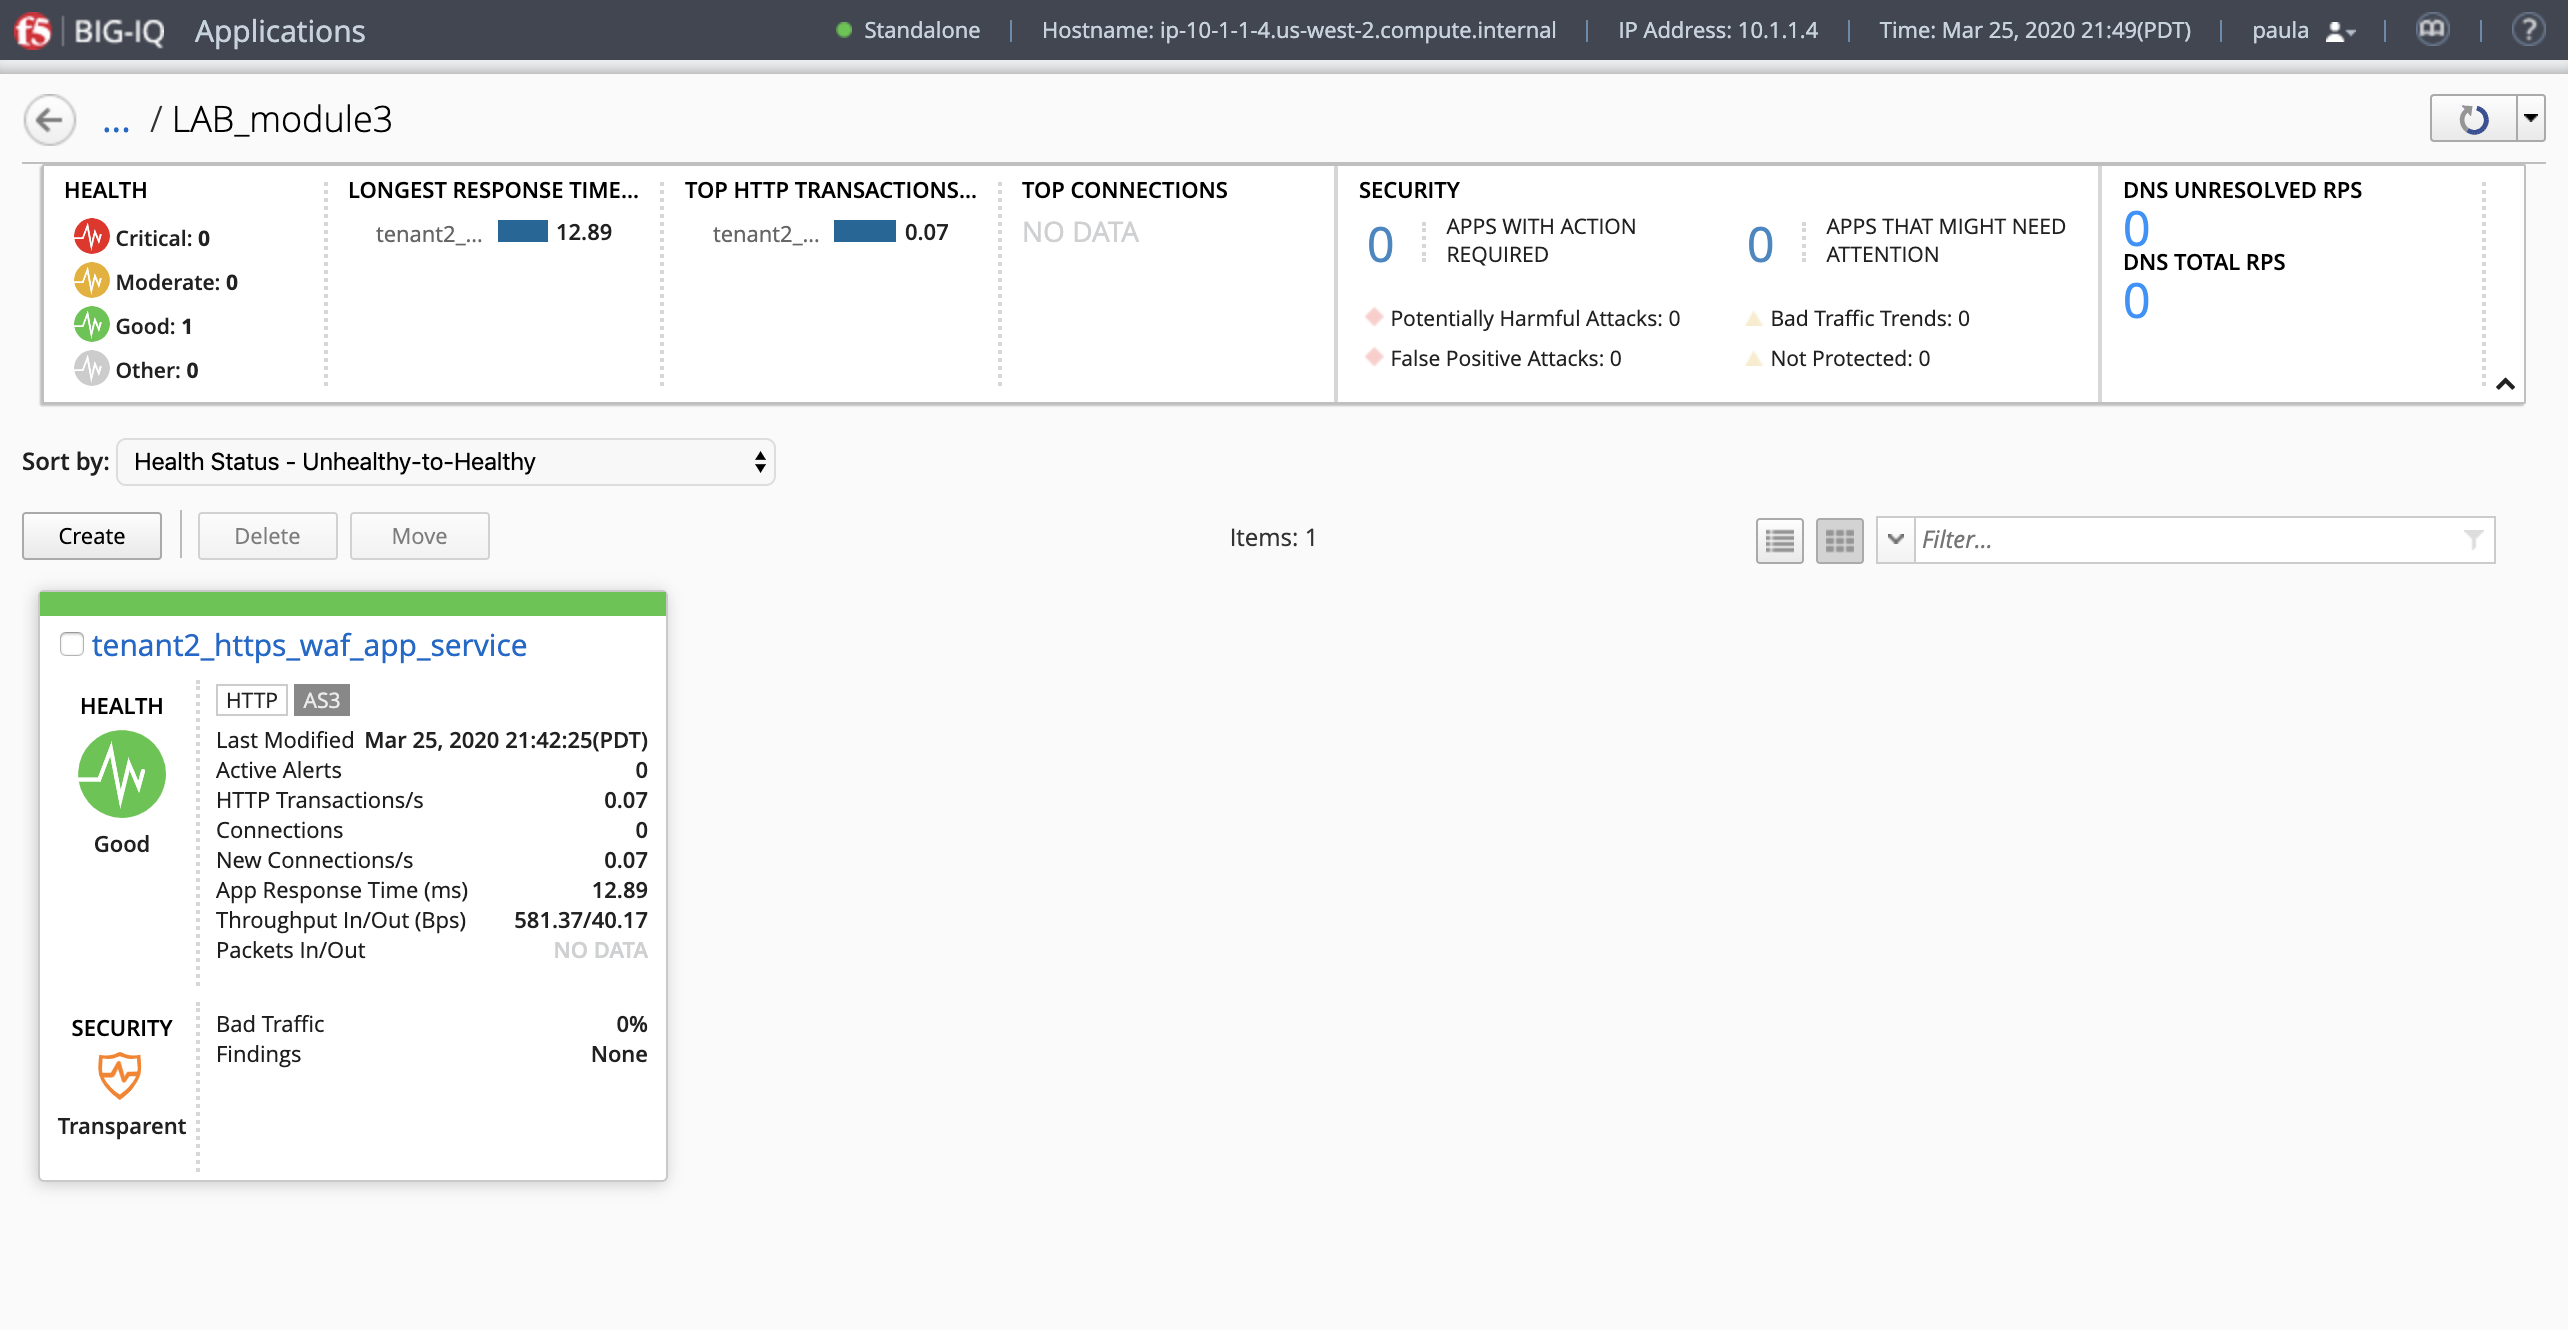
- Check the application service
https_waf_app_servicehas been created under ApplicationLAB_module3.
- Now, let’s look on the BIG-IP and verify the application is correctly deployed in partition
tenant2. - Login to
SEA-vBIGIP01.termmarc.comBIG-IP from lab environment. Select the partitiontenant2and look at the objects created on the BIG-IP.
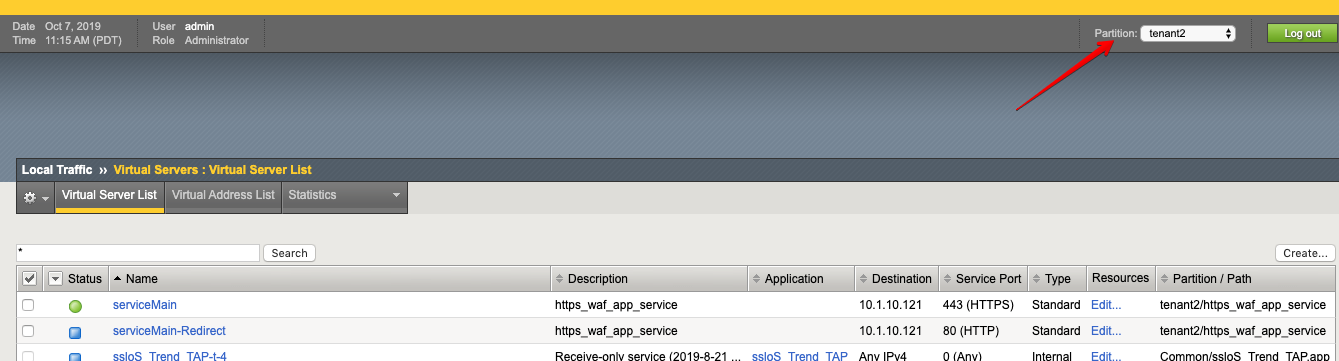
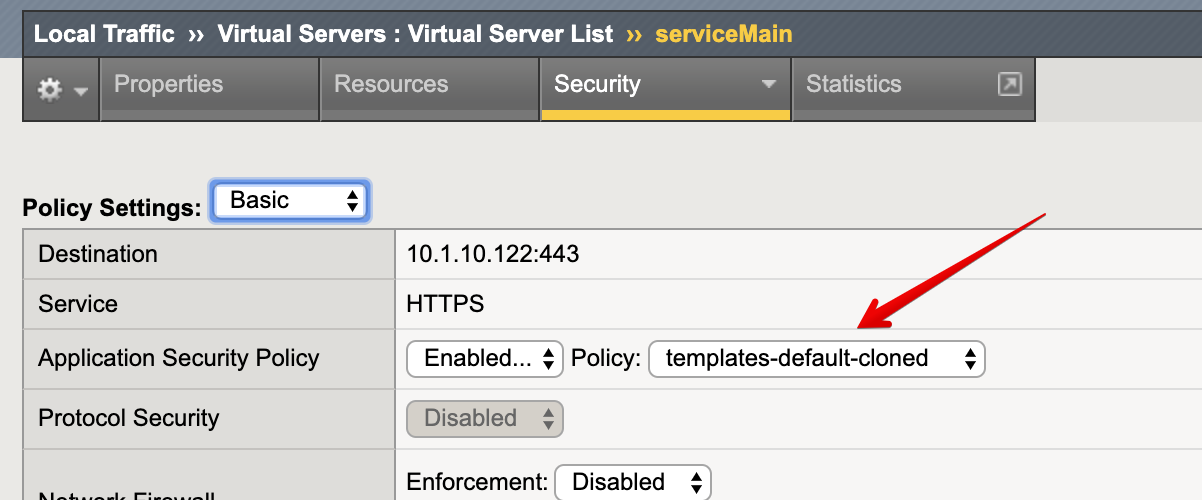
7. Notice that new https_waf_app_service comes with a redirect. Select the HTTPS VS, Select Security and
hit Policies. Application Security Policy is Enabled and the Log Profile has a templates-default selected.
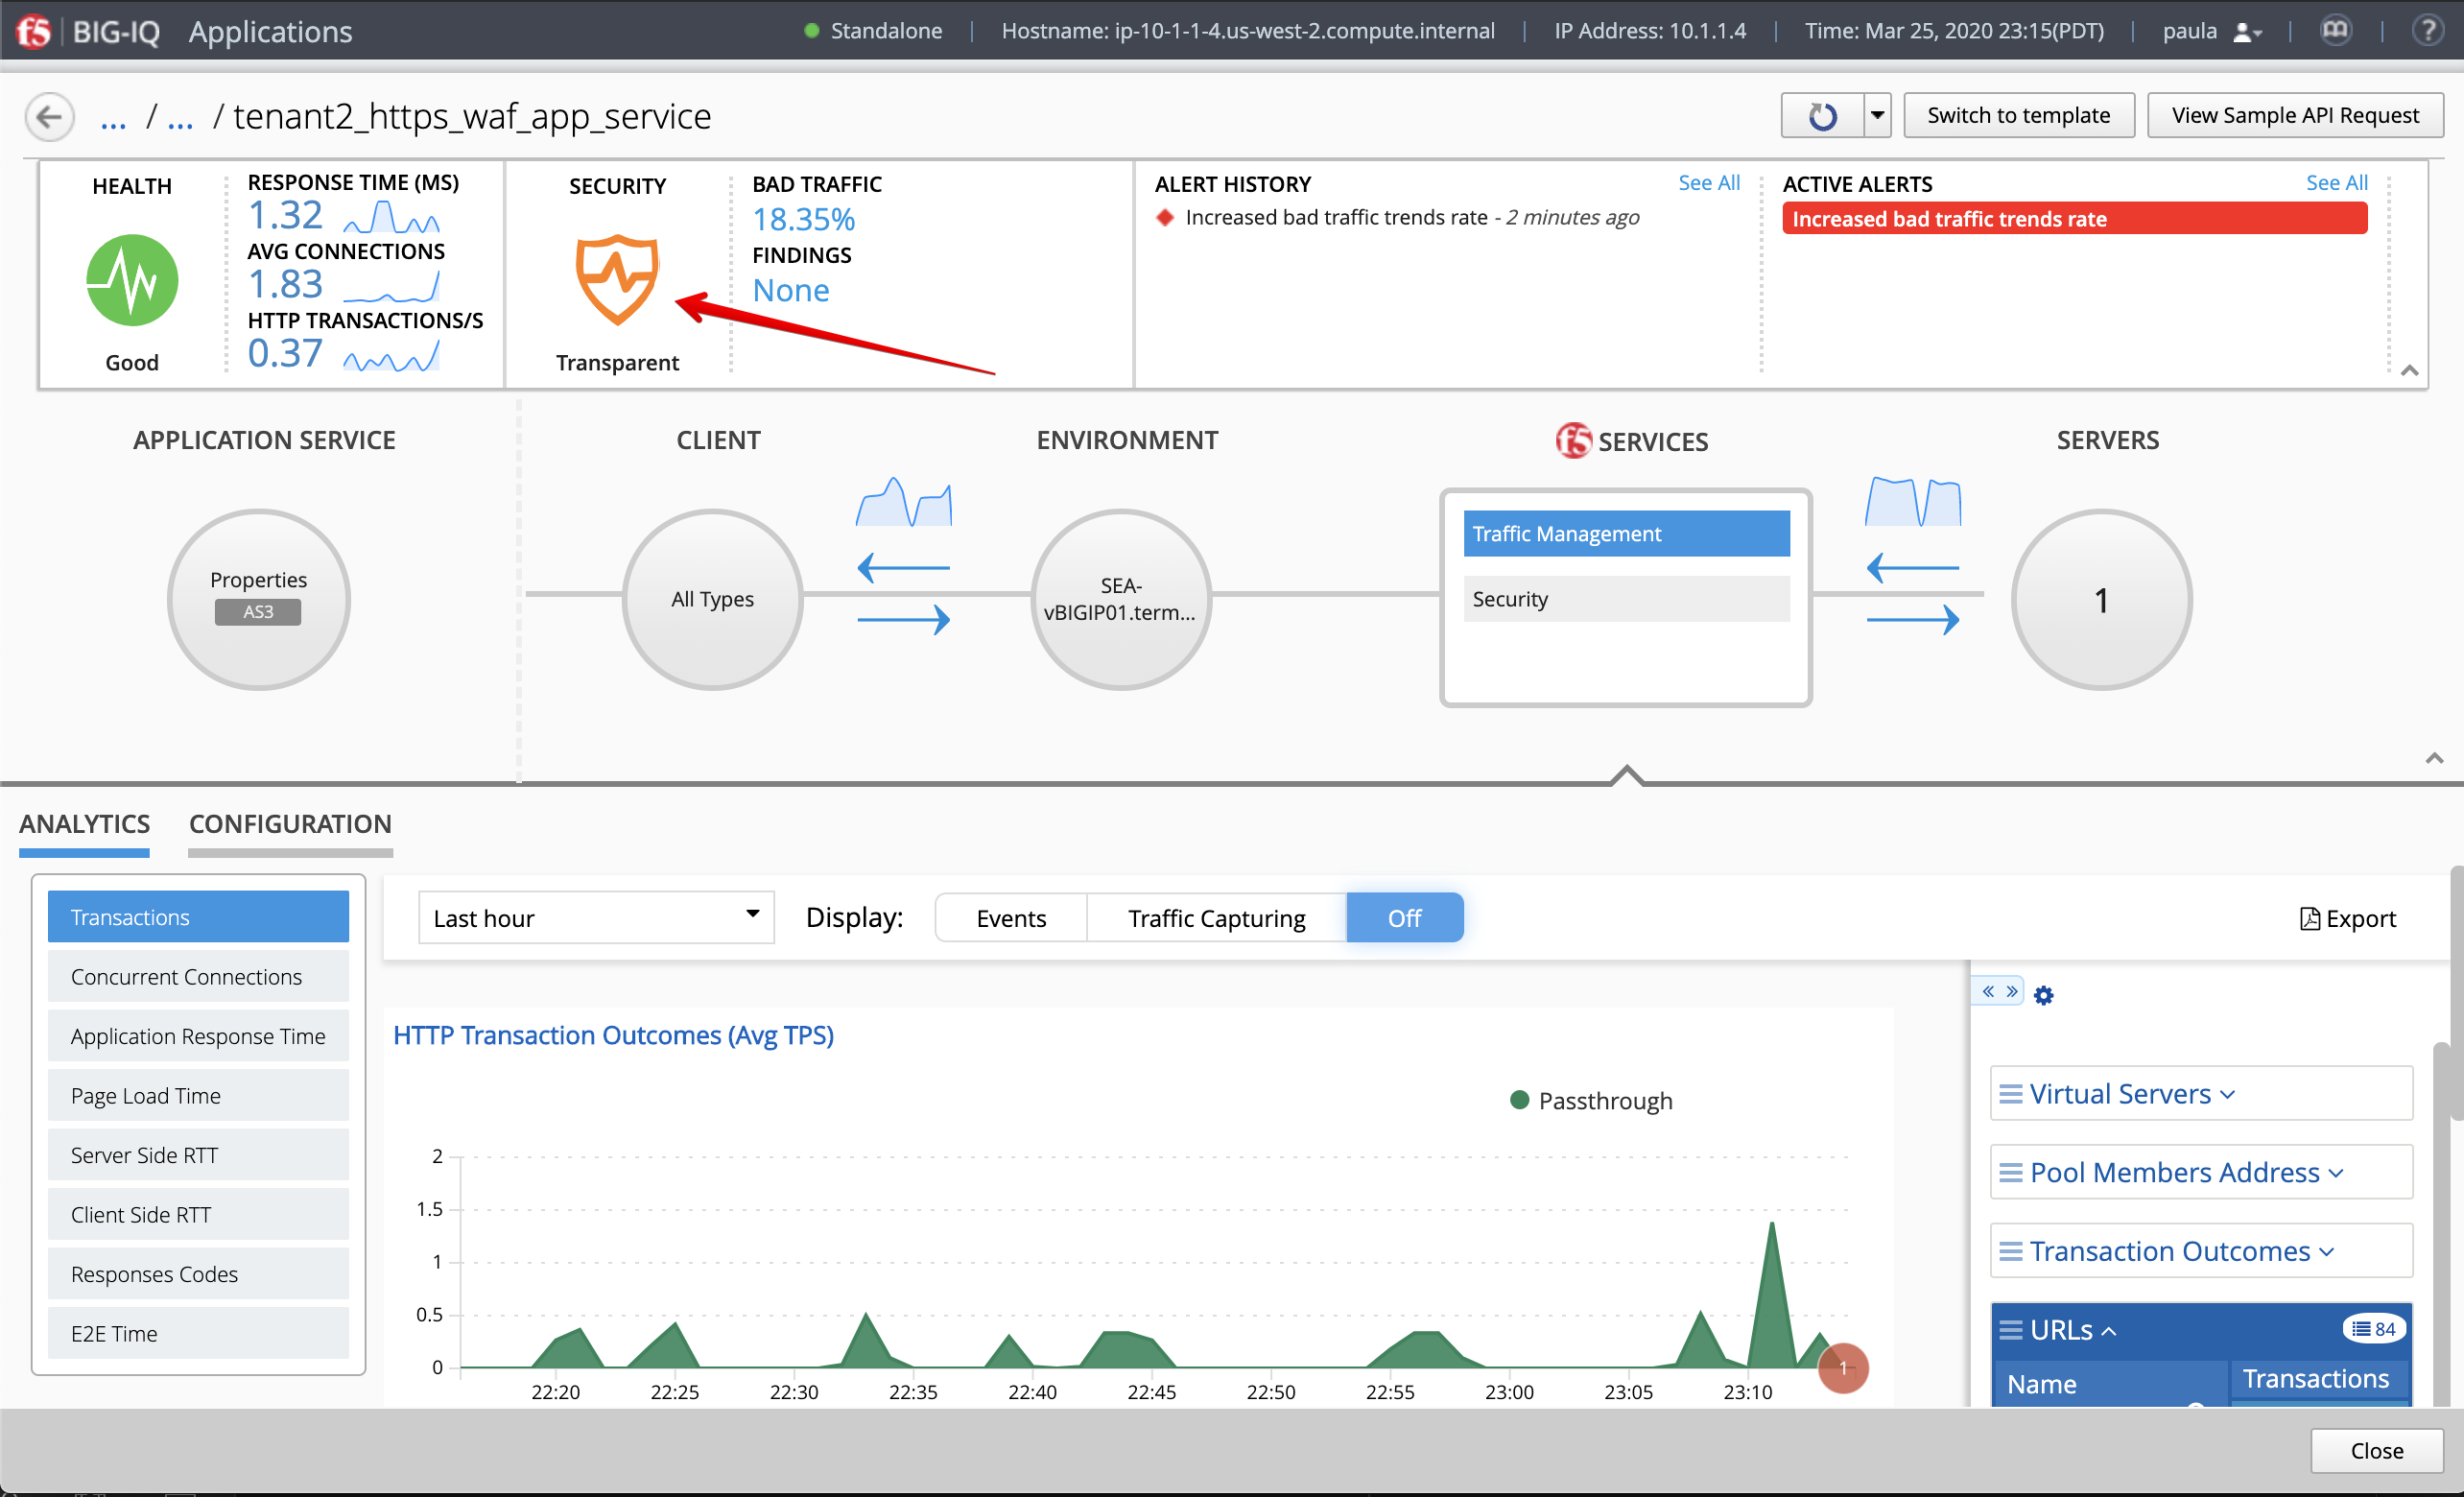
- Back to the BIG-IQ and logged in as paula, select
tenant2_https_waf_app_service. What is the enforced Protection Mode?
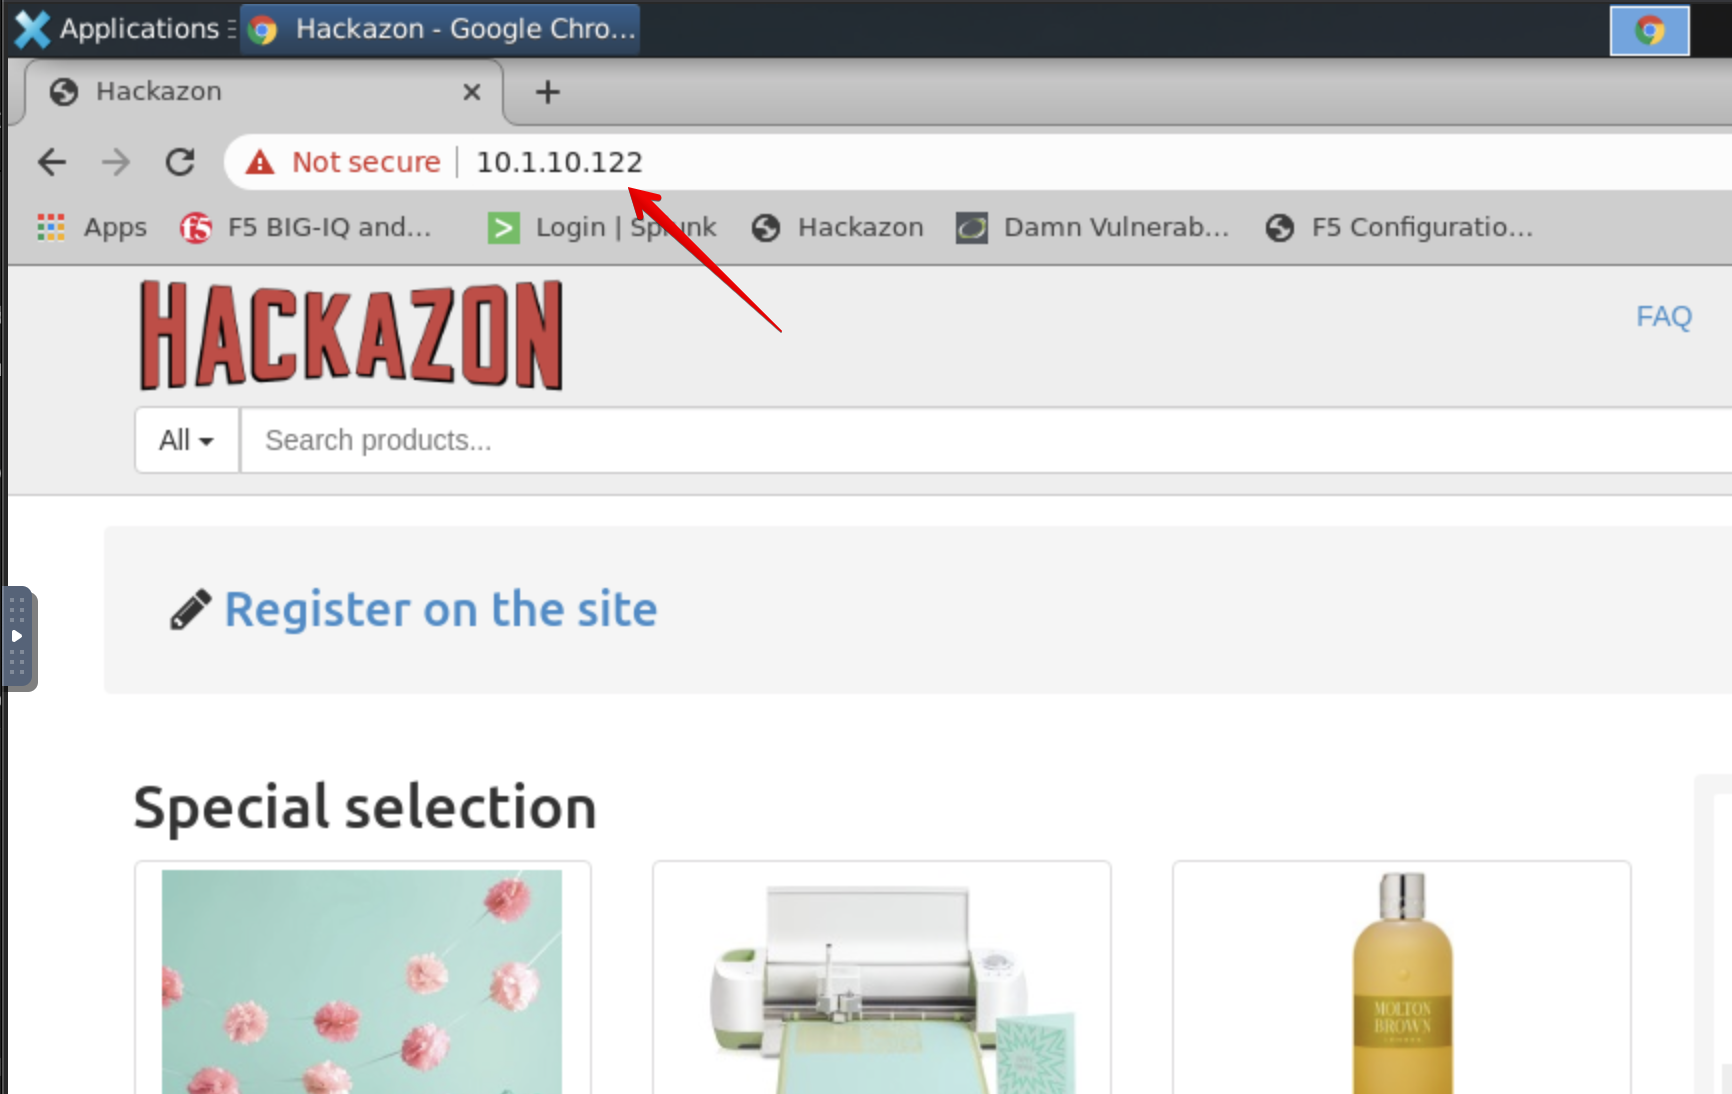
- From the lab environment, launch a remote desktop session to have access to the Ubuntu Desktop.
Open Chrome and navigate to the following URL: https://10.1.10.122.
- Paula does the necessary testing of her application, she reaches out to Larry when she is done.
Note
There are traffic generator sending good and bad traffic from the Lamp server in the lab.
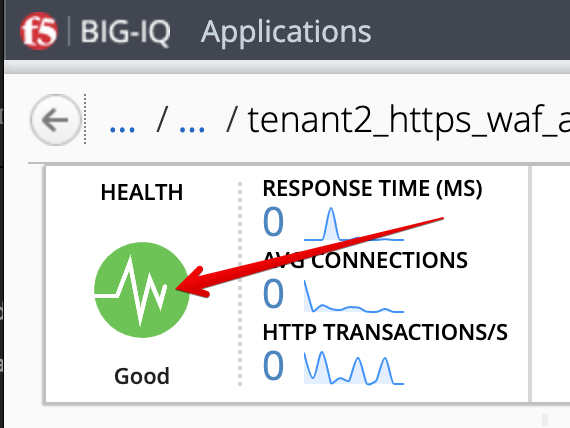
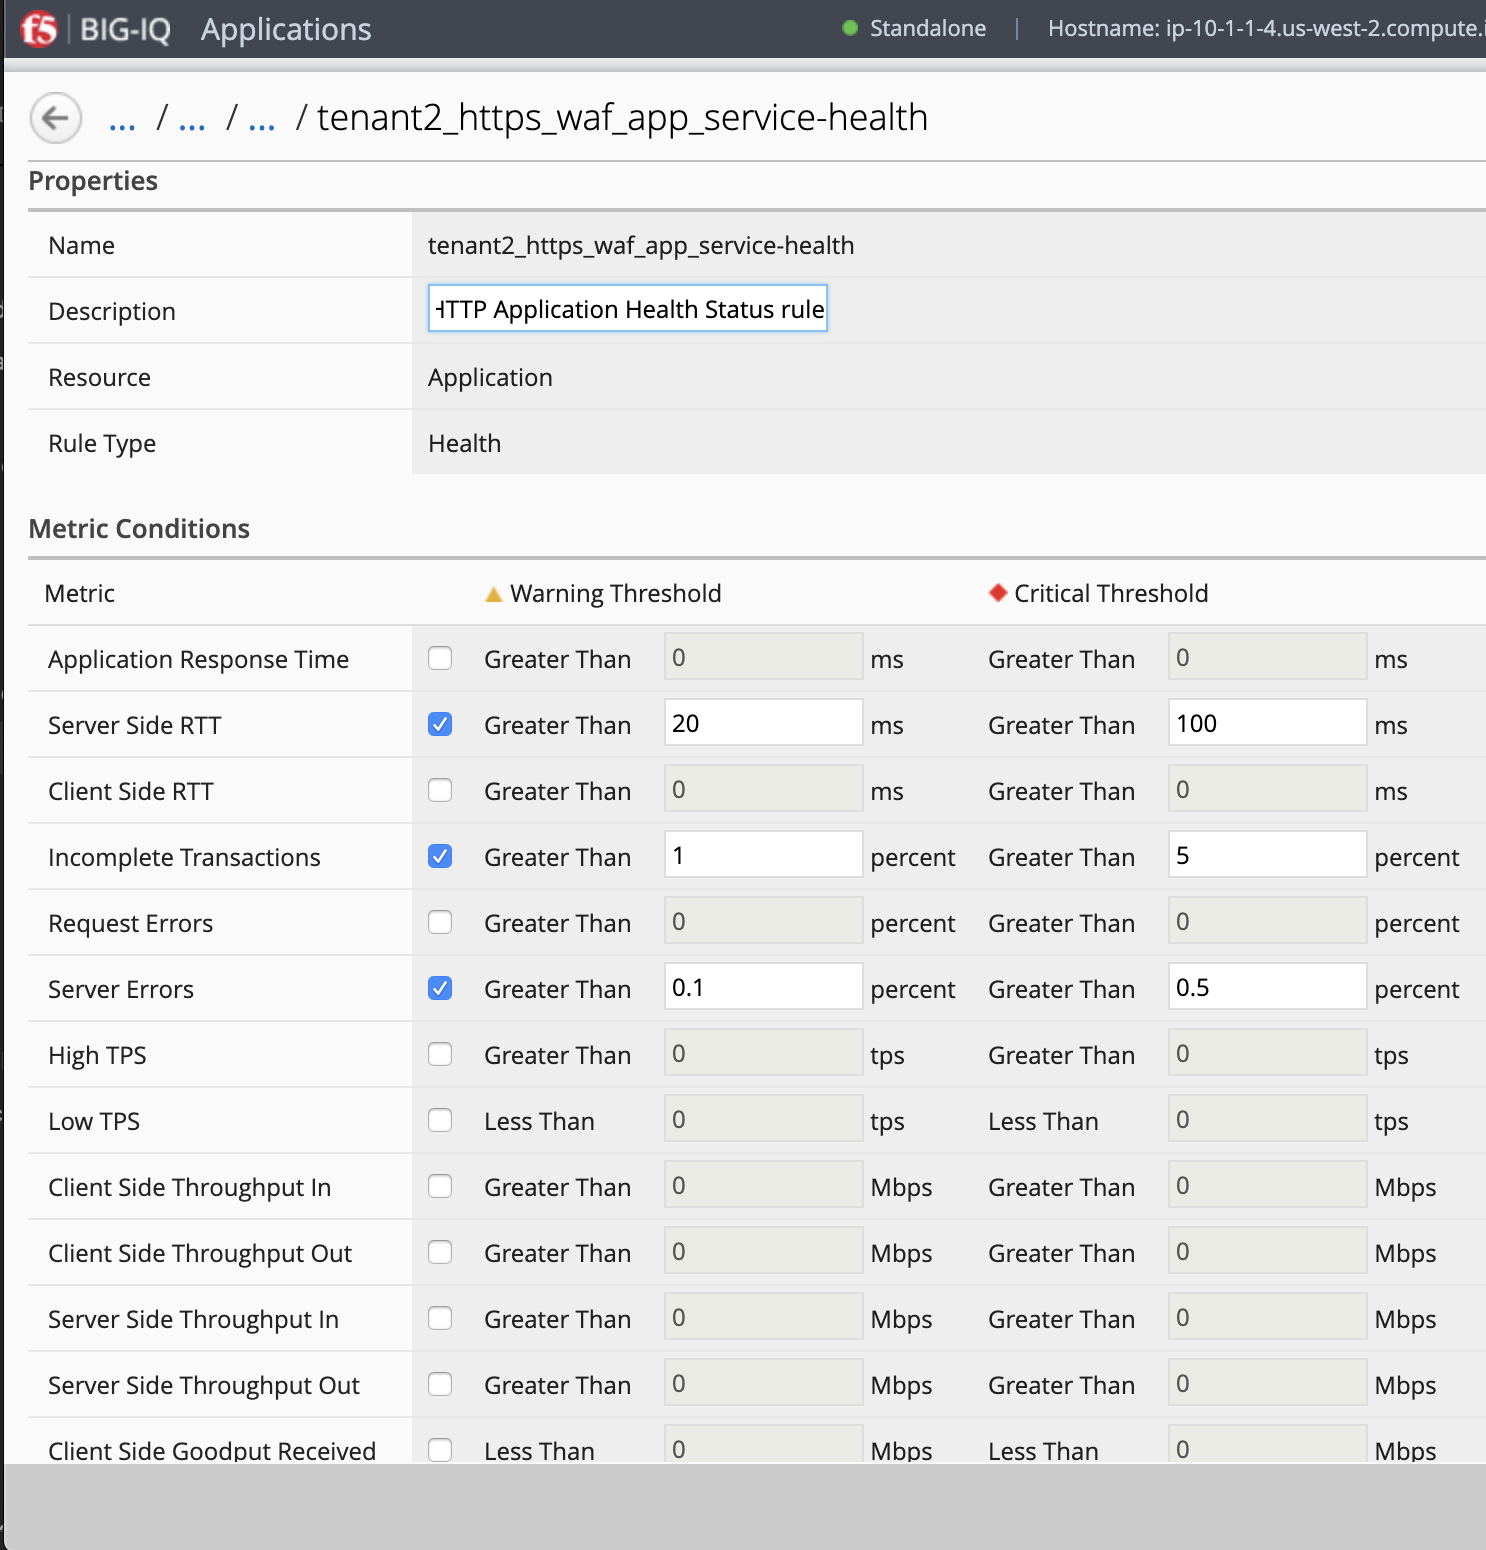
- Paula can update application service health alert rules by clicking on the Health Icon on the top left of the Application Dashboard.
ASM Policy Learning review and Dashboard/Events (Larry & Paula)
- Login as larry and go to Configuration > Security > Web Application Security > Policies.
- Select
templates-default-clonedand navigate under POLICY BUILDING > Suggestions and review the learning.
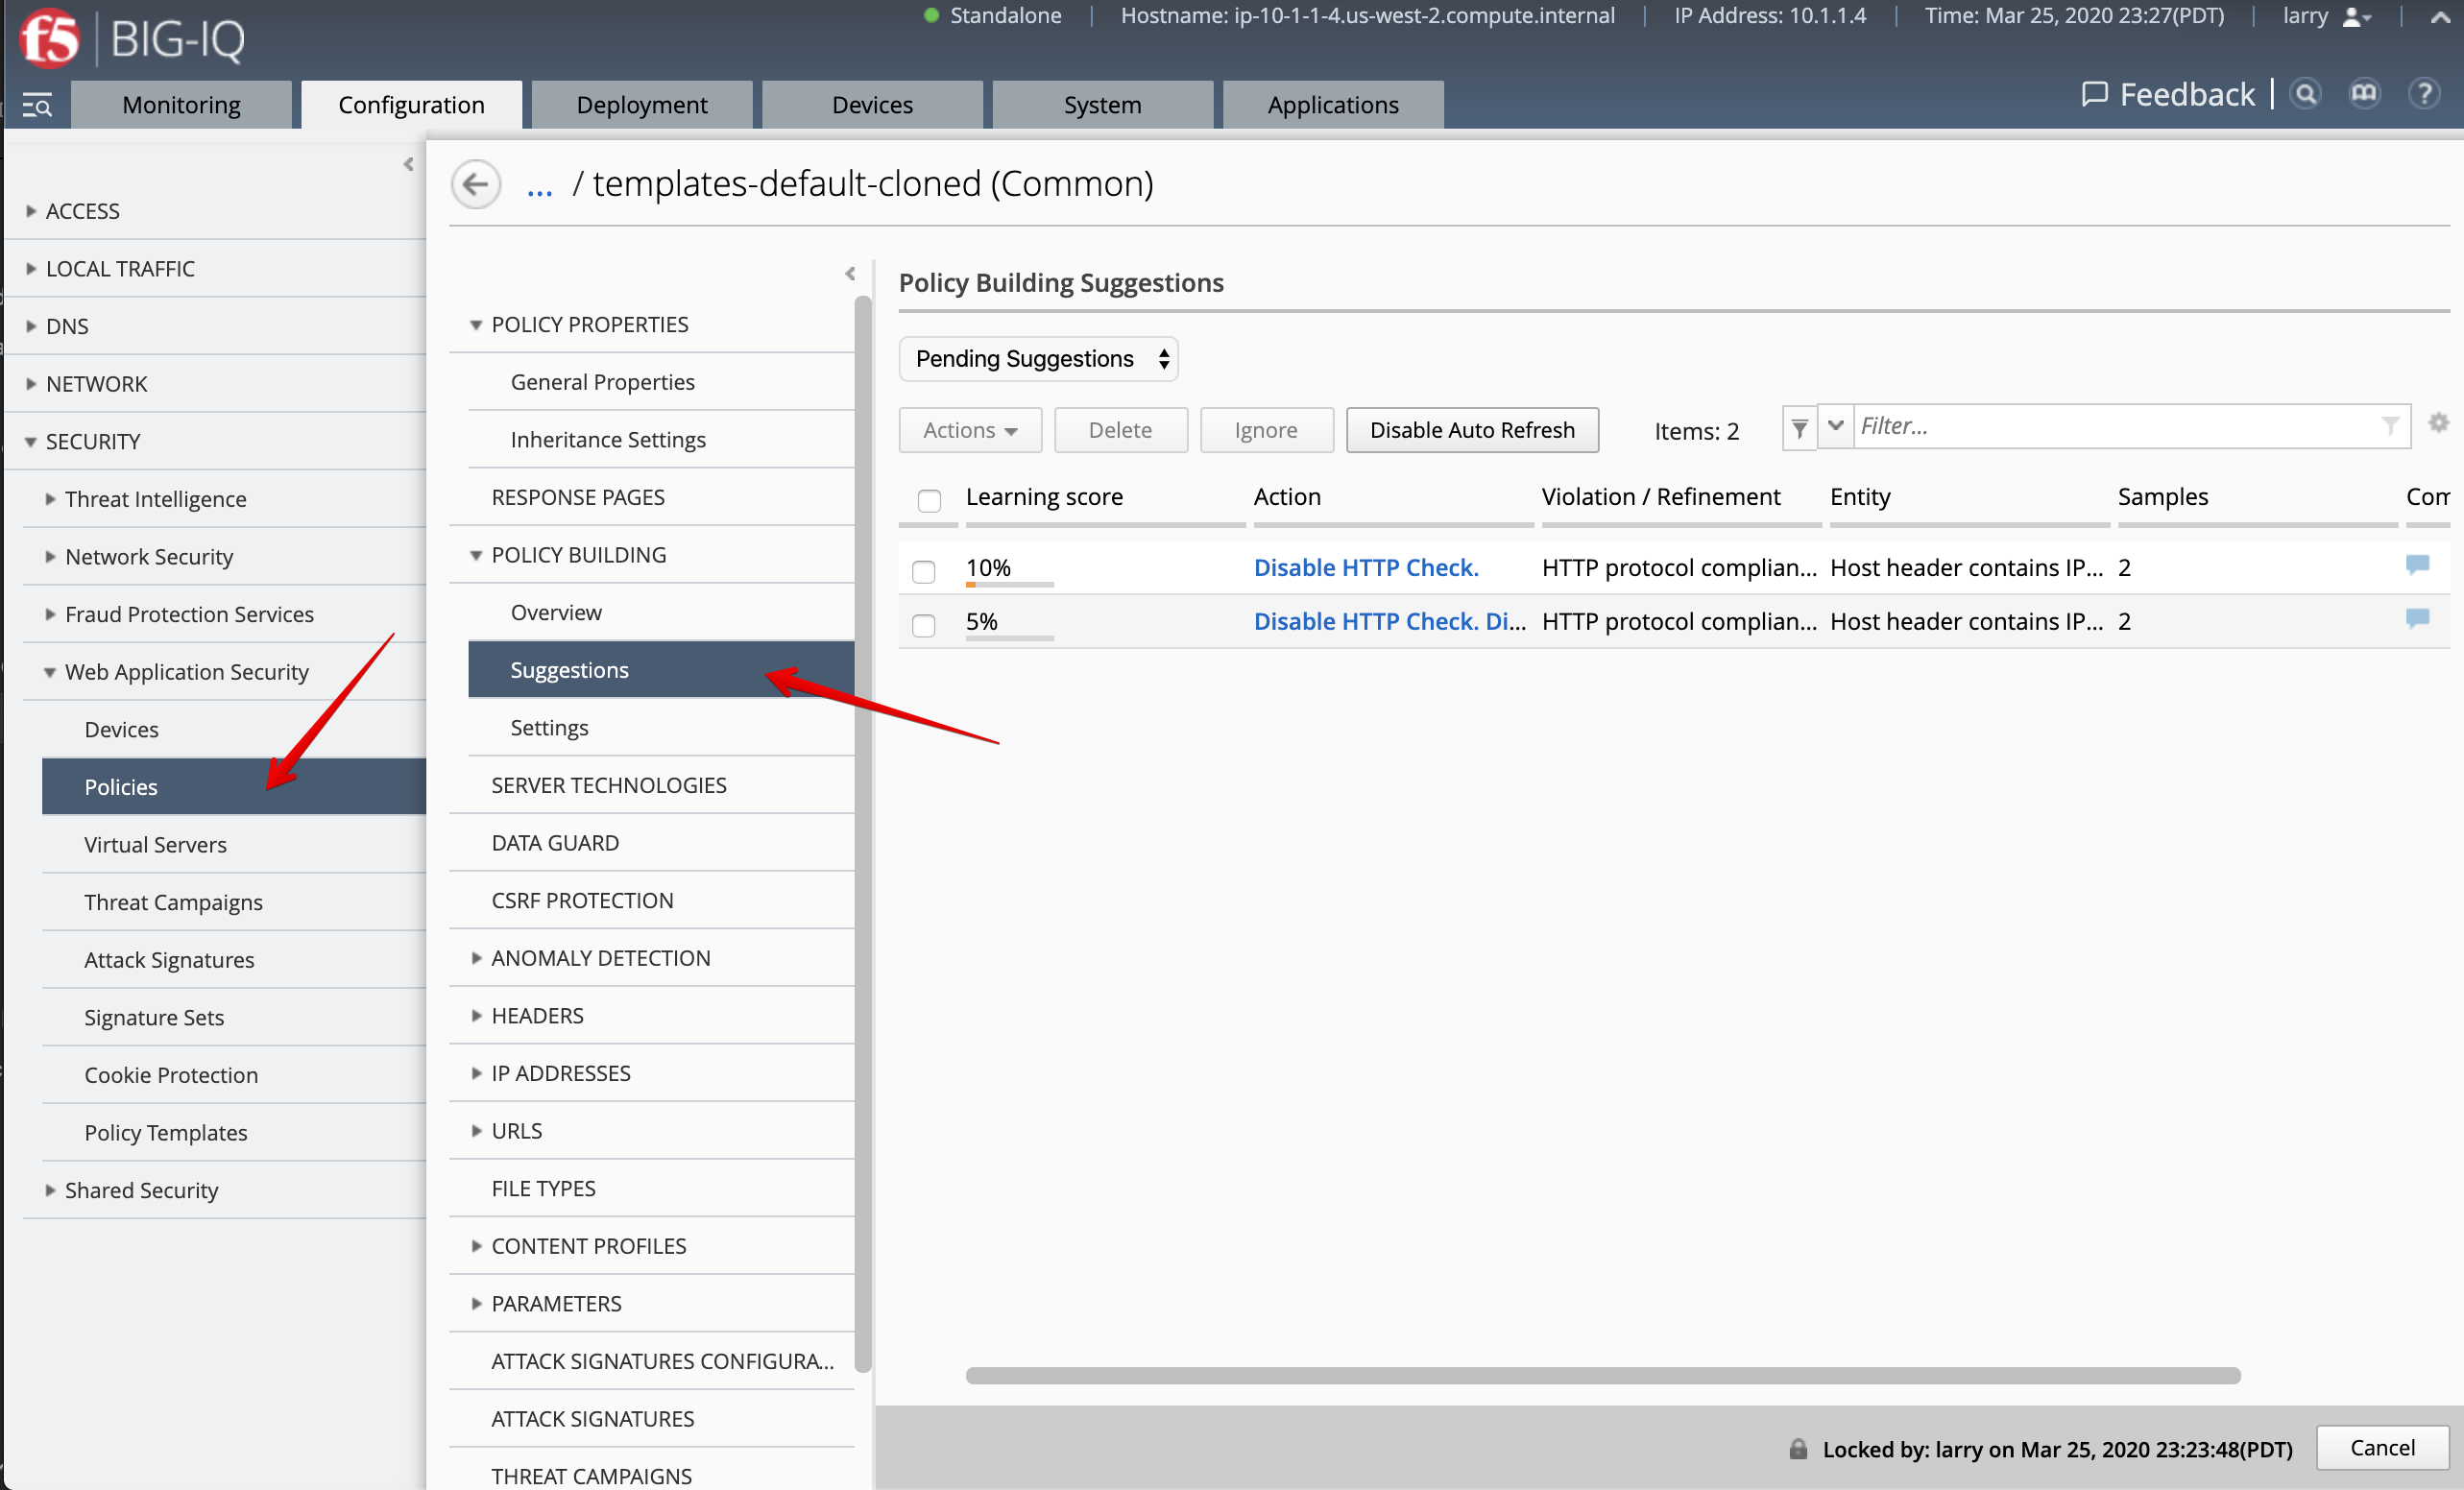
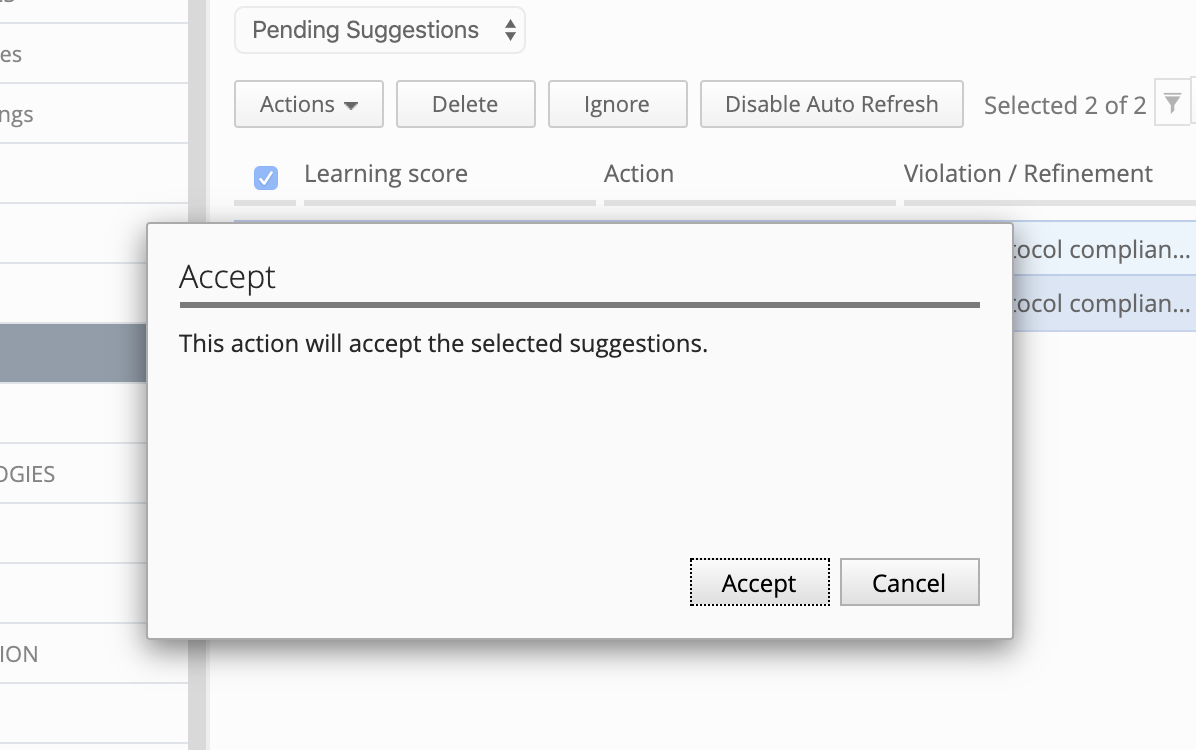
- Accept necessary suggestions.
Note
In case the app is deployed on a BIG-IP HA pair, the learning is not sync unless the failover group is set to automatic or the centrally builder feature is used.
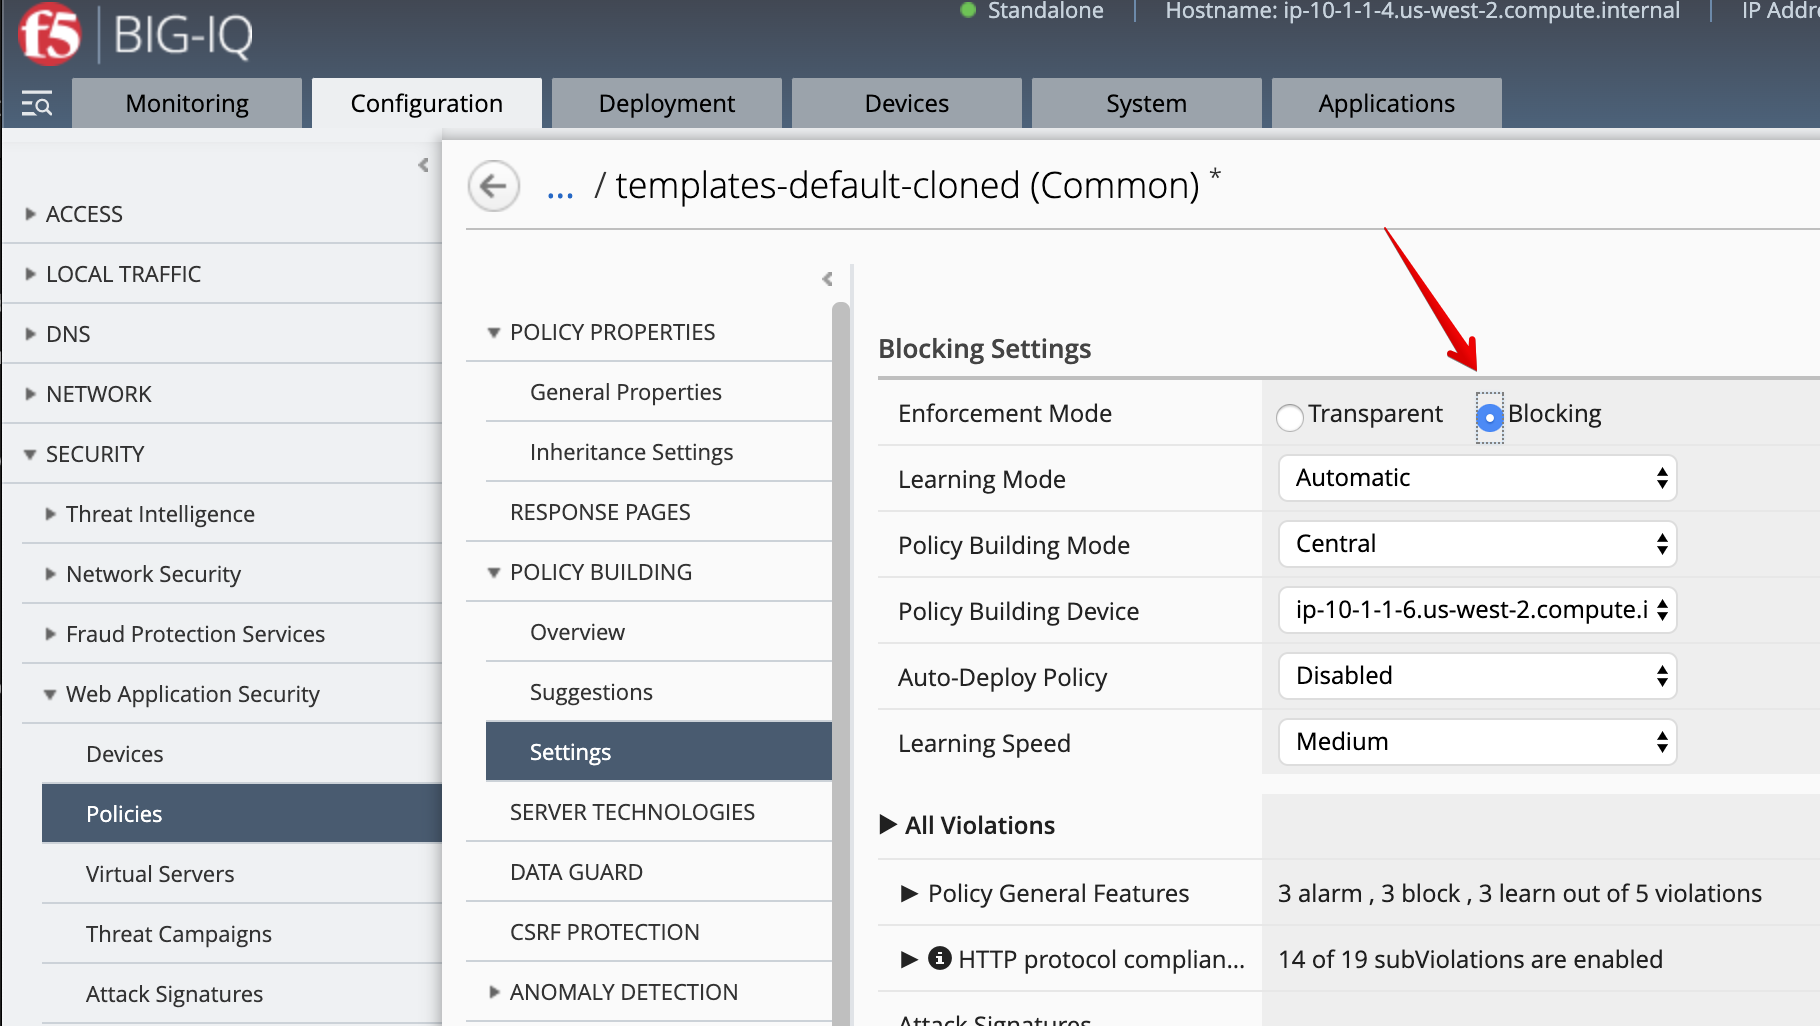
- Navigate under POLICY BUILDING > Settings, change Enforcement Mode to
blockingthen click on Save & Close.
- Select the
templates-default-cloned, click on Deploy to deploy the changes (same as previously done).
Let’s generate some bad traffic, connect on the Ubuntu Lamp Server server and launch the following script:
/home/f5/traffic-scripts/generate_http_bad_traffic.sh
Check ASM type of attacks by navigating under Monitoring > EVENTS > Web Application Security > Event Logs > Events
- Login as paula and select previously created
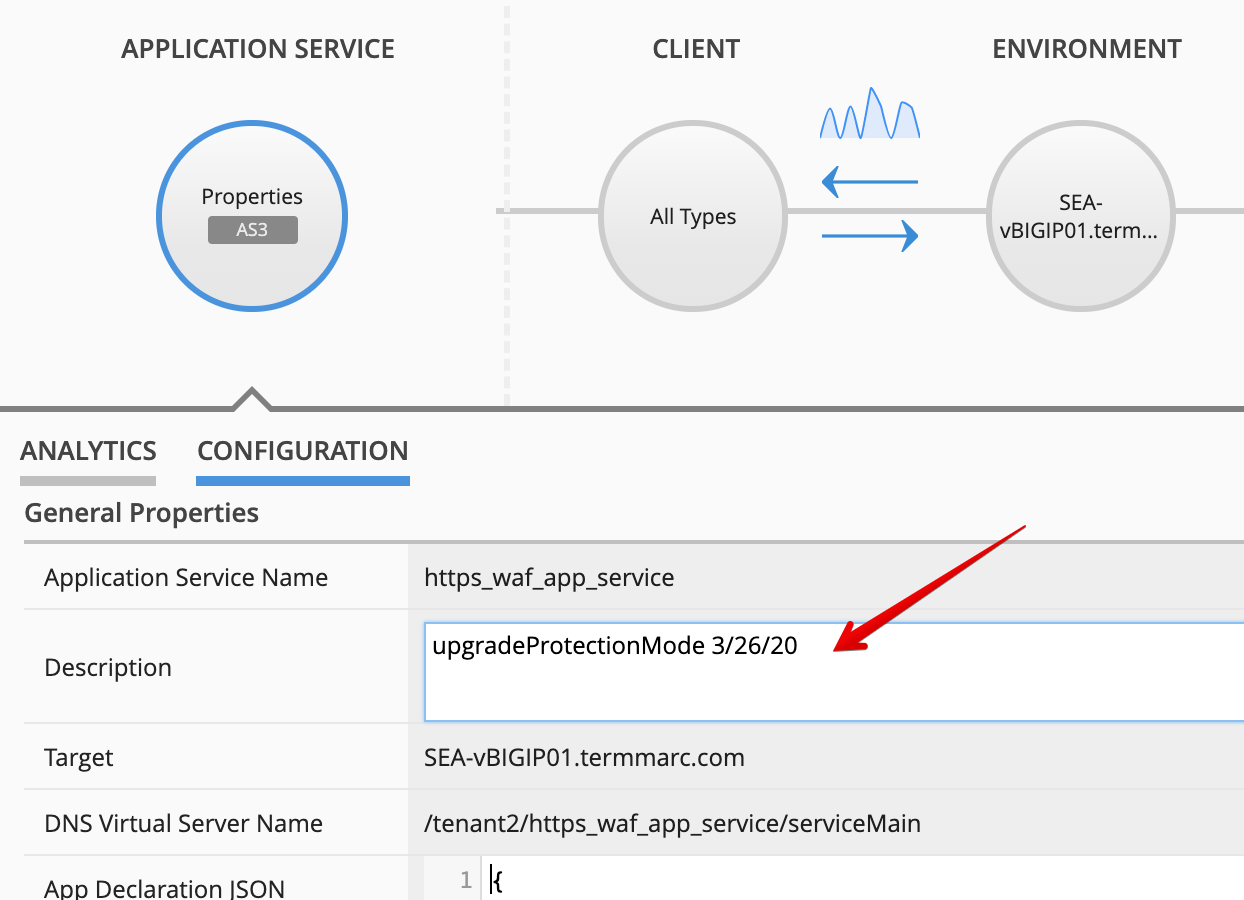
LAB_module3Application, then click onhttps_waf_app_service. - In 7.x, the protection mode isn’t automatically updated on the Application Dashboard. This is no longer needed for 8.0 version and above.
Under Properties, select CONFIGURATION, then add upgradeProtectionMode 3/26/20 in the Description
field and click Save.
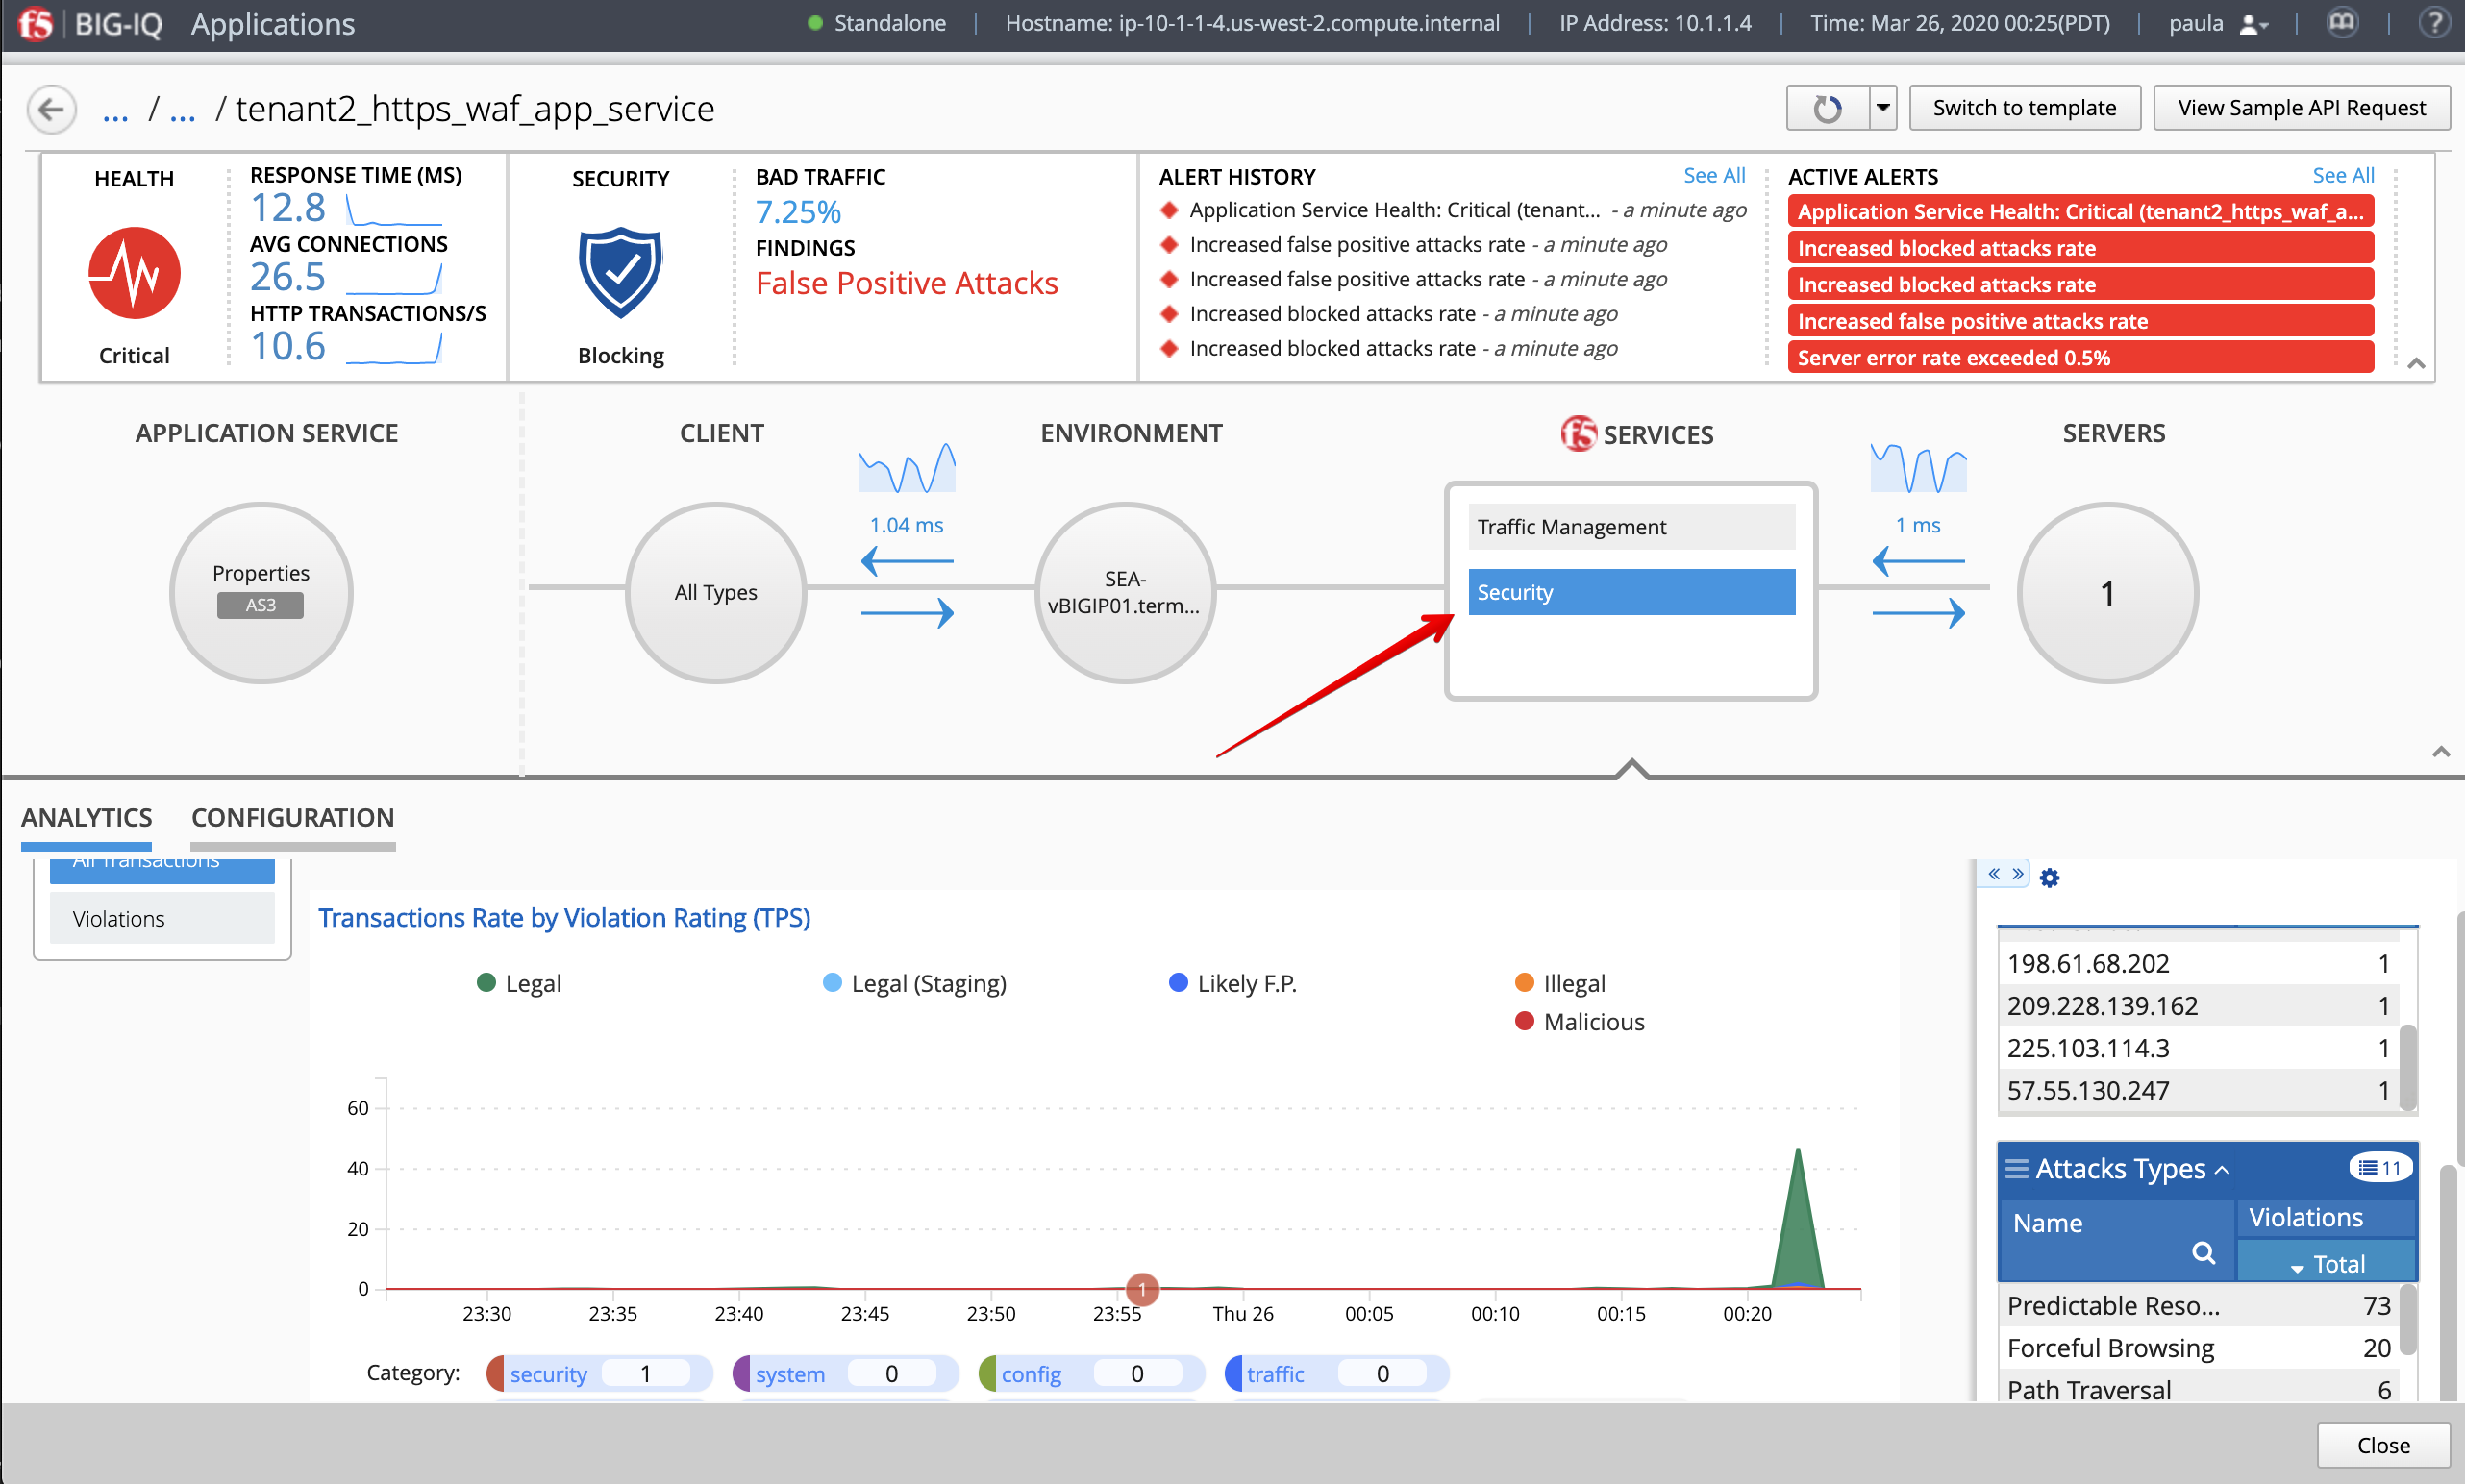
- In Application Dashboard, navigate to the Security Statistics and notice the Malicious Transactions.
- Stop the bad traffic script, connect on the Ubuntu Lamp Server server and CTRL+C.
Note
Try navigating to https://10.1.10.122/cal.exe from Chrome on the Lamp server.