F5 Solutions for Containers > Class 2: OpenShift with F5 Container Ingress Service > Module 1: CIS Using NodePort Mode Source | Edit on
Lab 1.1 - Install & Configure CIS in NodePort Mode
The BIG-IP Controller for OpenShift installs as a Deployment object
See also
The official CIS documentation is here: Install the BIG-IP Controller: Openshift
In this lab we’ll use NodePort mode to deploy an application to the BIG-IP.
See also
For more information see BIG-IP Deployment Options
BIG-IP Setup
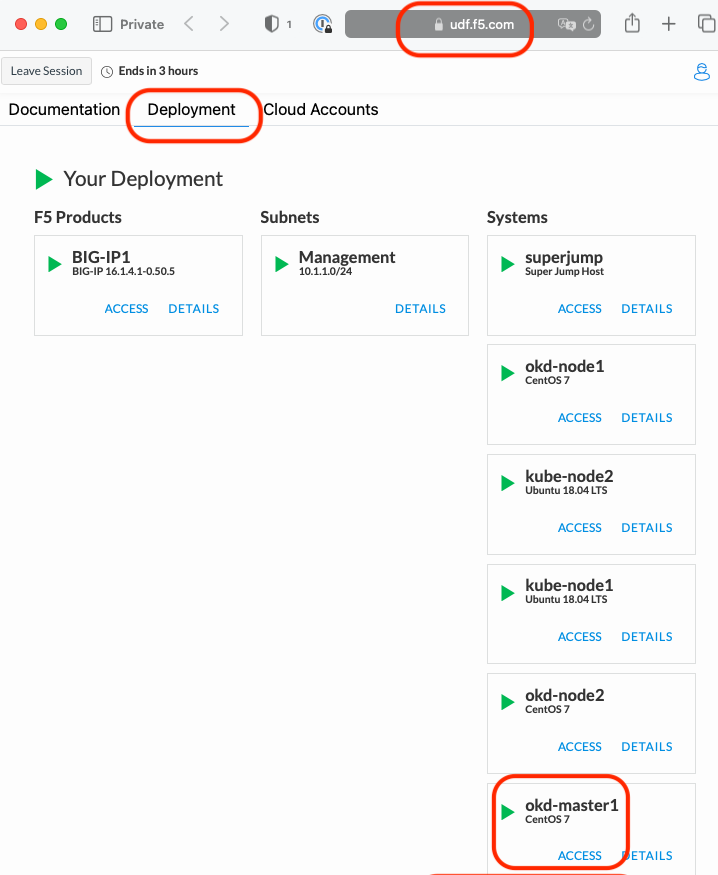
Browse to the Deployment tab of your UDF lab session at https://udf.f5.com and connect to BIG-IP1 using the TMUI access method.

Login with username: admin and password: admin.


Attention
- Check BIG-IP is active and licensed.
- If your BIG-IP has no license or its license expired, renew the license. You just need a LTM VE license for this lab. No specific add-ons are required (ask a lab instructor for eval licenses if your license has expired)
- Be sure to be in the
Commonpartition before creating the following objects.

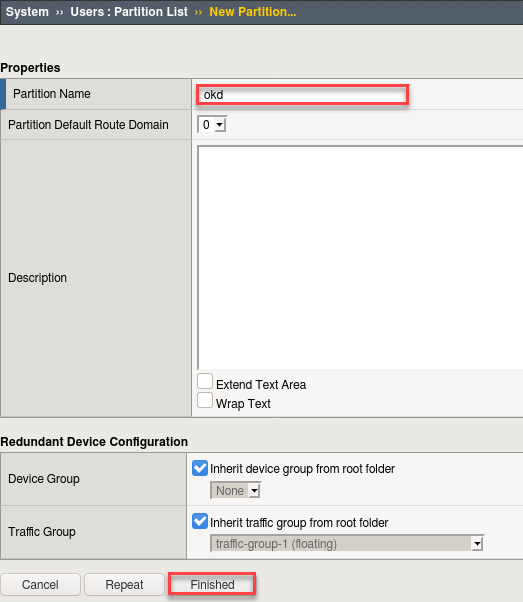
Just like the previous Kubernetes class we need to setup a partition that will be used by F5 Container Ingress Service.
- Browse to:
- Create a new partition called “okd” (use default settings)
- Click Finished
# Via the CLI:
ssh admin@10.1.1.4 tmsh create auth partition okd
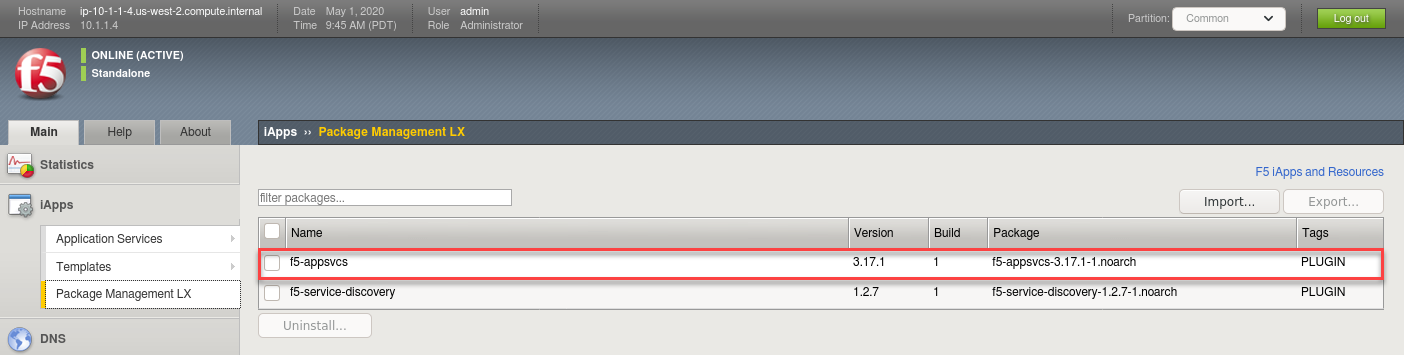
Verify AS3 is installed.
Attention
This has been done to save time but is documented here for reference.
See also
For more info click here: Application Services 3 Extension Documentation
Browse to: . and confirm “f5-appsvcs” is in the last as shown below.
If AS3 is NOT installed follow these steps:
- Click here to: Download latest AS3
- Go back to:
- Click Import
- Browse and select the downloaded AS3 RPM
- Click Upload
Explore the OpenShift Cluster
Go to the Deployment tab of your UDF lab session at https://udf.f5.com to connect to okd-master1 using the Web Shell access method, then switch to the centos user account using the “su” command:
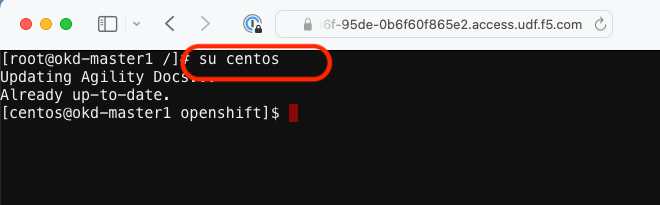
su centos“git” the demo files
Note
These files should already be there and upon login updated. If not use the following command to clone the repo.
git clone -b develop https://github.com/f5devcentral/f5-agility-labs-containers.git ~/agilitydocs

cd ~/agilitydocs/docs/class2/openshift
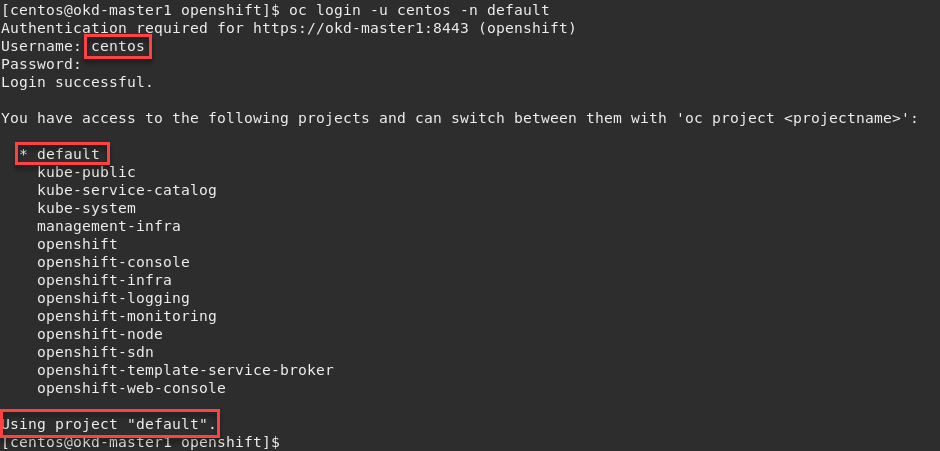
Log in with an Openshift Client.
Note
Here we’re using the “centos” user, added when we built the cluster. When prompted for password enter “centos”.
oc login -u centos -n default
Important
Upon logging in you’ll notice access to several projects. In our lab we’ll be working from the default “default”.
Check the OpenShift status
The oc status command shows a high level overview of the project currently in use, with its components and their relationships, as shown in the following example:
oc status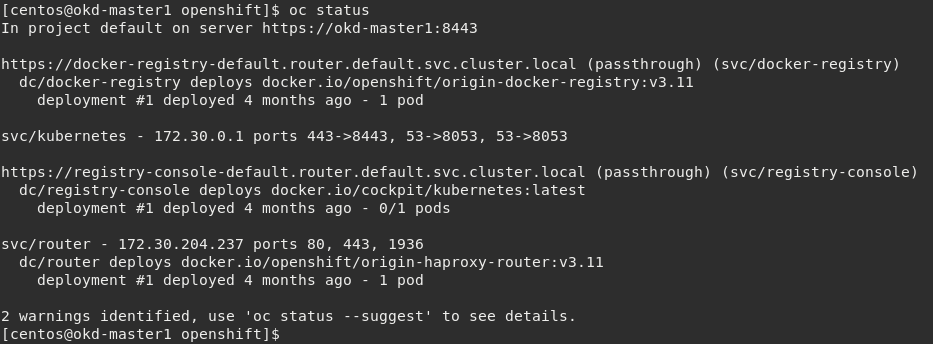
Check the OpenShift cluster nodes
You can manage nodes in your instance using the CLI. The CLI interacts with node objects that are representations of actual node hosts. The master uses the information from node objects to validate nodes with health checks.
To list all nodes that are known to the master:
oc get nodes

Attention
If the node STATUS shows NotReady or SchedulingDisabled contact the lab proctor. The node is not passing the health checks performed from the master, therefor pods cannot be scheduled for placement on the node.
To get more detailed information about a specific node, including the reason for the current condition use the oc describe node command. This does provide alot of very useful information and can assist with throubleshooting issues.
oc describe node okd-master1

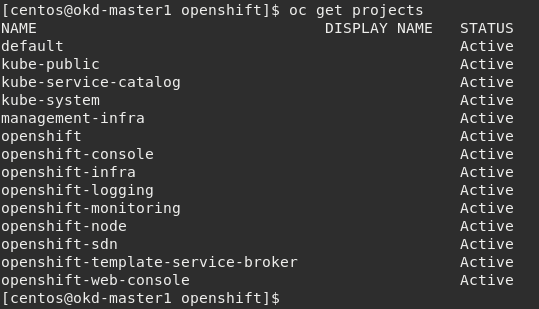
Check to see what projects you have access to:
oc get projects
Note
You will be using the “default” project in this class.
CIS Deployment
See also
For a more thorough explanation of all the settings and options see F5 Container Ingress Service - Openshift
Now that BIG-IP is licensed and prepped with the “okd” partition, we need to define a Kubernetes deployment and create a Kubernetes secret to hide our bigip credentials.
Create bigip login secret
oc create secret generic bigip-login -n kube-system --from-literal=username=admin --from-literal=password=admin
You should see something similar to this:

Create kubernetes service account for bigip controller
oc create serviceaccount k8s-bigip-ctlr -n kube-system
You should see something similar to this:

Create cluster role for bigip service account (admin rights, but can be modified for your environment)
oc create clusterrolebinding k8s-bigip-ctlr-clusteradmin --clusterrole=cluster-admin --serviceaccount=kube-system:k8s-bigip-ctlr
You should see something similar to this:

At this point we have two deployment mode options, Nodeport or ClusterIP. This class will feature both modes. For more information see BIG-IP Deployment Options
Lets start with Nodeport mode
Note
- For your convenience the file can be found in /home/ubuntu/agilitydocs/docs/class2/openshift (downloaded earlier in the clone git repo step).
- Or you can cut and paste the file below and create your own file.
- If you have issues with your yaml and syntax (indentation MATTERS), you can try to use an online parser to help you : Yaml parser
nodeport-deployment.yaml¶1apiVersion: apps/v1 2kind: Deployment 3metadata: 4 name: k8s-bigip-ctlr 5 namespace: kube-system 6spec: 7 replicas: 1 8 selector: 9 matchLabels: 10 app: k8s-bigip-ctlr 11 template: 12 metadata: 13 name: k8s-bigip-ctlr 14 labels: 15 app: k8s-bigip-ctlr 16 spec: 17 serviceAccountName: k8s-bigip-ctlr 18 containers: 19 - name: k8s-bigip-ctlr 20 image: "f5networks/k8s-bigip-ctlr:2.4.1" 21 imagePullPolicy: IfNotPresent 22 env: 23 - name: BIGIP_USERNAME 24 valueFrom: 25 secretKeyRef: 26 name: bigip-login 27 key: username 28 - name: BIGIP_PASSWORD 29 valueFrom: 30 secretKeyRef: 31 name: bigip-login 32 key: password 33 command: ["/app/bin/k8s-bigip-ctlr"] 34 args: [ 35 "--bigip-username=$(BIGIP_USERNAME)", 36 "--bigip-password=$(BIGIP_PASSWORD)", 37 "--bigip-url=https://10.1.1.4:8443", 38 "--insecure=true", 39 "--bigip-partition=okd", 40 "--namespace=default", 41 "--manage-routes=true", 42 "--route-vserver-addr=10.1.1.4", 43 "--route-http-vserver=okd_http_vs", 44 "--route-https-vserver=okd_https_vs", 45 "--route-label=hello-world", 46 "--pool-member-type=nodeport" 47 ]
Once you have your yaml file setup, you can try to launch your deployment. It will start our f5-k8s-controller container on one of our nodes.
Note
This may take around 30sec to be in a running state.
oc create -f nodeport-deployment.yaml
Verify the deployment “deployed”
oc get deployment k8s-bigip-ctlr --namespace kube-system

To locate on which node the CIS service is running, you can use the following command:
oc get pods -o wide -n kube-system
We can see that our container is running on okd-node1 below.

Troubleshooting
If you need to troubleshoot your container, you have two different ways to check the logs of your container, oc command or docker command.
Attention
Depending on your deployment, CIS can be running on either okd-node1 or okd-node2. In our example above it’s running on okd-node1
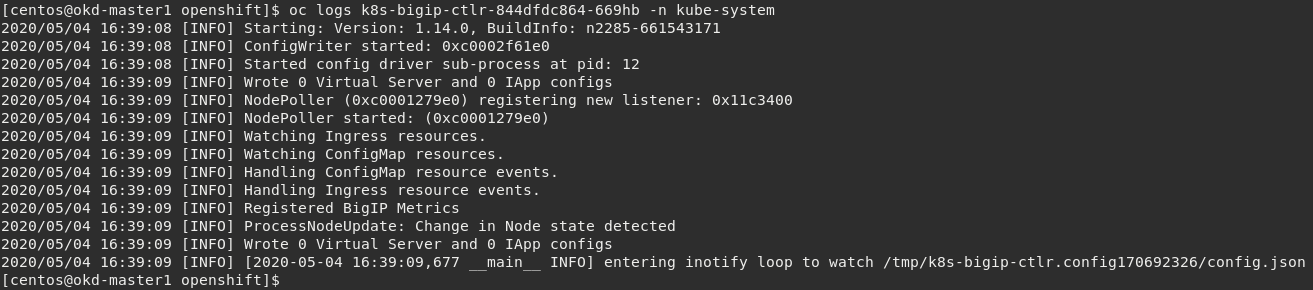
Using
occommand: you need to use the full name of your pod as shown in the previous image.# For example: oc logs k8s-bigip-ctlr-844dfdc864-669hb -n kube-system
Using docker logs command: From the previous check we know the container is running on okd-node1 (yours could be okd-node2). On your current session with okd-master1, SSH to okd-node1 first and then run the docker command:
Important
Be sure to check which Node your “connector” is running on.
# If directed to, accept the authenticity of the host by typing "yes" and hitting Enter to continue.

ssh okd-node1
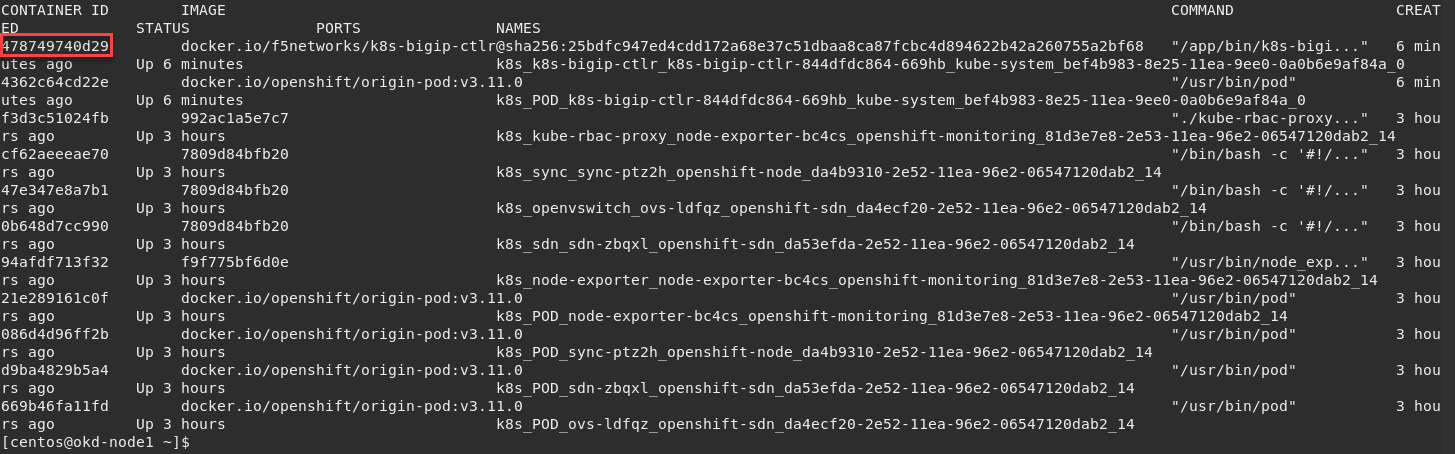
sudo docker ps
In this example, we can see our container ID is “478749740d29”
Now we can check our container logs:
sudo docker logs 478749740d29
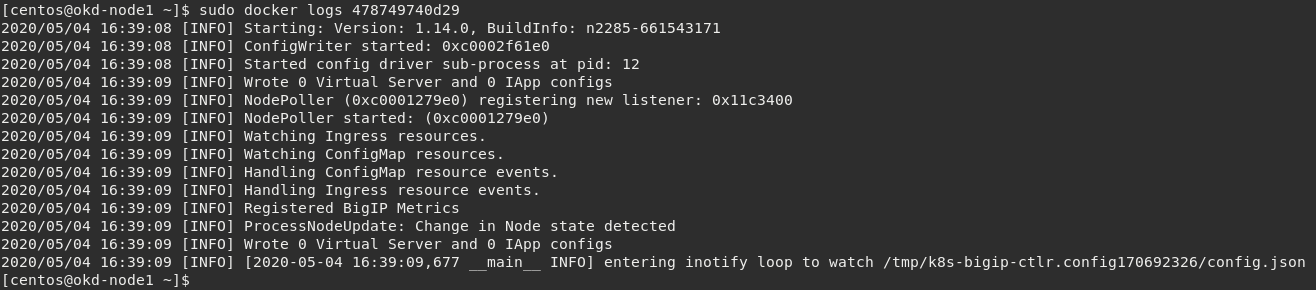
Note
The log messages here are identical to the log messages displayed in the previous oc logs command.
Exit okd-node1 back to okd-master1
exitYou can connect to your container with kubectl as well. This is something not typically needed but support may direct you to do so.
Important
Be sure the previous command to exit okd-node1 back to okd-master1 was successfull.
oc exec -it k8s-bigip-ctlr-844dfdc864-669hb -n kube-system -- /bin/sh
cd /app

ls -la

exit