F5 Solutions for DDoS > F5 Agility 2018: DDoS Attack Protection > DDoS Hybrid Defender Attacks and Mitigations Source | Edit on
Lab 2 - Multi-vector Attack Demo
In this simple demo you will launch a small number of network attacks and show the configuration, logging and reporting capabilities of the F5® DDoS Hybrid Defender™. The point of this demo is to provide context for a UI walk-through with more live data and viewing and setting manual thresholds.
Task 1 – Create a Protected Object that the Attacker will be targeting
The DHD device wide protection is enforced for all traffic flowing through the device. For more granular control, we use Protected Objects and configure mitigation settings for those objects to be enforced.
In this task you will configure Object-Level DoS protection for a network (L4), simulating your Server Network and then issue an attack and review the results.
- In the BIG-IP Configuration Utility, open the DoS Configuration >> Protected Objects page and in the Protected Objects section click the Create dropdown and select Protected Object.
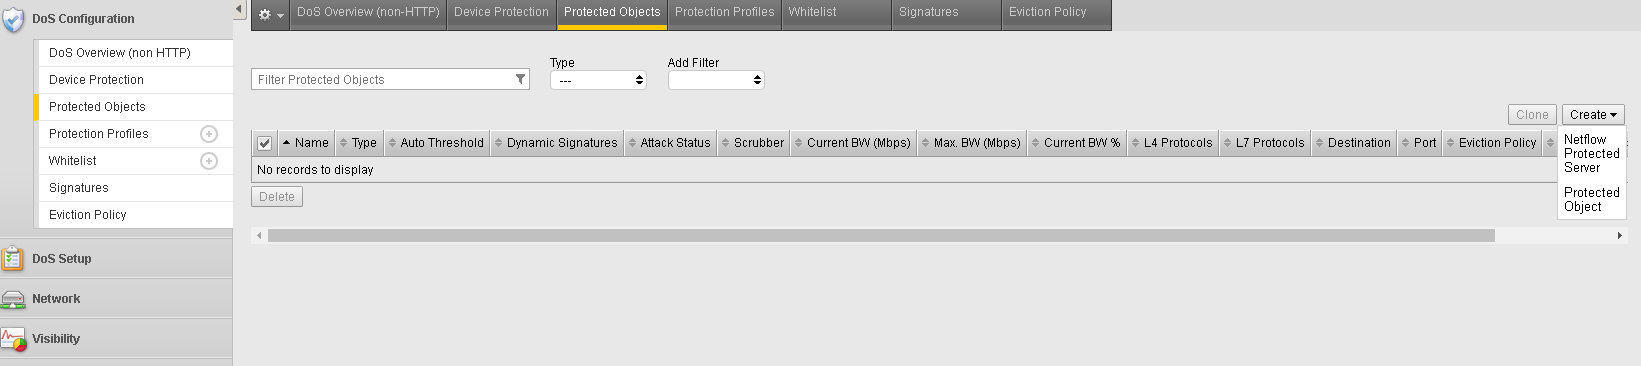
- Configure the Protected Object using the following information, and then click Create.
| Name | ServerNet |
| Destination Address | 10.1.20.0/24 |
| Port | *All Ports |
| Protocol | All Protocols |
| Protection Profile: | dos |
| Eviction Policy: | Leave Blank |
| VLAN(s): | defaultVLAN |
| Logging Profiles: | local-dos |
- Click Save
This protected object is defending all ports/protocols for 10.1.20.0/24, which is the network behind the Hybrid Defender. Attacks will be launched at 10.1.20.12, which is an interface on the LAMP server.
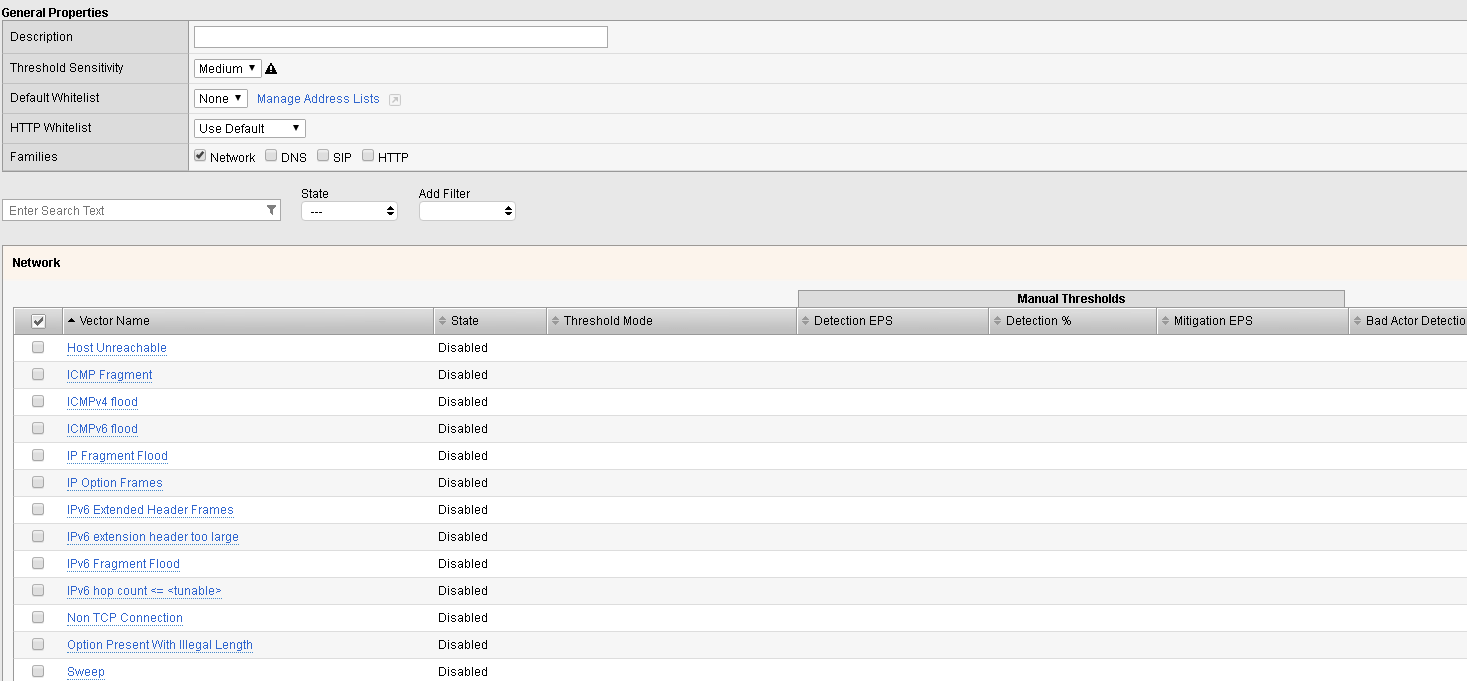
In the default dos profile no sections are selected or enabled for protected objects in the default configuration.
- In the BIG-IP Configuration Utility, open the DoS Configuration >> Protection Profiles page. Click dos, Then Check the Network box under the Families Heading.
- Click the Network Section. Notice all vectors are disabled. Check the top box to select all the vectors, Scroll to the bottom and Select Mitigate. Scroll to the top and Commit Changes to System.
- Navigate to DoS Configuration >> Device Protection. Under Log Publisher select “local-db-publisher” from the drop down. Select Commit Changes to System. This publishes our logs to the appropriate location for analysis.
You will now launch the attacks and show the behavior
- Open the following tabs in the DHD UI (Duplicate Tabs to make it easier):
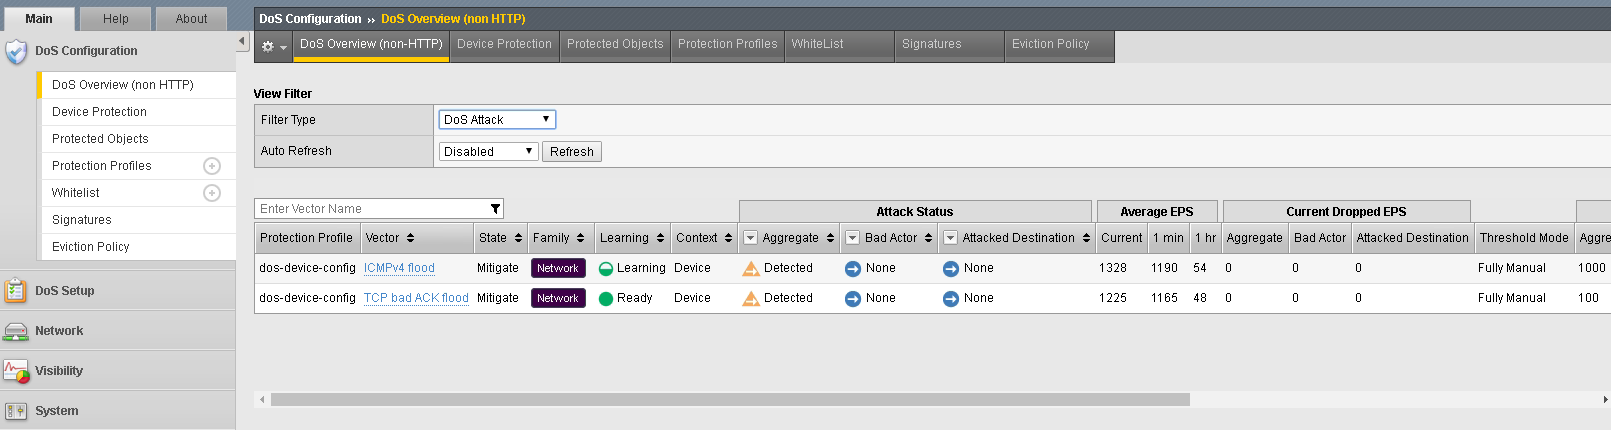
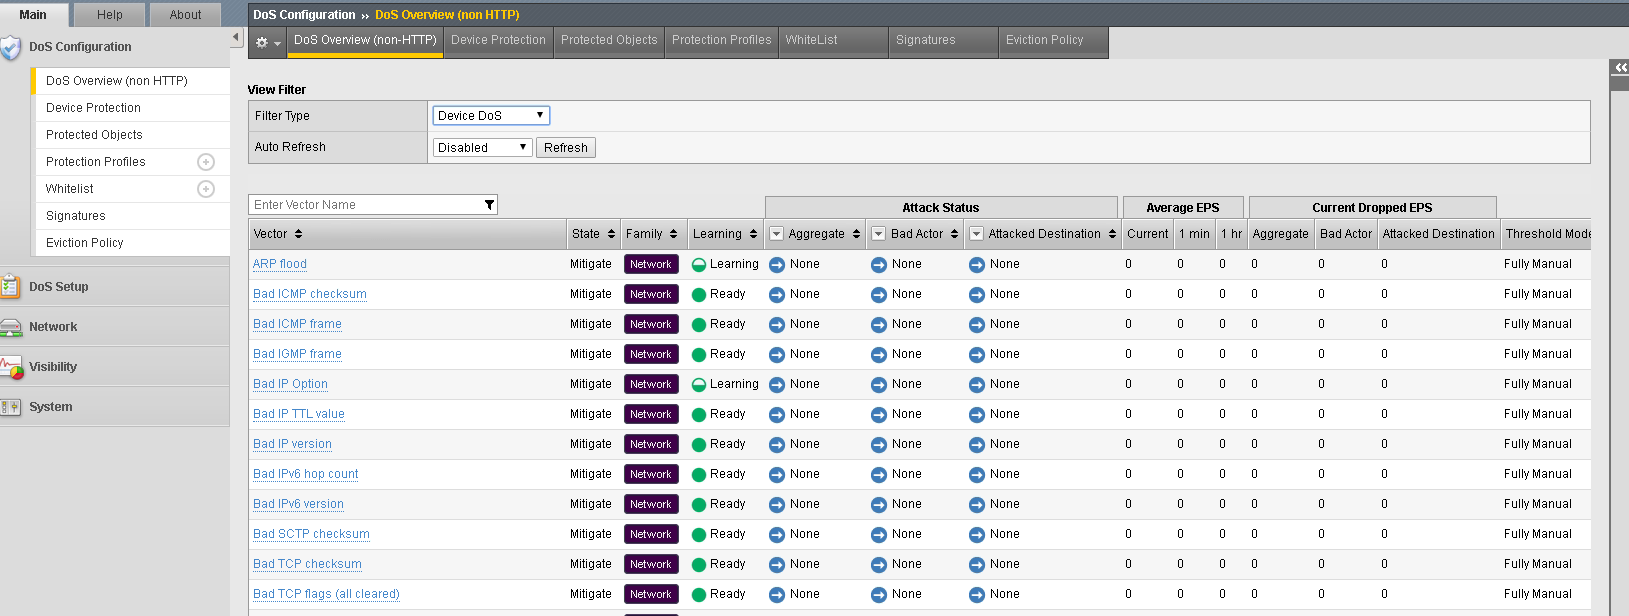
- DoS Configuration >> DoS Overview >> Filter Type >> Try Both DoS Attack and Device Dos
- Visibility >> Dashboard change Dashboard to Real Time which is centered on the timeline.
- Visibility >> Event Logs >> DoS >> Network >> Events
- Access the Attacker shell and run the following commands/attack (if already in the folder just issue the command)
# sudo su
# cd ~/scripts
# ./multivector.sh
Note
Ignore the “sudo: unable to resolve host” error.

- Click Refresh on the DoS Overview page. Look at and explore both DoS Attack and Device Dos filters to refine your results.
Note
The screens show different info, why? Device Dos shows the status of all vectors for that profile and the current status and rates. Use the last lesson to adjust thresholds of the current attacks to see different results.
Hint
Manual thresholds under Dos Overview >> Filter Type >> Device DoS. Scroll down and see all the vectors and rates. Adjust if you desire.
- Change the View Filter and see how you get different Views of some of the same data in a different context.
- Make sure you adjust the filter to Protected Object and select ServerNet. This will show the status of the protected object, not the device level protection.
- Navigate to Visibility >> Dashboard. Explore the amount of rich data returned. Hover over the attacks. Scroll down and see what information is supplied.
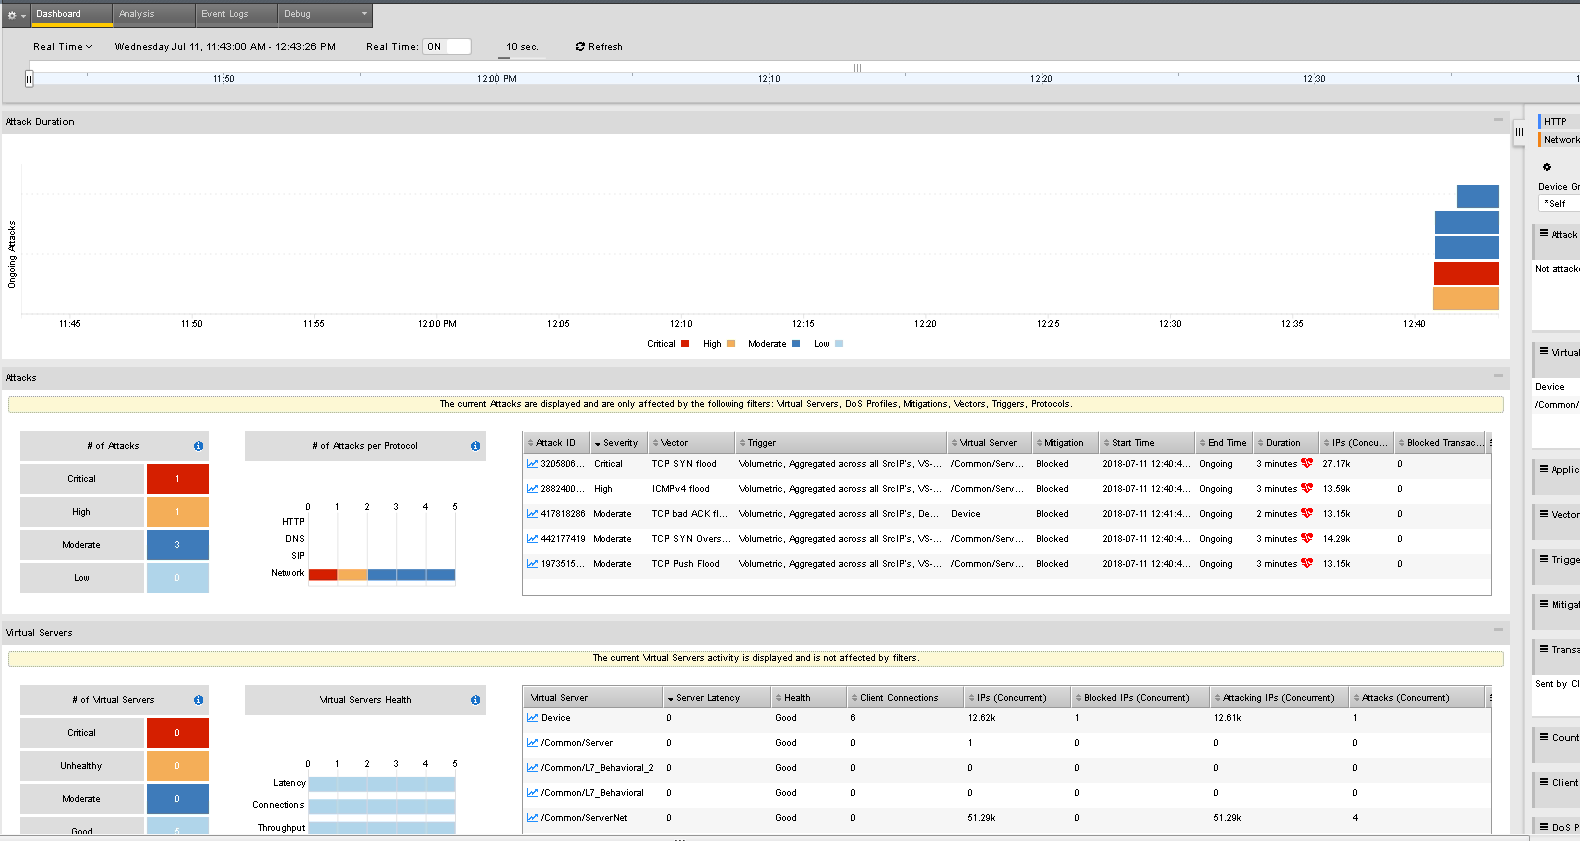
- Notice under Attack Duration the red heart symbol. Signifies an ongoing attack. If you don’t see it. Use Ctrl - to shrink your screen view. Or use the arrow at the top to expand.
Note
Why is there no data in the Virtual Server Section?
Hint
We only have Device Protection and the Server Network /24 protection set. We will see VS when we configure the next exercise.
- Navigate to Visibility >> Event Logs >> DoS >> Network >> Events
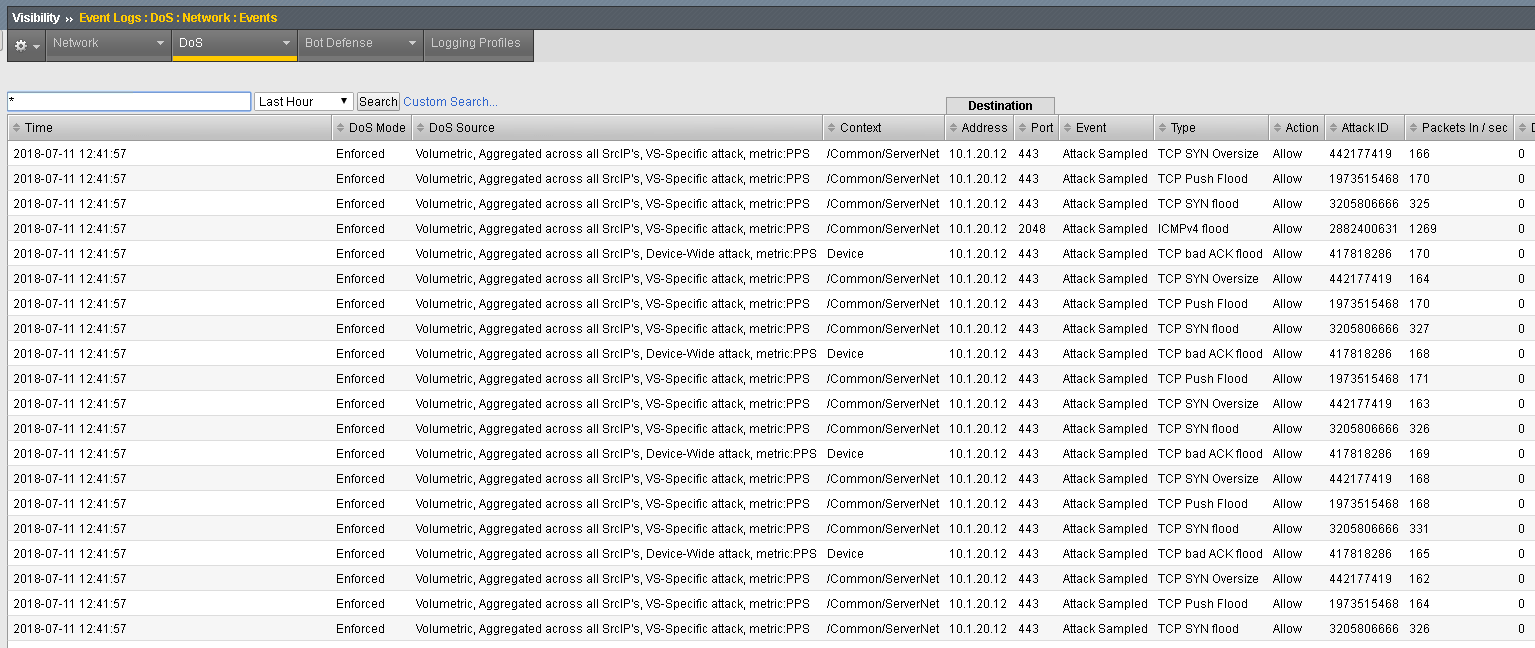 - Further explore the DoS Event logs. For example, clear the search and identify the “Stop” and “Start” times for an attack, type, action, PPS and Dropped Packets etc.
- Clean-up: On the Attacker CLI, if the attack is still running be certain to end it with Ctrl-C.
- Clean-up: After stopping the attack, delete the ServerNet Protected Object.