F5 Distributed Cloud > F5 Distributed Cloud - Intro to Multi-Cloud Networking > Module 2: App Connect Source | Edit on
Lab 3: Globally Available Front End
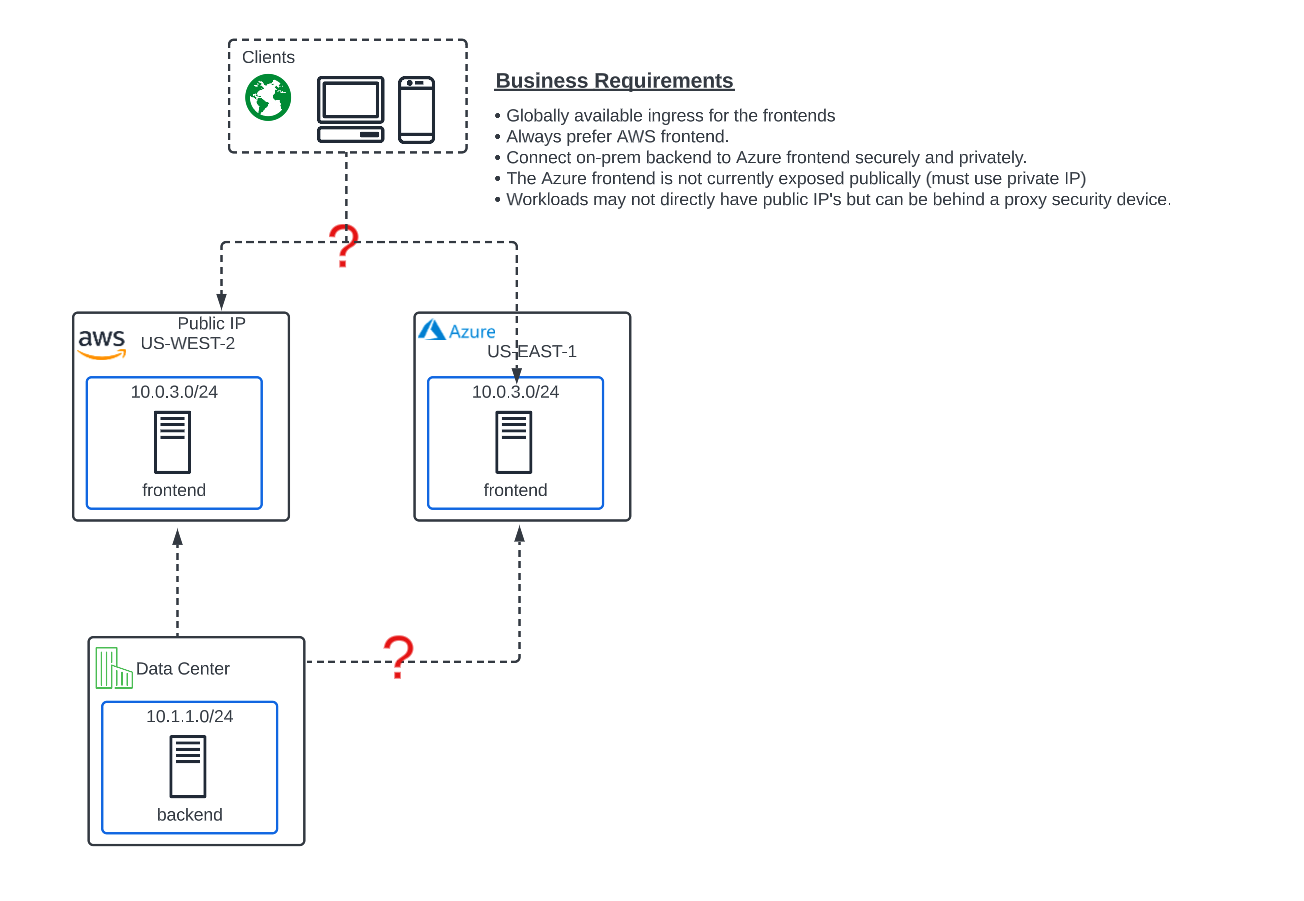
Objective:
Use XC Regional Edges to provide future-proof, globally available frontend.
XC frontend (RE) must be able to load balance the 2 cloud frontends.
Expose Azure private frontend without adding a public IP for the workload.
Always prefer the AWS frontend for ingress traffic.
What they want:
Narrative:
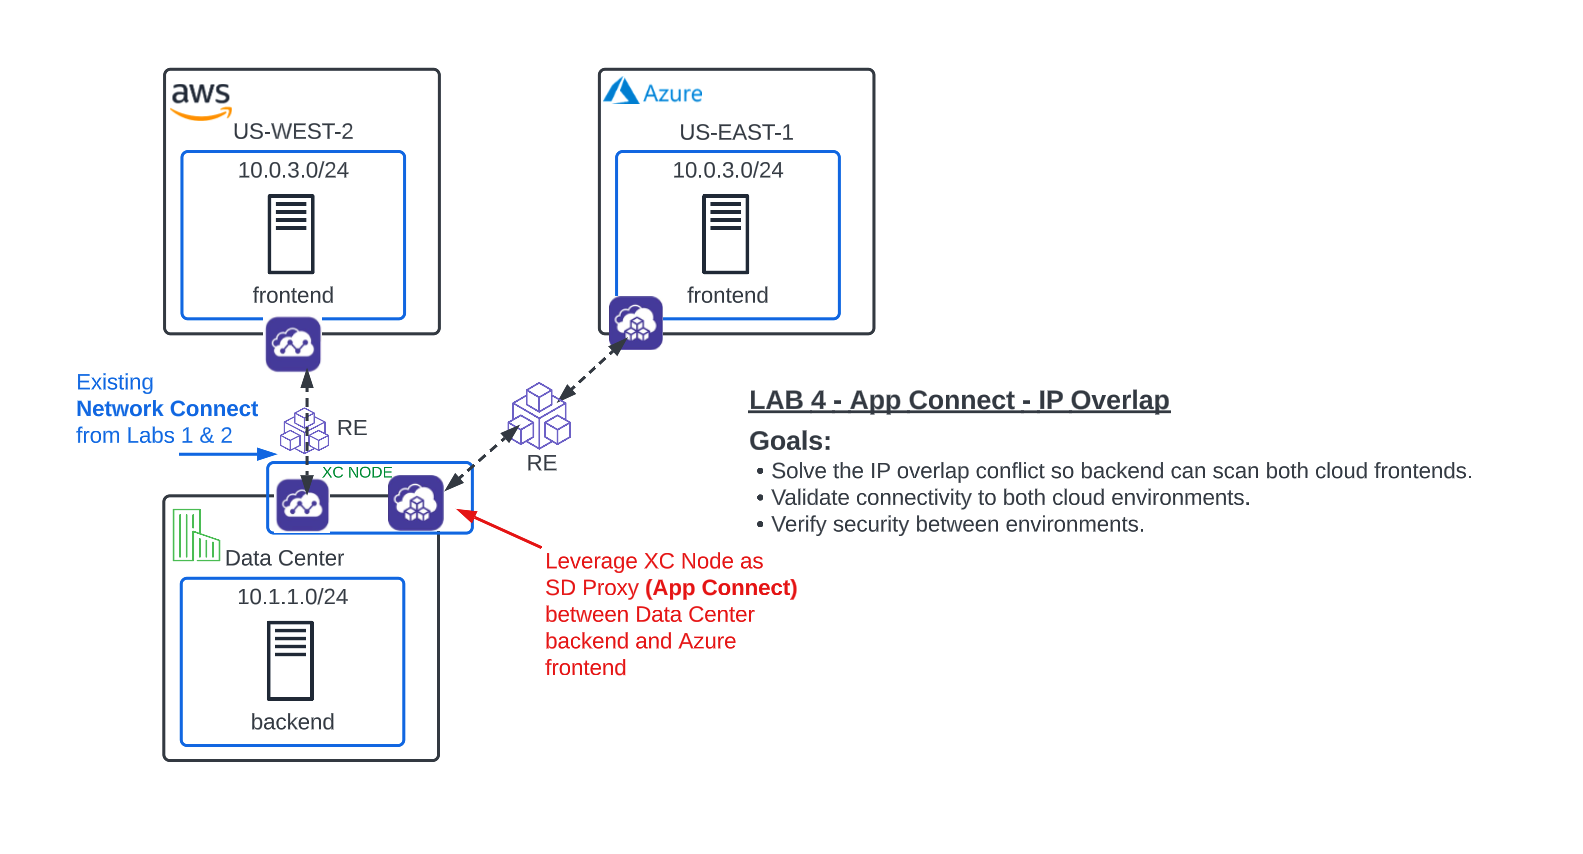
Unfortunately, after doing your due diligence, you find that the Azure VNET overlaps with the AWS subnets. To make matters worse, the Azure server is not associated with any public IP and there is a security directive in place to not have any workload servers in Azure associated with a public IP without a security device.
Lately, the site has been getting pounded with attack traffic and frontend security has become a hot topic at ACME. You think to yourself, this is going to be tricky, and reach out to your trusted F5 Solutions Engineer to see how this will work with Distributed Cloud.
Your F5 Solutions Engineer explains that IP overlap between sites is a common problem and one that can be easily solved with Distributed Cloud App Connect. App Connect alleviates this problem by leveraging the XC Nodes as Software-Defined Proxies rather than Software-Defined Routers as they were configured with Network Connect. Additionally App Connect enforces a default deny architecture, where only the port and domain name defined on the load balancer will accept traffic.
Also, you are informed that by using F5 Distributed Cloud Regional Edges for the frontend workloads, you will be able to have full proxy security, visibility and analytics for the client traffic, so the Security team will be pleased.
After reviewing the architecture with you, your Solutions Engineer advises you to break up these requirements in to 2 specific deliverables.
Deliverable 1:
Create a globally scaled and future-proof frontend with the XC Regional Edges (Lab 3)

Deliverable 2:
Leverage App Connect for secure site to site connectivity regardless of IP overlap. (Lab 4)
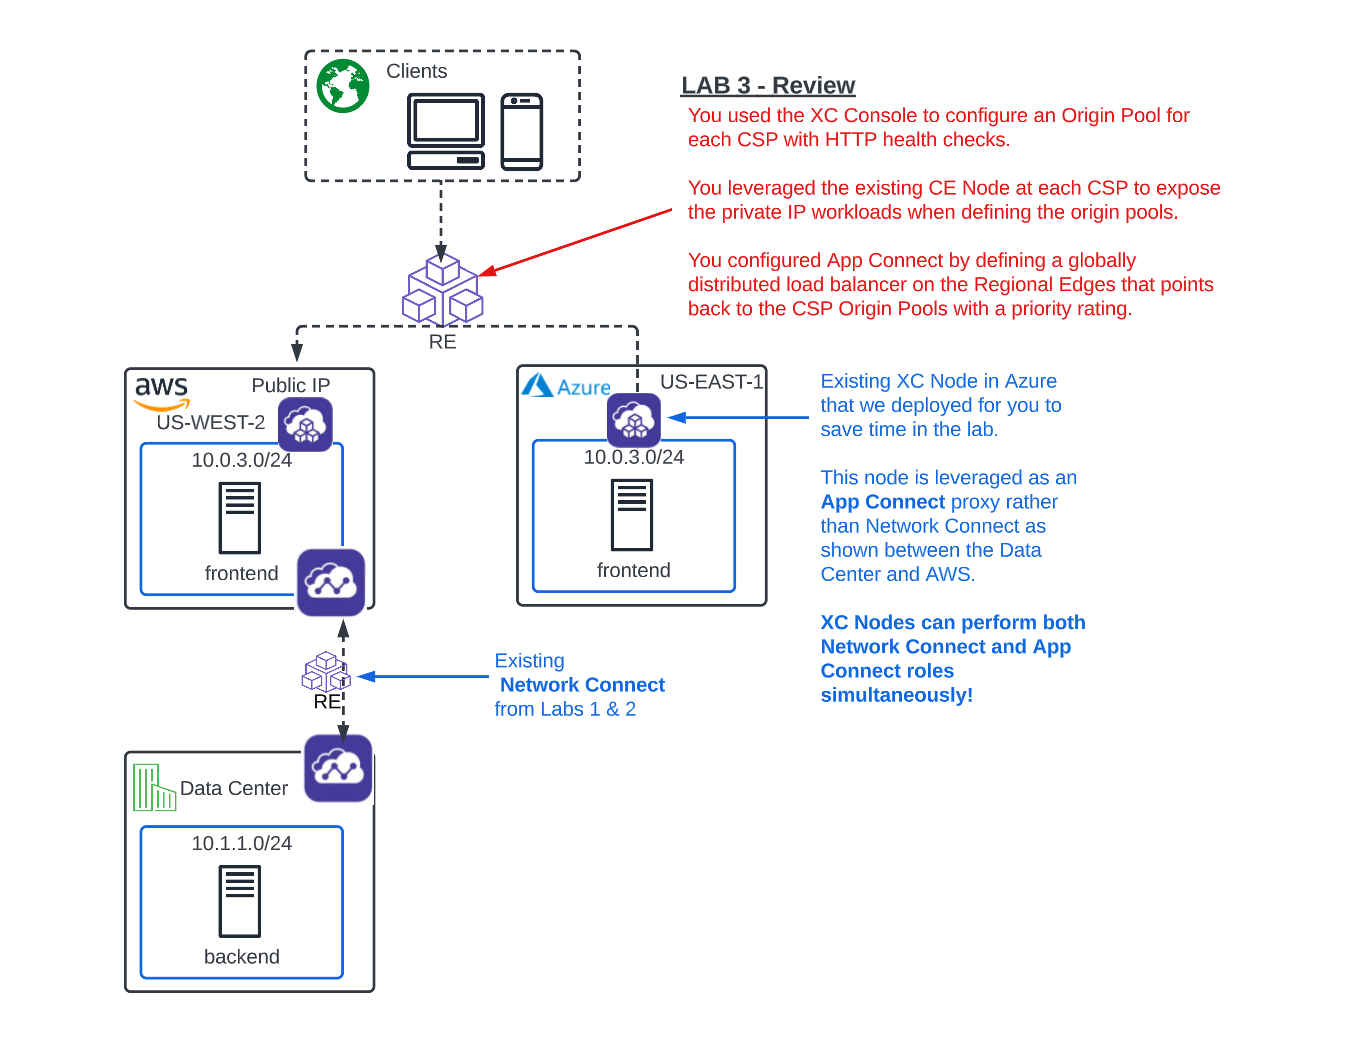
Multi-Cloud App Connect
With Network Connect you connected routed networks with your CE Node which acted as a Software-Defined Router.
Now with App Connect you will be configuring our Regional Edges and your CE Nodes as Sofware-Defined-Proxies to provide connectivity between workloads. The CE’s can do both functions simultaneously!!
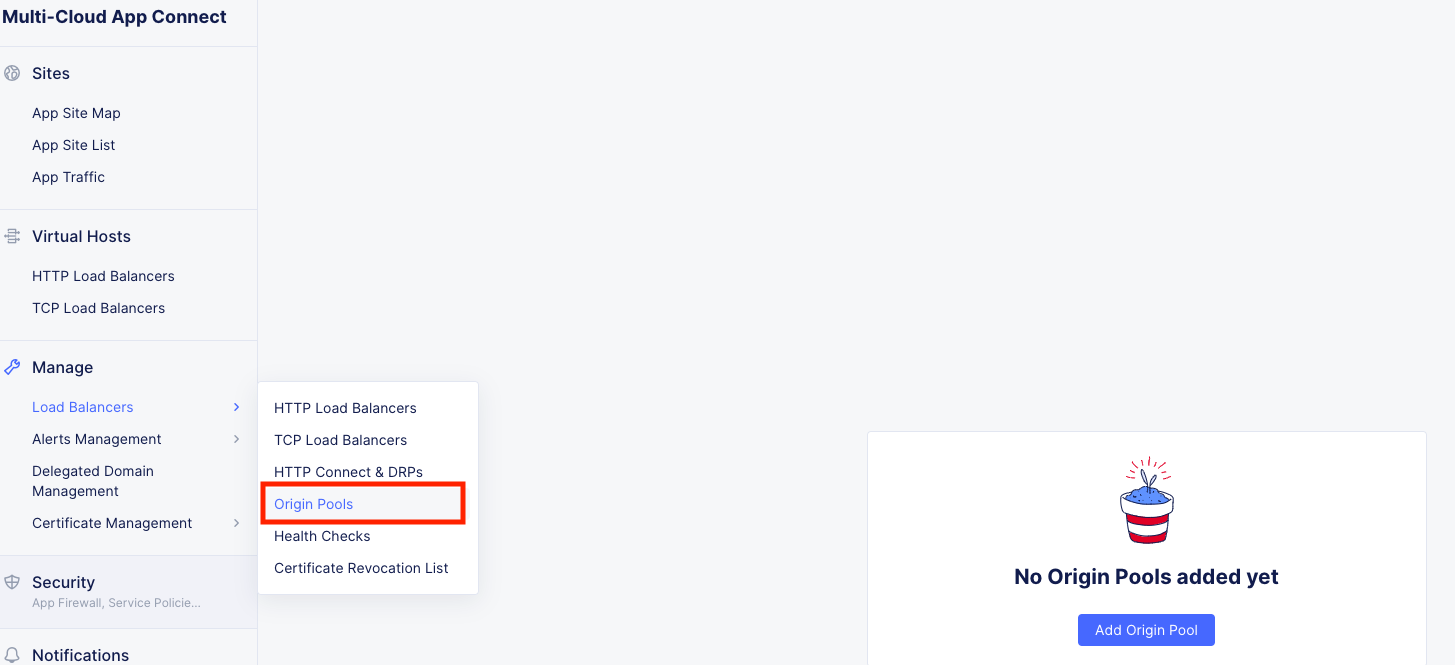
In the Side menu select service Multi-Cloud App Connect, then navigate to Manage click on Load Balancers >> Origin Pools and click the Add Origin Pool button.
AWS Origin Pool
Enter the following Values:
Variable |
Value |
|---|---|
Name |
animal-name-aws-pool |
Origin Server Port |
80 |
Origin Servers |
See Below |
Health Checks |
See Below |
Origin Servers: Click Add Item
In the dropdown keep: Public DNS Name of Origin Server and type: public.lab.f5demos.com and click Apply.
Health Checks: Under “Health Check object” click the Select Item dropdown and click Add Item.
For the Name use: [animal-name]-http and take the rest as defaults.
Click Continue
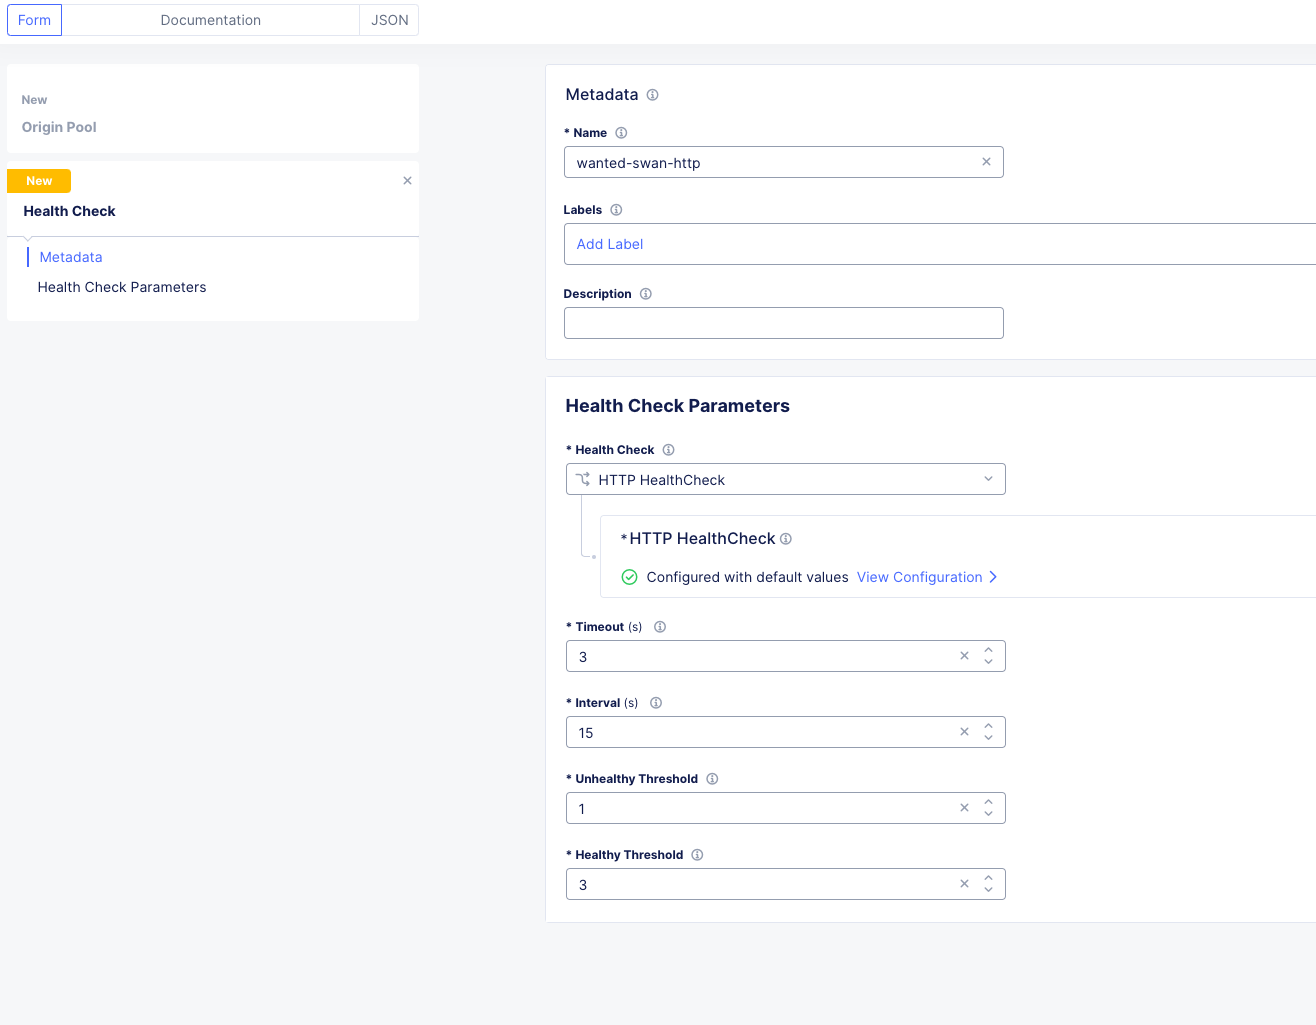
Your Origin Pool should now look like this:
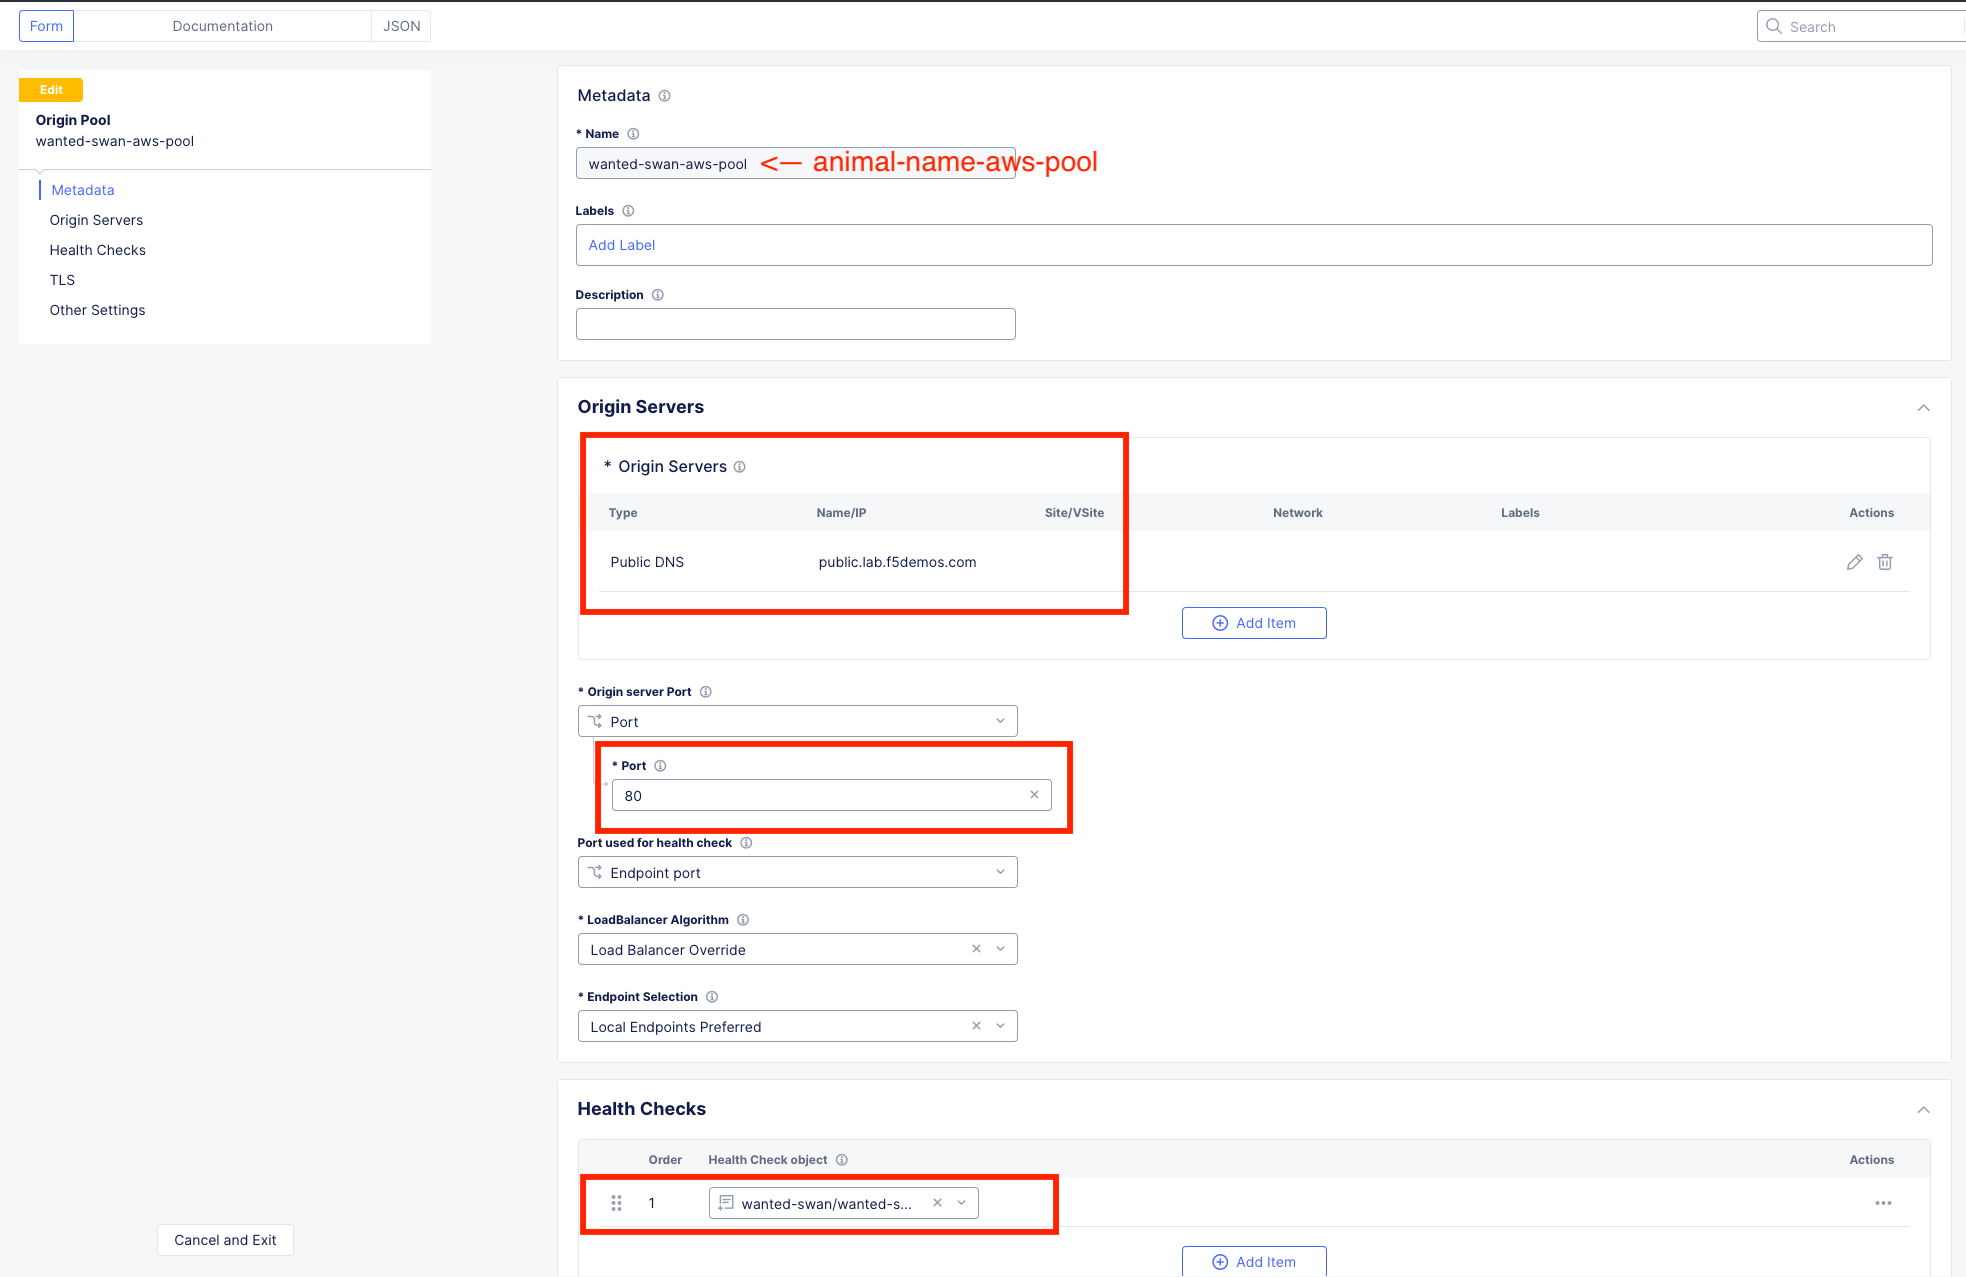
Leave everything else as default and click Save and Exit.
Azure Origin Pool
Click the Add Origin Pool button at the top the screen.
Variable |
Value |
|---|---|
Name |
animal-name-azure-pool |
Origin Server Port |
80 |
Origin Servers |
See Below |
Health Checks |
[animal-name]-http |
Origin Servers: Hit the dropdown for Select Type of Origin Server and choose IP Address of Origin Server on given Sites.
Variable |
Value |
|---|---|
IP |
10.0.3.253 (Note: this is not a typo. The CSP workloads have IP overlap) |
Site or Virtual Site |
Site |
Site: |
system/student-azurenet |
Select Network on the site |
Inside Network |
Click Apply.
Health Checks: Under “Health Check object” click the Select Item dropdown and choose the object that you created previously for the AWS origin pool. The name of the health check should be [animal-name]/[animal-name]-http.
Your config should look like this:
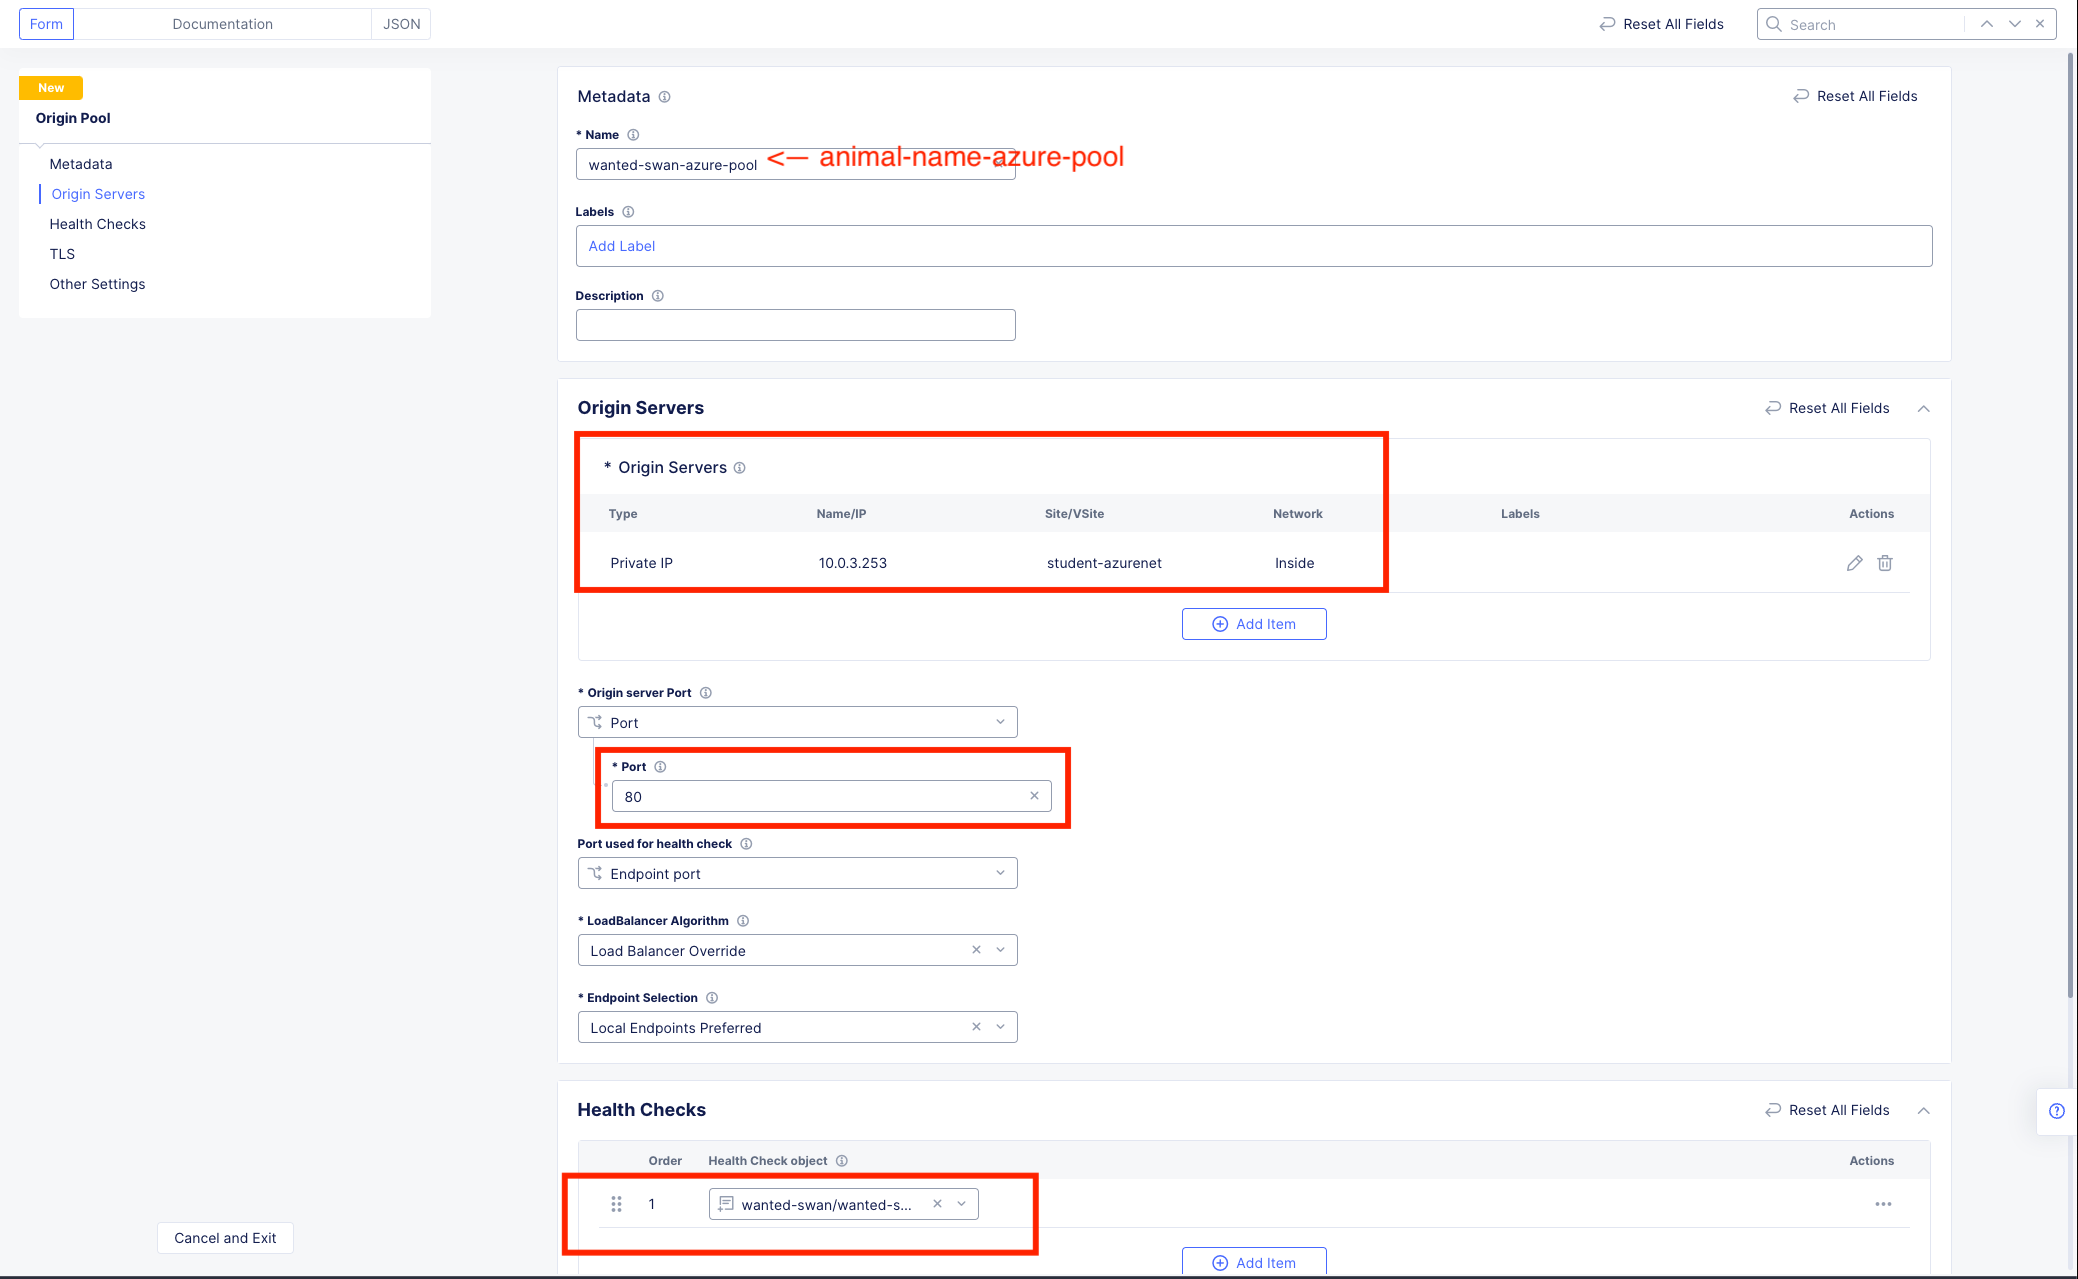
Leave everything else as default and click Save and Exit.
Now that we have defined both of our Origin Server pools which are a public DNS Name in AWS and a private IP in Azure, we will set up the App Connect Proxy to provide a Global Frontend to load balance them.
Global Frontend
In the Side menu under Manage click on Load Balancers >> HTTP Load Balancers and click the Add HTTP Load Balancer button.
Variable |
Value |
|---|---|
Name |
animal-name-acme-frontend |
Domains and LB Type |
animal-name-acme-frontend.lab-mcn.f5demos.com |
Load Balancer Type |
HTTP |
Automatically Manage DNS Records |
check |
HTTP Port |
80 |
Origin Pools |
See Below |
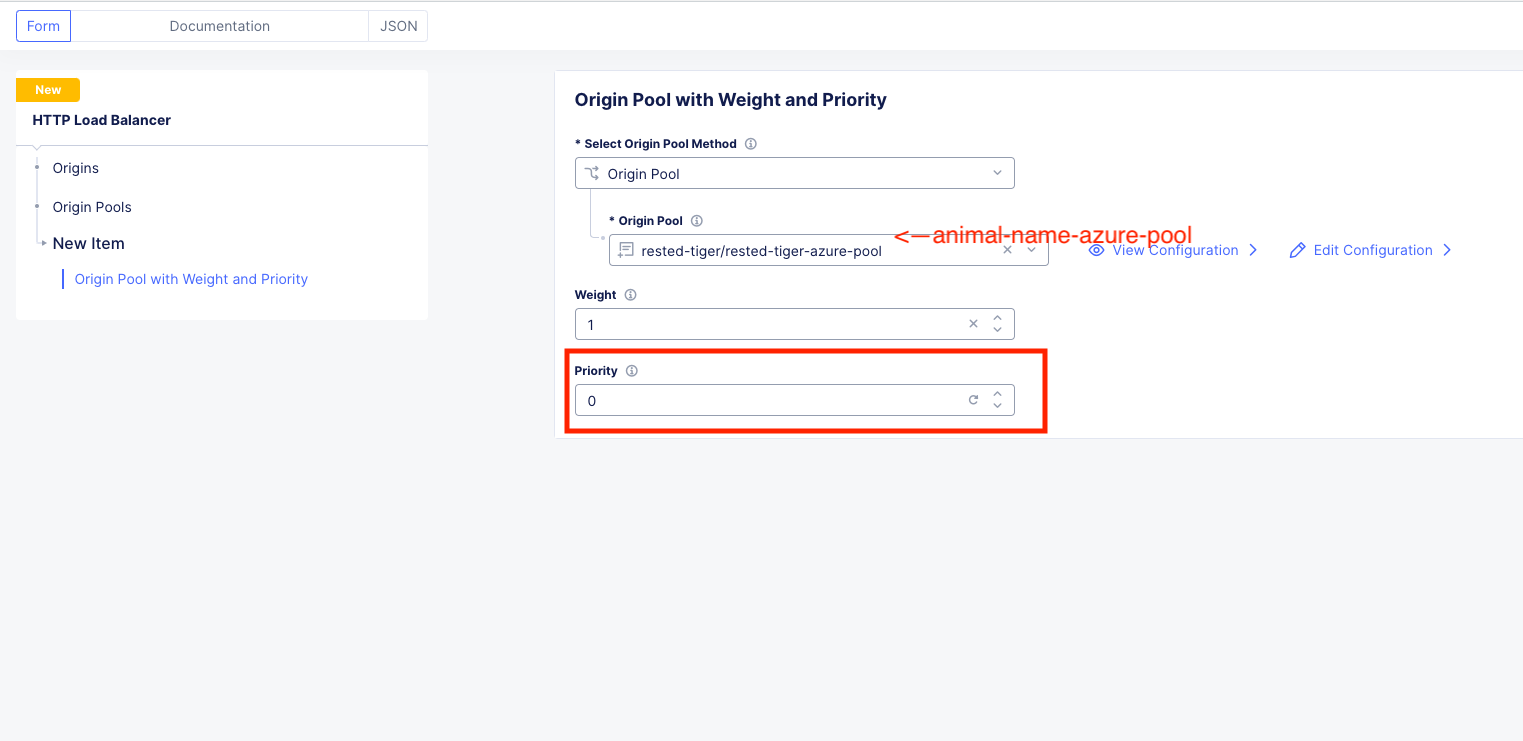
Origin Pools
Click Add Item and under “Origin Pool” select the AWS pool with your animal name. Leave everything else as default and click Apply.
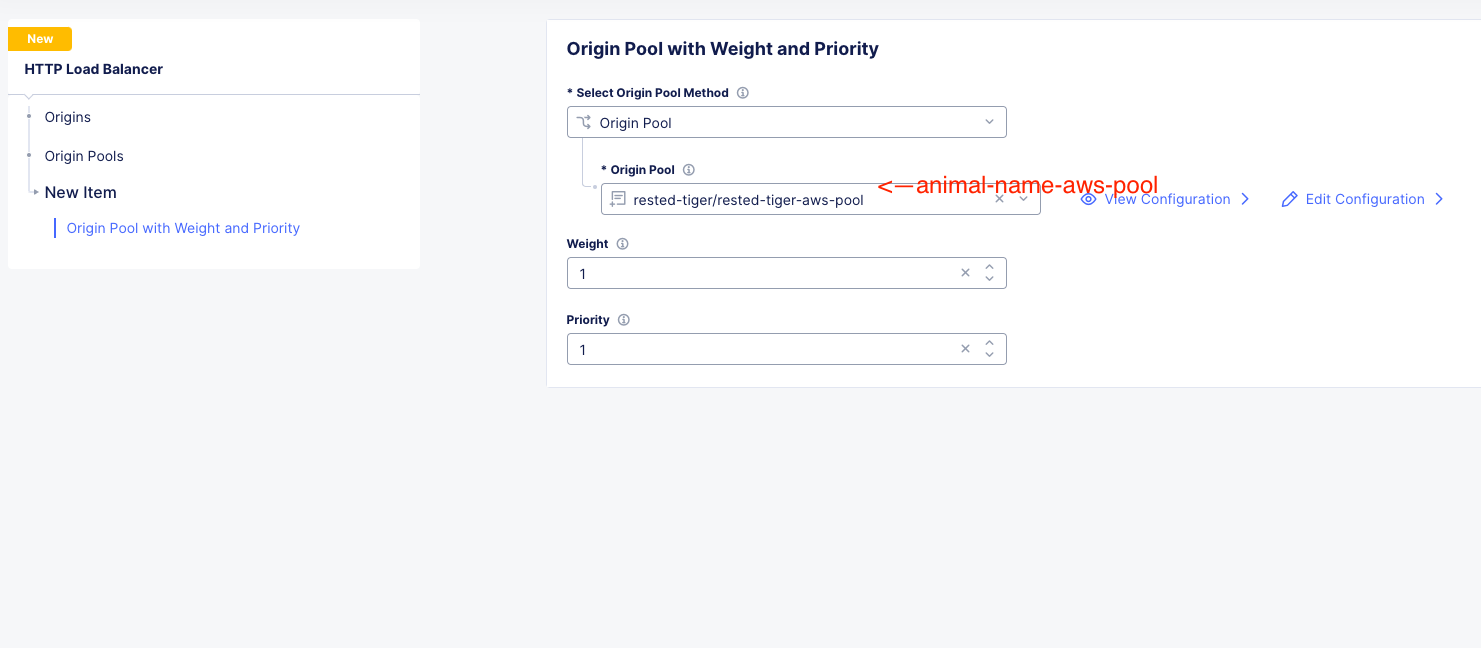
Click Add Item again and under “Origin Pool” select the Azure pool with your animal name. This time, change the priority to 0 and click Apply.
Note
A zero value priority makes that pool the lowest priority. A value of 1 is the highest priority. AWS was set to 1 by default.
Click Apply and you should now be back to the HTTP Load Balancer configuration screen which should look like this.
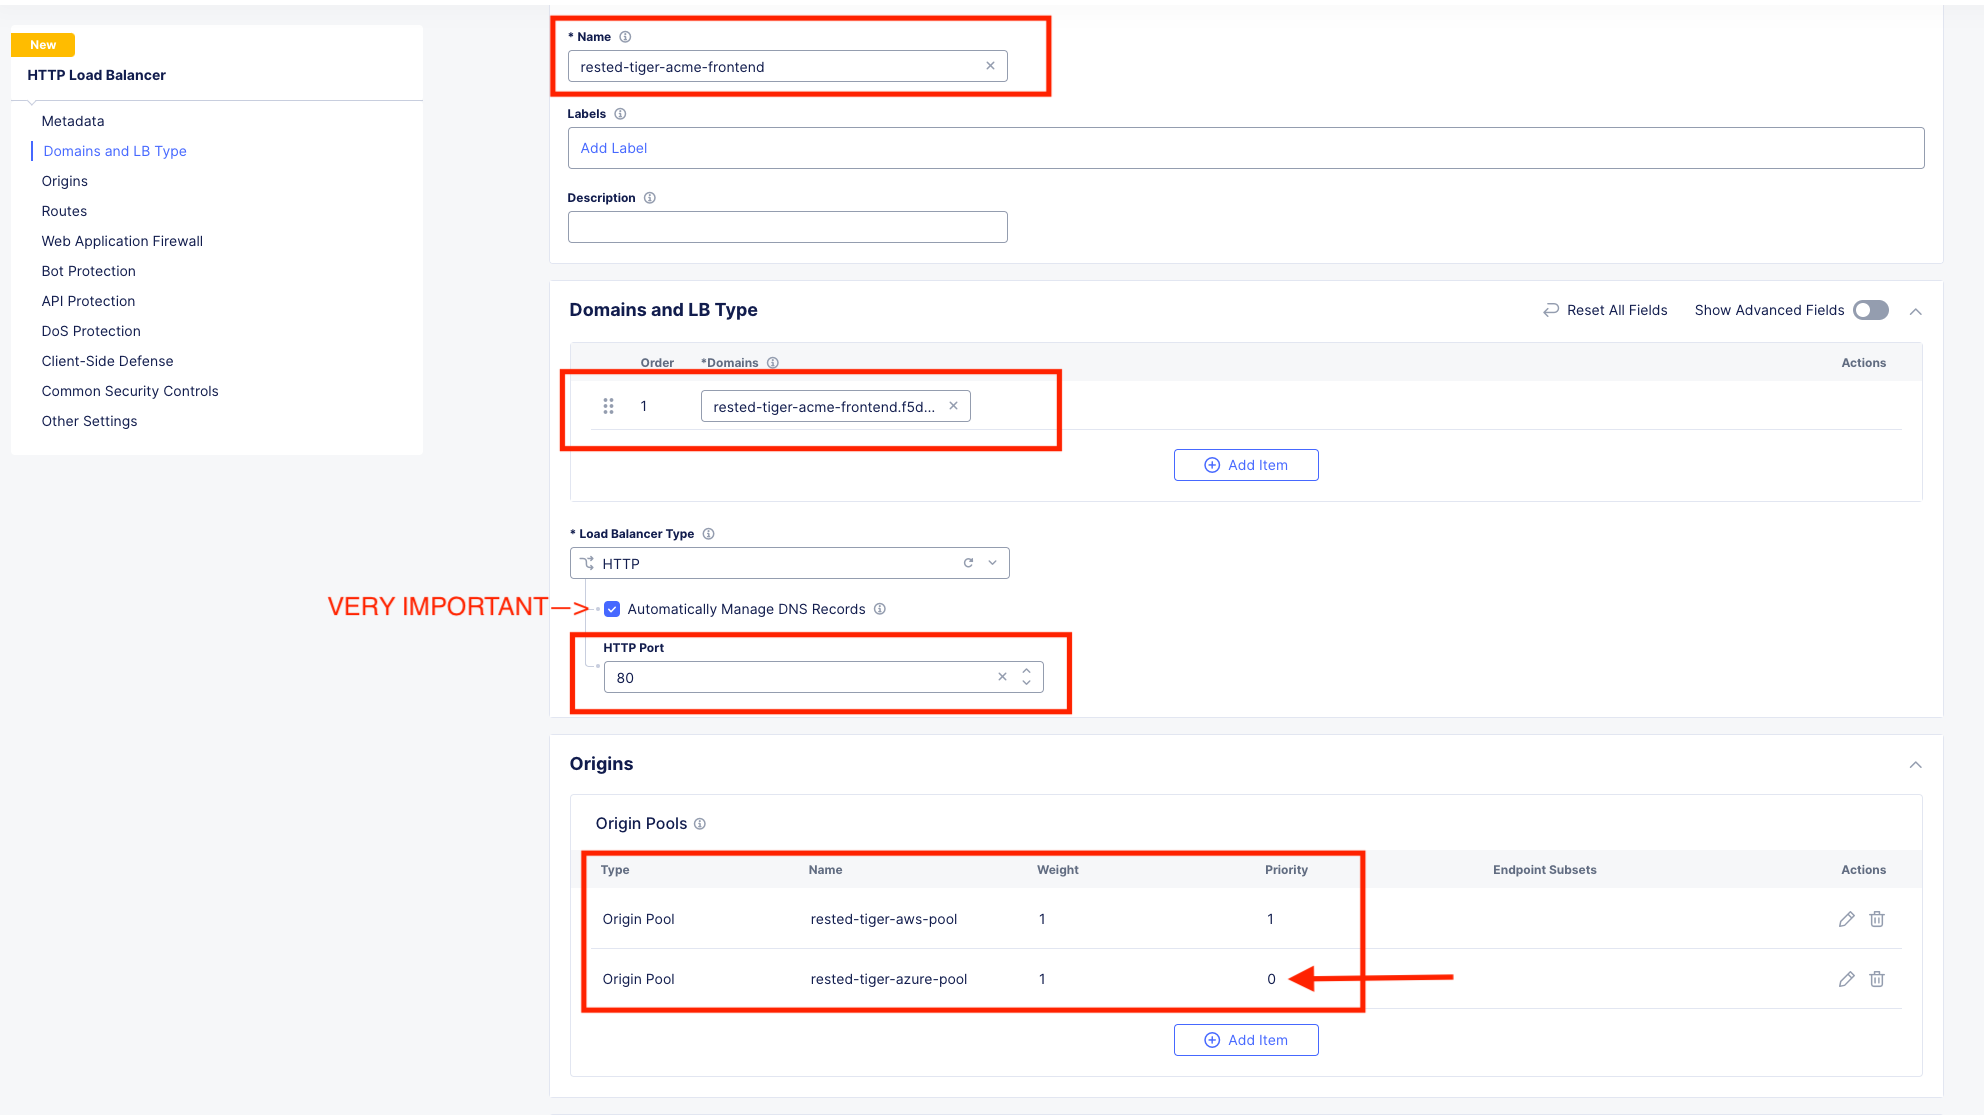
Leave everything else as default and scroll down to the bottom to click Save and Exit.
You should now see your Globally Available frontend in the HTTP Load Balancers screen.

Testing
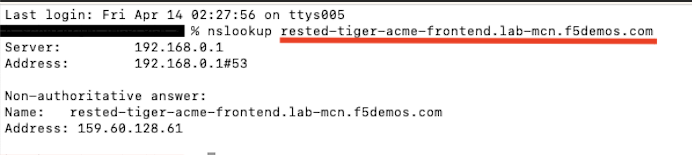
Go ahead and open up a Command Prompt or Terminal on your personal machine and type the following command:
nslookup [animal-name]-acme-frontend.lab-mcn.f5demos.com and note the IP address that is returned.
In my example, I am using a terminal on MAC and my animal-name was rested-tiger.
Note
This may take a few moments to become resolvable depending on your local DNS configuration.
Now open up a new tab in your browser and try http://[animal-name]-acme-frontend.lab-mcn.f5demos.com
If you reached this page, you set it up right! Nice work.
Hit [Shift + Refresh] a few times in your browser and make sure you are staying on the same site. You should NOT be seeing a blue page at any point.
In XC Console, navigate to Manage >> Load Balancers >> Origin Pools, click on the 3 Button Actions Menu and choose Manage Configuration for your [animal-name]-aws-pool.
Click Edit Configuration in the upper right and then scroll to the bottom of the AWS origin Servers configuration screen.
Under TLS, hit the dropdown and choose Enable and click Save and Exit.
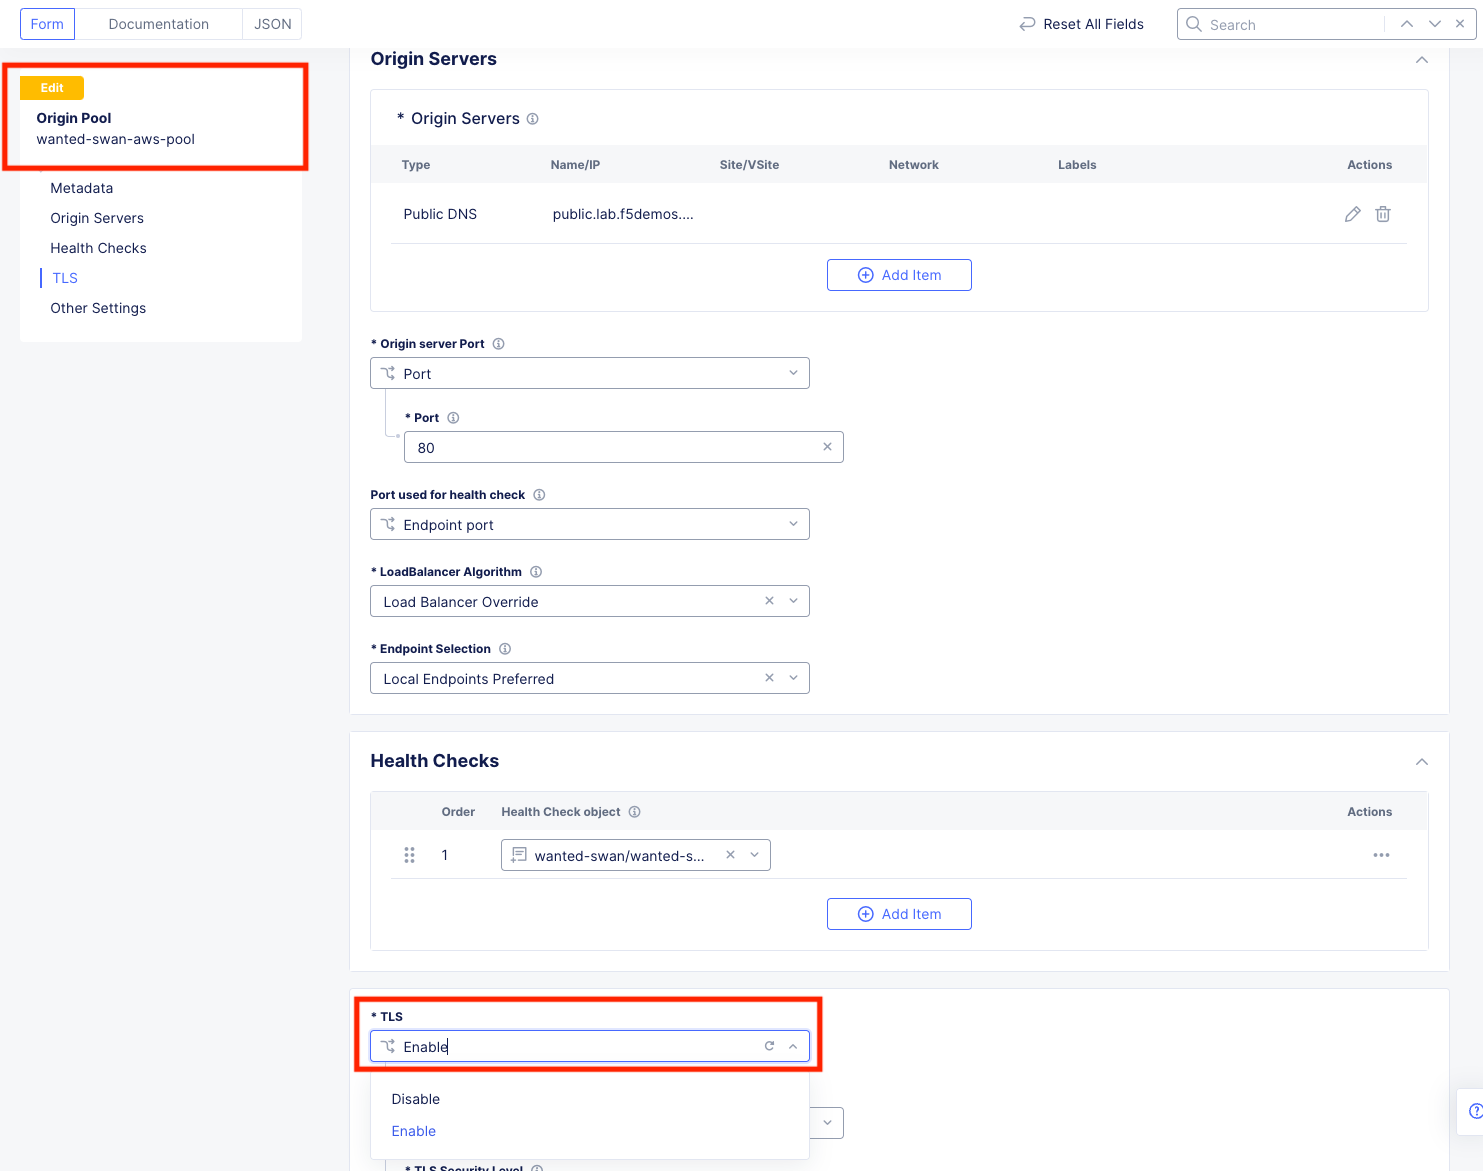
Important
What you are doing here, is enabling TLS on the backend connection to the Origin Server of the AWS pool. This WILL FAIL, as the Server is not expecting TLS which will effectively cause the monitors to fail. This will take down the AWS pool and allow us to test the Azure failover as if the AWS workload itself was failing.
Check it out….
Go back to your browser tab that you had open to http://[animal-name]-frontend.lab-mcn.f5demos.com and hit [Shift + Refresh].
Go back to XC Console and edit the AWS pool again to disable TLS and bring the AWS site back online.

Click Save and Exit.
Go back to your browser tab that you had open to http://[animal-name]-frontend.lab-mcn.f5demos.com and hit [Shift + Refresh].
Note
If you receive a 503 error, please wait a moment and [Shift + Refresh] your browser.
You should be back to the AWS page now.
Dashboard and Analytics
Now that we’ve sent several requests to our shiny new Globally Available Frontend, we can take a look at the traffic dashboards.
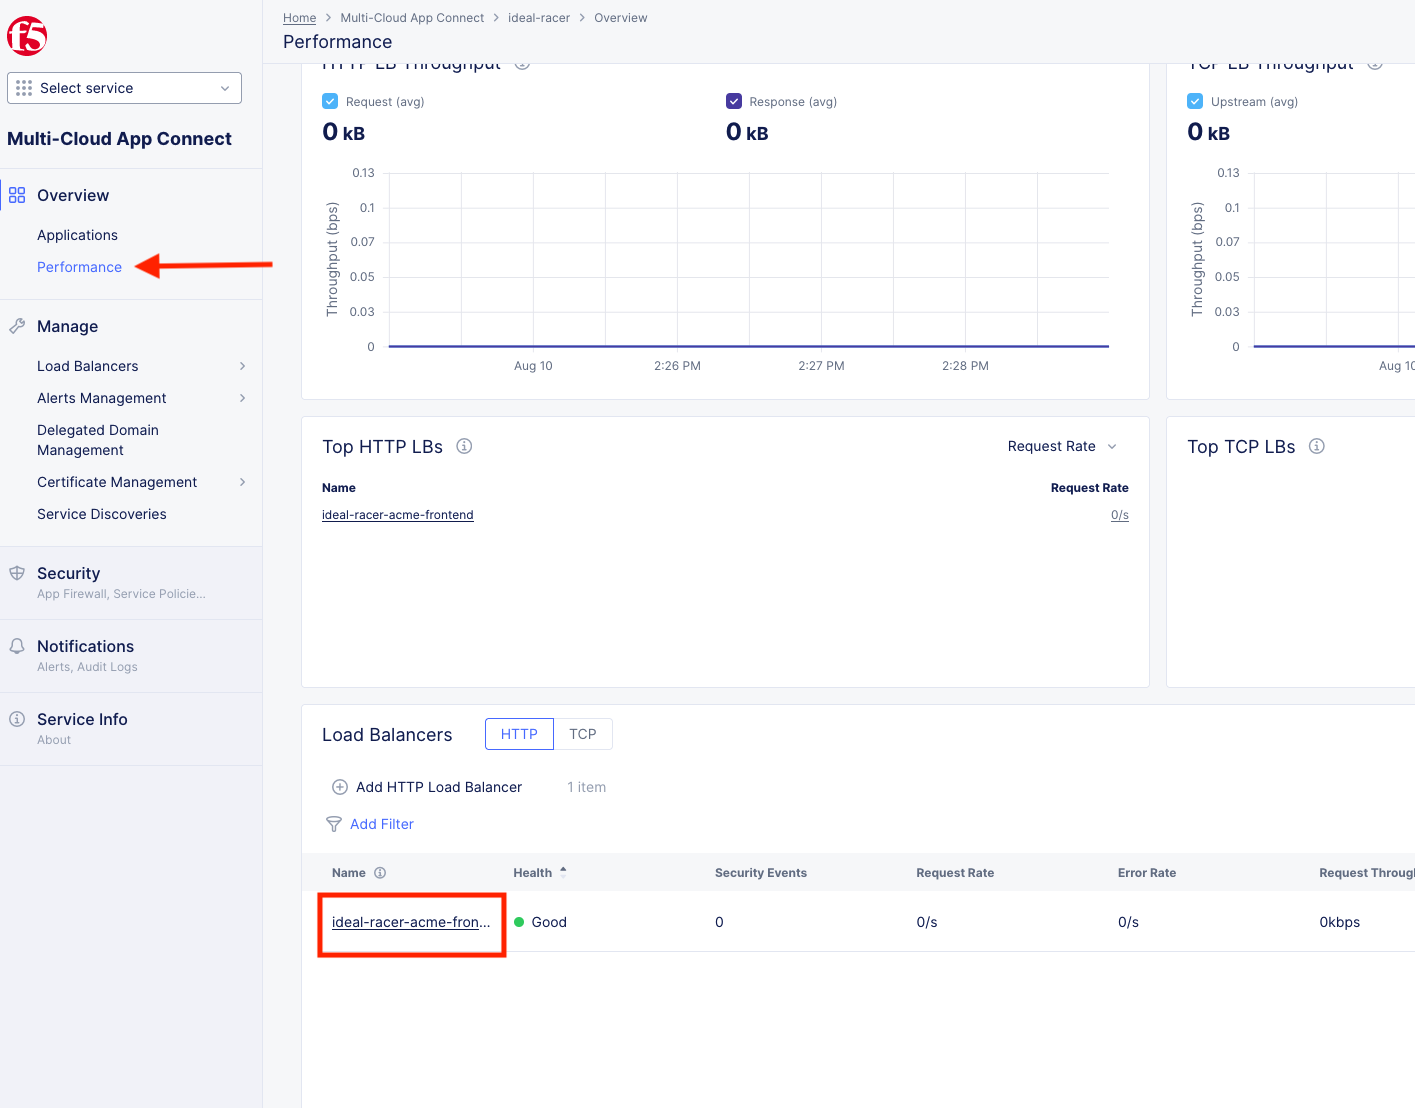
In XC Console >> Multi-Cloud App Connect >> Overview click on Performance.
Scroll all the way to the bottom and under Load Balancers, click directly on your [animal-name-acme-frontend].
This will take you to the Performance Monitoring Dashboard. If you took a break or don’t see any live traffic, try tuning your time-frame.
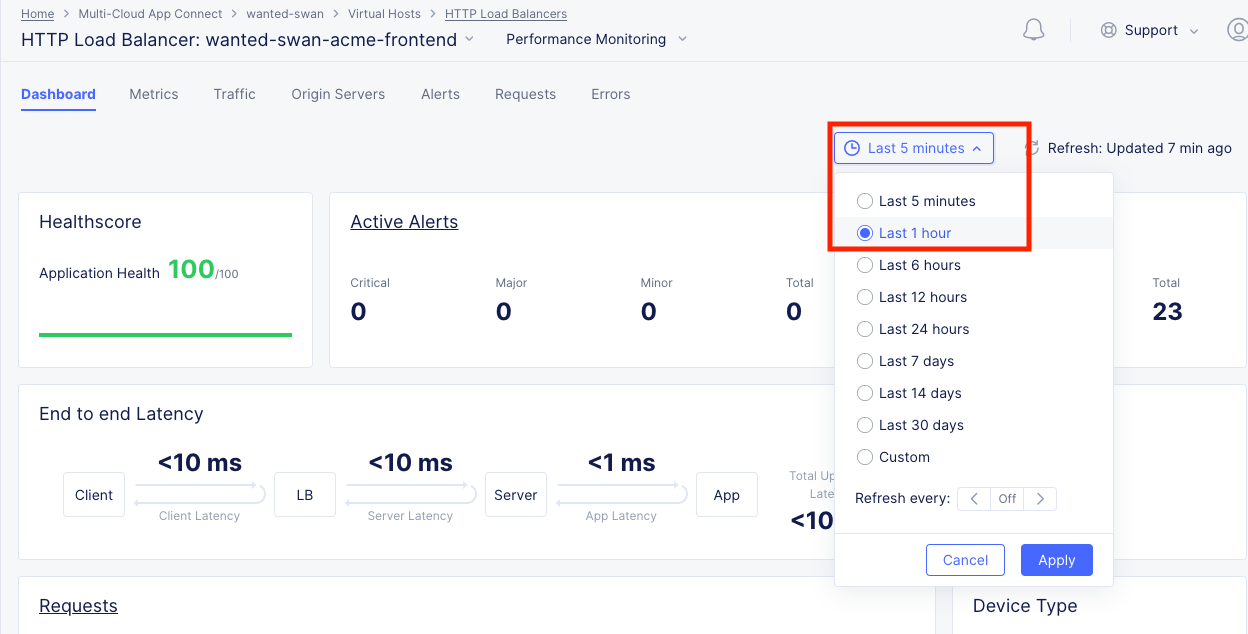
You should see a number of metrics including a Application Health score which may NOT be at 100 due to the AWS site being offline earlier when we tested failover.
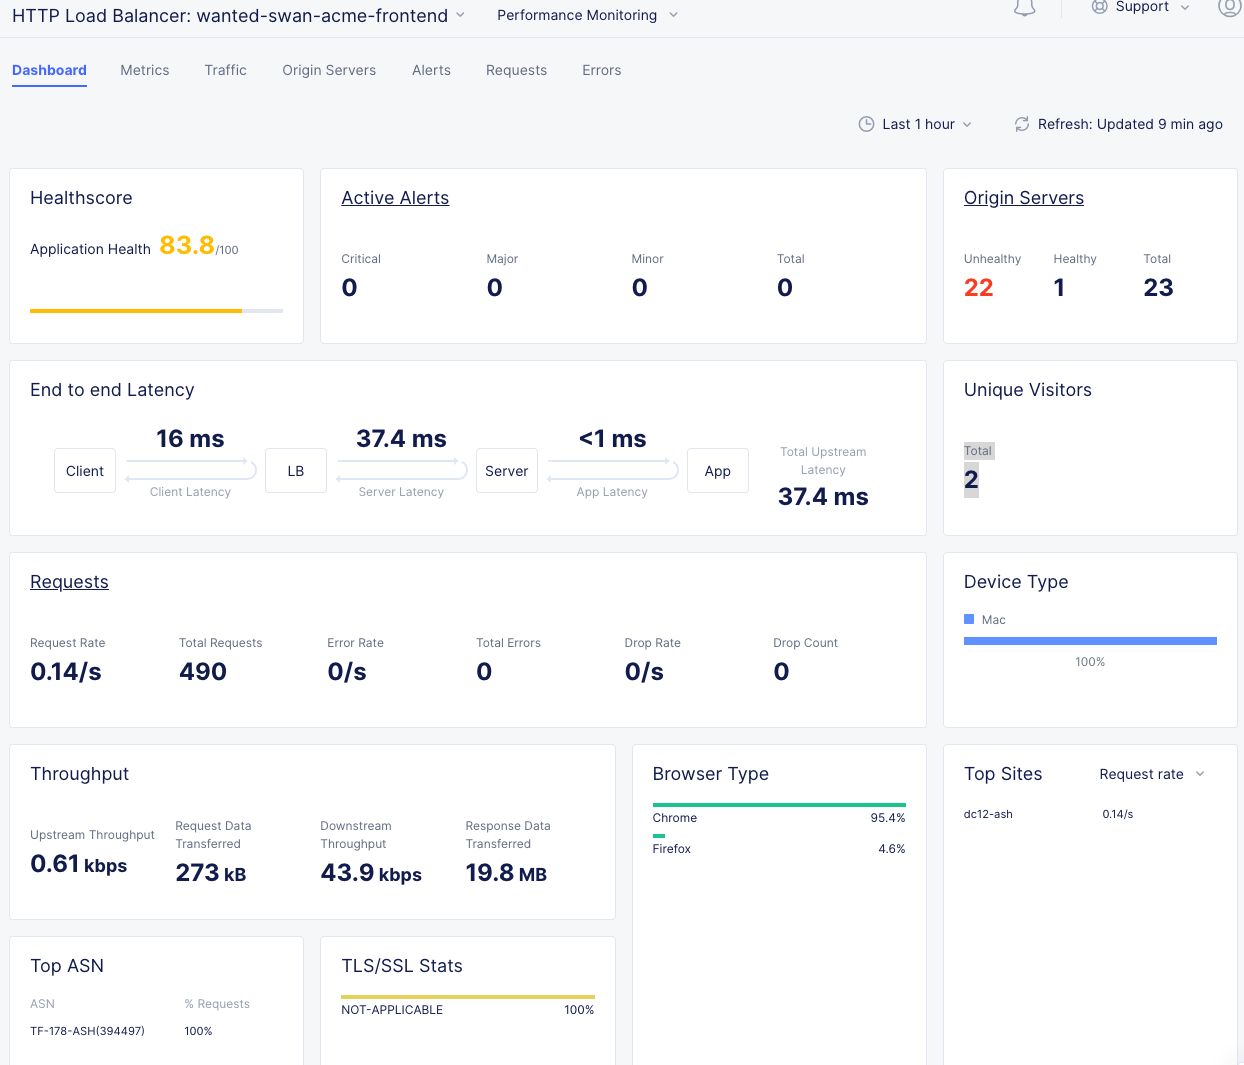
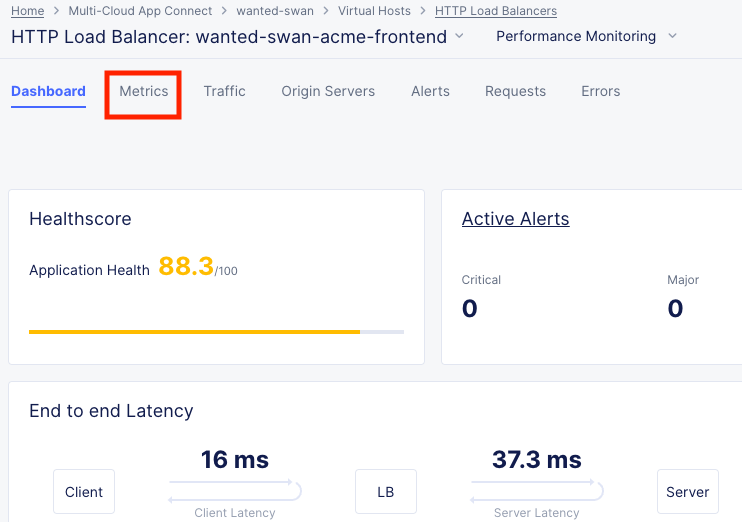
Notice the invaluable End to end Latency analytic. Click on the Metrics tab.
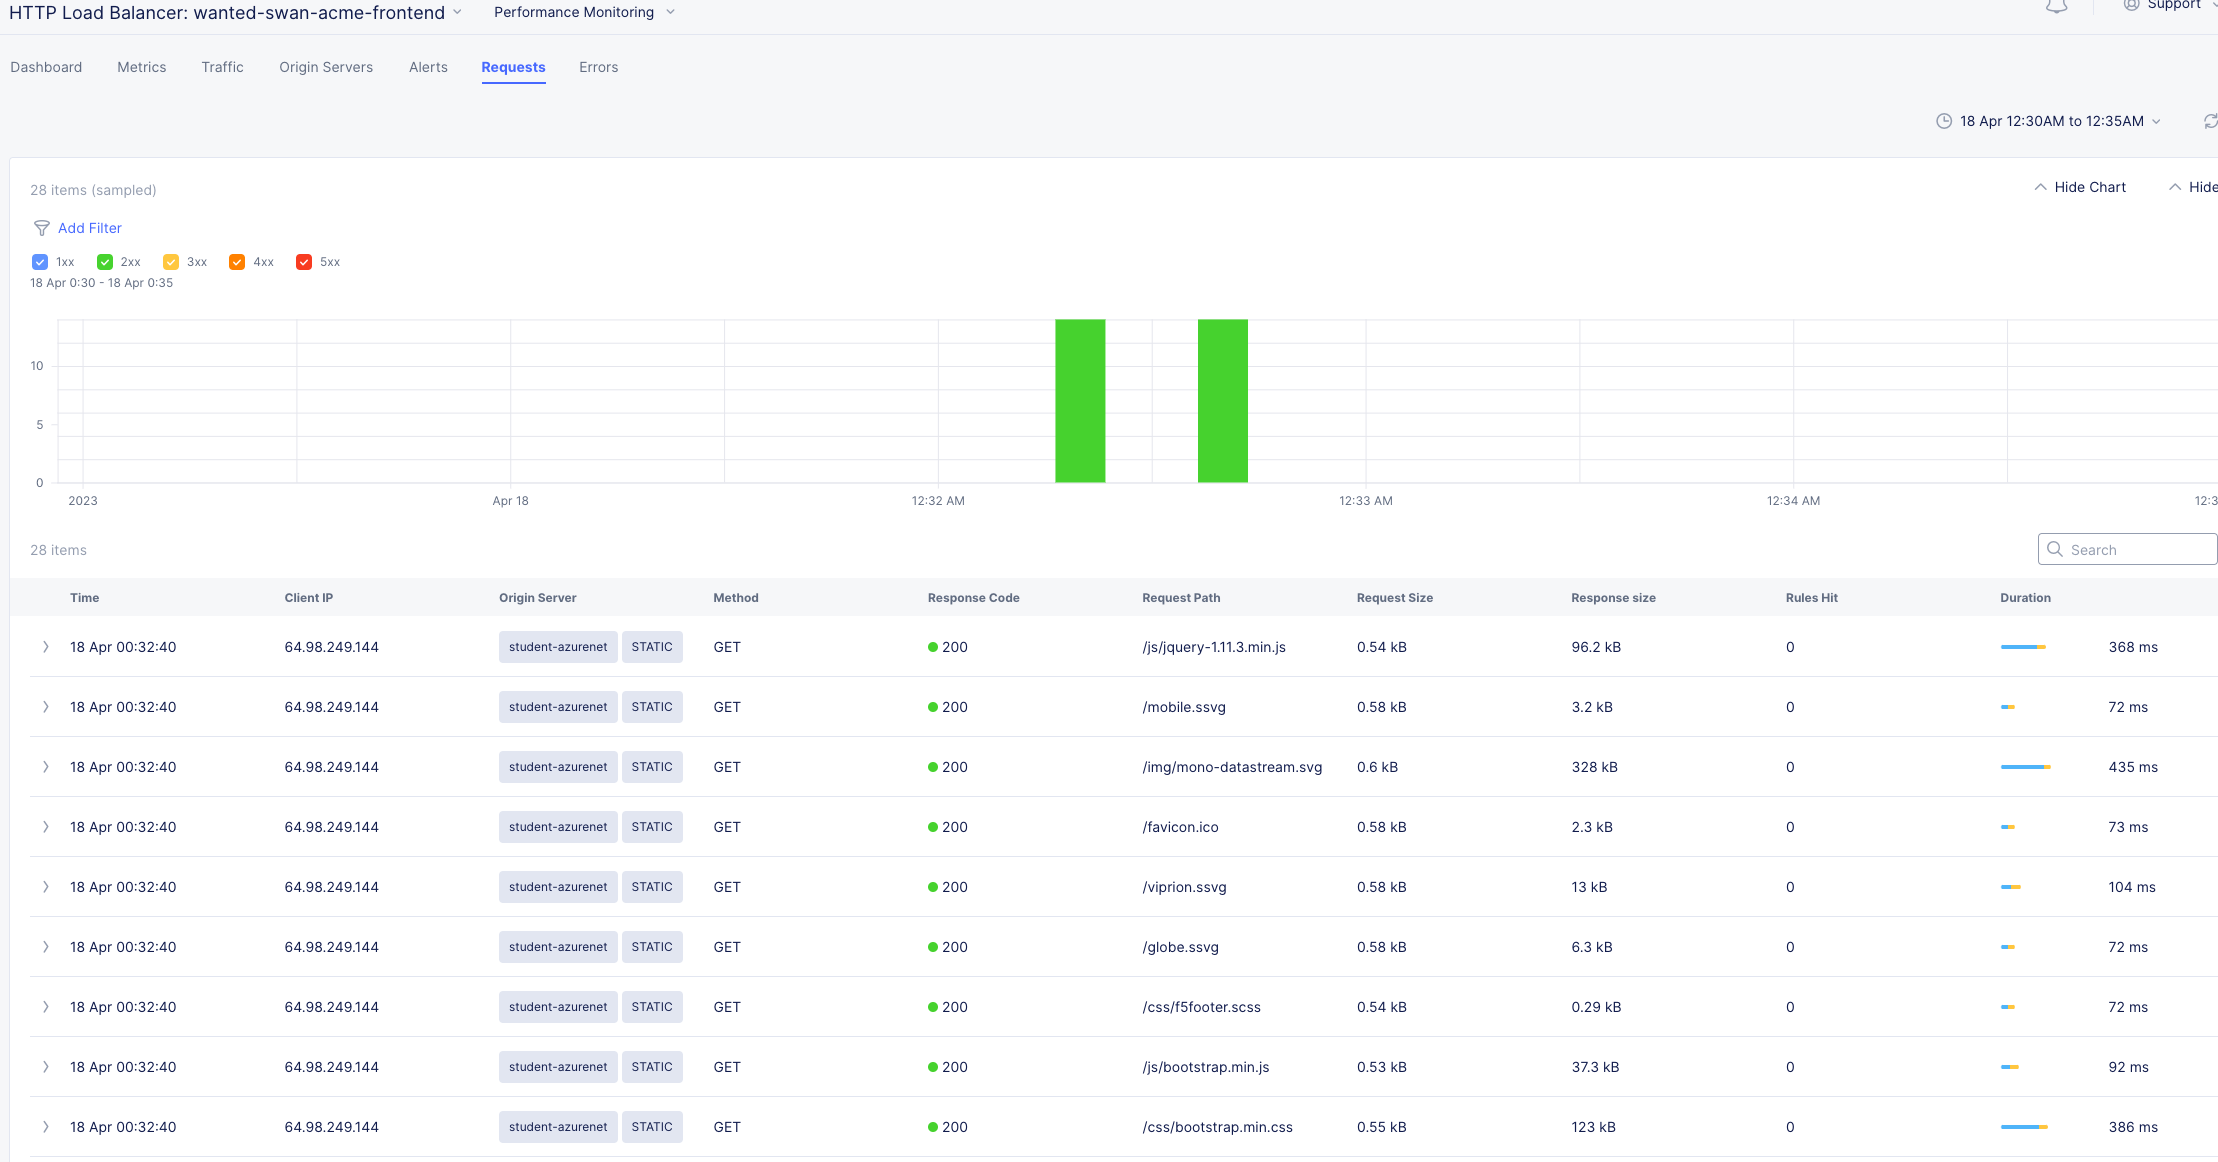
Click on the Health Percent metric over on the right side. Use the time-sliders at the bottom to try and zoom in to the approximate time when the applications health was poor.
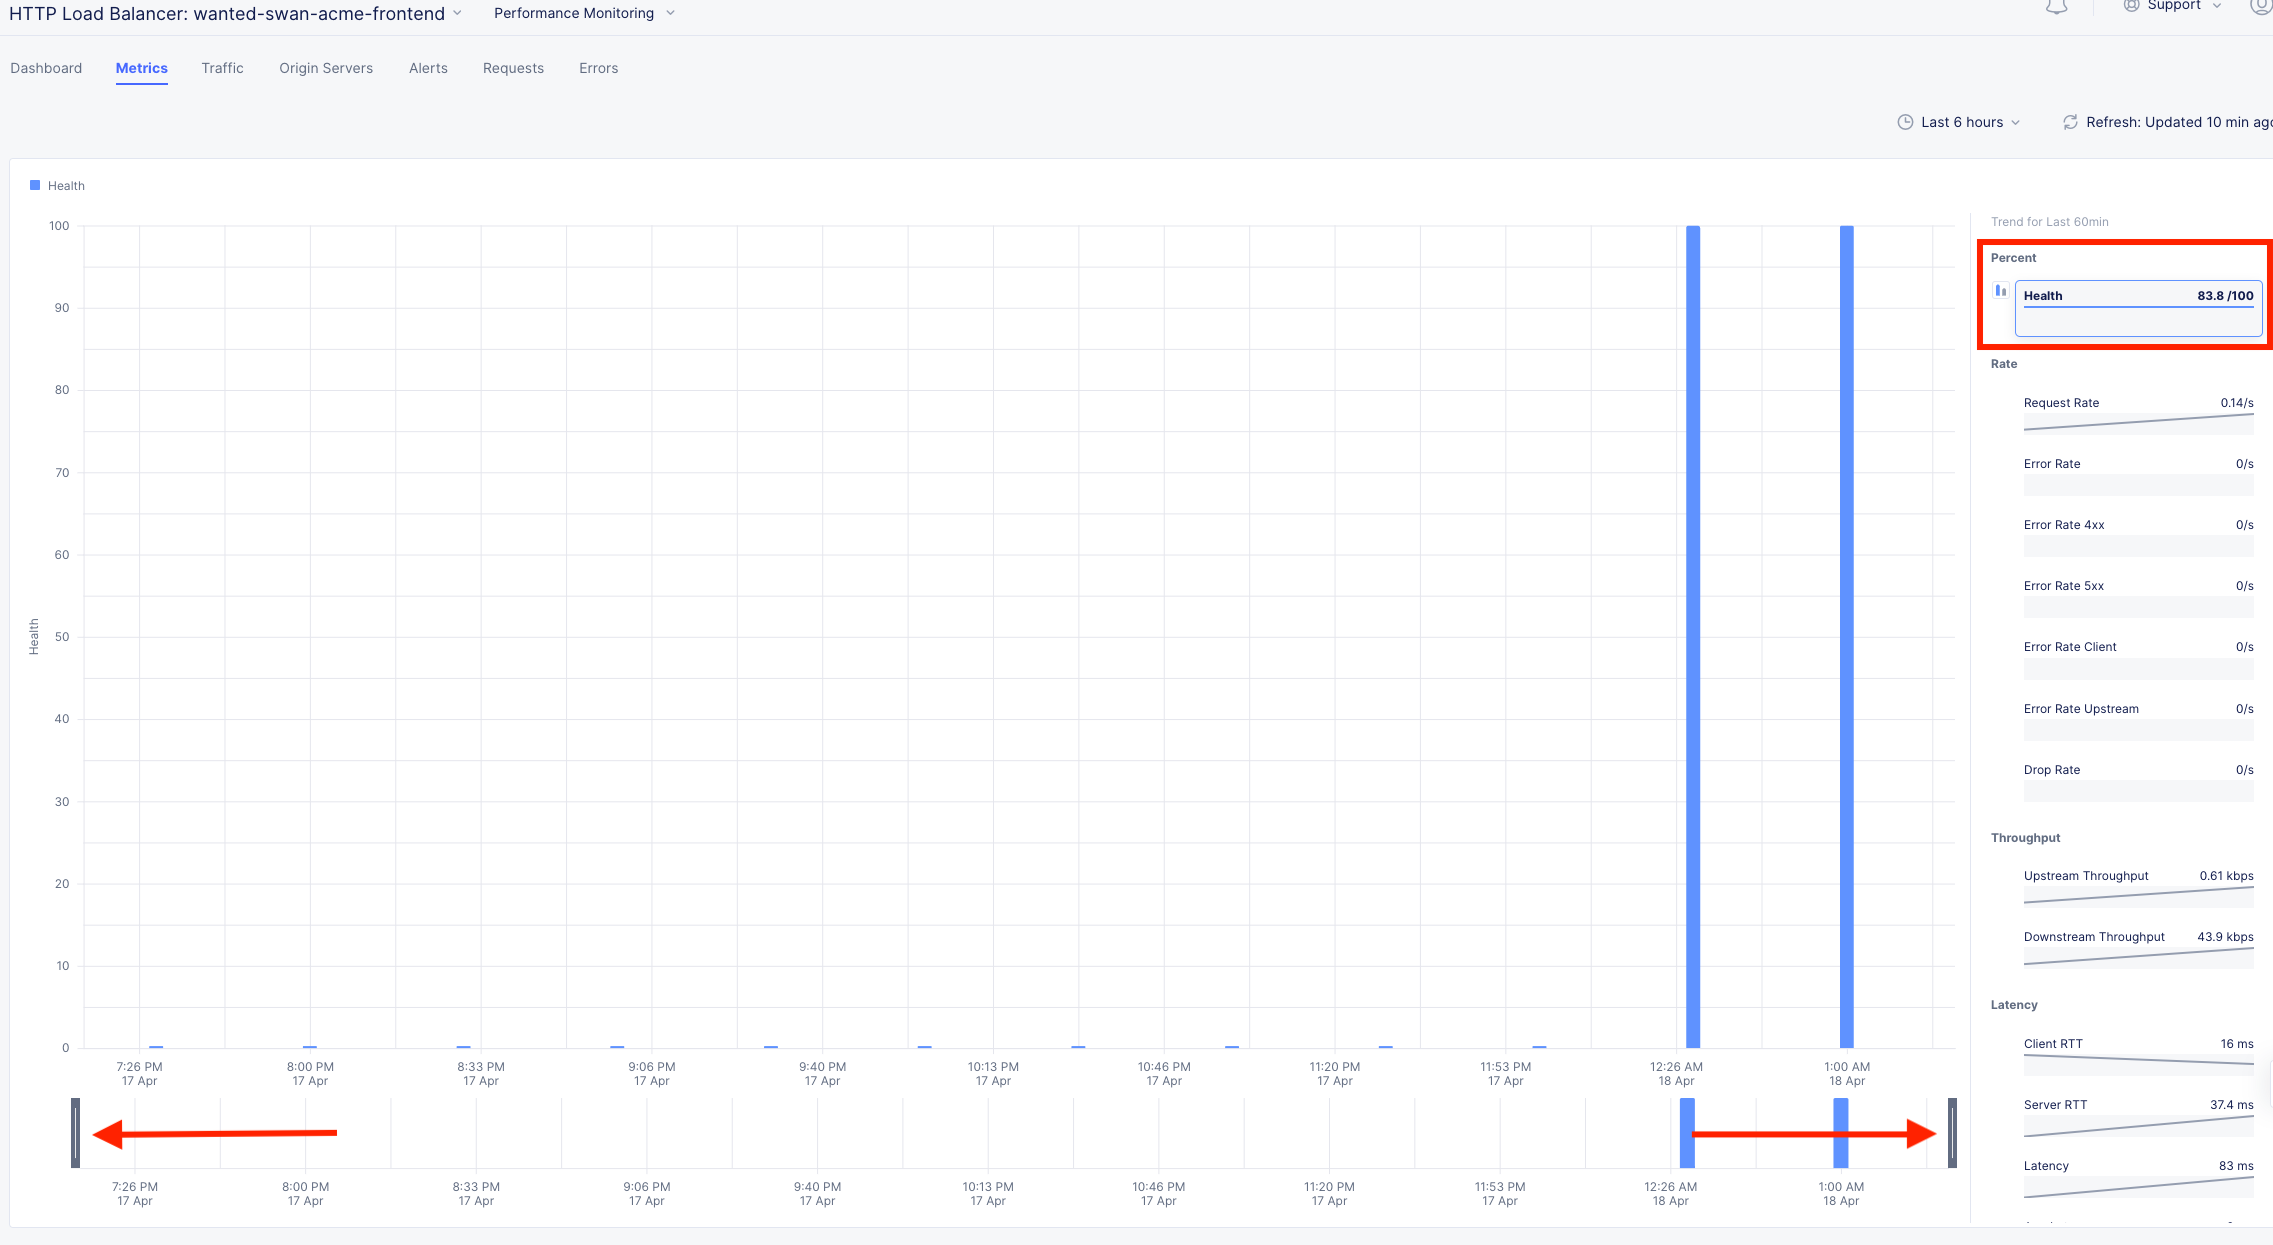
In my example, I am zooming in to approx 12:33AM and can click the color block to get a filtered view of the requests as they were being served at that time.
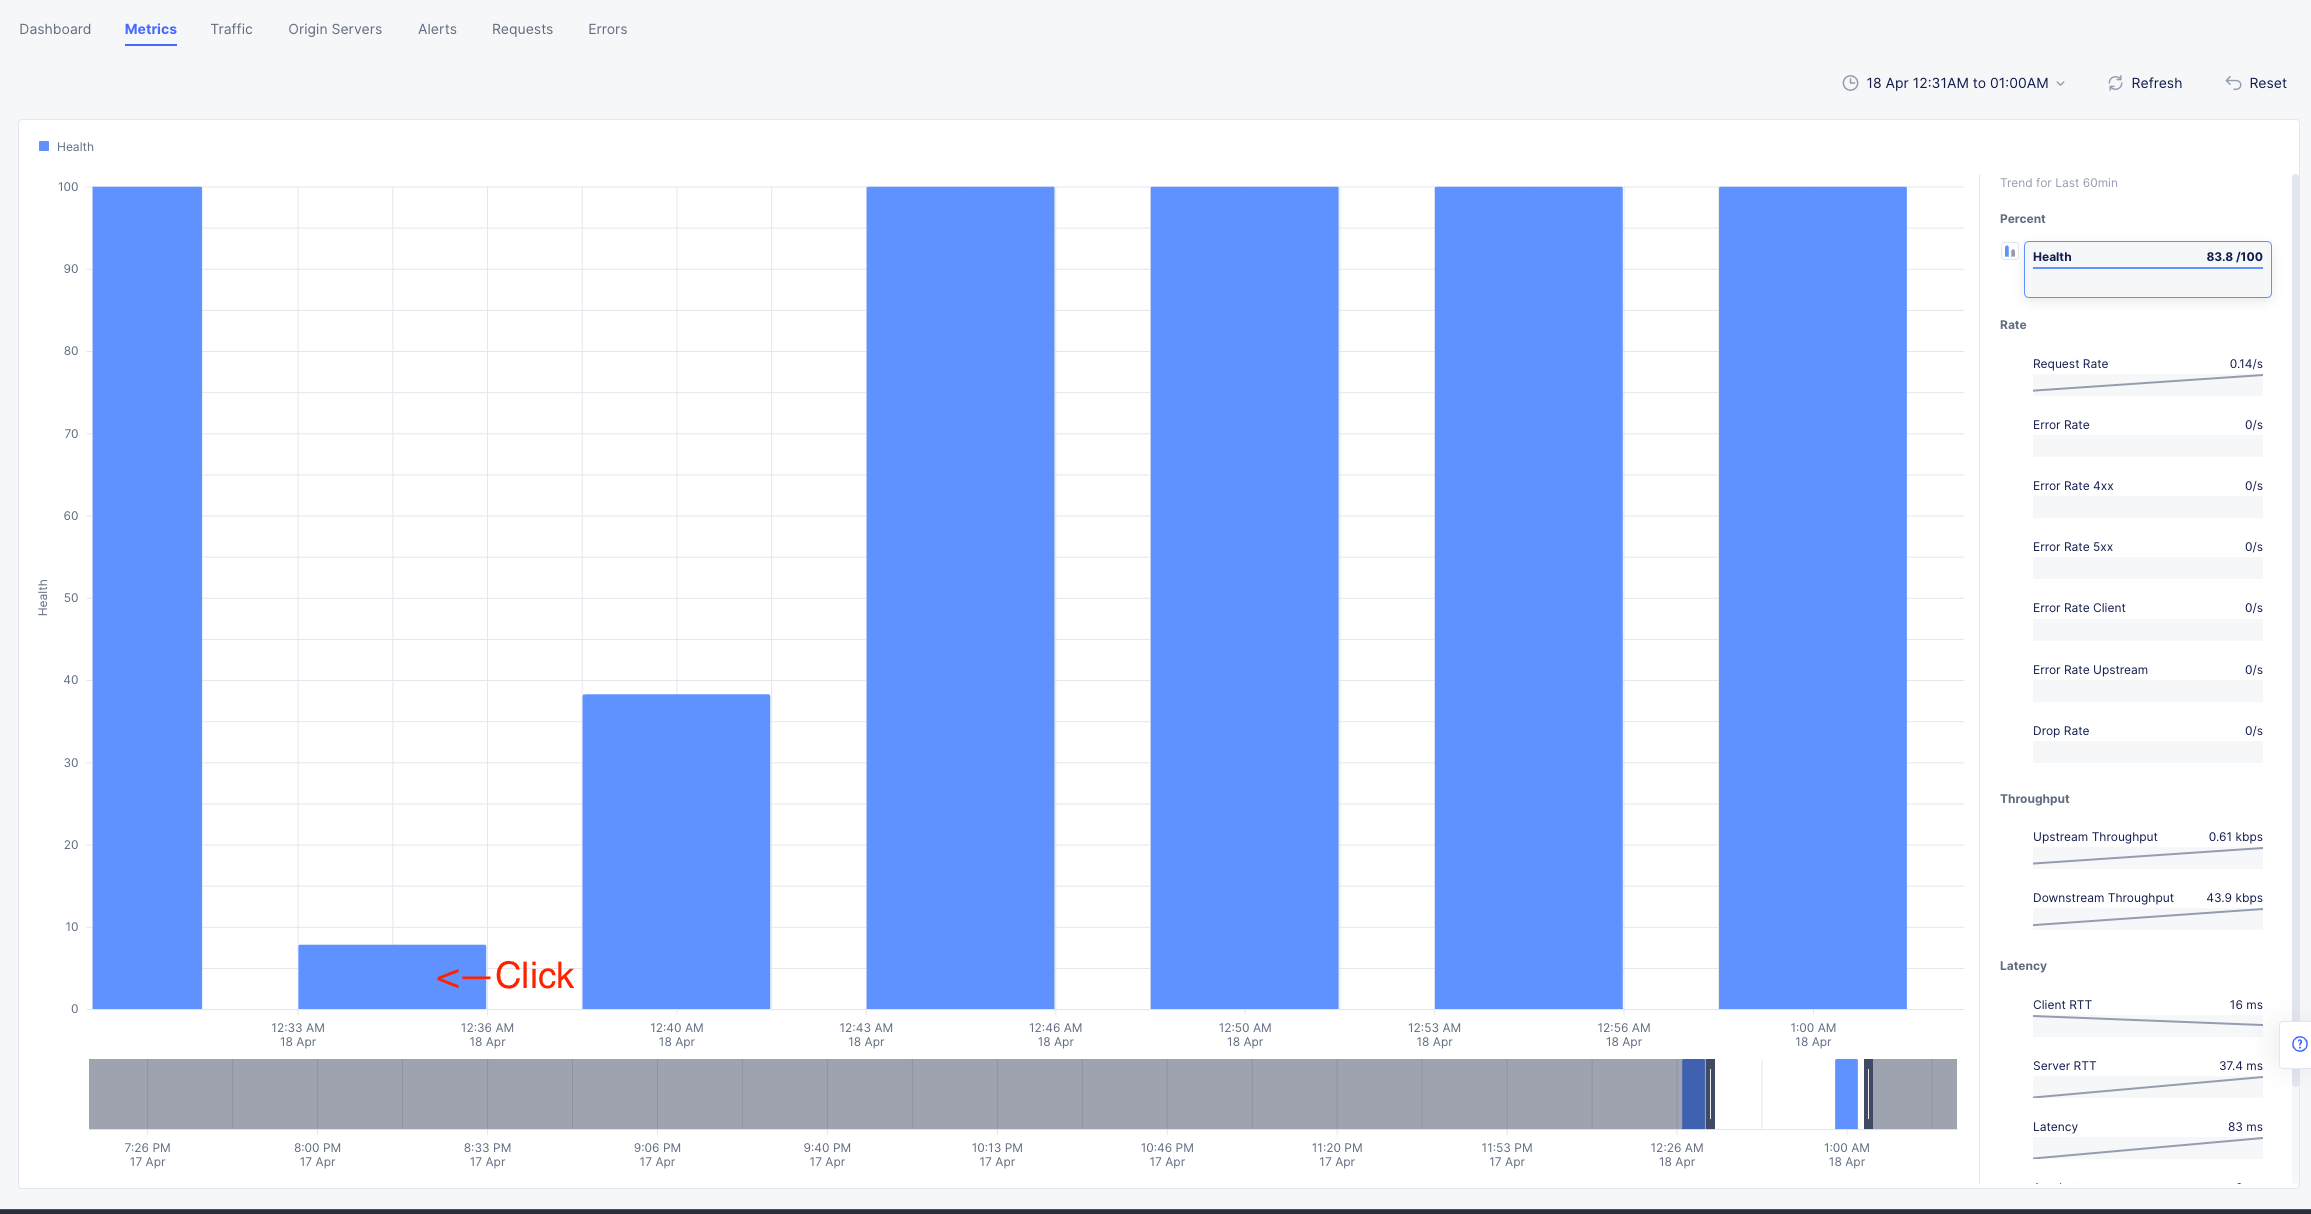
We can confirm that the Standby Azure workload was sure enough serving up requests during that time.
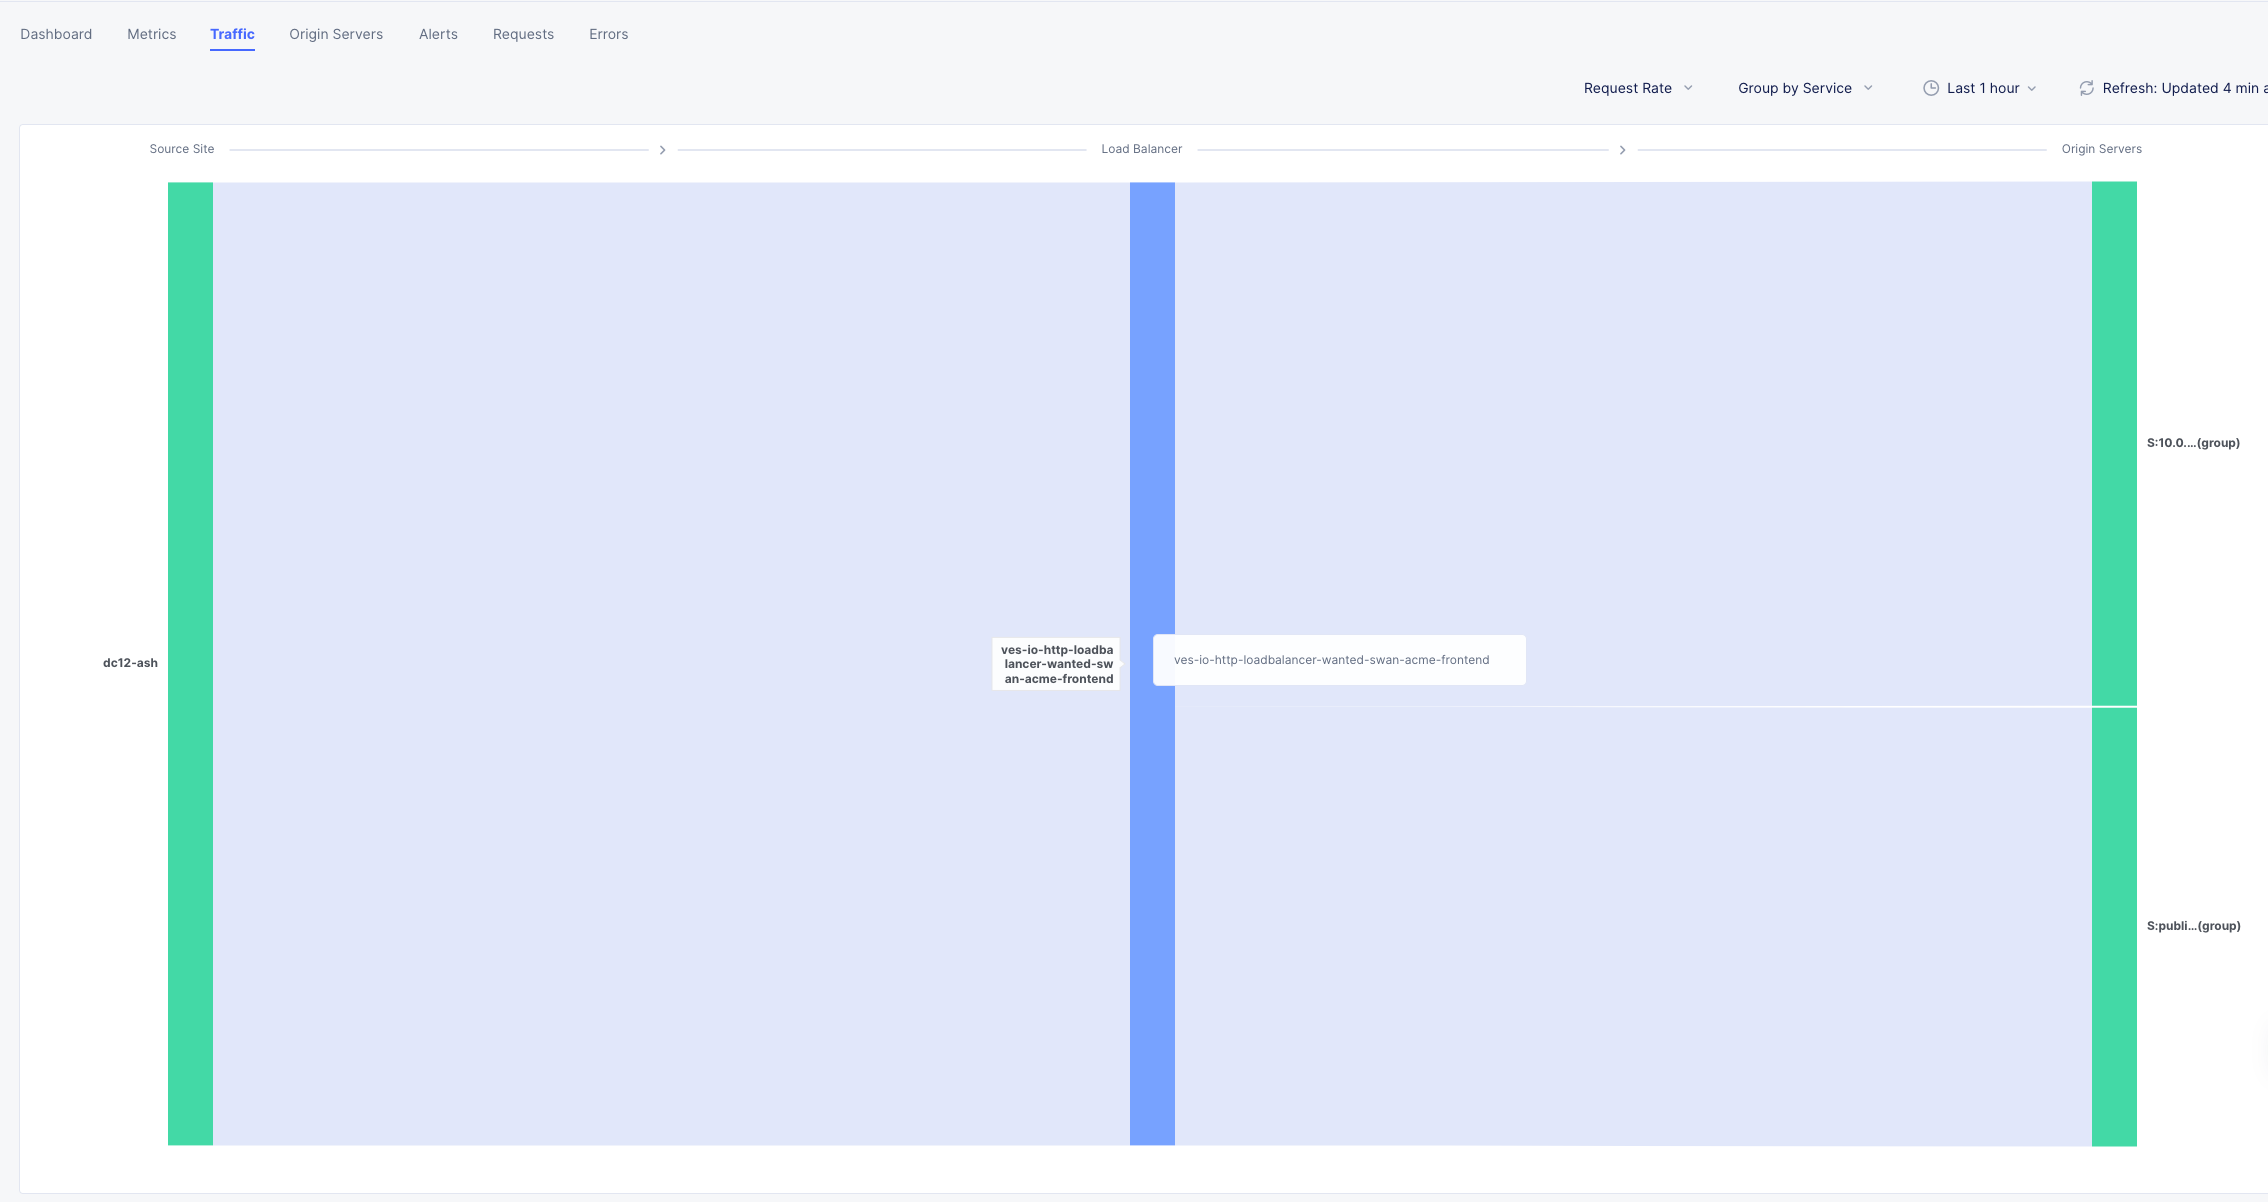
Click the Traffic Tab in the top menu and change your time-frame back to 1 hour.
This graph shows you a visual representation on where your traffic is ingressing our Regional Edges. In my example below, I am local to the DC area, so you can see I consistently hit the DC12 RE in Ashburn Virginia.
You may see different Source Sites depending where you are geographically located. In production you would see several source sites here if your customer traffic is geographically diverse.
You can also see the load balancer name and the Origin Servers to the right. If you hover over them you will get a Request Rate metric.
Click the Origin Servers Tab in the top menu and change your time-frame to 1 hour. At the bottom left, change your setting to 50 items per page.
Q: Why do you think there are so many Origin Servers showing for the AWS EC2 workload DNS name?
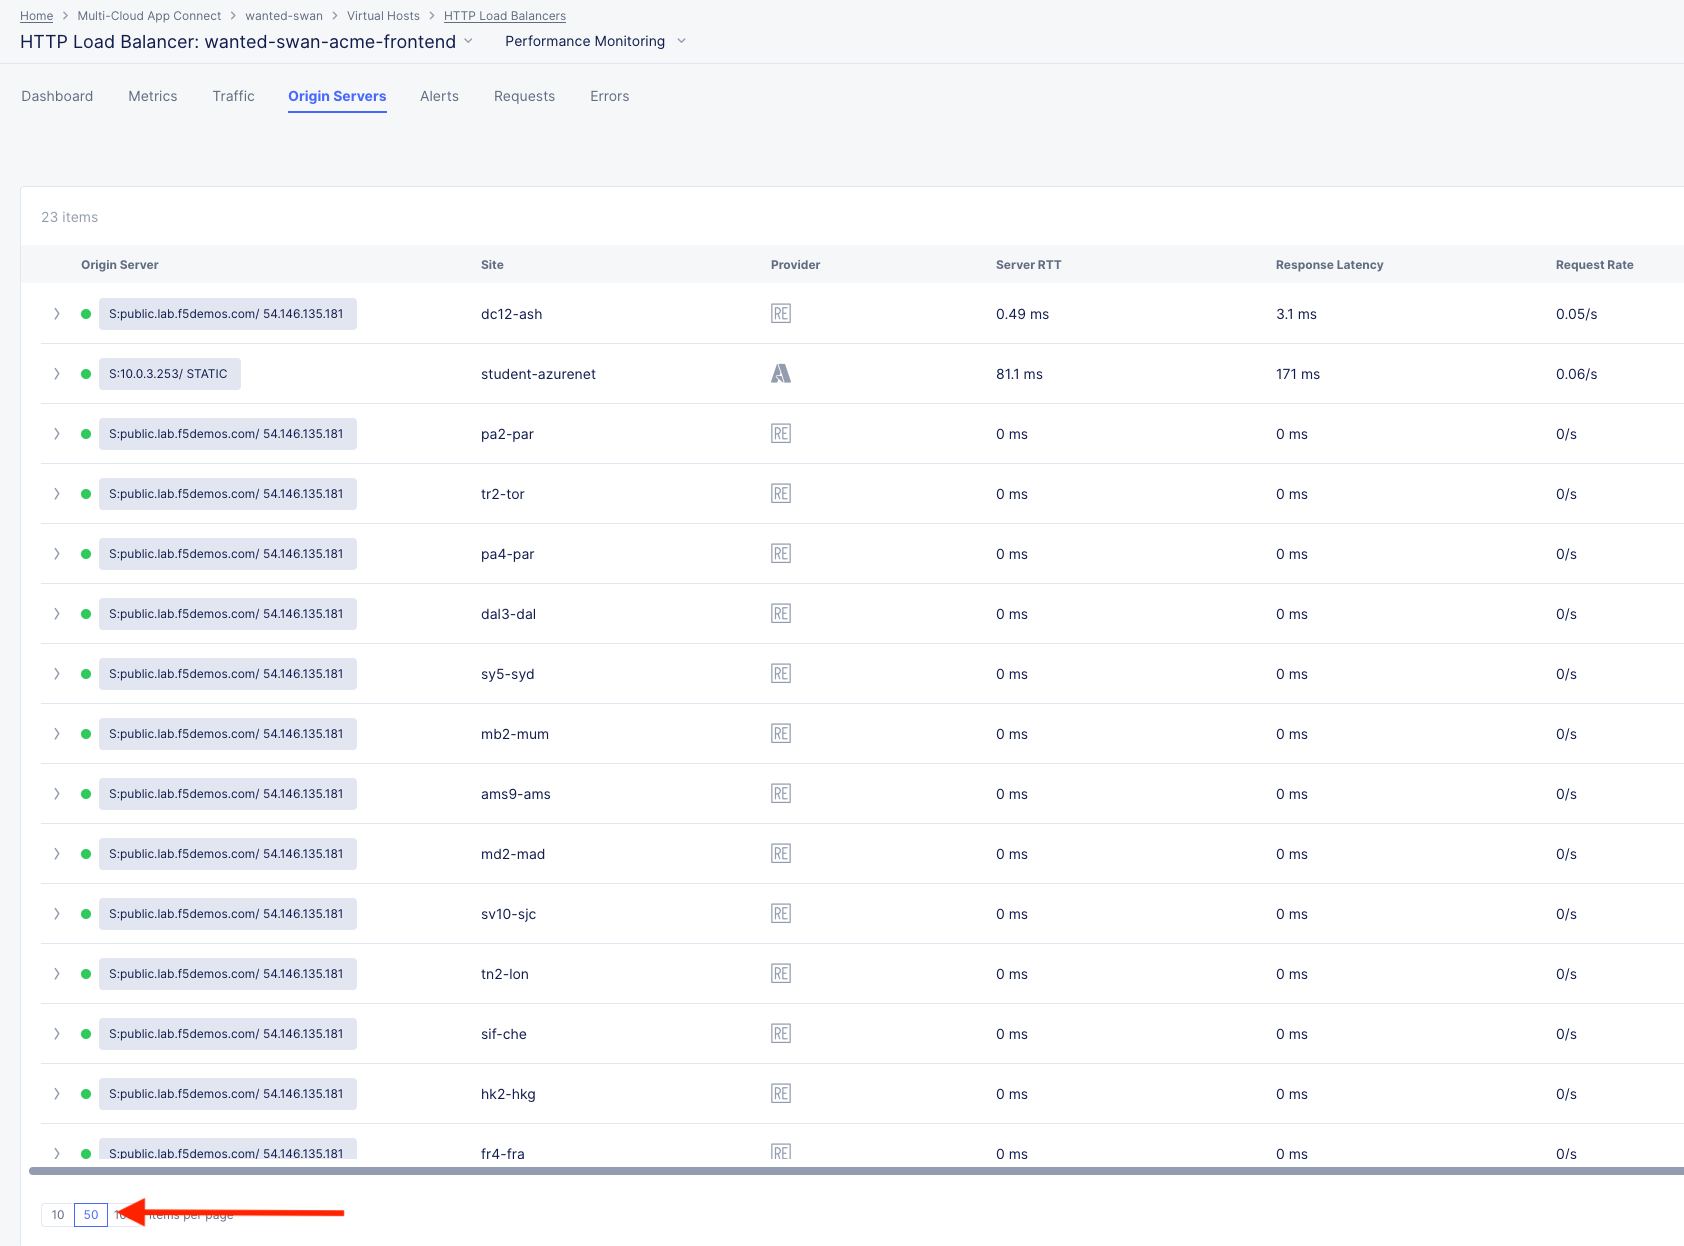
A: The AWS site was defined in the pool using (FQDN) public DNS. Each Regional Edge is a proxy from the XC network to the public IP that the FQDN resolves to, thus each Regional Edge must know the availability of any given IP from its perspective.
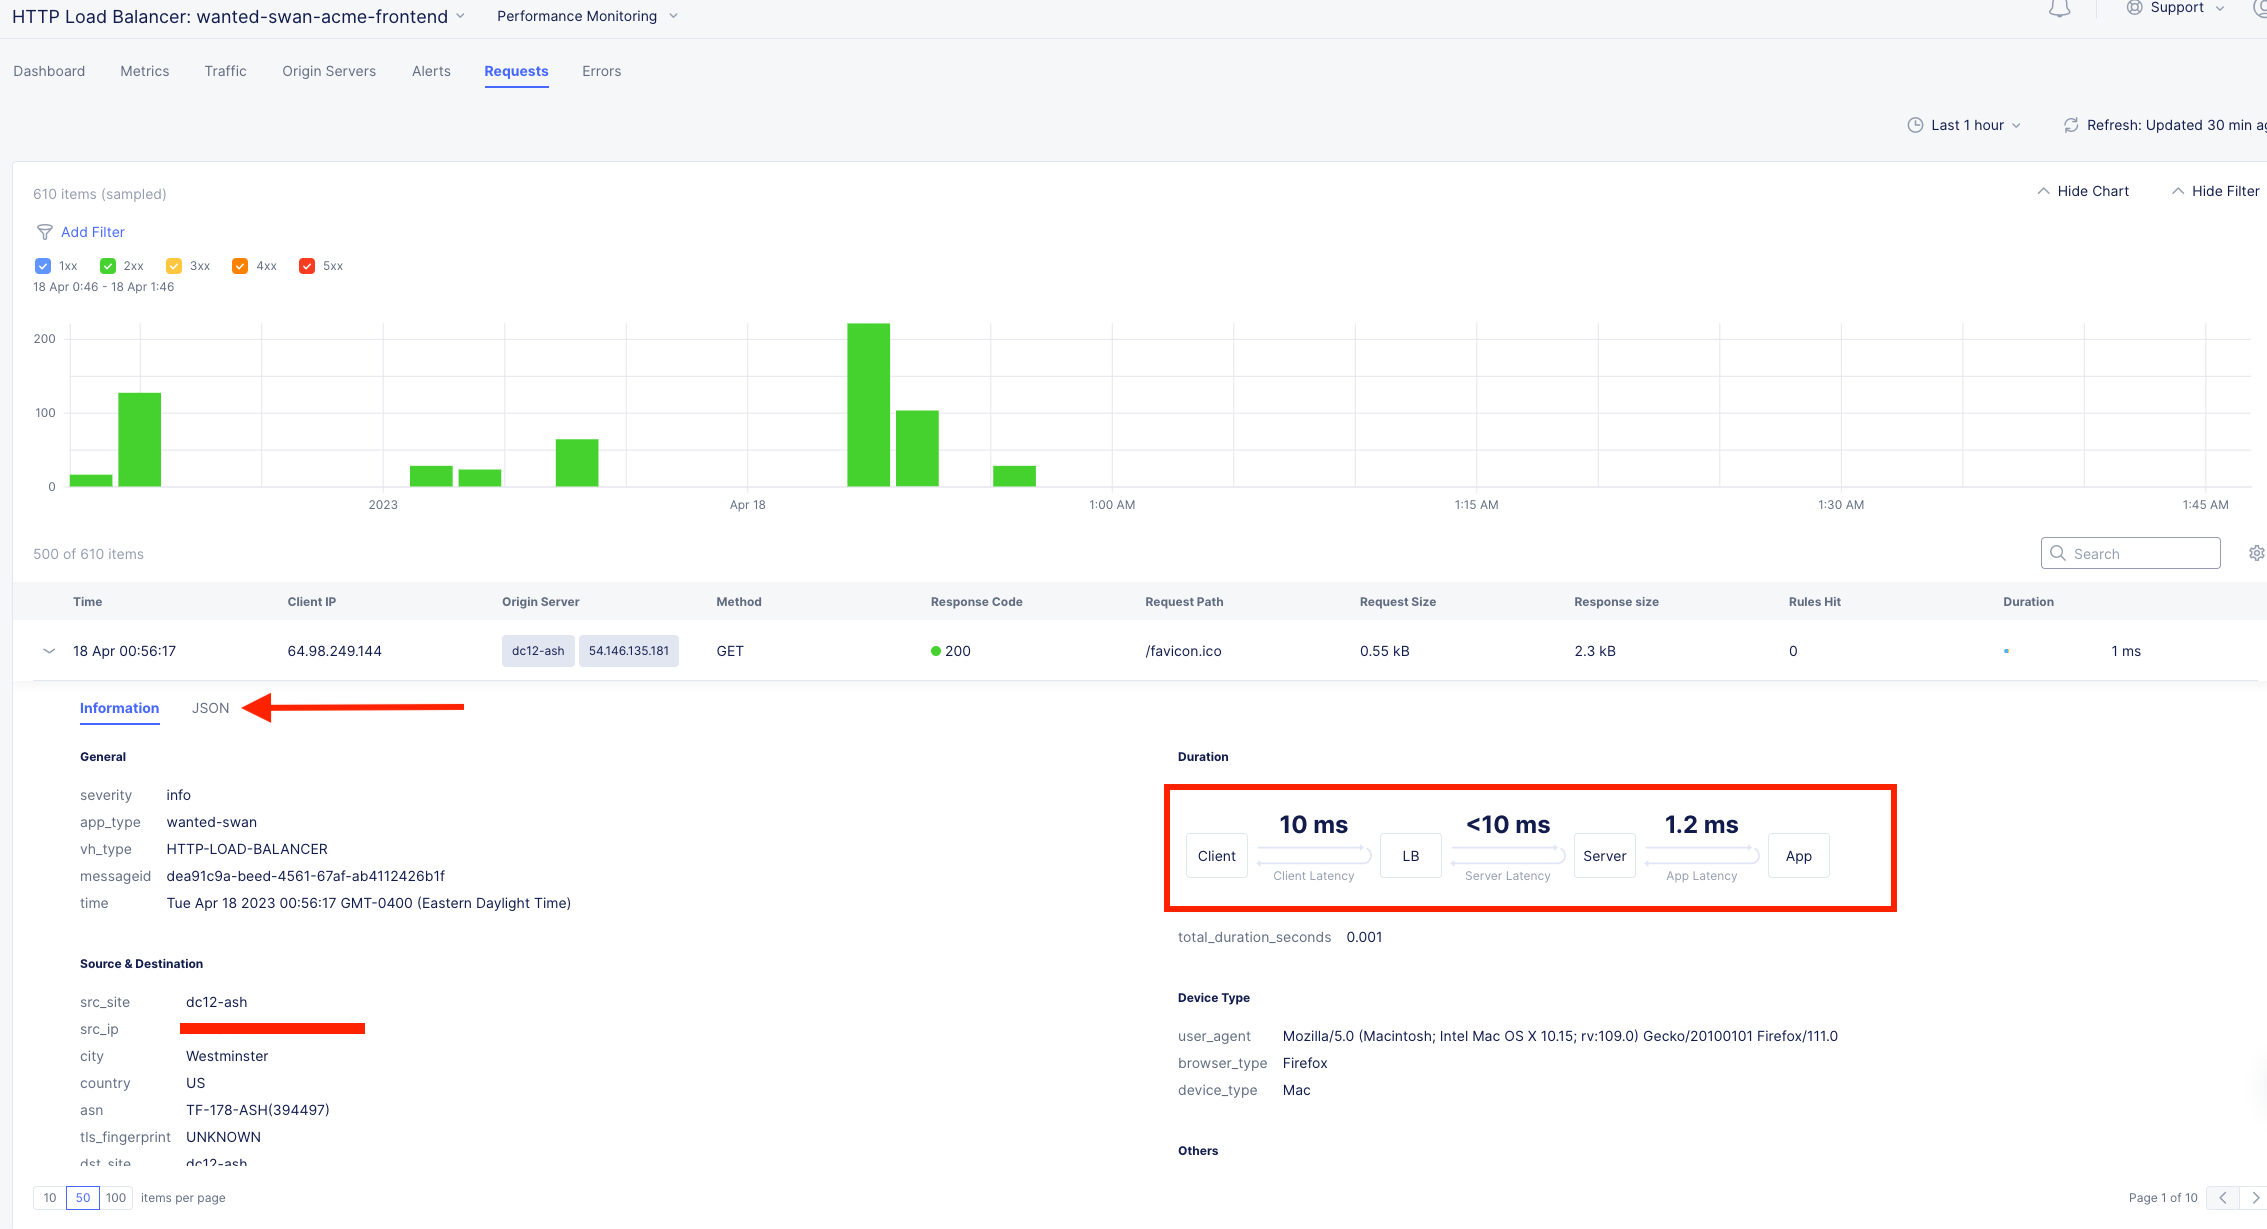
Click the Requests Tab in the top menu and change your time-frame to 1 hour. At the bottom left, change your setting to 50 items per page.
The request log has a wealth of information. Literally everything about the request is logged and analyzed.
Choose any request in the log and click the expand arrow next to the time-stamp.
Every request has built in End-to-End analytics. You can also click on JSON to see the request log in JSON format.
Feel free to explore additional requests and/or fields while other students are getting caught up.