NGINX Modern Apps > Class 18 - Mastering cloud-native app delivery: Unlocking advanced capabilities and use cases with F5’s ADCaaS (NGINXaaS) Source | Edit on
Module 4: Protecting Applications with Rate Limiting
Overview
Welcome to Lab 4. In this module of “Mastering cloud-native app delivery,” we focus on application resilience. You will protect the OWASP Juice Shop application from brute-force attempts and DoS-like traffic patterns by implementing NGINX Rate Limiting.
🏗️ Pre-provisioned Infrastructure
The following resources are prepared for this lab:
- Ubuntu VM: Running OWASP Juice Shop in a Docker container on Port 3000.
🚀 Lab Exercises
Task 1: Create the Rate Limit Zones
Instead of cluttering the main configuration, we will create a dedicated file for our limit definitions. You will see 4 different Rate Limits defined, using the limit_req_zone directive. This directive creates an Nginx memory zone where the limit Keys and counters are stored. When a request matches a Key, the counter is incremented. If no key exists, it is added to the zone and the counter is incremented, as you would expect. Keys are ephemeral, they are lost if you restart Nginx, but are preserved during an Nginx Reload.
Example: limit_req_zone $binary_remote_addr zone=limitone:10m rate=1r/s;
A. The first parameter, $binary_remote_addr is the Key used in the memory zone for tracking. In this example, the client’s IP Address in binary format is used. Binary being shorter, using less memory, than a dot.ted.dec.imal IP Address string. You can use whatever Key $variable you like, as long as it is an Nginx $variable available when Nginx receives an HTTP request - like a cookie, URL argument, HTTP Header, TLS Serial Number, etc. There are literally hundreds of request $variables you could use, and you can combine multiple $variables together.
B. The second parmater, zone=limitXYZ:10m, is the name of the zone, and the size is 10MB. You can define larger memory zones if needed, 10MB is a good starting point. Each zone must have a unique name, which matches the actual limit being defined in this example. The size needed depends on how many Keys are stored.
- limitone is the zone for 1 request/second
- limit10 is the zone for 10 requests/second
- limit100 is the zone for 100 requests/second
- limit1000 is the zone for 1,000 requests/second
C. The third parameter is the actual Rate Limit Value, expressed as r/s for requests/second.
You can define as many zones as you need, as long as you have enough memory for it. You can use a zone more than once in an Nginx configuration. You can see the number of requests that are being counted in each limit zone with Azure Monitoring. You can also use Nginx Logging $variables to track when Limits are being counted and used for the request. You will create an HTTP Header that will also show you the limit status of the request when Nginx sends back the response. So you will have very good visibility into how/when the limits are being used.
- In the Azure Portal, go to your NGINX for Azure resource.
- Select NGINX configuration -> Edit.
- Click + New File and name it: /etc/nginx/includes/rate-limits.conf.
- Copy and paste the following standard definitions:
## Define HTTP Request Limit Zones
limit_req_zone $binary_remote_addr zone=limitone:10m rate=1r/s;
limit_req_zone $binary_remote_addr zone=limit10:10m rate=10r/s;
limit_req_zone $binary_remote_addr zone=limit100:10m rate=100r/s;
limit_req_zone $binary_remote_addr zone=limit1000:10m rate=1000r/s;
Task 2: Apply the Rate Limits
- Now, create a new file named /etc/nginx/conf.d/juiceshop.conf and apply the limit to the location block:
  upstream juiceshop_backend {
    # Added a zone here too; it helps with Azure Metrics visibility for Upstreams
    zone juiceshop_backend 64k;
    server n4a-ubuntuvm:3000;
}

server {
    listen 80;
    server_name juiceshop.example.com;
    status_zone juiceshop.example.com;

    location / {
        # This matches the 'zone=limit10' we just defined in rate-limits.conf
        limit_req zone=limit10;  #burst=11;       # Set  Limit and burst here

        proxy_pass http://juiceshop_backend;
        proxy_set_header Host $host;
        proxy_set_header X-Real-IP $remote_addr;
        add_header X-Ratelimit-Status $limit_req_status;   # Add a custom status header

    }
}
Notice the 2 directives enabled:
limit_reqsets the active zone being used, in this example, limit100, meaning 100 requests/second.Burstis optional, allowing you to define an overage, allowing for some elasticity in the limit enforcement.add_headercreates a Custom Header, and adds thelimit_req_status $variable, so you can see it with Chrome Dev Tools or curl.
- Next updated the main_ext logging format in nginx.conf file. it will be used, to capture Rate Limit logging variables.
Update your nginx.conf
log_format  main_ext  'remote_addr="$remote_addr", '
                     '[time_local=$time_local], '
                     'request="$request", '
                     'status="$status", '
                     'http_referer="$http_referer", '
                     'body_bytes_sent="$body_bytes_sent", '
                     'Host="$host", '
                     'sn="$server_name", '
                     'request_time=$request_time, '
                     'http_user_agent="$http_user_agent", '
                     'http_x_forwarded_for="$http_x_forwarded_for", '
                     'request_length="$request_length", '
                     'upstream_address="$upstream_addr", '
                     'upstream_status="$upstream_status", '
                     'upstream_connect_time="$upstream_connect_time", '
                     'upstream_header_time="$upstream_header_time", '
                     'upstream_response_time="$upstream_response_time", '
                     'upstream_response_length="$upstream_response_length", '
                     'limitstatus="$limit_req_status" ';
- Click Submit.
Task 3: Test the Rate Limit
To see the rate limiting in action, we need to send requests faster than 1 per second.
Open a terminal on your local machine.
Like before, update your local system’s DNS
/etc/hostsfile. This time, you will add the hostnamejuiceshop.example.comafter your previous update (cafe.example.com), as shown below:cat /etc/hosts 127.0.0.1 localhost ... # Nginx for Azure testing 11.22.33.44 cafe.example.com 11.22.33.44 juiceshop.example.com ...
where
11.22.33.44replace with yourn4a-publicIPresource IP address.
Once you have updated the host your /etc/hosts file, save it and quit vi tool.
Open Chrome and go to
http://juiceshop.example.com. You should see the main Juiceshop page, explore around a bit if you like, find a great tasting smoothy.Right+Click, and choose
Inspecton the Chrome menu to open Developer tools. On the top Nav bar, click theNetwork Tab, and make sure theDisable cacheis checked, you don’t want Chrome caching any images for this exercise.Click Refresh, and you will see a long list of items being sent from the application.
In the Object Details Display Bar, where you see
Name Status Type Size, Time, etc, Right+Click again, thenResponse Headers, thenManage Header Columns. Right-click onjuiceshop.example.comfrom the list of items, thenHeader options,Response Headers, andManage Header Column.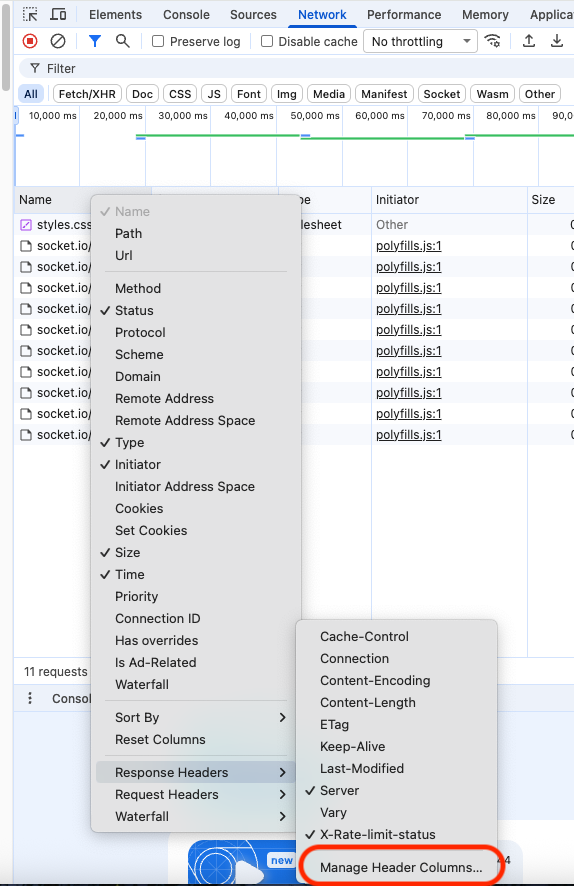
You will be adding your custom Nginx headers to the display for easy viewing. Click on
Add custom header...,:- X-RateLimit-Status
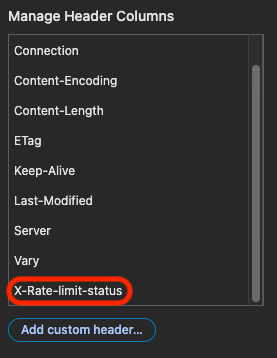

You have previously added the Nginx Custom Headers to the display, so you should already have a Header Column labeled
X-Ratelimit-Status. Click Refresh Several times, what do you see?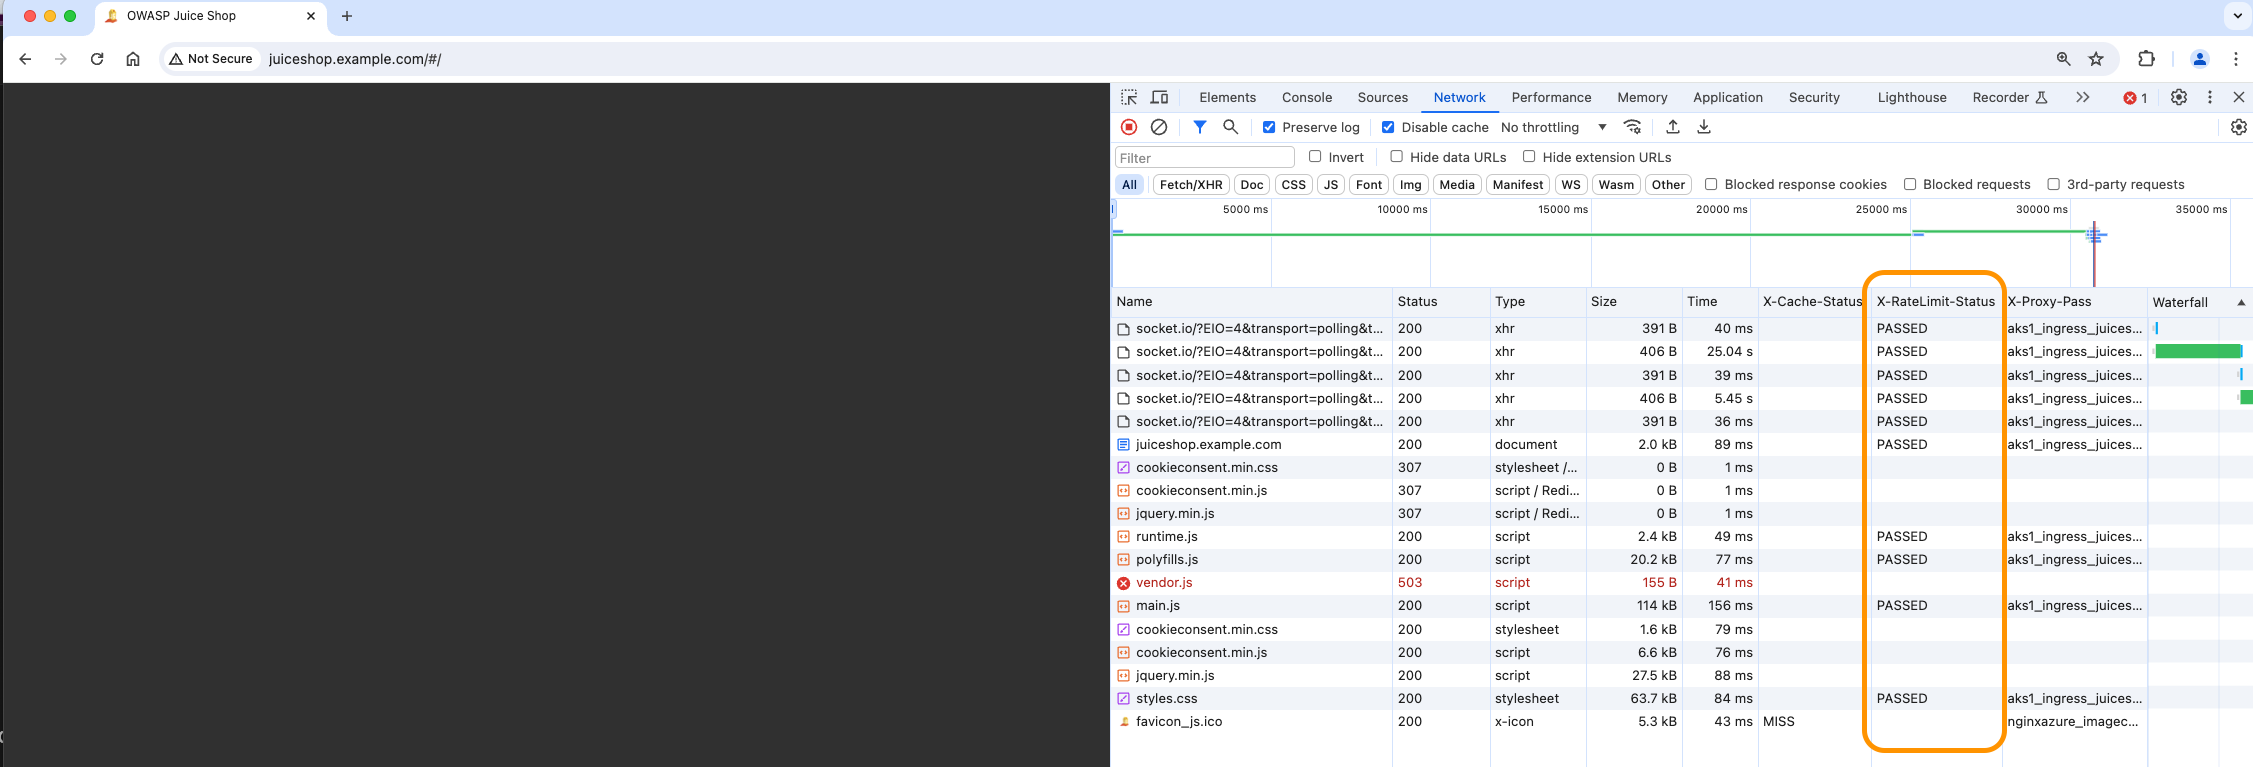
You will see a partial Juiceshop webpage, as Nginx is only allowing your computer to send 100 req/s. You see the Header status set to PASSED for requests that were allowed. Other requests were stopped for
Exceeding the Rate Limit. Check the HTTP Status Code on an item that failed, you will find the503 Service Temporarily Unavailable.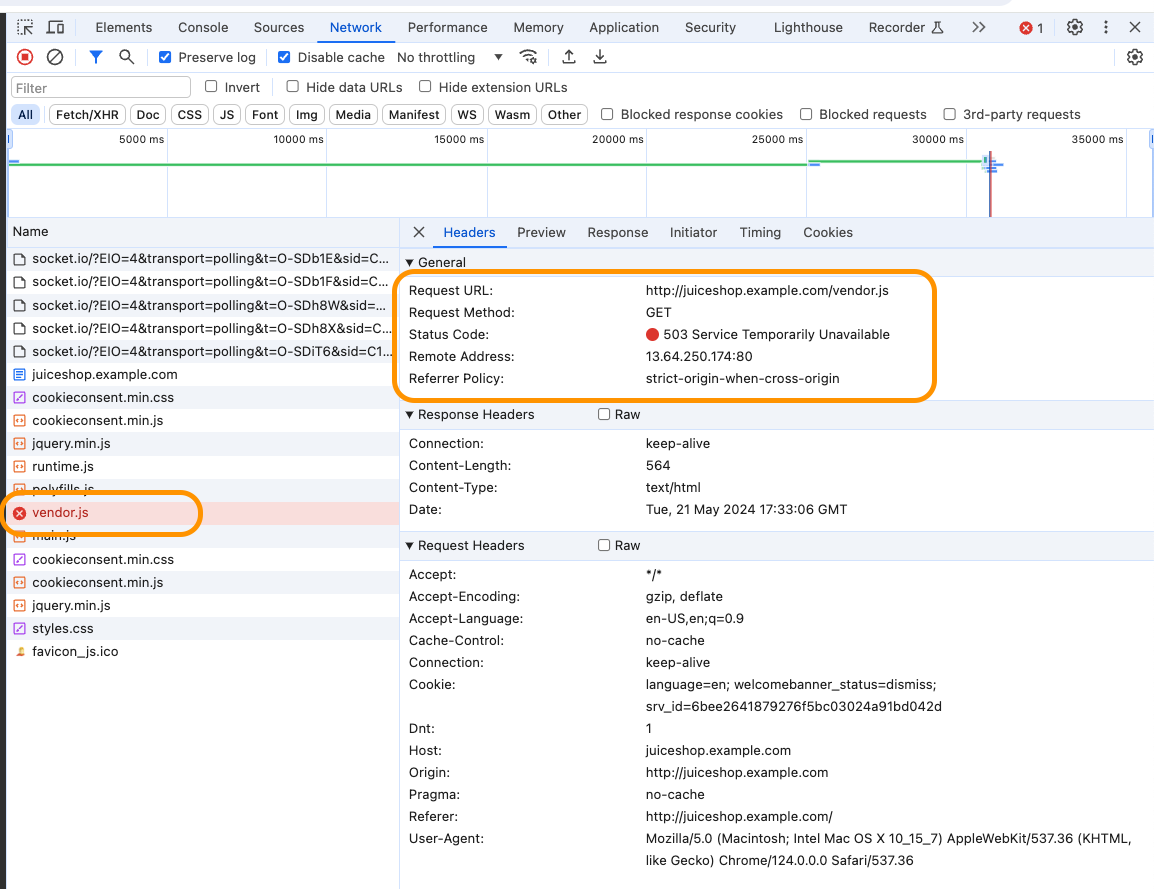
Well, this is not actually the real situation, right? You have set a
limit, not turned off the Service. So you will
change the HTTP Status code, using the limit_req_status
directive, which lets you set a custom HTTP Status code. The HTTP
standard for “excessive requests” is normally 429. So you will
change it to that.
Add limit_req_status 429; to the
/etc/nginx/includes/rate-limits.conf file after the
## Define HTTP Request Limit Zones section. Click Submit and
make sure the change is successful.
Now, click Refresh on the Juice
Shop page several more times and check the HTTP Status Code on an item
that failed. It should now show 429 Too Many Requests.
This can also verified using your terminal.
- Run a loop to hit the site rapidly:
for i in {1..10}; do curl -I http://juiceshop.example.com; done
- Observe the results: You should see several 200 OK responses followed by 503 Service Temporarily Unavailable (or 429 Too Many Requests depending on NGINX version/config) as the rate limit kicks in.
Task 4: Verify via Log Analytics
- Navigate to your Log Analytics Workspace.
- Run the following query to see the rejected requests:
NGXOperationLogs
| where FilePath == "/var/log/nginx/access.log"
| where Message contains "503"
| summarize Count = count() by bin(TimeGenerated, 1m)
| render barchart with (title="Lab 4: Blocked Requests (503) per Minute")

Congratulations on completing Lab 4!