F5 rSeries Planning Guide Source |
Securing / Hardening F5OS on rSeries
F5OS tenants follow the standard hardening/security best practices that are outlined in the following solution article:
K53108777: Hardening your F5 system
This section will focus on how to harden/secure the F5OS layer of the rSeries appliances.
F5OS Platform Layer Isolation
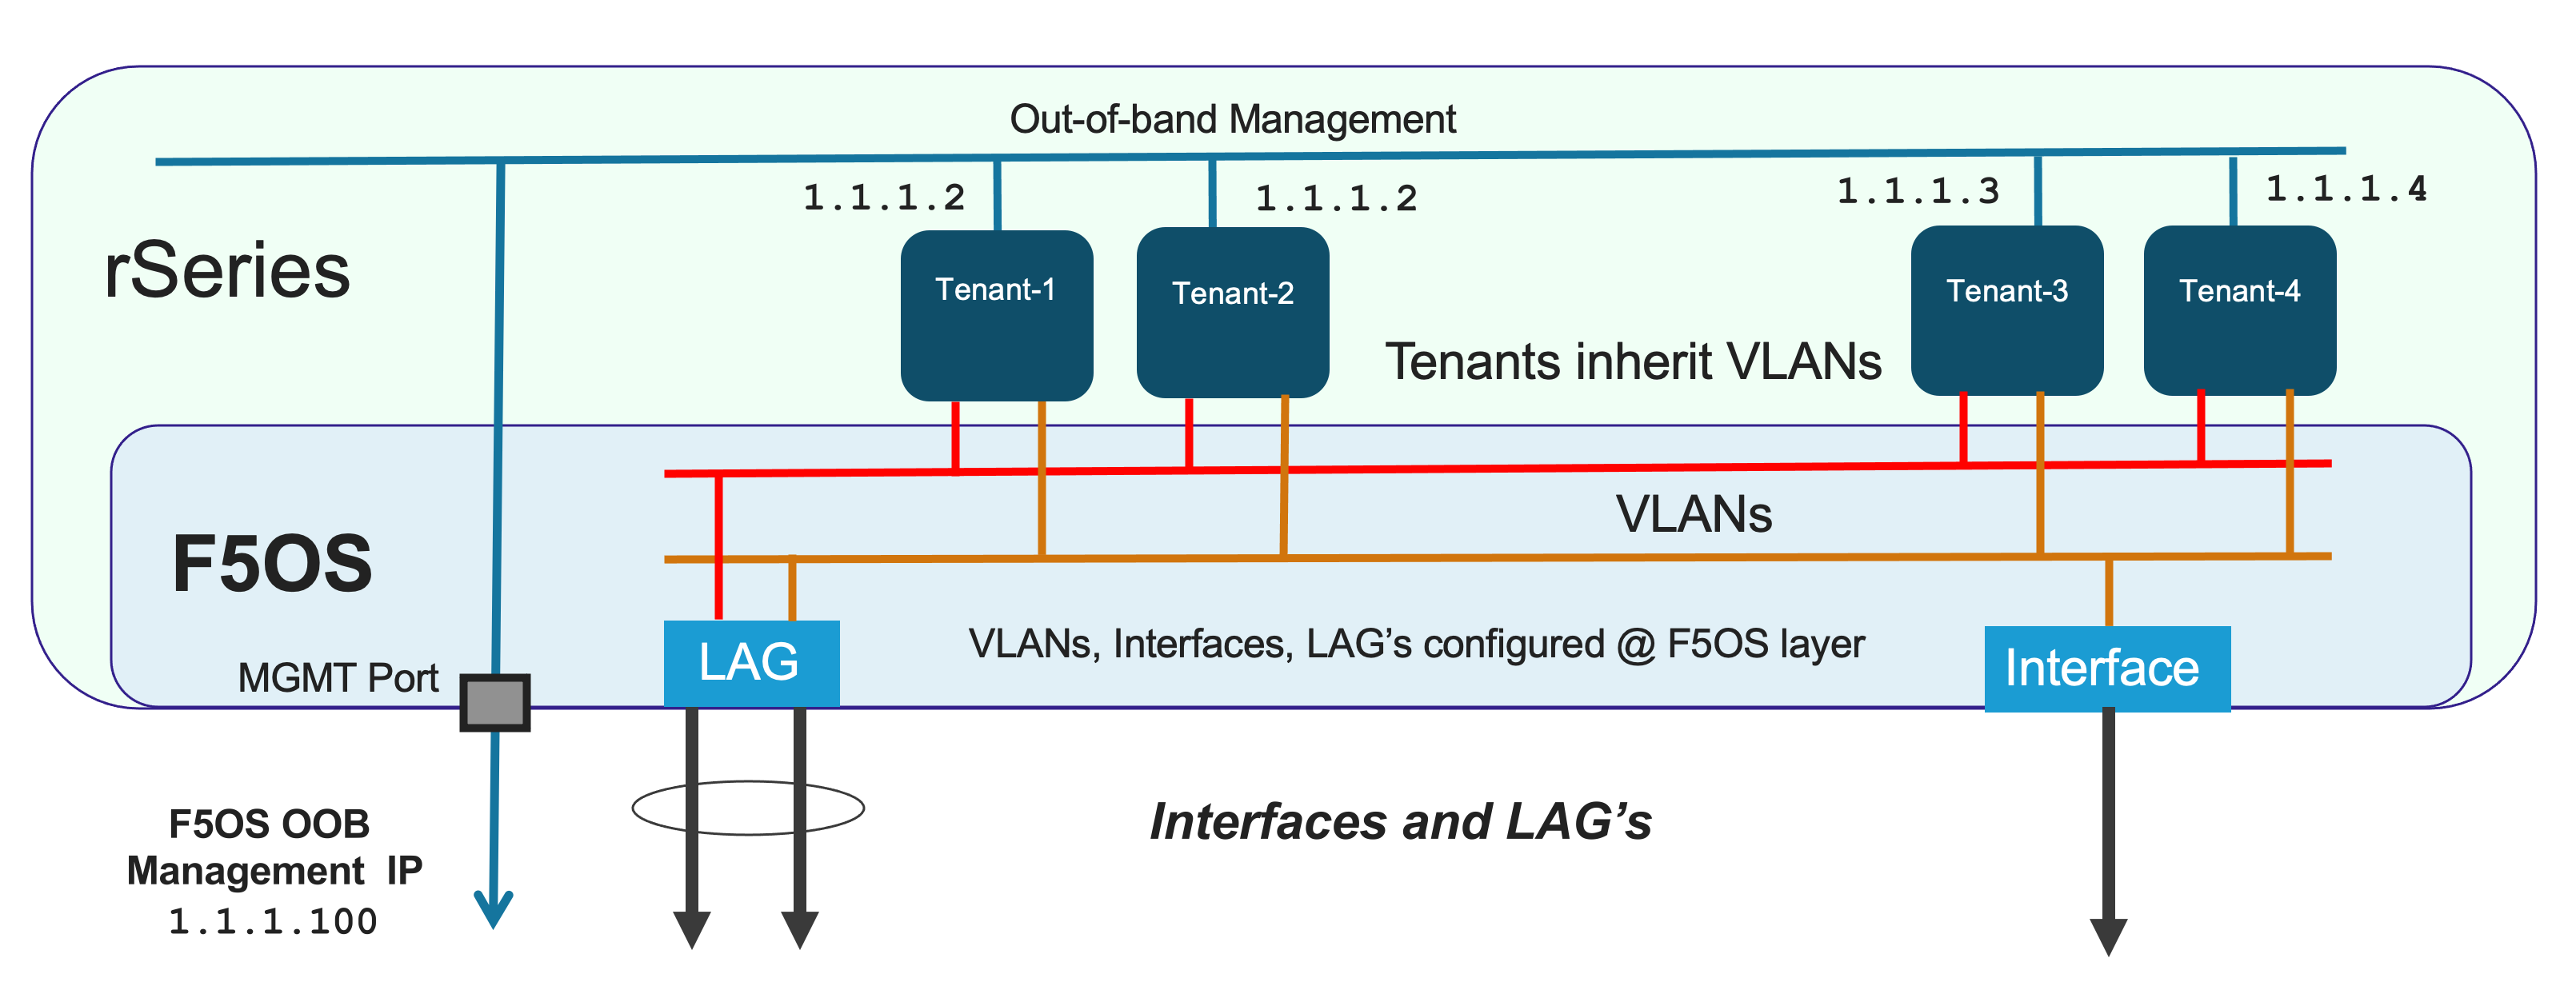
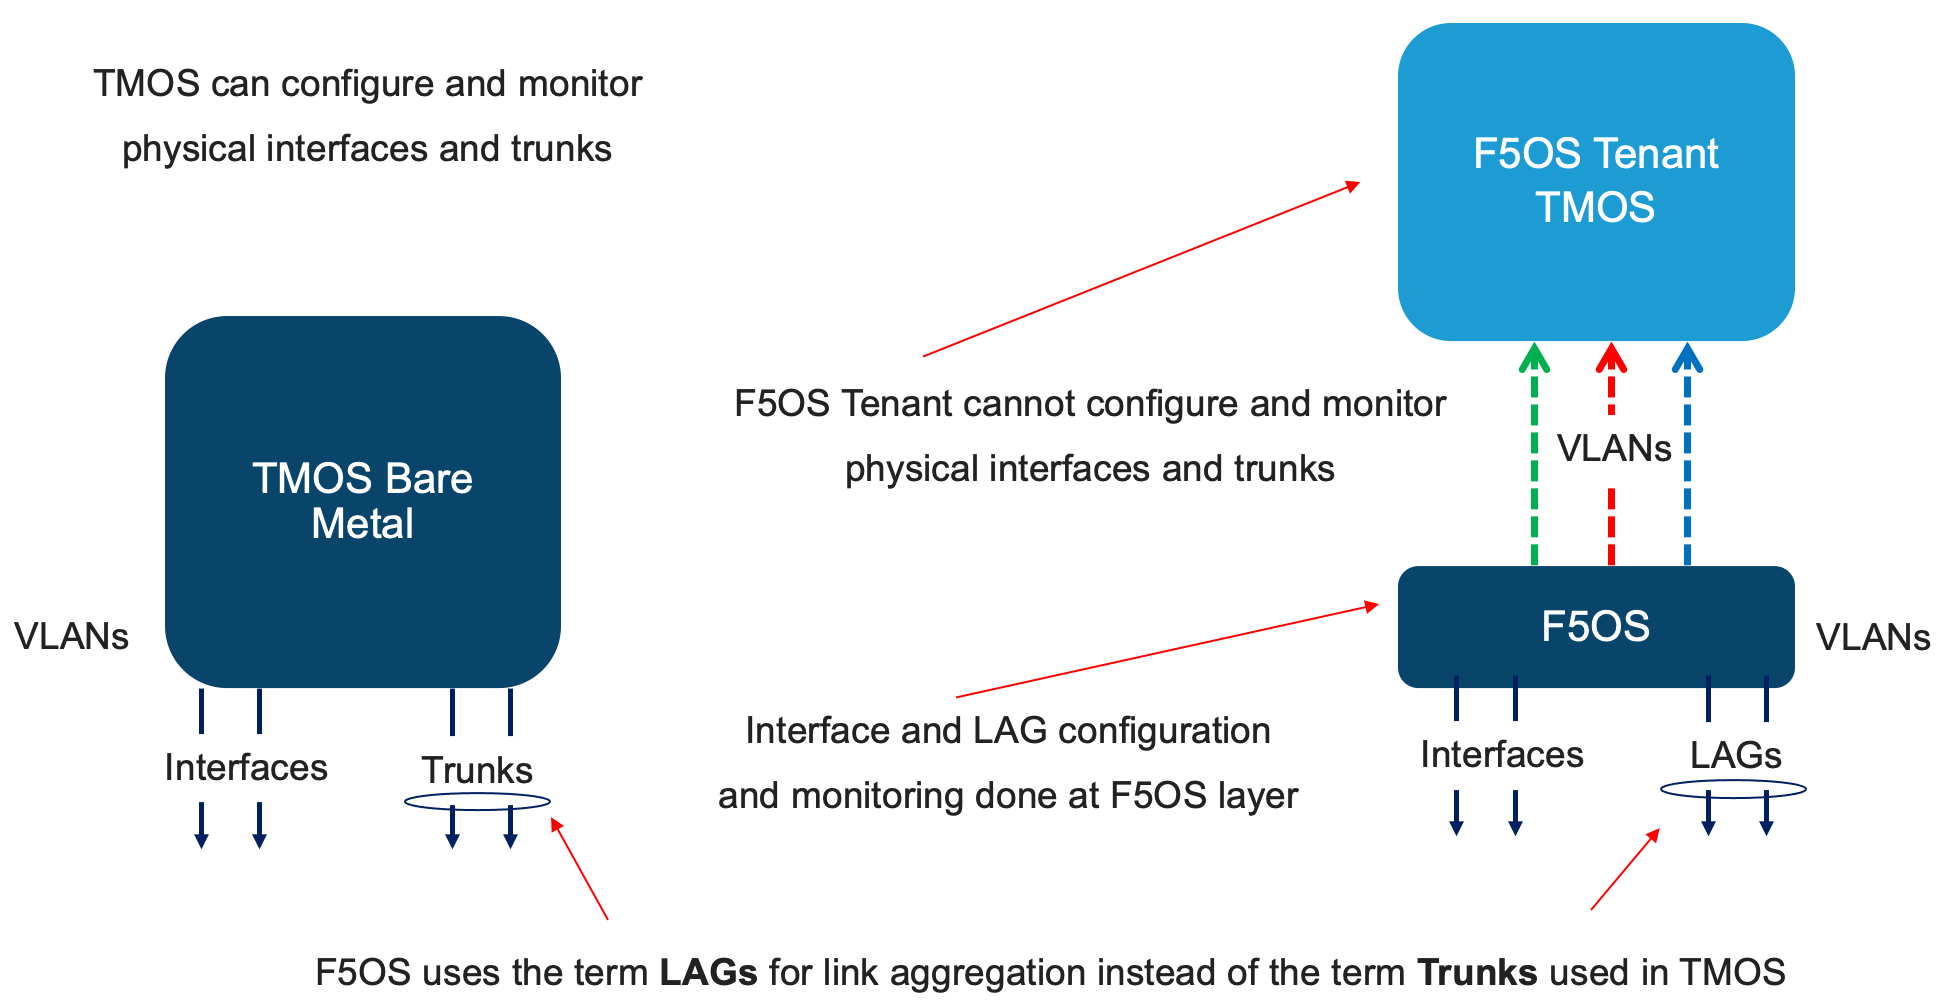
When looking at management of the rSeries platform, it is important to separate the in-band (data plane) networking from the out-of-band (management) networking. Management of the new F5OS platform layer is completely isolated from in-band data-plane traffic, networking, and VLANs. It is managed via the out-of-band management network only. It is purposely isolated so that F5OS is only accessible via the out-of-band management network. In fact, there are no in-band (data-plane) IP addresses assigned to the F5OS layer, only tenants will have in-band (data-plane) IP addresses and access. Tenants also have out-of-band connectivity so they can be managed via the out-of-band network.
This allows customers to run a secure/locked-down out-of-band management network where access is tightly restricted. The diagram below shows the out-of-band management access entering the rSeries appliance through the MGMT port. The external MGMT port is bridged to an internal out-of-band network that connects to all tenants within the rSeries appliance.
Allow List for F5OS Management
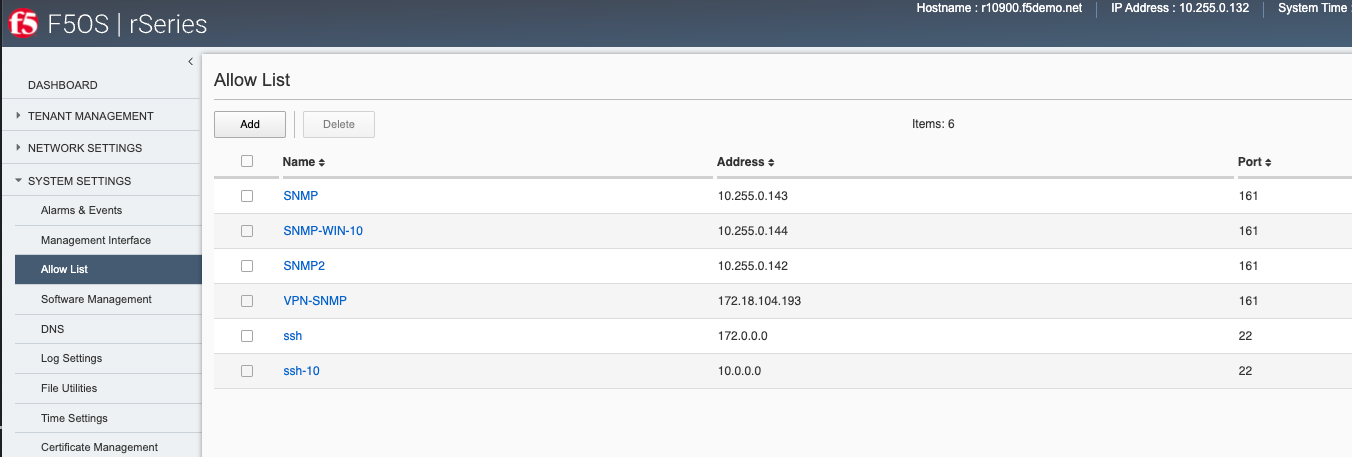
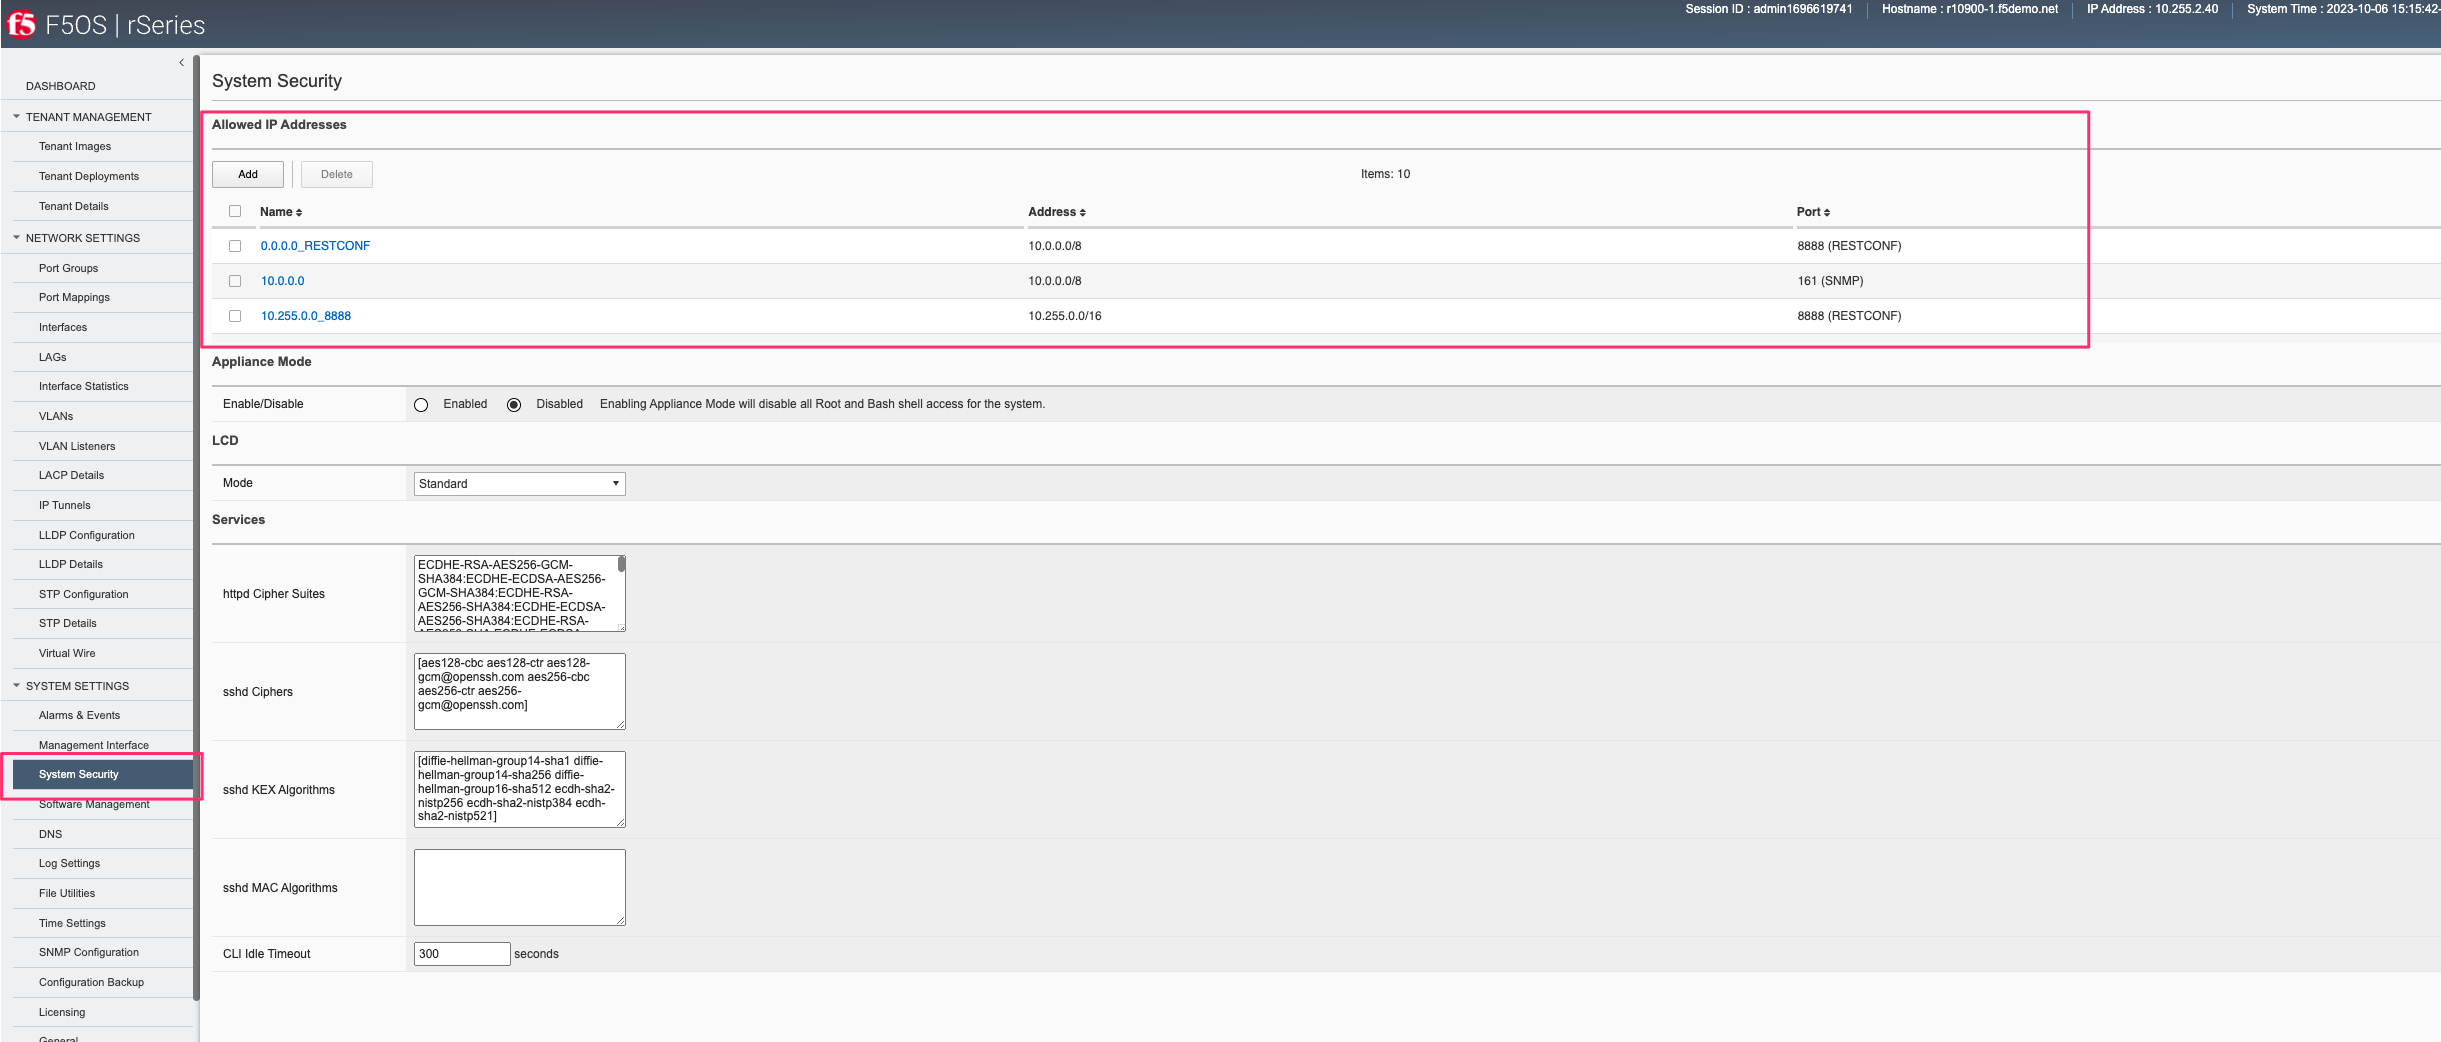
F5OS only allows management access via a single out-of-band management interface. Access to that single management IP address may be restricted to specific IP addresses (both IPv4 and IPv6), subnets (via Prefix Length), as well as protocols - 443 (HTTPS), 80 (HTTP), 8888 (RESTCONF), 161 (SNMP), 7001 (VCONSOLE), and 22 (SSH). An administrator can add one or more Allow List entries via the CLI, webUI or API to lock down access to specific endpoints.
By default, all ports except for 161 (SNMP) are enabled for access, meaning ports 80, 443, 8888, 7001, and 22 are allowed access. Port 80 is only open to allow a redirect to port 443 in case someone tries to access the webUI over port 80. The webUI itself is not accessible over port 80. Port 161 (SNMP) is typically viewed as un-secure and is therefore not accessible until an allow list entry is created for the endpoint trying to access F5OS using SNMP queries. Ideally SNMPv3 should be utilized to provide additional layers of security on an otherwise un-secure protocol. VCONSOLE access also must be explicitly configured before access to the tenants is possible over port 7001.
To further lock down access, you may add an Allow List entry including an IP address and optional prefix for each of the protocols listed above. As an example, if you wanted to restrict API and webUI access to a particular IP address and/or subnet, you can add an Allow List entry for the desired IP or subnet (using the prefix length), specify port 443 and all access from other IP endpoints will be prevented.
Adding Allow List Entries via CLI
If you would like to lock down one of the protocols to either a single IP address or subnet, use the system allowed-ips command. Be sure to commit any changes. The prefix-length parameter is optional. If you omit it, then you will lock down access to a specific IP endpoint, if you add it you can lock down access to a specific subnet.
r10900-2(config)# system allowed-ips allowed-ip snmp config ipv4 address 10.255.0.0 prefix-length 24 port 161
r10900-2(config-allowed-ip-snmp)# commit
Commit complete.
Currently you can add one IP address/port pair per allowed-ip name with an optional prefix length to specify a CIDR block containing multiple addresses. If you require more than one non-contiguous IP address or subnets, you can add it under another name as seen below.
appliance-1(config)# system allowed-ips allowed-ip SNMP-144 config ipv4 address 10.255.0.144 port 161
appliance-1(config-allowed-ip-SNMP)# commit
Commit complete.
appliance-1(config-allowed-ip-SNMP)#


appliance-1(config)# system allowed-ips allowed-ip SNMP-145 config ipv4 address 10.255.2.145 port 161
appliance-1(config-allowed-ip-SNMP)# commit
Commit complete.
appliance-1(config-allowed-ip-SNMP)#
Adding Allow List Entries via API
Below is an example of allowing multiple SNMP endpoints (port 161) to query SNMP on the F5OS platform layer.
POST https://{{rseries_appliance1_ip}}:8888/restconf/data/openconfig-system:system/f5-allowed-ips:allowed-ips
Within the body of the API call, specific IP address/port, and optional prefix-length combinations can be added under a given name. In the current releases, you are limited to one IP address/port/prefix per name.
{
    "allowed-ip": [
        {
            "name": "SNMP-142",
            "config": {
                "ipv4": {
                    "address": "10.255.0.142",
                    "prefix-length": "32",
                    "port": 161

                }
            }
        },
        {
            "name": "SNMP-143",
            "config": {
                "ipv4": {
                    "address": "10.255.0.143",
                    "prefix-length": "32",
                    "port": 161
                }
            }
        },
        {
            "name": "SNMP-144",
            "config": {
                "ipv4": {
                    "address": "10.255.0.144",
                    "prefix-length": "32",
                    "port": 161
                }
            }
        }
    ]
}
To view the current allowed IP configuration via the API, use the following API call.
GET https://{{rseries_appliance1_ip}}:8888/restconf/data/openconfig-system:system/f5-allowed-ips:allowed-ips
The output will show the previously configured allowed-ips.
{
    "f5-allowed-ips:allowed-ips": {
        "allowed-ip": [
            {
                "name": "SNMP-142",
                "config": {
                    "ipv4": {
                        "address": "10.255.0.142",
                        "prefix-length": "32",
                        "port": 161
                    }
                }
            },
            {
                "name": "SNMP-143",
                "config": {
                    "ipv4": {
                        "address": "10.255.0.143",
                        "prefix-length": "32",
                        "port": 161
                    }
                }
            },
            {
                "name": "SNMP-144",
                "config": {
                    "ipv4": {
                        "address": "10.255.0.144",
                        "prefix-length": "32",
                        "port": 161
                    }
                }
            }
        ]
    }
}
Adding Allow List Entries via webUI
You can configure Allow List entries in the webUI under the System Settings section in older version of F5OS. In newer versions of F5OS the Allowed IP Addresses configuration can be found under System Settings -> System Security.
Below is an example of allowing any SNMP endpoint at 10.255.0.0 (prefix length of 24) to query the F5OS layer on port 161.
In newer releases, the allowed IP functionality has been moved to the System Settings -> Security page as seen below.
Setting F5OS Primary Key
The F5 rSeries system uses a primary key to encrypt highly sensitive passwords/passphrases in the configuration database, such as:
- Tenant unit keys used for TMOS Secure Vault
- The F5OS API Service Gateway TLS key
- Stored iHealth credentials
- Stored AAA server credentials
The primary key is randomly generated by F5OS during initial installation. You should set the primary key to a known value prior to performing a configuration backup. If you restore a configuration backup on a different rSeries device, e.g., during an RMA replacement, you must first set the primary key passphrase and salt on the destination device to the same value as the source device. If this is not done correctly, the F5OS configuration restoration may appear to succeed but produce failures later when the system attempts to decrypt and use the secured parameters.
You should periodically change the primary key for additional security. If doing so, please note that a configuration backup is tied to the primary key at the time it was generated. If you change the primary key, you cannot restore older configuration backups without first setting the primary key to the previous value, if it is known. More details are provided in the solution article below.
K47512994: Backup and restore the F5OS-A configuration on an rSeries system
To set the primary-key issue the following command in config mode.
system aaa primary-key set passphrase <passphrase string> confirm-passphrase <passphrase string> salt <salt string> confirm-salt <salt string>
Note that the hash key can be used to check and compare the status of the primary-key on both the source and the replacement devices if restoring to a different device. To view the current primary-key hash, issue the following CLI command.
r10900-1# show system aaa primary-key
system aaa primary-key state hash IWDanp1tcAO+PJPH2Hti6BSvpFKgRvvFpXNZRIAk3JoXhypflBofHc+IJp8LA2SDGCQ2IgE8Z628lGjCWVjBxg==
system aaa primary-key state status "COMPLETE        Initiated: Mon Feb 27 13:38:02 2023"
r10900-1#
Certificates for Device Management
F5OS supports TLS device certificates and keys to secure connections to the management interface. You can either create a self-signed certificate or load your own certificates and keys into the system. In F5OS-A 1.4.0 an admin can now optionally enter a passphrase with the encrypted private key. More details can be found in the link below.
Transport Layer Security (TLS) configuration overview
Managing Device Certificates, Keys, CSRs, and CAs via CLI
By default, F5OS uses a self-signed certificate and key for device management. If you would like to create your own private key and self-signed certificate, use the following CLI command:
r10900-1(config)# system aaa tls create-self-signed-cert name jim email jim@f5.com city Boston region MA country US organization F5 unit Sales version 1 days-valid 365 key-type encrypted-ecdsa curve-name secp384r1 store-tls true key-passphrase
Value for 'key-passphrase' (<string, min: 6 chars, max: 255 chars>): **************
Value for 'confirm-key-passphrase' (<string, min: 6 chars, max: 255 chars>): **************
r10900-1(config)#
The store-tls option when set to true, stores the private key and self-signed certificate in the system instead of returning the values only in the CLI output. If you would prefer to have the keys returned in the CLI output and not stored in the system, then set store-tls false as seen below.
r10900-1(config)# system aaa tls create-self-signed-cert name jim email jim@f5.com city Boston region MA country US organization F5 unit Sales version 1 days-valid 365 key-type encrypted-ecdsa curve-name secp384r1 store-tls false key-passphrase
Value for 'key-passphrase' (<string, min: 6 chars, max: 255 chars>): **************
Value for 'confirm-key-passphrase' (<string, min: 6 chars, max: 255 chars>): **************
key-response
-----BEGIN EC PRIVATE KEY-----
Proc-Type: 4,ENCRYPTED
DEK-Info: AES-256-CBC,BA7ECF55A14EBD39F5DB48EBB6BBB53E

IF6Uk2tLE6LzIu3mEgy3VB/uADkN53HO4LE7P8QDTLBRt5f81LjxhP5MFJlKFk2a
iYpZEqzhZwCAfOetcaK+LFv+z26NzUSdHLmEvM+qG3B5s6U7eQbes6mMPAyOFZcj
+1El1olDrHfn+xmcbUFlM7lUVRgIhABy+Y3WT6GaH7CaYghDjKkRoppiiQs3KwXf
/ZdO7QFRAWr0Lfi8iBtVZKBqL2CHsBQxfggvP0EB+9o=
-----END EC PRIVATE KEY-----

cert-response
-----BEGIN CERTIFICATE-----
MIICDjCCAZUCCQCRNihj9kub1zAKBggqhkjOPQQDAjBxMQwwCgYDVQQDDANqaW0x
CzAJBgNVBAYTAlVTMQswCQYDVQQIDAJNQTEPMA0GA1UEBwwGQm9zdG9uMQswCQYD
VQQKDAJGNTEOMAwGA1UECwwFU2FsZXMxGTAXBgkqhkiG9w0BCQEWCmppbUBmNS5j
b20wHhcNMjMwMjIzMDUwMDE0WhcNMjQwMjIzMDUwMDE0WjBxMQwwCgYDVQQDDANq
aW0xCzAJBgNVBAYTAlVTMQswCQYDVQQIDAJNQTEPMA0GA1UEBwwGQm9zdG9uMQsw
CQYDVQQKDAJGNTEOMAwGA1UECwwFU2FsZXMxGTAXBgkqhkiG9w0BCQEWCmppbUBm
NS5jb20wdjAQBgcqhkjOPQIBBgUrgQQAIgNiAATDLVWBq7s1nwkZy27DGbqNEkHM
/WTXwKo2i+uzoB2fL6DXGlgKJo1WIY5sFMYGv1lNsDte5Ztr11331rmcWghVOHkr
FndFmeEnSNRyHZoqHXzVIkp60JAsv2Yv2ZafGJEwCgYIKoZIzj0EAwIDZwAwZAIw
EluMBf0X9Zotm6pWMiajR5AL8Z2PMIE3hqpc3IREeSs09xf8ADKoCEEudRMHB1lc
AjBelhJIkUoiZBtfAdf6NrUDWQdrN7kvC4h8DLm1XV9lr4Wxh5Es1WSwF1PoTRMt
Mqs=
-----END CERTIFICATE-----
r10900-1(config)#
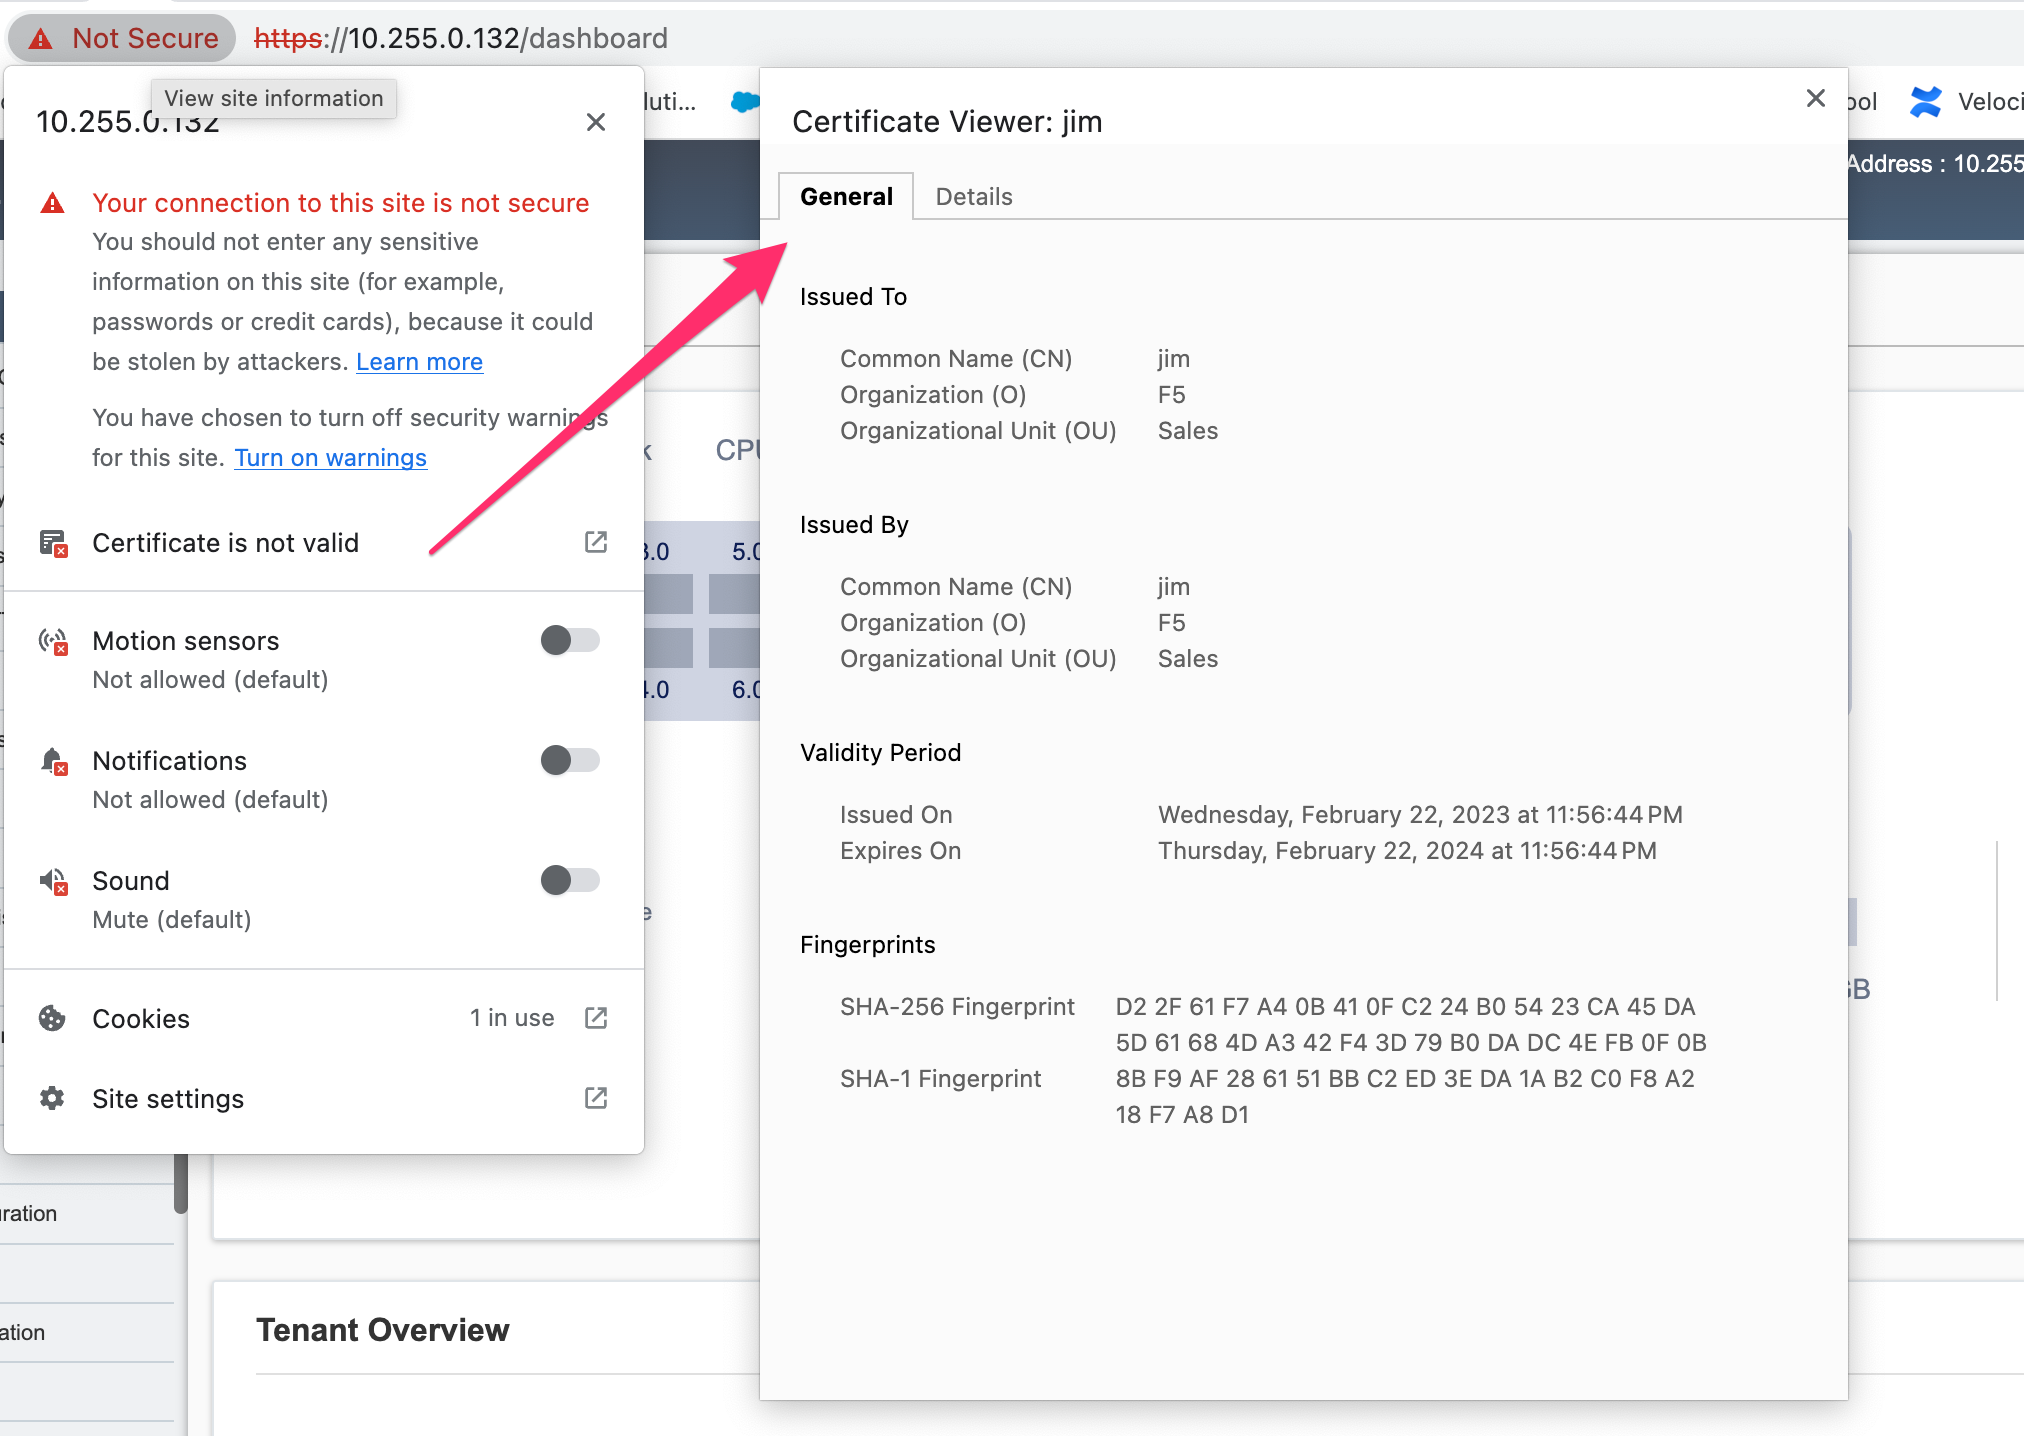
The management interface will now use the self-signed certificate you just created. You can verify by connecting to the F5OS management interface via a browser and then examining the certificate.
To create a Certificate Signing Request (CSR) via the CLI use the system aaa tls create-csr command.
r10900-1(config)# system aaa tls create-csr name r10900-1.f5demo.net email jim@f5.com city Boston country US organization F5 region MA unit Sales version 1
response
-----BEGIN CERTIFICATE REQUEST-----
MIIBezCCAQECAQEwgYExHDAaBgNVBAMME3IxMDkwMC0xLmY1ZGVtby5uZXQxCzAJ
BgNVBAYTAlVTMQswCQYDVQQIDAJNQTEPMA0GA1UEBwwGQm9zdG9uMQswCQYDVQQK
DAJGNTEOMAwGA1UECwwFU2FsZXMxGTAXBgkqhkiG9w0BCQEWCmppbUBmNS5jb20w
djAQBgcqhkjOPQIBBgUrgQQAIgNiAAQ/8UzZtEGMJ+vtmkEUsgiv2hL8r81sKwB3
clwqnXKl08vFCNr4wy7TB28b4EszAQDTBhIipHuC5L2GpetjNsFywkDqZuoJAvmx
nrqYQe5z9bDUpO6AJsAaohLG0sc9E4WgADAKBggqhkjOPQQDAgNoADBlAjEAsTST
M43RDyve46QJtHf3ofCVuhmxZ8lAcWBX5W3JsDiZcdaNCeXgSk4pX5nwSrDnAjAH
GPjWc5CcyCBh8+RyV9zNL7I5WlIsZj1aUAA3PD1CSgFHxaXV6cpHP8H8kQiJjjE=
-----END CERTIFICATE REQUEST-----
r10900-1(config)#
To create a CA bundle via the CLI use the system aaa tls ca-bundle command.
r10900-1(config)# system aaa tls ca-bundles ca-bundle ?
Possible completions:
<Reference to configured name of the CA Bundle.>
r10900-1(config)# system aaa tls ca-bundles ca-bundle
To create a Client Revocation List (CRL) via the CLI issue the following command.
r10900-1(config)# system aaa tls crls crl ?
Possible completions:
<Reference to configured name of the CRL.>
r10900-1(config)# system aaa tls crls crl
You can display the current certificate, keys, and passphrases using the CLI command show system aaa tls.
r10900-1# show system aaa tls
system aaa tls state certificate Certificate:
                                    Data:
                                        Version: 1 (0x0)
                                        Serial Number:
                                            c9:79:f0:b2:3e:9e:d2:a1
                                    Signature Algorithm: ecdsa-with-SHA256
                                        Issuer: CN=jim2, C=US, ST=MA, L=Boston, O=F5, OU=Sales/emailAddress=jim@f5.com
                                        Validity
                                            Not Before: Feb 24 21:35:31 2023 GMT
                                            Not After : Feb 24 21:35:31 2024 GMT
                                        Subject: CN=jim2, C=US, ST=MA, L=Boston, O=F5, OU=Sales/emailAddress=jim@f5.com
                                        Subject Public Key Info:
                                            Public Key Algorithm: id-ecPublicKey
                                                Public-Key: (384 bit)
                                                pub:
                                                    04:3f:f1:4c:d9:b4:41:8c:27:eb:ed:9a:41:14:b2:
                                                    08:af:da:12:fc:af:cd:6c:2b:00:77:72:5c:2a:9d:
                                                    72:a5:d3:cb:c5:08:da:f8:c3:2e:d3:07:6f:1b:e0:
                                                    4b:33:01:00:d3:06:12:22:a4:7b:82:e4:bd:86:a5:
                                                    eb:63:36:c1:72:c2:40:ea:66:ea:09:02:f9:b1:9e:
                                                    ba:98:41:ee:73:f5:b0:d4:a4:ee:80:26:c0:1a:a2:
                                                    12:c6:d2:c7:3d:13:85
                                                ASN1 OID: secp384r1
                                                NIST CURVE: P-384
                                    Signature Algorithm: ecdsa-with-SHA256
                                        30:66:02:31:00:ad:83:1c:be:06:49:b7:16:36:57:aa:20:f5:
                                        73:b6:59:2a:48:01:cd:18:3f:8a:65:87:4c:02:17:14:32:47:
                                        02:db:c6:c7:28:48:ac:6c:9a:fc:e2:88:40:71:1c:31:45:02:
                                        31:00:b3:06:dc:eb:60:42:df:d7:a6:b2:21:aa:ad:15:e9:70:
                                        1f:76:d6:1d:2d:25:5a:d0:0f:53:ab:1c:1a:3c:ce:e3:9a:6d:
                                        c4:e0:1f:38:58:d0:b3:dc:94:6a:02:47:a8:d0

system aaa tls state verify-client false
system aaa tls state verify-client-depth 1
r10900-1#
Managing Device Certificates, Keys, CSRs, and CAs via webUI
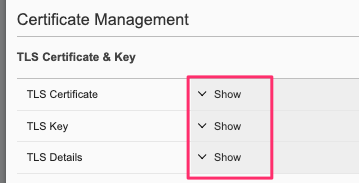
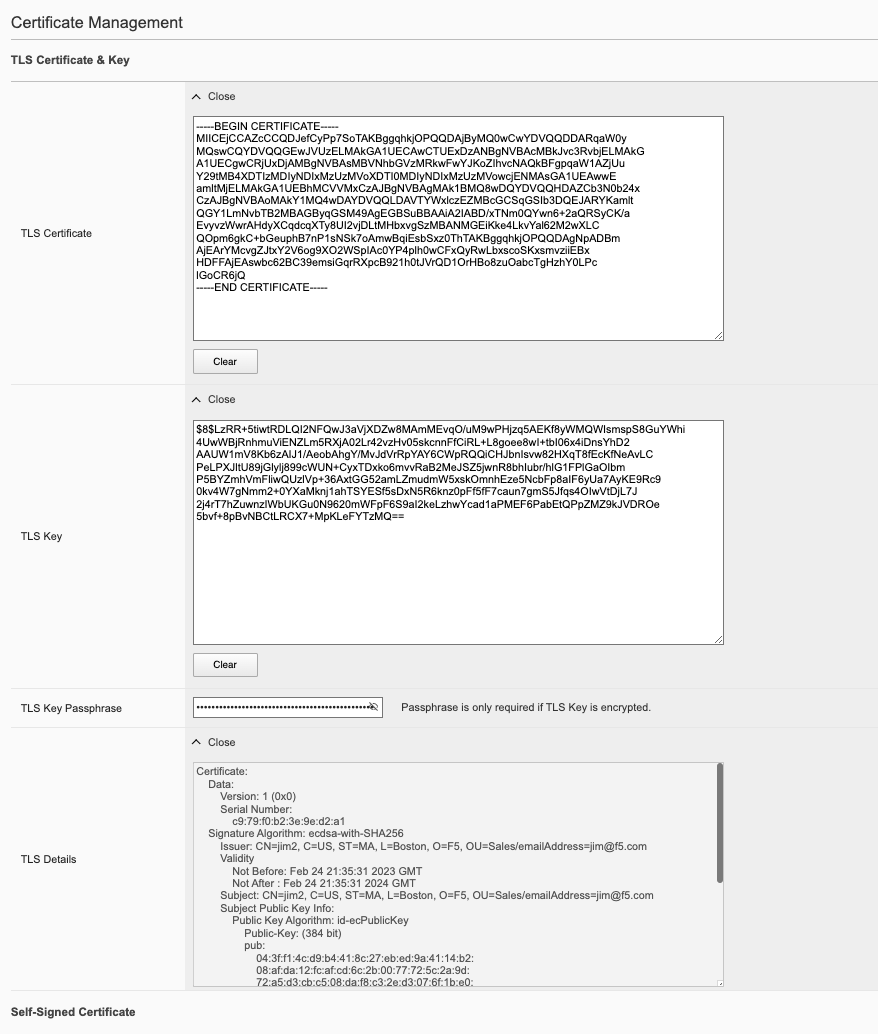
In the F5OS webUI you can manage device certificates for the management interface via the System Settings -> Certificate Management page in older versions of F5OS. In newer versions of F5OS, certificates are managed under the Authentication & Access -> TLS page. There are options to view the TLS certificates, keys, and details. You may also create self-signed certificates, create certificate signing requests (CSRs), and CA bundles.
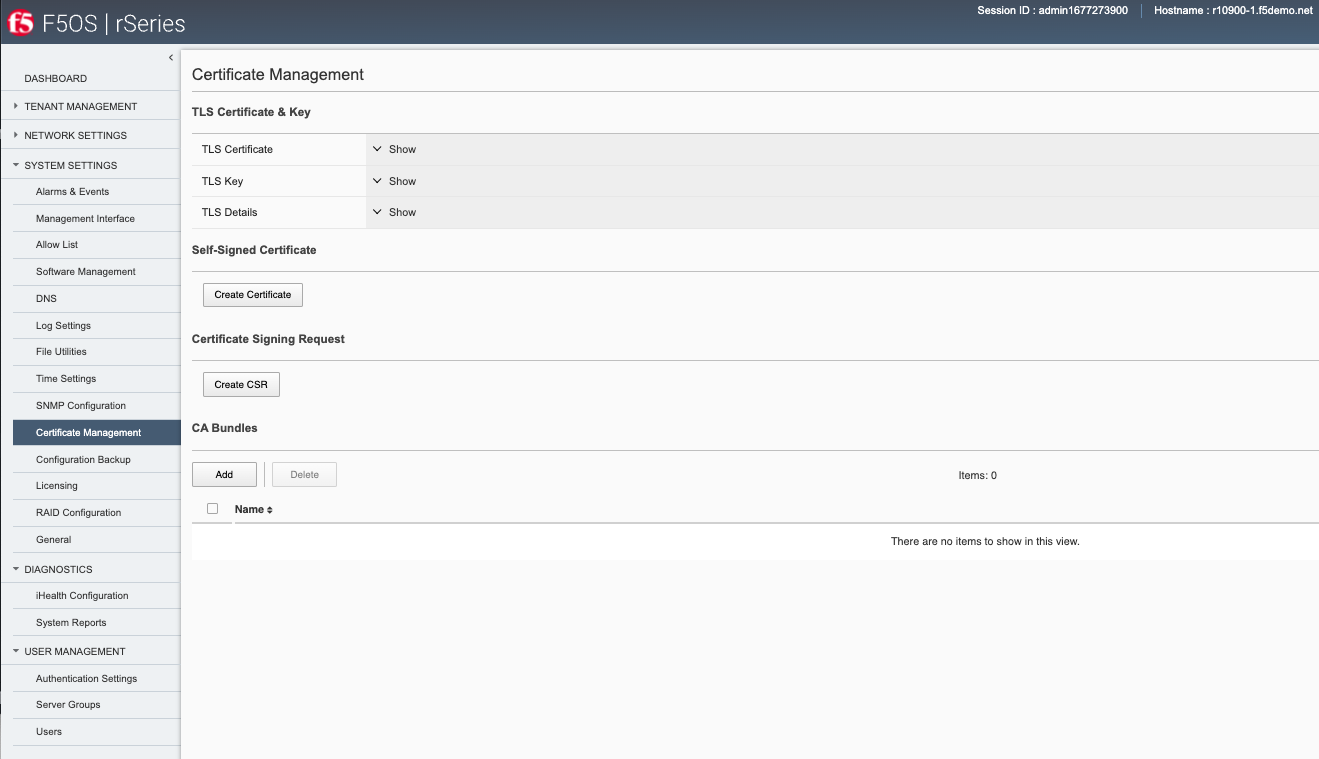
In newer versions of F5OS the Certificate Management is now under the Authentication & Access -> TLS Configuration page.

The screen below shows the options when creating a self-signed certificate.
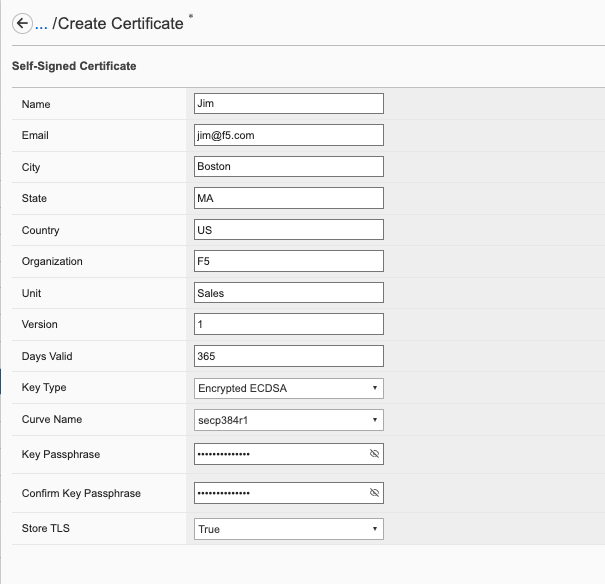
If you choose the Store TLS option of False then the certificate details will be displayed, and you will be given the option to copy them to the clipboard. If you want to store them on the system, then set the Store TLS option to True.
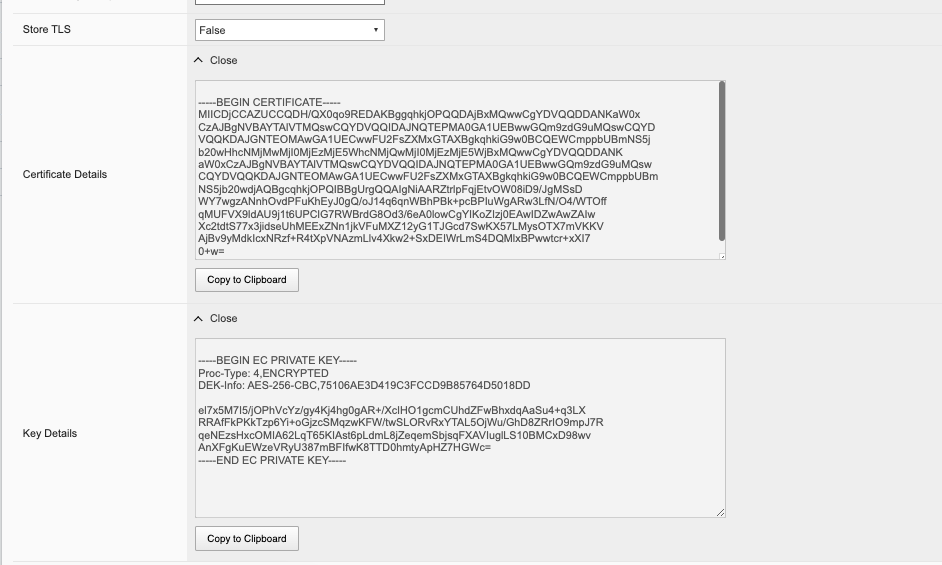
You can then use the Show options to display the current certificate, key, and details. Paste the text into the respective text boxes to add a certificate. TLS Key Passphrase is only required if TLS Key is in encrypted format.
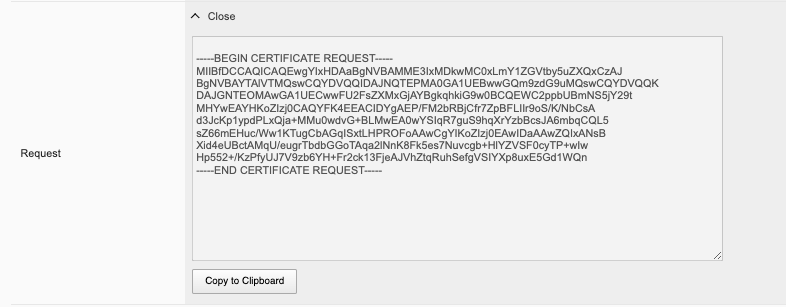
If you do not want to use a self-signed certificate, you can create a Certificate Signing Request (CSR) for use when submitting the certificate to a Certificate Authority (CA)..
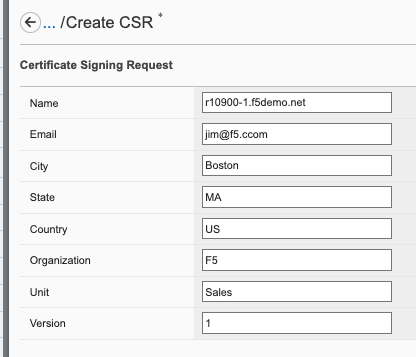
After clicking Save the CSR will appear, and you will be able to Copy to Clipboard so you can submit the signing request.
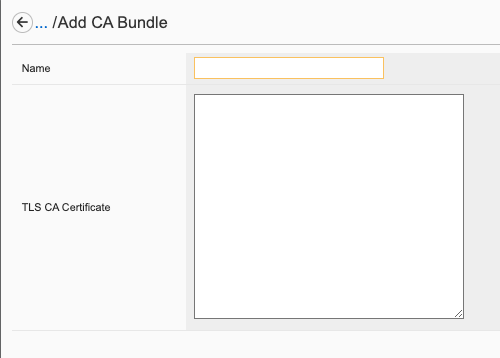
When you install an SSL certificate on the system, you also install a certificate authority (CA) bundle, which is a file that contains root and intermediate certificates. The combination of these two files completes the SSL chain of trust.
Managing Device Certificates, Keys, CSRs, and CAs via API
You can view the current certificates, keys and passphrases via the API using the following API call.
GET https://{{rseries_appliance1_ip}}:8888/restconf/data/openconfig-system:system/aaa/f5-openconfig-aaa-tls:tls
In the response you will notice the certificate, key, and optional passphrase as well as the state.
{
    "f5-openconfig-aaa-tls:tls": {
        "config": {
            "certificate": "-----BEGIN CERTIFICATE-----\nMIICEjCCAZcCCQDJefCyPp7SoTAKBggqhkjOPQQDAjByMQ0wCwYDVQQDDARqaW0y\nMQswCQYDVQQGEwJVUzELMAkGA1UECAwCTUExDzANBgNVBAcMBkJvc3RvbjELMAkG\nA1UECgwCRjUxDjAMBgNVBAsMBVNhbGVzMRkwFwYJKoZIhvcNAQkBFgpqaW1AZjUu\nY29tMB4XDTIzMDIyNDIxMzUzMVoXDTI0MDIyNDIxMzUzMVowcjENMAsGA1UEAwwE\namltMjELMAkGA1UEBhMCVVMxCzAJBgNVBAgMAk1BMQ8wDQYDVQQHDAZCb3N0b24x\nCzAJBgNVBAoMAkY1MQ4wDAYDVQQLDAVTYWxlczEZMBcGCSqGSIb3DQEJARYKamlt\nQGY1LmNvbTB2MBAGByqGSM49AgEGBSuBBAAiA2IABD/xTNm0QYwn6+2aQRSyCK/a\nEvyvzWwrAHdyXCqdcqXTy8UI2vjDLtMHbxvgSzMBANMGEiKke4LkvYal62M2wXLC\nQOpm6gkC+bGeuphB7nP1sNSk7oAmwBqiEsbSxz0ThTAKBggqhkjOPQQDAgNpADBm\nAjEArYMcvgZJtxY2V6og9XO2WSpIAc0YP4plh0wCFxQyRwLbxscoSKxsmvziiEBx\nHDFFAjEAswbc62BC39emsiGqrRXpcB921h0tJVrQD1OrHBo8zuOabcTgHzhY0LPc\nlGoCR6jQ\n-----END CERTIFICATE-----",
            "key": "$8$LzRR+5tiwtRDLQI2NFQwJ3aVjXDZw8MAmMEvqO/uM9wPHjzq5AEKf8yWMQWIsmspS8GuYWhi\n4UwWBjRnhmuViENZLm5RXjA02Lr42vzHv05skcnnFfCiRL+L8goee8wI+tbI06x4iDnsYhD2\nAAUW1mV8Kb6zAIJ1/AeobAhgY/MvJdVrRpYAY6CWpRQQiCHJbnIsvw82HXqT8fEcKfNeAvLC\nPeLPXJltU89jGlylj899cWUN+CyxTDxko6mvvRaB2MeJSZ5jwnR8bhIubr/hlG1FPlGaOIbm\nP5BYZmhVmFliwQUzlVp+36AxtGG52amLZmudmW5xskOmnhEze5NcbFp8aIF6yUa7AyKE9Rc9\n0kv4W7gNmm2+0YXaMknj1ahTSYESf5sDxN5R6knz0pFf5fF7caun7gmS5Jfqs4OIwVtDjL7J\n2j4rT7hZuwnzIWbUKGu0N9620mWFpF6S9aI2keLzhwYcad1aPMEF6PabEtQPpZMZ9kJVDROe\n5bvf+8pBvNBCtLRCX7+MpKLeFYTzMQ==",
            "passphrase": "$8$4hyAzRD/Wy3WCyocZXv6K4XeM8qDmgfX0CIHtfJYZDY=",
            "verify-client": false,
            "verify-client-depth": 1
        },
        "state": {
            "certificate": "Certificate:\n    Data:\n        Version: 1 (0x0)\n        Serial Number:\n            c9:79:f0:b2:3e:9e:d2:a1\n    Signature Algorithm: ecdsa-with-SHA256\n        Issuer: CN=jim2, C=US, ST=MA, L=Boston, O=F5, OU=Sales/emailAddress=jim@f5.com\n        Validity\n            Not Before: Feb 24 21:35:31 2023 GMT\n            Not After : Feb 24 21:35:31 2024 GMT\n        Subject: CN=jim2, C=US, ST=MA, L=Boston, O=F5, OU=Sales/emailAddress=jim@f5.com\n        Subject Public Key Info:\n            Public Key Algorithm: id-ecPublicKey\n                Public-Key: (384 bit)\n                pub: \n                    04:3f:f1:4c:d9:b4:41:8c:27:eb:ed:9a:41:14:b2:\n                    08:af:da:12:fc:af:cd:6c:2b:00:77:72:5c:2a:9d:\n                    72:a5:d3:cb:c5:08:da:f8:c3:2e:d3:07:6f:1b:e0:\n                    4b:33:01:00:d3:06:12:22:a4:7b:82:e4:bd:86:a5:\n                    eb:63:36:c1:72:c2:40:ea:66:ea:09:02:f9:b1:9e:\n                    ba:98:41:ee:73:f5:b0:d4:a4:ee:80:26:c0:1a:a2:\n                    12:c6:d2:c7:3d:13:85\n                ASN1 OID: secp384r1\n                NIST CURVE: P-384\n    Signature Algorithm: ecdsa-with-SHA256\n         30:66:02:31:00:ad:83:1c:be:06:49:b7:16:36:57:aa:20:f5:\n         73:b6:59:2a:48:01:cd:18:3f:8a:65:87:4c:02:17:14:32:47:\n         02:db:c6:c7:28:48:ac:6c:9a:fc:e2:88:40:71:1c:31:45:02:\n         31:00:b3:06:dc:eb:60:42:df:d7:a6:b2:21:aa:ad:15:e9:70:\n         1f:76:d6:1d:2d:25:5a:d0:0f:53:ab:1c:1a:3c:ce:e3:9a:6d:\n         c4:e0:1f:38:58:d0:b3:dc:94:6a:02:47:a8:d0\n",
            "verify-client": false,
            "verify-client-depth": 1
        }
    }
}
If you would like to create a self-signed certificate, key, and add a passphrase via the API, you can issue the following API POST command.
POST https://{{rseries_appliance1_ip}}:8888/restconf/data/openconfig-system:system/aaa/f5-openconfig-aaa-tls:tls/create-self-signed-cert
In the body of the API call enter the following JSON syntax.
{
    "f5-openconfig-aaa-tls:key-type": "encrypted-rsa",
    "f5-openconfig-aaa-tls:key-size": 4096,
    "f5-openconfig-aaa-tls:days-valid": 365,
    "f5-openconfig-aaa-tls:key-passphrase": "Pa$$W0rd!23",
    "f5-openconfig-aaa-tls:confirm-key-passphrase": "Pa$$W0rd!23",
    "f5-openconfig-aaa-tls:name": "r5900-1-gsa.cpt.f5net.com",
    "f5-openconfig-aaa-tls:organization": "f5",
    "f5-openconfig-aaa-tls:unit": "sales",
    "f5-openconfig-aaa-tls:city": "boston",
    "f5-openconfig-aaa-tls:region": "ma",
    "f5-openconfig-aaa-tls:country": "us",
    "f5-openconfig-aaa-tls:email": "jim@f5.com",
    "f5-openconfig-aaa-tls:san": "IP:172.22.50.1",
    "f5-openconfig-aaa-tls:version": 1,
    "f5-openconfig-aaa-tls:store-tls": "true"
}
If you would like to upload a certificate, key, and passphrase you can issue the following API PUT command.
PUT https://{{rseries_appliance1_ip}}:8888/restconf/data/openconfig-system:system/aaa/f5-openconfig-aaa-tls:tls
In the body of the API call enter the following JSON syntax.
{
    "f5-openconfig-aaa-tls:tls": {
        "config": {
            "certificate": "-----BEGIN CERTIFICATE-----\nMIICEjCCAZcCCQDJefCyPp7SoTAKBggqhkjOPQQDAjByMQ0wCwYDVQQDDARqaW0y\nMQswCQYDVQQGEwJVUzELMAkGA1UECAwCTUExDzANBgNVBAcMBkJvc3RvbjELMAkG\nA1UECgwCRjUxDjAMBgNVBAsMBVNhbGVzMRkwFwYJKoZIhvcNAQkBFgpqaW1AZjUu\nY29tMB4XDTIzMDIyNDIxMzUzMVoXDTI0MDIyNDIxMzUzMVowcjENMAsGA1UEAwwE\namltMjELMAkGA1UEBhMCVVMxCzAJBgNVBAgMAk1BMQ8wDQYDVQQHDAZCb3N0b24x\nCzAJBgNVBAoMAkY1MQ4wDAYDVQQLDAVTYWxlczEZMBcGCSqGSIb3DQEJARYKamlt\nQGY1LmNvbTB2MBAGByqGSM49AgEGBSuBBAAiA2IABD/xTNm0QYwn6+2aQRSyCK/a\nEvyvzWwrAHdyXCqdcqXTy8UI2vjDLtMHbxvgSzMBANMGEiKke4LkvYal62M2wXLC\nQOpm6gkC+bGeuphB7nP1sNSk7oAmwBqiEsbSxz0ThTAKBggqhkjOPQQDAgNpADBm\nAjEArYMcvgZJtxY2V6og9XO2WSpIAc0YP4plh0wCFxQyRwLbxscoSKxsmvziiEBx\nHDFFAjEAswbc62BC39emsiGqrRXpcB921h0tJVrQD1OrHBo8zuOabcTgHzhY0LPc\nlGoCR6jQ\n-----END CERTIFICATE-----",
            "key": "$8$LzRR+5tiwtRDLQI2NFQwJ3aVjXDZw8MAmMEvqO/uM9wPHjzq5AEKf8yWMQWIsmspS8GuYWhi\n4UwWBjRnhmuViENZLm5RXjA02Lr42vzHv05skcnnFfCiRL+L8goee8wI+tbI06x4iDnsYhD2\nAAUW1mV8Kb6zAIJ1/AeobAhgY/MvJdVrRpYAY6CWpRQQiCHJbnIsvw82HXqT8fEcKfNeAvLC\nPeLPXJltU89jGlylj899cWUN+CyxTDxko6mvvRaB2MeJSZ5jwnR8bhIubr/hlG1FPlGaOIbm\nP5BYZmhVmFliwQUzlVp+36AxtGG52amLZmudmW5xskOmnhEze5NcbFp8aIF6yUa7AyKE9Rc9\n0kv4W7gNmm2+0YXaMknj1ahTSYESf5sDxN5R6knz0pFf5fF7caun7gmS5Jfqs4OIwVtDjL7J\n2j4rT7hZuwnzIWbUKGu0N9620mWFpF6S9aI2keLzhwYcad1aPMEF6PabEtQPpZMZ9kJVDROe\n5bvf+8pBvNBCtLRCX7+MpKLeFYTzMQ==",
            "passphrase": "$8$4hyAzRD/Wy3WCyocZXv6K4XeM8qDmgfX0CIHtfJYZDY=",
            "verify-client": false,
            "verify-client-depth": 1
        }
    }
}
Encrypt Management TLS Private Key
Previously, F5OS allowed an admin to import a TLS certificate and key in clear text. In F5OS-A 1.4.0 an admin can now optionally enter a passphrase with the encrypted private key. This is like the BIG-IP functionality defined in the link below.
K14912: Adding and removing encryption from private SSL keys (11.x - 16.x)
Appliance Mode for F5OS
If you would like to prevent root / bash level access to the F5OS layer, you can enable Appliance Mode, which operates in a similar manner as TMOS appliance mode. Enabling Appliance mode will disable the root account, and access to the underlying bash shell is disabled. The admin account to the F5OS CLI is still enabled. This is viewed as a more secure setting as many vulnerabilities can be avoided by not allowing access to the bash shell. In some heavily audited environments, this setting may be mandatory, but it may prevent lower-level debugging from occurring directly in the bash shell. It can be disabled on a temporary basis to do advanced troubleshooting, and then re-enabled when finished.
Enabling F5OS Appliance Mode via the CLI
Appliance mode can be enabled or disabled via the CLI using the command system appliance-mode config and entering either enabled or disabled. The command show system appliance-mode will display the status. Be sure to commit any changes.
r10900(config)# system appliance-mode config enabled
r10900(config)# commit
Commit complete.
r10900(config)#
To display the current status.
r10900(config)# do show system appliance-mode
system appliance-mode state enabled
r10900(config)#
If you then try to login as root, you will get a permission denied error. You can still login as admin to gain access to the F5OS CLI.
To disable appliance mode.
r10900(config)# system appliance-mode config disabled
r10900(config)# commit
Commit complete.
r10900(config)#
Enabling F5OS Appliance Mode via the webUI
Appliance mode can be enabled or disabled via the webUI under the System Settings -> General page.
In newer F5OS releases, Appliance Mode configuration has been moved to the System Settings -> System Security page.

Enabling F5OS Appliance Mode via the API
Appliance mode can be enabled or disabled via the API. To view the current status of appliance mode use the following API call.
GET https://{{rseries_appliance1_ip}}:8888/restconf/data/openconfig-system:system/f5-security-appliance-mode:appliance-mode
You will see output similar to the response below showing the config and state of appliance mode for F5OS.
{
    "f5-security-appliance-mode:appliance-mode": {
        "config": {
            "enabled": false
        },
        "state": {
            "enabled": false
        }
    }
}
To change the mode from disabled to enabled, use the following API call.
PATCH https://{{rseries_appliance1_ip}}:8888/restconf/data/openconfig-system:system/f5-security-appliance-mode:appliance-mode/f5-security-appliance-mode:config
In the body of the API call add the following:
{
    "f5-security-appliance-mode:config": {
        "f5-security-appliance-mode:enabled": "true"
    }
}
Appliance Mode for BIG-IP Tenants
If you would like to prevent root / bash level access to the BIG-IP tenants, you can enable Appliance Mode. in the tenant settings. Enabling Appliance mode will disable the root account, and access to the underlying bash shell is disabled for BIG-IP. The admin account to the TMOS CLI is still enabled. This is viewed as a more secure setting as many vulnerabilities can be avoided by not allowing access to the bash shell. In some heavily audited environments, this setting may be mandatory, but it may prevent lower-level debugging from occurring directly in the bash shell. It can be disabled on a temporary basis to do advanced troubleshooting, and then re-enabled when finished.
Enabling BIG-IP Tenant Appliance Mode via the CLI
When creating a BIG-IP tenant via the CLI you have the option of enabling or disabling (default) appliance-mode as seen below.
Boston-r10900-1# config
Entering configuration mode terminal
Boston-r10900-1(config)# tenants tenant tenant2
Boston-r10900-1(config-tenant-test-tenant)# config ?
Possible completions:
    appliance-mode           Appliance mode can be enabled/disabled at tenant level
    cryptos                  Enable crypto devices for the tenant.
    dag-ipv6-prefix-length   Tenant default value of IPv6 networking mask used by disaggregator algorithms
    gateway                  User-specified gateway for the tenant static mgmt-ip.
    image                    User-specified image for tenant.
    mac-data
    memory                   User-specified memory in MBs for the tenant.
    mgmt-ip                  User-specified mgmt-ip for the tenant management access.
    nodes                    User-specified node-number(s) in the partition to schedule the tenant.
    prefix-length            User-specified prefix-length for the tenant static mgmt-ip.
    running-state            User-specified desired state for the tenant.
    storage                  User-specified storage information
    type                     Tenant type.
    vcpu-cores-per-node      User-specified number of logical cpu cores for the tenant.
    virtual-wires            User-specified virtual-wires from virtual-wire table for the tenant.
    vlans                    User-specified vlan-id from vlan table for the tenant.
Boston-r10900-1(config-tenant-tenant2)# config ?
Boston-r10900-1(config-tenant-tenant2)# config cryptos enabled
Boston-r10900-1(config-tenant-tenant2)# config vcpu-cores-per-node 4
Boston-r10900-1(config-tenant-tenant2)# config type BIG-IP
Boston-r10900-1(config-tenant-tenant2)# config vlans 500
Boston-r10900-1(config-tenant-tenant2)# config vlans 3010
Boston-r10900-1(config-tenant-tenant2)# config vlans 3011
Boston-r10900-1(config-tenant-tenant2)# config running-state deployed
Boston-r10900-1(config-tenant-tenant2)# config appliance-mode enabled
Boston-r10900-1(config-tenant-tenant2)# config memory 14848
Any changes must be committed for them to be executed:
Boston-r10900-1(config-tenant-tenant2)# commit
Commit complete.
Boston-r10900-1(config-tenant-tenant2)#
You may alternatively put all the parameters on one line instead of using the interactive mode above:
Boston-r10900-1(config)# tenants tenant tenant2 config image BIGIP-15.1.5-0.0.8.ALL-F5OS.qcow2.zip.bundle vcpu-cores-per-node 2 nodes 1 vlans [ 500 3010 3011 ] mgmt-ip 10.255.0.136 prefix-length 24 gateway 10.255.0.1 name tenant2 running-state deployed appliance-mode enabled
Boston-r10900-1(config-tenant-tenant2)# commit
Commit complete.
Boston-r10900-1(config-tenant-tenant2)#
Enabling BIG-IP Tenant Appliance Mode via the webUI
When creating a BIG-IP tenant via the webUI you have the option of enabling or disabling (default) appliance-mode as seen below.

Enabling BIG-IP Tenant Appliance Mode via the API
When creating a BIG-IP tenant via the API you have the option of enabling or disabling (default) appliance-mode as seen below. Tenant creation via the API is as simple as defining the parameters below and sending the POST to the rSeries out-of-band IP address. The API call below will create a tenant; many of the fields are defined as variables in Postman. That way the API calls don’t have to be rewritten for different tenant names or IP addressing, or images, and they can be reused easily and adapted to any environment.
POST https://{{rseries_appliance1_ip}}:8888/restconf/data/f5-tenants:tenants
Below is the body of the API call above.
{
    "tenant": [
        {
            "name": "{{New_Tenant1_Name}}",
            "config": {
                "image": "{{Appliance_Tenant_Image}}",
                "nodes": [
                    1
                ],
                "mgmt-ip": "{{Appliance1_Tenant1_IP}}",
                "gateway": "{{OutofBand_DFGW}}",
                "prefix-length": 24,
                "vlans": [
                    3010,
                    3011,
                    500
                ],
                "vcpu-cores-per-node": 2,
                "memory": 7680,
                "cryptos": "enabled",
                "running-state": "configured"
                "appliance-mode": "enabled"
            }
        }
    ]
}
Validating Tenant Status via API
The command below will show the current state and status of the tenant. Remember it has not been changed to the Deployed state yet.
GET https://{{rseries_appliance1_ip}}:8888/restconf/data/f5-tenants:tenants
The output of the above API call shows the state and status of the tenant.
{
    "f5-tenants:tenants": {
        "tenant": [
            {
                "name": "tenant1",
                "config": {
                    "name": "tenant1",
                    "type": "BIG-IP",
                    "image": "BIGIP-15.1.5-0.0.8.ALL-F5OS.qcow2.zip.bundle",
                    "nodes": [
                        1
                    ],
                    "mgmt-ip": "10.255.0.149",
                    "prefix-length": 24,
                    "gateway": "10.255.0.1",
                    "vlans": [
                        500,
                        3010,
                        3011
                    ],
                    "cryptos": "enabled",
                    "vcpu-cores-per-node": 2,
                    "memory": "7680",
                    "storage": {
                        "size": 76
                    },
                    "running-state": "configured",
                    "appliance-mode": {
                        "enabled": false
                    }
                },
                "state": {
                    "name": "tenant1",
                    "unit-key-hash": "ec+5rtpwnIt6awtkadYqXyWzJ/Oty4tRbfPICaz6OzPSw4KILtQMJZETeq/Q6pbfBh8zXQfBPTetgvPw2dW2ig==",
                    "type": "BIG-IP",
                    "mgmt-ip": "10.255.0.149",
                    "prefix-length": 24,
                    "gateway": "10.255.0.1",
                    "mac-ndi-set": [
                        {
                            "ndi": "default",
                            "mac": "00:94:a1:69:59:24"
                        }
                    ],
                    "vlans": [
                        500,
                        3010,
                        3011
                    ],
                    "cryptos": "enabled",
                    "vcpu-cores-per-node": 2,
                    "memory": "7680",
                    "storage": {
                        "size": 76
                    },
                    "running-state": "configured",
                    "mac-data": {
                        "base-mac": "00:94:a1:69:59:26",
                        "mac-pool-size": 1
                    },
                    "appliance-mode": {
                        "enabled": false
                    },
                    "status": "Configured"
                }
            }
        ]
    }
}
Resource Admin & Guest User Role
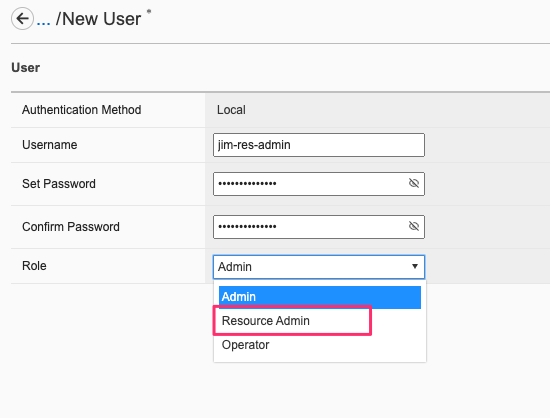
The F5OS-A 1.4.0 release introduced the Resource Admin user role, which is similar to the Admin user role but it cannot create additional local user accounts, delete existing local users, change local user authorizations, or change the set of remotely authenticated users allowed to access the system. Below is an example creating a resource admin user via the CLI. When assigning a new user to role resource-admin, their access will be restricted as noted above.
F5OS-A 1.8.0 also adds a new “Guest” role called user. The new user role available at the F5OS-A system level restricts access to the logs similar to BIG-IP Guest user. F5OS has implemented a new role called user which provides read-only access to view all the non-sensitive information on the system. The user role cannot modify any system configurations, however users can change account passwords.
Resource Admin & Guest User Role via CLI
Below is an example of setting up a new user with the built-in resource-admin role.
r10900-2(config)# system aaa authentication users user res-admin-user config username res-admin-user role resource-admin
r10900-2(config-user-res-admin-user)# commit
Commit complete.
r10900-2(config-user-res-admin-user)# config set-password password
Value for 'password' (<string>): **************
r10900-2(config-user-res-admin-user)#
When logging in as the resource-admin user, the aaa and aaa authentication options in the CLI will be limited compared to a normal admin user. The CLI output below shows the full configuration options available to a typical admin user.
r10900-2(config)# system aaa ?
Possible completions:
authentication
password-policy   Top-level container for password-policy settings.
primary-key
restconf-token    restconf-token lifetime.
server-groups
tls               Top-level container for key/certificate settings.
Below is a typical output of system aaa authentication for an admin role.
r10900-2(config)# system aaa authentication ?
Possible completions:
config
ldap     Top-level container for LDAP search settings.
roles    Enclosing container list of roles.
users    Enclosing container list of local users.
r10900-2(config)#
The output below shows the limited aaa and aaa authentication options available to the resource-admin user. Note, that this role is unable to configure new users, edit users, change password policies, configure the primary-key, server-groups, or rest-conf token timeouts.
r10900-2(config)# system aaa ?
Possible completions:
authentication
tls              Top-level container for key/certificate settings.
Below is a limited output of system aaa authentication for the resource-admin role.
r10900-2(config)# system aaa authentication ?
Possible completions:
users   Enclosing container list of local users.
<cr>
r10900-2(config)#
Below is an example of setting up a new user with the built-in user role.
r10900-1-gsa(config)# system aaa authentication users user guest-user2 config username guest-user2 role user
r10900-1-gsa(config-user-guest-user2)# commit
Commit complete.
r10900-1-gsa(config-user-guest-user2)# config set-password
Value for 'password' (<string>): **************
response Password successfully updated.
r10900-1-gsa(config-user-guest-user2)#
When logging in as the user with the user role assigned, the configuration mode will be unavailable. The user role will prevent the user from entering config mode.
r10900-1-gsa# config
--------------^
syntax error: expecting
The user role will also prevent the user from running file operations from the CLI.
r10900-1-gsa# file ?
            ^
% Invalid input detected at '^' marker.
r10900-1-gsa# file
Resource Admin & Guest User Role via webUI
The webUI also supports the assignment of the resource-admin role to any user.
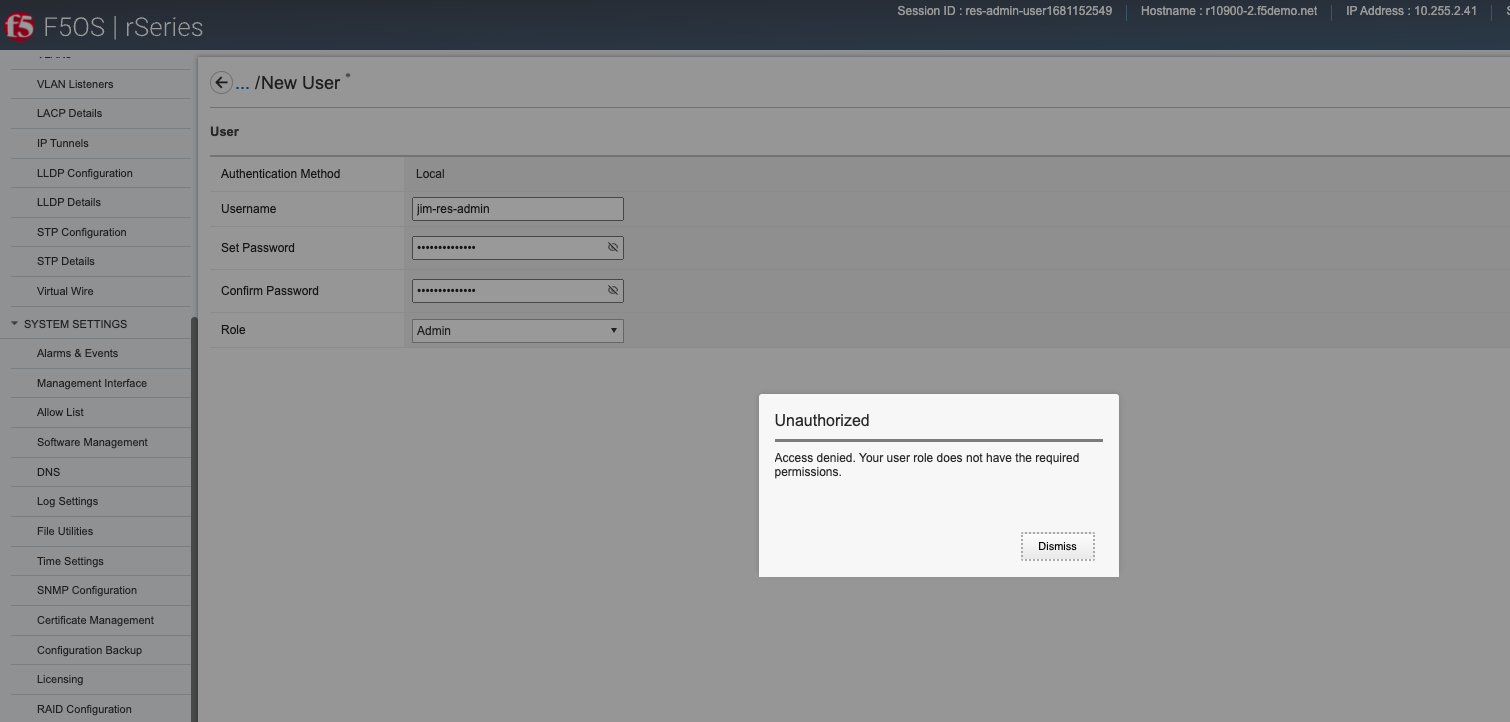
When logging in as the resource-admin user, any attempt to configure the restricted items above will result in an Access Denied error like the one below.
The webUI also supports the assignment of the user role to any user.

When a user logs in with the user role assigned, they can view configuration, but the webUI will prevent any changes from being made by blocking save functions.

Resource-Admin & Guest User Role via API
The API also supports the assignment of the resource-admin role to any user.
To view the current user roles:
GET https://{{rseries_appliance1_ip}}:8888/restconf/data/openconfig-system:system/aaa/authentication
The output will look similar to the response below. Note, the resource-admin role.
{
    "openconfig-system:authentication": {
        "config": {
            "f5-aaa-confd-restconf-token:basic": {
                "enabled": true
            },
            "f5-openconfig-aaa-clientcert:cert-auth": {
                "enabled": false
            },
            "f5-openconfig-aaa-superuser:superuser-bash-access": false
        },
        "state": {
            "f5-aaa-confd-restconf-token:basic": {
                "enabled": true
            },
            "f5-openconfig-aaa-clientcert:cert-auth": {
                "enabled": false
            },
            "f5-openconfig-aaa-superuser:superuser-bash-access": false
        },
        "f5-aaa-confd-restconf-token:state": {
            "basic": {
                "enabled": true
            }
        },
        "f5-openconfig-aaa-clientcert:clientcert": {
            "config": {
                "client-cert-name-field": "subjectname-cn",
                "OID": "UPN"
            },
            "state": {
                "client-cert-name-field": "subjectname-cn",
                "OID": "UPN"
            }
        },
        "f5-openconfig-aaa-ldap:ldap": {
            "bind_timelimit": 10,
            "timelimit": 0,
            "idle_timelimit": 0,
            "ldap_version": 3,
            "ssl": "off",
            "active_directory": false,
            "unix_attributes": true,
            "tls_reqcert": "demand",
            "chase-referrals": true
        },
        "f5-openconfig-aaa-ocsp:ocsp": {
            "config": {
                "override-responder": "off",
                "response-max-age": -1,
                "response-time-skew": 300,
                "nonce-request": "on",
                "enabled": false
            },
            "state": {
                "override-responder": "off",
                "response-max-age": -1,
                "response-time-skew": 300,
                "nonce-request": "on",
                "enabled": false
            }
        },
        "f5-openconfig-aaa-radius:radius": {
            "require_message_authenticator": false
        },
        "f5-system-aaa:users": {
            "user": [
                {
                    "username": "admin",
                    "config": {
                        "username": "admin",
                        "last-change": "2021-09-29",
                        "tally-count": 0,
                        "expiry-date": "-1",
                        "role": "admin",
                        "expiry-status": "enabled"
                    },
                    "state": {
                        "authorized-keys": "-",
                        "username": "admin",
                        "last-change": "2021-09-29",
                        "tally-count": 0,
                        "expiry-date": "-1",
                        "role": "admin",
                        "expiry-status": "enabled"
                    }
                },
                {
                    "username": "operator",
                    "config": {
                        "username": "operator",
                        "last-change": "2024-04-09",
                        "tally-count": 0,
                        "expiry-date": "-1",
                        "role": "operator",
                        "expiry-status": "enabled"
                    },
                    "state": {
                        "authorized-keys": "-",
                        "username": "operator",
                        "last-change": "2024-04-09",
                        "tally-count": 0,
                        "expiry-date": "-1",
                        "role": "operator",
                        "expiry-status": "enabled"
                    }
                },
                {
                    "username": "root",
                    "config": {
                        "username": "root",
                        "last-change": "2021-11-29",
                        "tally-count": 0,
                        "expiry-date": "-1",
                        "role": "root",
                        "expiry-status": "enabled"
                    },
                    "state": {
                        "username": "root",
                        "last-change": "2021-11-29",
                        "tally-count": 0,
                        "expiry-date": "-1",
                        "role": "root",
                        "expiry-status": "enabled"
                    }
                }
            ]
        },
        "f5-system-aaa:roles": {
            "role": [
                {
                    "rolename": "admin",
                    "config": {
                        "rolename": "admin",
                        "gid": 9000,
                        "description": "Unrestricted read/write access."
                    },
                    "state": {
                        "rolename": "admin",
                        "gid": 9000,
                        "remote-gid": "-",
                        "ldap-group": "-",
                        "description": "Unrestricted read/write access."
                    }
                },
                {
                    "rolename": "operator",
                    "config": {
                        "rolename": "operator",
                        "gid": 9001,
                        "description": "Read-only access to system level data."
                    },
                    "state": {
                        "rolename": "operator",
                        "gid": 9001,
                        "remote-gid": "-",
                        "ldap-group": "-",
                        "description": "Read-only access to system level data."
                    }
                },
                {
                    "rolename": "resource-admin",
                    "config": {
                        "rolename": "resource-admin",
                        "gid": 9003,
                        "description": "Restricted read/write access. No access to modify authentication configuration."
                    },
                    "state": {
                        "rolename": "resource-admin",
                        "gid": 9003,
                        "remote-gid": "-",
                        "ldap-group": "-",
                        "description": "Restricted read/write access. No access to modify authentication configuration."
                    }
                },
                {
                    "rolename": "superuser",
                    "config": {
                        "rolename": "superuser",
                        "gid": 9004,
                        "description": "Sudo privileges and Bash access to the system (if enabled)."
                    },
                    "state": {
                        "rolename": "superuser",
                        "gid": 9004,
                        "remote-gid": "-",
                        "ldap-group": "-",
                        "description": "Sudo privileges and Bash access to the system (if enabled)."
                    }
                },
                {
                    "rolename": "user",
                    "config": {
                        "rolename": "user",
                        "gid": 9002,
                        "description": "Read-only access to non-sensitive system level data."
                    },
                    "state": {
                        "rolename": "user",
                        "gid": 9002,
                        "remote-gid": "-",
                        "ldap-group": "-",
                        "description": "Read-only access to non-sensitive system level data."
                    }
                }
            ]
        }
    }
}
To see the current user accounts on the system.
GET https://{{rseries_appliance1_ip}}:8888/restconf/data/openconfig-system:system/aaa/authentication/f5-system-aaa:users
The response will detail all the configured user accounts on the system.
{
    "f5-system-aaa:users": {
        "user": [
            {
                "username": "admin",
                "config": {
                    "username": "admin",
                    "last-change": "2021-09-29",
                    "tally-count": 0,
                    "expiry-date": "-1",
                    "role": "admin",
                    "expiry-status": "enabled"
                },
                "state": {
                    "authorized-keys": "-",
                    "username": "admin",
                    "last-change": "2021-09-29",
                    "tally-count": 0,
                    "expiry-date": "-1",
                    "role": "admin",
                    "expiry-status": "enabled"
                }
            },
            {
                "username": "operator",
                "config": {
                    "username": "operator",
                    "last-change": "2024-04-09",
                    "tally-count": 0,
                    "expiry-date": "-1",
                    "role": "operator",
                    "expiry-status": "enabled"
                },
                "state": {
                    "authorized-keys": "-",
                    "username": "operator",
                    "last-change": "2024-04-09",
                    "tally-count": 0,
                    "expiry-date": "-1",
                    "role": "operator",
                    "expiry-status": "enabled"
                }
            },
            {
                "username": "root",
                "config": {
                    "username": "root",
                    "last-change": "2021-11-29",
                    "tally-count": 0,
                    "expiry-date": "-1",
                    "role": "root",
                    "expiry-status": "enabled"
                },
                "state": {
                    "username": "root",
                    "last-change": "2021-11-29",
                    "tally-count": 0,
                    "expiry-date": "-1",
                    "role": "root",
                    "expiry-status": "enabled"
                }
            }
        ]
    }
}
To create a new user and assign it to the resource-admin role, use the following API call.
PATCH https://{{rseries_appliance1_ip}}:8888/restconf/data/openconfig-system:system/aaa
In the body of the API call add the username and role as seen below.
{
"openconfig-system:aaa": {
    "authentication": {
        "f5-system-aaa:users": {
            "user": [
                {
                    "username": "resource-admin-user",
                    "config": {
                        "role": "resource-admin"
                    }
                }
            ]
        }
    }
}
To create a new user and assign it to the user role, use the following API call.
PATCH https://{{rseries_appliance1_ip}}:8888/restconf/data/openconfig-system:system/aaa
In the body of the API call add the username and role as seen below.
{
"openconfig-system:aaa": {
    "authentication": {
        "f5-system-aaa:users": {
            "user": [
                {
                    "username": "guest-user",
                    "config": {
                        "role": "user"
                    }
                }
            ]
        }
    }
}
Superuser Role
F5OS-A 1.8.0 adds a new role called superuser. The new superuser role available at the F5OS-A system level provides sudo privileges and bash access to the system (if enabled). This role is intended for environments where appliance mode (prevent bash level access) is disabled. Some customers prefer to manage BIG-IP from the bash shell and leverage tmsh commands to pipe into various Unix utilities to parse output. A similar feature has been added to F5OS 1.8.0 where F5OS commmands can now be executed from the bash shell via the new f5sh utility. This new role provides a way for a user with “sudo” privileges to be able to be remotely authenticated into the F5OS bash shell, but also provides an audit trail of the users interactions with the new f5sh utility in bash shell.
RBAC on F5OS has been implemented in a way where Roles provide slices of privileges that can be composed with each other. There are Primary Roles and Secondary Roles which can be combined together to give a particular user multiple privileges.
Users must be assigned to a single primary group/role, and can become members of further supplementary groups/roles by adding them to the users list for that group/role. The roles can be combined together to give a particular user multiple privileges. The superuser role is intended to be assigned as a supplementary role in addition to another role like admin, whether the role is primary or supplementary does not matter (order does not matter), if only the superuser role was applied it would restrict access to services like the webUI, granting the admin role as a supplemental role will provide normal webUI access.
As an example, assigning a Primary Role of admin to a user and then adding that same user to the superuser role will give the user access to the webUI via the admin privileges, and if the system aaa authentication config superuser-bash-access true command is set (to true) the default CLI login for this user will be the bash shell. The superuser role does not grant webUI access or Confd CLI access on its own.
Superuser Role via CLI using Named Groups on LDAP/Active Directory
To enable LDAP remote authentication see an example configuration below.
system aaa authentication config authentication-method LDAP_ALL
system aaa authentication ldap base distinguishedName=CN=ABC-ADCAdmins,OU=Groups,OU=XYZ,DC=abc123,DC=root,DC=org
system aaa server-groups server-group ldap-group config name ldap-group type LDAP
servers server 10.10.10.223 config address 10.10.10.223
ldap config auth-port 389 type ldap
If the LDAP server is an Active Directory server, then the following CLI command should be added.
r10900-1-gsa(config)# system aaa authentication ldap active_directory true
r10900-1-gsa(config)# commit
Commit complete.
r10900-1-gsa(config)#
The admin will then need to enable the ldap-group filters for both the primary and supplementary groups/roles which in this case are admin and superuser. In this case, named LADP groups are being used.
system aaa authentication roles role admin config ldap-group <filter for remote admin group>
system aaa authentication roles role superuser config ldap-group <filter for remote superuser group>
The ldap-group mapping using the group’s LDAP distinguished name is only necessary if the user/group records do not contain “posix/unix attributes” (‘gidNumber’) that identify the Linux GID of the group. If the records on the remote authentication server have Unix attributes, you can use ‘system aaa authentication roles role <role> config remote-gid’ to specify the remote group by GID, rather than mapping by name.
Because this particular configuration is using named LDAP groups, you must disable the unix_attributes via the following CLI command. You cannot mix named LDAP groups with GID based unix groups, you must pick one or the other. In this example we are using the named LDAP groups.
r10900-1-gsa(config)# system aaa authentication ldap unix_attributes false
r10900-1-gsa(config)# commit
Commit complete.
r10900-1-gsa(config)#
If the configuration were using LDAP Group ID’s instead of named LDAP groups, then the above configuration would be set to true. The configuration above should be enough to remotely authenticate users who are within one or more of the groups specified. To finalize the superuser configuration, you must also set the following F5OS command to true to enable bash shell access for users assigned to the superuser group.
r10900-1-gsa(config)# system aaa authentication config superuser-bash-access true
r10900-1-gsa(config)# commit
Commit complete.
r10900-1-gsa(config)#
You can view the current state of these parmeters via the following CLI show comands.
appliance-1# show system aaa authentication
system aaa authentication state cert-auth disabled
system aaa authentication f5-aaa-token:state basic disabled
system aaa authentication state superuser-bash-access true
system aaa authentication ocsp state override-responder off
system aaa authentication ocsp state response-max-age -1
system aaa authentication ocsp state response-time-skew 300
system aaa authentication ocsp state nonce-request on
system aaa authentication ocsp state disabled
            AUTHORIZED  LAST        TALLY  EXPIRY
USERNAME       KEYS        CHANGE      COUNT  DATE    ROLE
----------------------------------------------------------------------
admin          -           2022-08-31  0      -1      admin
big-ip-15-1-6  -           0           0      1       tenant-console
big-ip-15-1-8  -           0           0      1       tenant-console
root           -           2022-08-31  0      -1      root

                    REMOTE
ROLENAME        GID   GID     USERS
-------------------------------------
admin           9000  -       -
operator        9001  -       -
resource-admin  9003  -       -
tenant-console  9100  -       -
superuser       9004  -       -

Superuser Role via WebUI
--------------------------------
Superuser Role via WebUI using Named Groups on LDAP/Active Directory
Enable Superuser Bash Access Go to Authentication Settings screen. Edit the Superuser Bash Access dropdown by selecting ‘Enabled’ option. Click on Save.
Superuser Role via API using Named Groups on LDAP/Active Directory
Session Timeouts and Token Lifetime
Idle timeouts were configurable in previous releases, but the configuration only applied to the current session and was not persistent. F5OS-A 1.3.0 added the ability to configure persistent idle timeouts for F5OS for both the CLI and webUI. The F5OS CLI timeout is configured under system settings and is controlled via the idle-timeout option. This will logout idle sessions to the F5OS CLI whether they are logged in from the console or over SSH.
In F5OS-A 1.4.0, a new sshd-idle-timeout option has been added that will control idle-timeouts for both root sessions to the bash shell over SSH, as well as F5OS CLI sessions over SSH. When the idle-timeout and sshd-idle-timeout are both configured, the shorter interval should take precedence. As an example, if the idle-timeout is configured for three minutes, but the sshd-idle-timeout is set to 2 minutes, then an idle connection that is connected over SSH will disconnect in two minutes, which is the shorter of the two configured options. An idle connection to the F5OS CLI over the console will disconnect in three minutes, because the sshd-idle-timeout doesn’t apply to console sessions.
There is one case that is not covered by either of the above idle-timeout settings until version F5OS-A 1.8.0. When connecting over the console to the bash shell as root, neither of these settings will disconnect an idle session in previous releases. Only console connections to the F5OS CLI are covered via the idle-timeout setting. In F5OS-A 1.8.0 the new deny-root-ssh mode when enabled restricts root access over SSH. However, root users can still access the system through the system’s console interface as long as appliance-mode is disabled. If appliance-mode is enabled it overrides this setting, and no root access is allowed via SSH or console. The table below provides more details on the behavior of the setting in conjunction with the appliance mode setting.
| Appliance-mode = Disabled | ||
|---|---|---|
| deny-root-ssh | root console access | root ssh access |
| enabled | Yes | No |
| disabled | Yes | Yes |
| Appliance-mode = Enabled | ||
|---|---|---|
| deny-root-ssh | root console access | root ssh access |
| enabled | No | No |
| disabled | No | No |
For the webUI, a token-based timeout is now configurable under the system aaa settings. The default RESTCONF token lifetime is 15 minutes and can be configured for a maximum of 1440 minutes. RESTCONF token will be automatically renewed when the token’s lifetime is less than one-third of its original token lifetime. For example, if we set the token lifetime to two minutes, it will be renewed and a new token will be generated, when the token’s lifetime is less than one-third of its original lifetime, that is, anytime between 80 to 120 seconds. However, if a new RESTCONF request is not received within the buffer time (80 to 120 seconds), the token will expire and you will be logged out of the session. The RESTCONF token will be renewed up to five times, after that the token will not be renewed and you will need to log back in to the system.
Configuring SSH and CLI Timeouts & Deny Root SSH Settings via CLI
To configure the F5OS CLI timeout via the CLI, use the command system settings config idle-timeout <value-in-seconds>. Be sure to issue a commit to save the changes. In the case below, a CLI session to the F5OS CLI should disconnect after 300 seconds of inactivity. This will apply to connections to the F5OS CLI over both console and SSH.
r10900(config)# system settings config idle-timeout 300
r10900(config)# commit
Commit complete.
To configure the SSH timeout via the CLI, use the command system settings config sshd-idle-timeout <value-in-seconds>. This idle-timeout will apply to both bash sessions over SSH, as well as F5OS CLI sessions over SSH. Be sure to issue a commit to save the changes. In the case below, the CLI session should disconnect after 300 seconds of inactivity.
r10900(config)# system settings config sshd-idle-timeout 300
r10900(config)# commit
Commit complete.
To configure the deny-root-ssh option use the command system security config deny-ssh-root.
r5900-1-gsa(config)# system security config deny-root-ssh enabled
r5900-1-gsa(config)# commit
Commit complete.
Both timeout settings can be viewed using the show system settings command.
r10900-1# show system settings
system settings state idle-timeout 300
system settings state sshd-idle-timeout 300
system settings state portgroup-confirmation-warning on
system settings dag state gtp-u teid-hash disabled
system settings gui advisory state disabled
r10900-1#
The deny-root-ssh setting can be seen by issuing the CLI command show system security.
r5900-1-gsa# show system security
system security firewall state logging disabled
system security state deny-root-ssh disabled
system security services service httpd
state ssl-ciphersuite ECDHE-RSA-AES256-GCM-SHA384:ECDHE-ECDSA-AES256-GCM-SHA384:ECDHE-RSA-AES256-SHA384:ECDHE-ECDSA-AES256-SHA384:ECDHE-RSA-AES256-SHA:ECDHE-ECDSA-AES256-SHA:DHE-DSS-AES256-GCM-SHA384:DHE-RSA-AES256-GCM-SHA384:DHE-RSA-AES256-SHA256:DHE-DSS-AES256-SHA256:DHE-RSA-AES256-SHA:DHE-DSS-AES256-SHA:DHE-RSA-CAMELLIA256-SHA:DHE-DSS-CAMELLIA256-SHA:ECDH-RSA-AES256-GCM-SHA384:ECDH-ECDSA-AES256-GCM-SHA384:ECDH-RSA-AES256-SHA384:ECDH-ECDSA-AES256-SHA384:ECDH-RSA-AES256-SHA:ECDH-ECDSA-AES256-SHA:AES256-GCM-SHA384:AES256-SHA256:AES256-SHA:CAMELLIA256-SHA:PSK-AES256-CBC-SHA:ECDHE-RSA-AES128-GCM-SHA256:ECDHE-ECDSA-AES128-GCM-SHA256:ECDHE-RSA-AES128-SHA256:ECDHE-ECDSA-AES128-SHA256:ECDHE-RSA-AES128-SHA:ECDHE-ECDSA-AES128-SHA:DHE-DSS-AES128-GCM-SHA256:DHE-RSA-AES128-GCM-SHA256:DHE-RSA-AES128-SHA256:DHE-DSS-AES128-SHA256:DHE-RSA-AES128-SHA:DHE-DSS-AES128-SHA:DHE-RSA-CAMELLIA128-SHA:DHE-DSS-CAMELLIA128-SHA:ECDH-RSA-AES128-GCM-SHA256:ECDH-ECDSA-AES128-GCM-SHA256:ECDH-RSA-AES128-SHA256:ECDH-ECDSA-AES128-SHA256:ECDH-RSA-AES128-SHA:ECDH-ECDSA-AES128-SHA:AES128-GCM-SHA256:AES128-SHA256:AES128-SHA:CAMELLIA128-SHA:PSK-AES128-CBC-SHA
system security services service sshd
state ciphers [ aes128-cbc aes128-ctr aes128-gcm@openssh.com aes256-cbc aes256-ctr aes256-gcm@openssh.com ]
state kexalgorithms [ diffie-hellman-group14-sha1 diffie-hellman-group14-sha256 diffie-hellman-group16-sha512 ecdh-sha2-nistp256 ecdh-sha2-nistp384 ecdh-sha2-nistp521 ]
r5900-1-gsa# show system settings
system settings state idle-timeout 300
system settings state sshd-idle-timeout 300
system settings state portgroup-confirmation-warning on
system settings dag state gtp-u teid-hash disabled
system settings gui advisory state disabled
r5900-1-gsa#
In addition, there is a separate setting for aom ssh access as described here:
K000138036: Configure AOM SSH access in F5OS-A
r10900-1(config)# system aom config ssh-session-idle-timeout 300
r10900-1(config)# commit
Commit complete.
Configuring SSH and CLI Timeouts & Deny Root SSH Settings via API
To configure the CLI or SSH timeouts via the API, use the PATCH API call below. In the case below, the CLI session should disconnect after 40 seconds of inactivity.
PATCH https://{{rseries_appliance1_ip}}:8888/restconf/data/openconfig-system:system/f5-system-settings:settings
Below is the payload in the API call above to set the idle-timeout.
{
    "f5-system-settings:settings": {
        "f5-system-settings:config": {
            "f5-system-settings:idle-timeout": 40,
            "f5-system-settings:sshd-idle-timeout": 20"
        }
    }
}
To view the current idle-timeout settings, issue the following GET API call.
GET https://{{rseries_appliance1_ip}}:8888/restconf/data/openconfig-system:system/f5-system-settings:settings/config
You’ll see output similar to the example below.
{
    "f5-system-settings:config": {
        "idle-timeout": "40",
        "sshd-idle-timeout": "20"
    }
}
Configuring SSH and CLI Timeouts & Deny Root SSH Settings via webUI
The CLI timeout, and deny-root-ssh settings are both configurable in the webUI. SSH timeouts are not currently configurable via the webUI. The deny-root-ssh and CLI timeout options can be configured in the System Settings -> System Security page.

Token Lifetime via CLI
As mentioned in the introduction, the webUI and API use token-based authentication and the timeout is based on five token refreshes failing, so the value is essentially five times the configured token lifetime. Use the command system aaa restconf-token config lifetime <value-in-minutes> to set the token lifetime. You may configure the restconf-token lifetime via the CLI. The value is in minutes, and the client is able to refresh the token five times before it expires. As an example, if the restconf-token lifetime is set to 1 minute, an inactive webUI session will have a token expire after one minute, but it can be refreshed a maximum of five times. This will result in a webUI session or API timing out after 5 minutes.
r10900(config)# system aaa restconf-token config lifetime 1
r10900(config)# commit
Commit complete.
r10900(config)#
To display the current restconf-token lifetime setting, use the command show system aaa*.
r10900(config)# do show system aaa
system aaa restconf-token state lifetime 1
system aaa primary-key state hash gK/F47uQfi7JWYFirStCVhIaGcuoctpbGpx63MNy/korwigBW6piKx9TldiRazHmE8Y+qylGY4MOcs9IZ+KG4Q==
system aaa primary-key state status NONE
system aaa authentication state basic enabled
        LAST        TALLY  EXPIRY
USERNAME  CHANGE      COUNT  DATE    ROLE
-----------------------------------------------------
admin     2022-06-02  0      -1      admin
jim-test  2022-09-02  10     -1      admin
operator  2022-10-11  0      -1      operator
root      2022-06-02  0      -1      root
tenant1   0           0      1       tenant-console
tenant2   0           0      1       tenant-console

ROLENAME        GID   USERS
-----------------------------
admin           9000  -
operator        9001  -
tenant-console  9100  -

NAME    NAME    TYPE
------------------------
tacacs  tacacs  TACACS

system aaa tls state verify-client false
system aaa tls state verify-client-depth 1
Token Lifetime via webUI
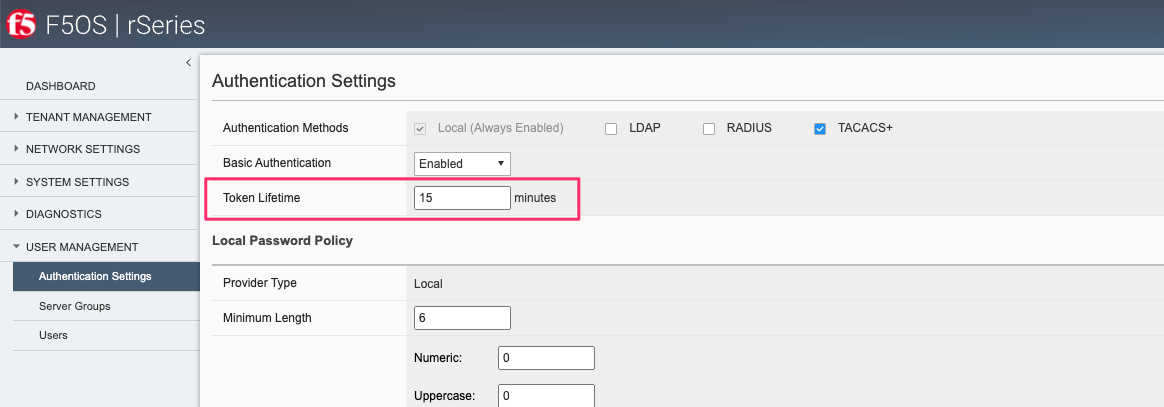
You may configure the restconf-token lifetime via the webUI (new feature added in F5OS-A 1.4.0). The value is in minutes, and the client can refresh the token five times before it expires. As an example, if the token lifetime is set to 1 minute, an inactive webUI session will have a token expire after one minute, but it can be refreshed a maximum of five times. This will result in the webUI session timing out after 5 minutes. The HTTPS Token Lifetime is configurable under the Authentication & Access -> Authentication Settings page.
Token Lifetime via API
You may configure the restconf-token lifetime via the API. The value is in minutes, and the client can refresh the token five times before it expires. As an example, if the token lifetime is set to 1 minute, an inactive webUI session or API session will have a token expire after one minute, but it can be refreshed a maximum of five times. This will result in the webUI session timing out after 5 minutes.
Use the following API PATCH call to set the restconf-token lifetime, or any other password policy parameter.
PATCH https://{{rseries_appliance1_ip}}:8888/restconf/data/openconfig-system:system/aaa
In the body of the API call adjust the restconf-token lifetime setting to the desired timeout in minutes. The example below is 10 minutes, and the session will timeout at five times the value of the lifetime setting due to token refresh.
{
    "openconfig-system:aaa": {
        "authentication": {
            "config": {
                "f5-aaa-confd-restconf-token:basic": {
                    "enabled": true
                }
            }
        },
        "f5-aaa-confd-restconf-token:restconf-token": {
            "config": {
                "lifetime": 10
            }
        },
        "f5-openconfig-aaa-password-policy:password-policy": {
            "config": {
                "min-length": 6,
                "required-numeric": 0,
                "required-uppercase": 0,
                "required-lowercase": 0,
                "required-special": 0,
                "required-differences": 8,
                "reject-username": false,
                "apply-to-root": true,
                "retries": 3,
                "max-login-failures": 10,
                "unlock-time": 60,
                "root-lockout": true,
                "root-unlock-time": 60,
                "max-age": 0
            }
        }
    }
}
Disabling Basic Authentication
F5OS utilizes basic authentication (username/password) as well as token-based authentication for both the API and the webUI. Generally, username/password is issued by the client to obtain a token from F5OS, which is then used to make further inquiries or changes. Tokens have a relatively short lifetime for security reasons, and the user is allowed to refresh that token a certain number of times before they are forced to re-authenticate using basic authentication again. Although token-based authentication is supported, basic authentication can still be utilized to access F5OS and make changes by default. A new option was added in F5OS-A 1.3.0 to allow basic authentication to be disabled, except for the means of obtaining a token. Once a token is issued to a client, it will be the only way to make changes via the webUI or the API.
Disabling Basic Auth via the CLI
The default setting for basic auth is enabled, and the current state can be seen by entering the show system aaa command. The line system aaa authentication state basic enabled indicates that basic authentication is still enabled.
r10900# show system aaa
system aaa restconf-token state lifetime 15
system aaa primary-key state hash gK/F47uQfi7JWYFirStCVhIaGcuoctpbGpx63MNy/korwigBW6piKx9TldiRazHmE8Y+qylGY4MOcs9IZ+KG4Q==
system aaa primary-key state status NONE
system aaa authentication state basic enabled
        LAST        TALLY  EXPIRY
USERNAME  CHANGE      COUNT  DATE    ROLE
-----------------------------------------------------
admin     2022-06-02  0      -1      admin
jim-test  2022-09-02  10     -1      admin
operator  2022-10-11  0      -1      operator
root      2022-06-02  0      -1      root
tenant1   0           0      1       tenant-console
tenant2   0           0      1       tenant-console

ROLENAME        GID   USERS
-----------------------------
admin           9000  -
operator        9001  -
root            0     -
tenant-console  9100  -

NAME    NAME    TYPE
------------------------
tacacs  tacacs  TACACS

r10900#
You may disable basic authentication by issuing the cli command system aaa authentication config basic disabled, and then committing the change.
r10900(config)# system aaa authentication config basic disabled
r10900(config)# commit
Commit complete.
r10900(config)#
To re-enable basic authentication, change the state to enabled and commit.
r10900(config)# system aaa authentication config basic enabled
r10900(config)# commit
Commit complete.
r10900(config)#
Disabling Basic Auth via the API
You may enable or disable basic authentication via the API. The default setting for basic authentication is enabled, and the current state can be seen by entering the following API call.
GET https://{{rseries_appliance1_ip}}:8888/restconf/data/openconfig-system:system/aaa/authentication/config
You should see the returned output below with the basic authentication state set to either true or false.
{`
    "openconfig-system:config": {
        "f5-aaa-confd-restconf-token:basic": {
            "enabled": true
        }
    }
}
Use the following API PATCH call to set the restconf-token:basic setting to true or false, or to adjust any other password policy parameter.
PATCH https://{{rseries_appliance1_ip}}:8888/restconf/data/openconfig-system:system/aaa
In the body of the API call adjust the restconf-token:basic setting to true or false.
{
    "openconfig-system:aaa": {
        "authentication": {
            "config": {
                "f5-aaa-confd-restconf-token:basic": {
                    "enabled": true
                }
            }
        },
        "f5-aaa-confd-restconf-token:restconf-token": {
            "config": {
                "lifetime": 10
            }
        },
        "f5-openconfig-aaa-password-policy:password-policy": {
            "config": {
                "min-length": 6,
                "required-numeric": 0,
                "required-uppercase": 0,
                "required-lowercase": 0,
                "required-special": 0,
                "required-differences": 8,
                "reject-username": false,
                "apply-to-root": true,
                "retries": 3,
                "max-login-failures": 10,
                "unlock-time": 60,
                "root-lockout": true,
                "root-unlock-time": 60,
                "max-age": 0
            }
        }
    }
}
Disabling Basic Auth via the webUI
Disabling basic authentication via the webUI is a new feature that has been added in F5OS-A 1.4.0. In the webUI go to User Management -> Authentication Settings and you’ll see a drop-down box to enable or disable Basic Authentication.

Confirming Basic Auth is Disallowed
With basic authentication enabled (default setting), you can make any API call using username/password (basic auth) authentication. Using the Postman utility this can be demonstrated on any configuration change by setting The Auth Type to Basic Auth and configuring a username and password as seen below.

While basic auth is enabled, any API call using username/password will complete successfully. After disabling basic auth, any attempt to access an API endpoint other than the root /api URI using basic auth will fail with a message like the one below indicating access denied.
{
    "ietf-restconf:errors": {
        "error": [
            {
                "error-type": "application",
                "error-tag": "access-denied",
                "error-path": "/openconfig-system:system/aaa",
                "error-message": "access denied"
            }
        ]
    }
}
There are two very limited exceptions when basic auth is disabled, that will still allow a post to succeed using basic auth. This limited mode still allows a user to use basic auth to query its own authentication state using the following query: openconfig-system:system/aaa/authentication/f5-system-aaa:users/user=${username}/state. In the example below, you can see that the user admin is allowed to use a basic authentication query to query the state of that user.
prompt$ curl -i -sku admin:admin -H "Content-Type: application/yang-data+json"  https://10.255.2.40:8888/restconf/data/openconfig-system:system/aaa/authentication/f5-system-aaa:users/user=admin/state
HTTP/1.1 200 OK
Date: Mon, 01 May 2023 16:58:10 GMT
Server: Apache/2.4.6 (Red Hat Enterprise Linux) OpenSSL/1.0.2zc-fips-dev
Last-Modified: Wed, 26 Apr 2023 18:38:15 GMT
Cache-Control: private, no-cache, must-revalidate, proxy-revalidate
Etag: "1682-534295-992625"
Content-Type: application/yang-data+json
Pragma: no-cache
X-Auth-Token: eyJhbGciOiJIUzI1NiIsInR5cCI6IkpXVCJ9.eyJTZXNzaW9uIElEIjoiYWRtaW4xNjgyOTYwMjkwIiwiYXV0aGluZm8iOiJhZG1pbiAxMDAwIDkwMDAgXC90bXAiLCJidWZmZXJ0aW1lbGltaXQiOiIzMDAiLCJleHAiOjE2ODI5NjExOTAsImlhdCI6MTY4Mjk2MDI5MCwicmVuZXdsaW1pdCI6IjUiLCJ1c2VyaW5mbyI6ImFkbWluIDE3Mi4xOC4xMDUuMTExIn0.s_wSwGlH7avk4HneM0jUXhHAGn38rvA1jv61dJcq2e0
Content-Security-Policy: default-src 'self'; block-all-mixed-content; base-uri 'self'; frame-ancestors 'none';
Strict-Transport-Security: max-age=15552000; includeSubDomains
X-Content-Type-Options: nosniff
X-Frame-Options: DENY
X-XSS-Protection: 1; mode=block
Transfer-Encoding: chunked

{
"f5-system-aaa:state": {
    "username": "admin",
    "last-change": "2023-01-23",
    "tally-count": 0,
    "expiry-date": "-1"
    "role": "admin"
}
}
prompt$
The second exception allows a user to change their password using the following POST command: operations/openconfig-system:system/aaa/authentication/f5-system-aaa:users/user=${username}/config/change-password. An example is provided below.
prompt:~ jmccarron$ curl  -sku jim-test:admin -H "Content-Type: application/yang-data+json" -d '{     "input": [         {             "old-password": "admin",             "new-password": "Passw0rd1@#",             "confirm-password": "Passw0rd1@#"         }     ] }' \  -X POST https://10.255.2.40:8888/restconf/operations/openconfig-system:system/aaa/authentication/f5-system-aaa:users/user=jim-test/config/change-password
prompt:~ jmccarron$
When basic authentication is enabled, a client will be allowed to obtain an auth token using username/password at any URI. The client can then choose to use the auth token for subsequent requests, or they can continue to use basic auth (username/password) authentication. As an example, the curl command below uses basic auth successfully to the URI endpoint restconf/data/openconfig-system:system/config. In the response you can see the X-Auth-Token header, which contains the auth token that can then be used by the client for subsequent requests:
user1$ curl -i -sku admin:admin -H "Content-Type: application/yang-data+json"  https://10.255.0.132:8888/restconf/data/openconfig-system:system/config
HTTP/1.1 200 OK
Date: Thu, 16 Mar 2023 13:04:38 GMT
Server: Apache/2.4.6 (Red Hat Enterprise Linux) OpenSSL/1.0.2zc-fips-dev
Last-Modified: Thu, 16 Mar 2023 12:50:11 GMT
Cache-Control: private, no-cache, must-revalidate, proxy-revalidate
Etag: "1678-971011-823929"
Content-Type: application/yang-data+json
Pragma: no-cache
X-Auth-Token: eyJhbGciOiJIUzI1NiIsInR5cCI6IkpXVCJ9.eyJTZXNzaW9uIElEIjoiYWRtaW4xNjc4OTcxODc4IiwiYXV0aGluZm8iOiJhZG1pbiAxMDAwIDkwMDAgXC90bXAiLCJidWZmZXJ0aW1lbGltaXQiOiI0MDAiLCJleHAiOjE2Nzg5NzMwNzgsImlhdCI6MTY3ODk3MTg3OCwicmVuZXdsaW1pdCI6IjUiLCJ1c2VyaW5mbyI6ImFkbWluIDE3Mi4xOC4xMDUuNDkifQ.RDMaZfL-g60SqUiGXkNkpIGYh2eualim5wTqbr_XSNc
Content-Security-Policy: default-src 'self'; block-all-mixed-content; base-uri 'self'; frame-ancestors 'none';
Strict-Transport-Security: max-age=15552000; includeSubDomains
X-Content-Type-Options: nosniff
X-Frame-Options: DENY
X-XSS-Protection: 1; mode=block
Transfer-Encoding: chunked

{
"openconfig-system:config": {
    "hostname": "r10900-1.f5demo.net",
    "login-banner": "This is the Global Solution Architect's rSeries r10900 unit-1 in the Boston Lab. Unauthorized use is prohibited. Please reach out to admin with any questions.",
    "motd-banner": "Welcome to the GSA r10900 Unit 1 in Boston"
}
}
Here is an example of the client issuing the same request with the auth token it received above to the same endpoint. Instead of specifying a user with the -u option, insert the header X-Auth-Token and add the token from the initial response above.
user1$ curl -i -sk -H "Content-Type: application/yang-data+json" -H "X-Auth-Token: eyJhbGciOiJIUzI1NiIsInR5cCI6IkpXVCJ9.eyJTZXNzaW9uIElEIjoiYWRtaW4xNjc4OTcxODc4IiwiYXV0aGluZm8iOiJhZG1pbiAxMDAwIDkwMDAgXC90bXAiLCJidWZmZXJ0aW1lbGltaXQiOiI0MDAiLCJleHAiOjE2Nzg5NzMwNzgsImlhdCI6MTY3ODk3MTg3OCwicmVuZXdsaW1pdCI6IjUiLCJ1c2VyaW5mbyI6ImFkbWluIDE3Mi4xOC4xMDUuNDkifQ.RDMaZfL-g60SqUiGXkNkpIGYh2eualim5wTqbr_XSNc" https://10.255.0.132:8888/restconf/data/openconfig-system:system/config
HTTP/1.1 200 OK
Date: Thu, 16 Mar 2023 13:04:53 GMT
Server: Apache/2.4.6 (Red Hat Enterprise Linux) OpenSSL/1.0.2zc-fips-dev
Last-Modified: Thu, 16 Mar 2023 12:50:11 GMT
Cache-Control: private, no-cache, must-revalidate, proxy-revalidate
Etag: "1678-971011-823929"
Content-Type: application/yang-data+json
Pragma: no-cache
Content-Security-Policy: default-src 'self'; block-all-mixed-content; base-uri 'self'; frame-ancestors 'none';
Strict-Transport-Security: max-age=15552000; includeSubDomains
X-Content-Type-Options: nosniff
X-Frame-Options: DENY
X-XSS-Protection: 1; mode=block
Transfer-Encoding: chunked

{
"openconfig-system:config": {
    "hostname": "r10900-1.f5demo.net",
    "login-banner": "This is the Global Solution Architect's rSeries r10900 unit-1 in the Boston Lab. Unauthorized use is prohibited. Please reach out to admin with any questions.",
    "motd-banner": "Welcome to the GSA r10900 Unit 1 in Boston"
}
}
user1$
If the same exercise is repeated after basic auth is disabled, then the user will not be able to run the initial request using basic auth (username/password). It will fail to any non-root URI (minus the exceptions noted above) as seen below. The response will contain and access-denied error.
user1$ curl -i -sku admin:admin -H "Content-Type: application/yang-data+json"  https://10.255.0.132:8888/restconf/data/openconfig-system:system/config
HTTP/1.1 403 Forbidden
Date: Thu, 16 Mar 2023 13:09:09 GMT
Server: Apache/2.4.6 (Red Hat Enterprise Linux) OpenSSL/1.0.2zc-fips-dev
Cache-Control: private, no-cache, must-revalidate, proxy-revalidate
Content-Length: 189
Content-Type: application/yang-data+json
Pragma: no-cache
Content-Security-Policy: default-src 'self'; block-all-mixed-content; base-uri 'self'; frame-ancestors 'none';
Strict-Transport-Security: max-age=15552000; includeSubDomains
X-Content-Type-Options: nosniff
X-Frame-Options: DENY
X-XSS-Protection: 1; mode=block

{
"ietf-restconf:errors": {
    "error": [
    {
        "error-type": "application",
        "error-tag": "access-denied",
        "error-message": "access denied"
    }
    ]
}
}
user1$
By changing the URI to use the top-level API endpoint: (:8888/restconf/data) or (:443/api/data), the client will now be able to obtain a token using basic authentication, but the token will be needed for any other API endpoints.
user1$ curl -i -sku admin:admin -H "Content-Type: application/yang-data+json"  https://10.255.0.132:8888/restconf/data/
HTTP/1.1 200 OK
Date: Thu, 16 Mar 2023 13:10:00 GMT
Server: Apache/2.4.6 (Red Hat Enterprise Linux) OpenSSL/1.0.2zc-fips-dev
Last-Modified: Thu, 16 Mar 2023 13:09:04 GMT
Cache-Control: private, no-cache, must-revalidate, proxy-revalidate
Etag: "1678-972144-404510"
Content-Type: application/yang-data+json
Pragma: no-cache
X-Auth-Token: eyJhbGciOiJIUzI1NiIsInR5cCI6IkpXVCJ9.eyJTZXNzaW9uIElEIjoiYWRtaW4xNjc4OTcyMjAwIiwiYXV0aGluZm8iOiJhZG1pbiAxMDAwIDkwMDAgXC90bXAiLCJidWZmZXJ0aW1lbGltaXQiOiI0MDAiLCJleHAiOjE2Nzg5NzM0MDAsImlhdCI6MTY3ODk3MjIwMCwicmVuZXdsaW1pdCI6IjUiLCJ1c2VyaW5mbyI6ImFkbWluIDE3Mi4xOC4xMDUuNDkifQ.dyhK90B_rkpQFkZGf1t-c6y2Vm1PbJUyO8IcVAjIefc
Content-Security-Policy: default-src 'self'; block-all-mixed-content; base-uri 'self'; frame-ancestors 'none';
Strict-Transport-Security: max-age=15552000; includeSubDomains
X-Content-Type-Options: nosniff
X-Frame-Options: DENY
X-XSS-Protection: 1; mode=block
Transfer-Encoding: chunked

{
"ietf-restconf:data": {
    "openconfig-system:system": {
    "aaa": {
        "authentication": {
        "f5-system-aaa:users": {
            "user": [
            {
                "state": {
                "username": "admin",
                "last-change": "2023-01-23",
                "tally-count": 0,
                "expiry-date": "-1",
                "role": "admin"
                }
            }
            ]
        }
        }
    }
    }
}
}
user1$
Setting Password Policies
You may configure the local password policy to ensure secure passwords are utilized, re-use is minimized, and to limit the amount of failures/retries. Below are some of the settings that can be set.
- Minimum Password Length - For Minimum Length, specify the minimum number of characters (6 to 255) required for a valid password.
- Password Required Characters - For Required Characters, specify the minimum number of Numeric, Uppercase, Lowercase, and Special characters that are required in a valid password.
- New/Old Password Differential - For New/Old Password Differential, specify the number of character changes in the new password that differentiate it from the old password. The default value is 8.
- Disallow Username - For Disallow Username, set to True to check whether the name of the user in forward or reversed form is contained in the password. The default value is False.
- Apply Password Policy to Root Account - For Apply Password Policy to Root Account, set to True to use the same password policy for the root account. The default value is True.
- Maximum Password Retries - For Maximum Password Retries, specify the number of times that a user can try to create an acceptable password. The default value is 3.
- Maximum Login Attempts - For Maximum Login Attempts, specify the number of times a user can attempt to log in before the account is temporarily suspended. The default value is 10; 0 means no limit.
- Lockout Duration - For Lockout Duration, specify the duration, in seconds, an account is locked out. The default value is 60.
- Maximum Password Age - For Max Password Age, specify the number of days after which the password will expire after being changed. 0 means never expires.
Setting Password Policies via CLI
Local Password Policies can be set in the CLI using the system aaa password-policy config command. Adding a question mark after the command will show all the configurable options. Be sure to commit after making any changes.
r5900-1-gsa(config)# system aaa password-policy config ?
Possible completions:
apply-to-root          Apply password policy to administrators when setting passwords for other user accounts.
max-age                Number of days after which the user will have to change the password.
max-class-repeat       Reject passwords with this many repeating upper/lowercase letters, digits or special characters such as '!@#$%' in the password.
max-letter-repeat      Reject passwords with this many repeating lower-case letters in the password.
max-login-failures     Number of unsuccessful login attempts allowed before lockout.
max-sequence-repeat    Reject passwords with this many repeating upper/lowercase letters or digits in the password.
min-length             Minimum length of a new password.
reject-username        Reject passwords that contain the username.
required-differences   Required number of differences between the old and new passwords.
required-lowercase     Required number of lowercase characters in password.
required-numeric       Required number of numeric digits in password.
required-special       Required number of 'special' characters in password.
required-uppercase     Required number of uppercase character in password.
retries                Number of times to prompt before failing.
root-lockout           Enable lockout of root users.
root-unlock-time       Time (seconds) before the root account is automatically unlocked.
unlock-time            Time (seconds) before a locked account is automatically unlocked.
r5900-1-gsa(config)#
Setting Password Policies via webUI
Local Password Policies can be set in the User Management -> Authentication Settings page in the webUI.
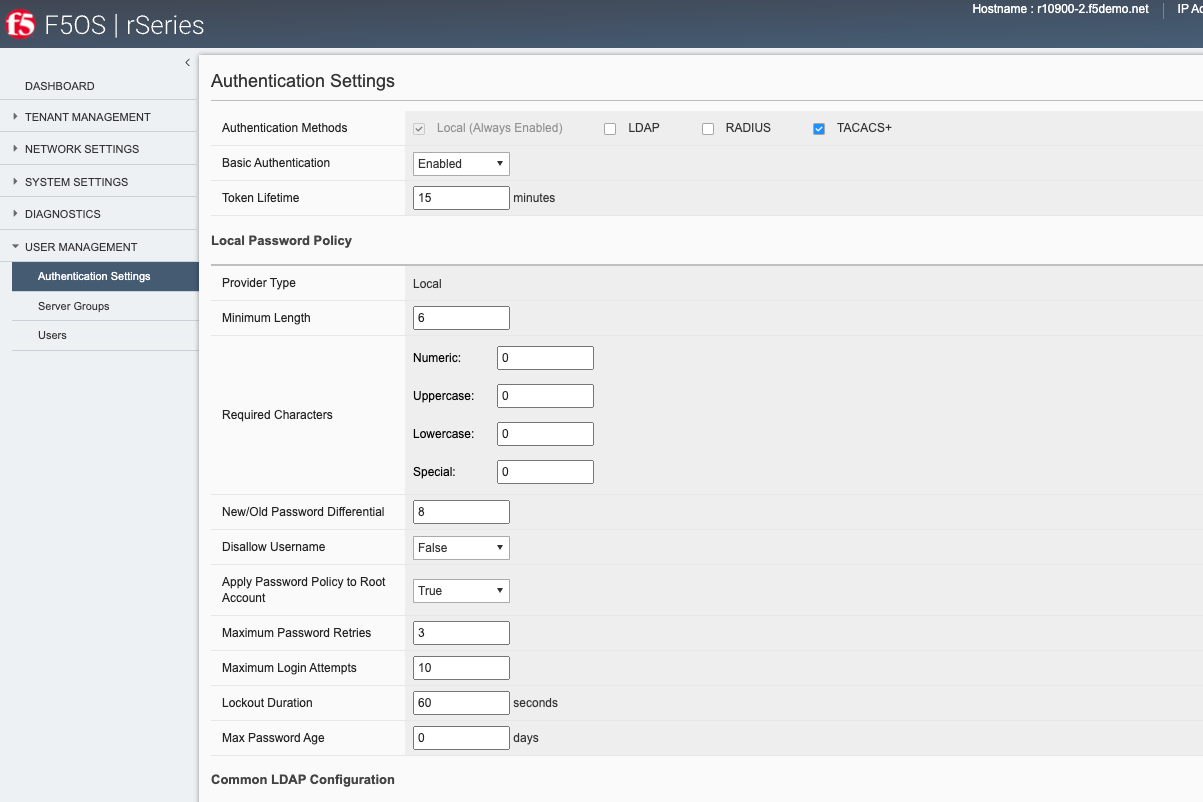
Setting Password Policies via API
Local Password Policies can be viewed or set via the API using the following API calls. To view the current password policy settings, issue the following GET API call.
GET https://{{rseries_appliance1_ip}}:8888/restconf/data/openconfig-system:system/aaa/f5-openconfig-aaa-password-policy:password-policy
The JSON output will reflect the current settings.
{
    "f5-openconfig-aaa-password-policy:password-policy": {
        "config": {
            "min-length": 6,
            "required-numeric": 0,
            "required-uppercase": 0,
            "required-lowercase": 0,
            "required-special": 0,
            "max-letter-repeat": 3,
            "max-sequence-repeat": 0,
            "max-class-repeat": 0,
            "required-differences": 0,
            "reject-username": false,
            "apply-to-root": false,
            "retries": 3,
            "max-login-failures": 10,
            "unlock-time": 60,
            "root-lockout": true,
            "root-unlock-time": 60,
            "max-age": 0
        }
    }
}
To change any of the password policy parameters, use the following API GET call.
PATCH https://{{rseries_appliance1_ip}}:8888/restconf/data/openconfig-system:system/aaa
In the payload of the API call adjust the appropriate parameters under f5-openconfig-aaa-password-policy:password-policy.
{
    "openconfig-system:aaa": {
        "authentication": {
            "config": {
                "f5-aaa-confd-restconf-token:basic": {
                    "enabled": true
                }
            }
        },
        "f5-aaa-confd-restconf-token:restconf-token": {
            "config": {
                "lifetime": 10
            }
        },
        "f5-openconfig-aaa-password-policy:password-policy": {
            "config": {
                "min-length": 6,
                "required-numeric": 0,
                "required-uppercase": 0,
                "required-lowercase": 0,
                "required-special": 0,
                "required-differences": 8,
                "reject-username": false,
                "apply-to-root": true,
                "retries": 3,
                "max-login-failures": 10,
                "unlock-time": 60,
                "root-lockout": true,
                "root-unlock-time": 60,
                "max-age": 0
            }
        }
    }
}
Remote Authentication
The F5OS platform layer supports both local and remote authentication. By default, there are local users enabled for both admin and root access. You will be forced to change passwords for both accounts on initial login. Many users will prefer to configure the F5OS layer to use remote authentication via LDAP, RADIUS, AD, or TACACS+. The F5OS TMOS based tenants maintain their own local or remote authentication, and details are covered in standard TMOS documentation.
Configuring Remote User Authentication and Authorization on TMOS
In versions prior to F5OS-A 1.4.0, F5OS only supported static pre-defined roles which in turn map to specific group IDs. Users created and managed on external LDAP, Active Directory, RADIUS, or TACACS+ servers must have the same group IDs on the external authentication servers as they do within F5OS based systems to allow authentication and authorization to occur. Users created on external LDAP, Active Directory, RADIUS, or TACACS+ servers must be associated with one of these group IDs on the system. The supported F5OS static group IDs and the roles they map to are seen in the table below. User defined roles are not supported in version prior to F5OS-A 1.4.0.
| Role | Group ID |
|---|---|
| admin | 9000 |
| operator | 9001 |
| resource-admin | 9003 |
| tenant-console | 9100 |
From a high level the admin role (group ID 9000) is a read/write role with full access to the system to make changes. The operator role (group ID 9001) is a read-only role and is prevented from making any configuration changes. The root role (group ID 0) gives full access to the bash shell, and in some environments this role will be disabled by enabling appliance mode. Note that the root role is valid only for the built-in ‘root’ user account; no other users have access to the bash shell. The last role is tenant-console (group ID 9100) and this role is used to provide remote access directly to the tenant console as noted here:
Console Access to Tenant via Built-In Terminal Server
The group IDs are typically specified in a user configuration file on the external server (file locations vary on different servers). You can assign these F5 user attributes:
F5-F5OS-UID=1001

F5-F5OS-GID=9000   <-- THIS MUST MATCH /etc/group items

F5-F5OS-HOMEDIR=/tmp  <-- Optional; prevents sshd warning msgs

F5-F5OS-USERINFO=test_user  <-- Optional user info

F5-F5OS-SHELL=/bin/bash    <--  Ignored; always set to /var/lib/controller/f5_confd_cli
Setting F5-F5OS-HOMEDIR=/tmp is a good idea to avoid warning messages from sshd that the directory does not exist. Also, the source address in the TACACS+ configuration is not used by the rSeries system.
If F5-F5OS-UID is not set, it defaults to 1001. F5-F5OS-GID is required; if not set, user authentication will fail. The F5-F5OS-USERINFO is a comment field. Essentially, F5-F5OS-GID is the only hard requirement and must coincide with group ID’s user role.
More specific configuration details can be found in the User Management section of the rSeries System Administration Guide.
The gidNumber attribute needs to either be on the user or on a group the user is a member of. The gidNumber must be one of those listed (9000, 9001, 9100). [The root role is not externally accessible via remote authentication.]
Currently the role numbers (9000, 9001, 9003, 9100) are fixed and hard-coded. The current implementation relies on AD “unix attributes” being installed into the directory. AD groups are not currently queried. The role IDs are fixed. As noted above, the IDs are configurable in F5OS-A 1.4.0, but this is still based on numeric GIDs not group names.
Roles are mutually exclusive. While it is theoretically possible to assign a user to multiple role groups, It is up to the underlying Confd to resolve how the roles present to it are assigned, and it doesn’t always choose the most logical answer. For that reason, you should consider them mutually exclusive and put the user in the role with the least access necessary to do their work. More details, on configuration of F5OS-A 1.4.0 can be found below.
LDAP/AD configuration overview
Changing Group ID Mapping via CLI (F5OS-A 1.4.0 and Later)
F5OS-A 1.4.0 has added the ability to customize the Group ID mapping to the remote authentication server. In previous releases the Group IDs were static, now they can be changed to map to user selectable Group IDs. Below is an example of changing the remote Group ID for the admin account to a custom value of 9200.
r10900-1(config)# system aaa authentication roles role admin config remote-gid 9200
r10900-1(config-role-admin)# commit
Commit complete.
r10900-1(config-role-admin)#
To view the current mappings use the show system aaa authentication roles CLI command.
r10900-1# show system aaa authentication roles
                    REMOTE
ROLENAME        GID   GID     USERS
-------------------------------------
admin           9000  9200    -
operator        9001  -       -
resource-admin  9003  -       -
tenant-console  9100  -       -

r10900-1#
Login Banner / Message of the Day
Some environments require warning or acceptance messages to be displayed to clients connecting to the F5OS layer at initial connection time and/or upon successful login. The F5OS layer supports configurable Message of the Day (MoTD) and Login Banners that are displayed to clients connecting to the F5OS layer via both CLI and the webUI. The MoTD and Login Banner can be configured via CLI, webUI, or API. The Login Banner is displayed at initial connect time and is commonly used to notify users they are connecting to a specific resource, and that they should not connect if they are not authorized. The MoTD is displayed after successful login and may also display some information about the resource the user is connecting to.
Configuring Login Banner / MoTD via CLI
Enter config mode and use the command system config login-banner to configure the login banner via the CLI. You must commit the change afterwards.
r10900(config)# system config login-banner "This is a restricted resource. Unauthorized access is prohibited. Please disconnect now if you are not authorized."
r10900(config)# commit
Commit complete.
r10900(config)#
Enter config mode and use the command system config motd-banner to configure the Message of the Day banner via the CLI. You must commit the change afterwards.
r10900(config)# system config motd-banner "Welcome to the GSA r10900 unit#1, do not make any changes to configuration without a ticket."
r10900(config)# commit
Commit complete.
r10900(config)#
To display both settings, use the show system state command.
r10900# show system state
system state hostname r10900.f5demo.net
system state login-banner This is a restricted resource. Unauthorized access is prohibited. Please disconnect now if you are not authorized.
system state motd-banner Welcome to the GSA r10900 unit#1, do not make any changes to configuration without a ticket.
system state current-datetime "2022-11-29 11:12:27-05:00"
system state base-mac 00:94:a1:69:59:00
system state mac-pool-size 256
r10900#
Configuring Login Banner / MoTD via webUI
You may configure both the Login Banner and the Message of the Day Banner via the webUI on the System Settings -> General page.
Configuring Login Banner / MoTD via API
You may configure both the Login Banner and the Message of the Day Banner via the API using the following API calls.
PATCH https://{{rseries_appliance1_ip}}:8888/restconf/data/openconfig-system:system
In the body of the API call configure the desired message of the day and login banner settings.
{
    "openconfig-system:system": {
        "config": {
            "hostname": "r10900-1.f5demo.net",
            "login-banner": "This is the Global Solution Architect's rSeries r10900 unit-1 in the Boston Lab. Unauthorized use is prohibited. Please reach out to Jim McCarron with any questions.",
            "motd-banner": "Welcome to the GSA r10900 Unit 1 in Boston"
        }
    }
}
To view the currently configured MoTD and login banner, issue the following GET API request.
GET https://{{rseries_appliance1_ip}}:8888/restconf/data/openconfig-system:system/config
The output will contain the current MoTD and login banner configuration.
{
    "openconfig-system:config": {
        "hostname": "r10900.f5demo.net",
        "login-banner": "This is a restricted resource. Unauthorized access is prohibited. Please disconnect now if you are not authorized.",
        "motd-banner": "This is a test"
    }
}
Display of Login Banner and MoTD
Below is an example of the Login Banner being displayed before the user is prompted for a password during an SSH connection to the F5OS platform layer. After a successful user login, the MoTD is then displayed.
prompt:~ user$ ssh -l admin 10.255.0.132
This is a restricted resource. Unauthorized access is prohibited. Please disconnect now if you are not authorized.
admin@10.255.0.132's password:
Last login: Tue Nov 29 10:41:06 2022 from 10.10.10.16
Welcome to the GSA r10900 unit#1, do not make any changes to configuration without a ticket.
System Time: 2022-11-29 11:17:00 EST
Welcome to the Management CLI
User admin last logged in 2022-11-29T16:17:00.008317+00:00, to appliance-1, from 10.10.10.16 using cli-ssh
admin connected from 10.10.10.16 using ssh on r10900.f5demo.net
r10900#
Below is an example of the Login Banner being displayed before the user is prompted for a password during a webUI connection to the F5OS platform layer. After a successful user login, the MoTD is then displayed.
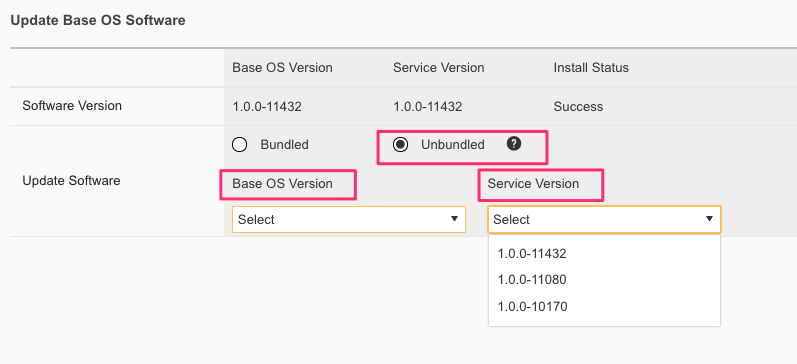
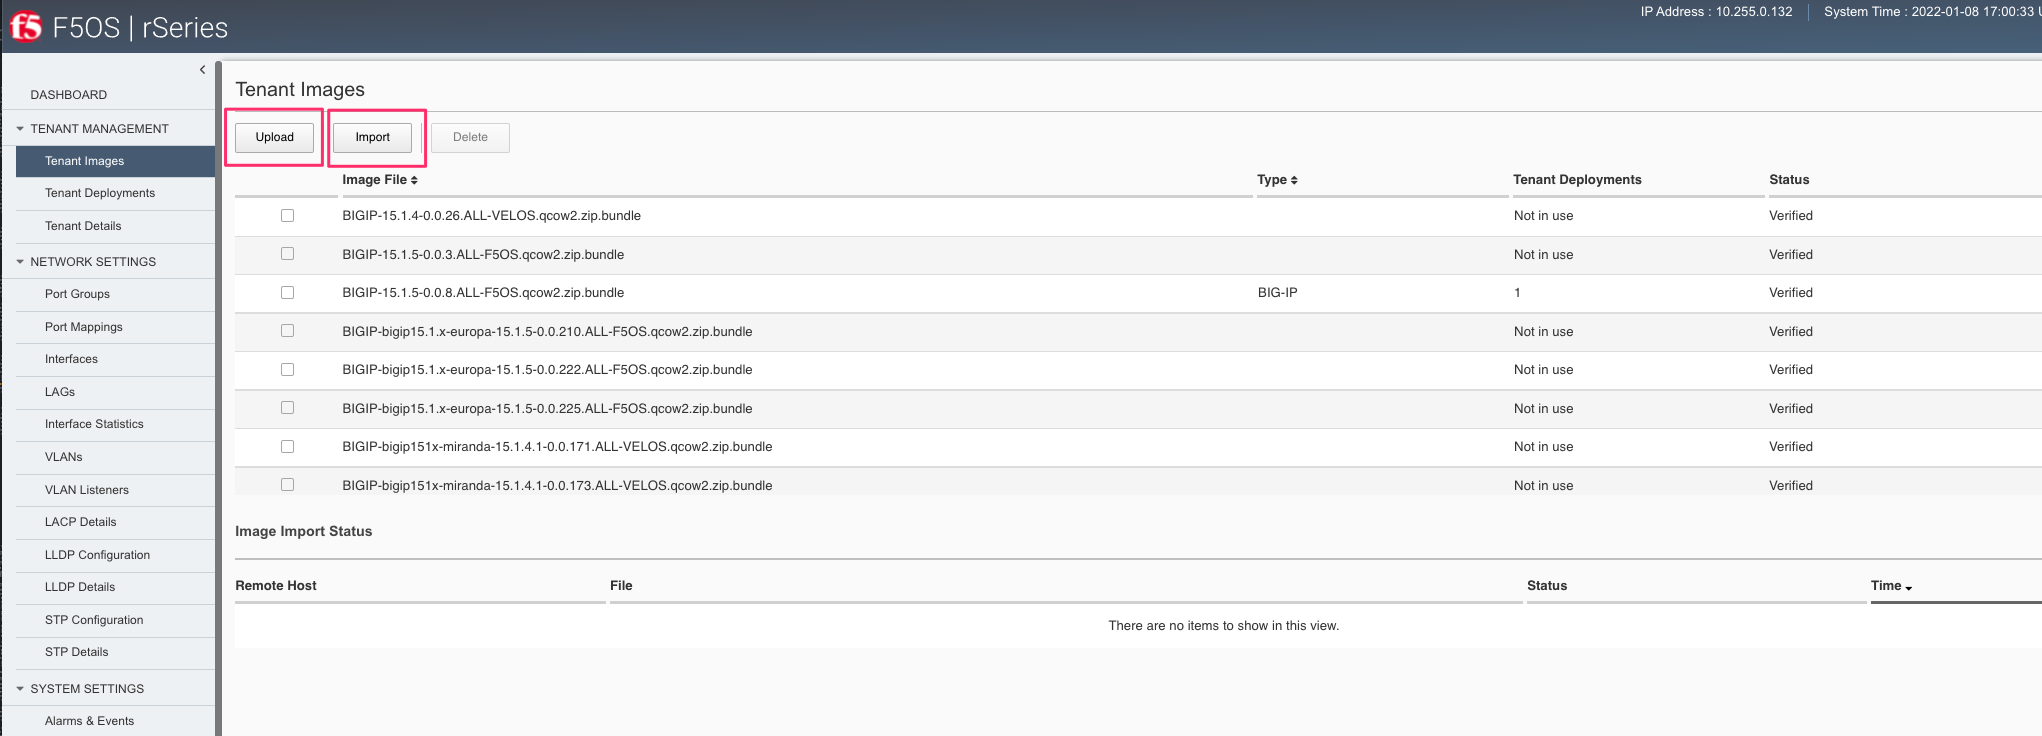
SNMPv3
F5OS-A 1.2.0 added support for SNMPv3. Earlier versions of F5OS-A only supported SNMPv1/v2c. SNMPv3 provides a more secure monitoring environment through the use of authenticated access. More details can be found here:
NTP Authentication
NTP Authentication can be enabled to provide a secure communication channel for Network Time Protocol queries from the F5OS platform layer. To utilize NTP authentication you must first enable NTP authentication and then add keys to secure communication to your NTP servers.
Enabling NTP Authentication via CLI
To enable NTP authentication use the system ntp config enable-ntp-auth true command in the CLI, and then commit the change.
r10900(config)# system ntp config enable-ntp-auth true
r10900(config)# commit
Commit complete.
r10900(config)#
Next you’ll need to add keys for NTP Authentication
r10900(config)# system ntp ntp-keys ntp-key 11 config key-id 11 key-type F5_NTP_AUTH_SHA1 key-value HEX:E27611234BB5E7CDFC8A8ACE55B567FC5CA7C890
The key ID, key type, and key value on this client system must match the server exactly. Lastly, you’ll need to associate the key with an NTP server using the configured key-id above.
r10900(config)# system ntp servers server 10.255.0.139
r10900(config-server-10.255.0.139)# config key-id 11
Enabling NTP Authentication via webUI
To enable NTP authentication in the webUI use the System Settings -> Time Settings page. You’ll need to enable NTP authentication then add the appropriate keys, and then associate those keys with an NTP server.
Enabling NTP Authentication via API
NTP authentication can also be set and viewed using the F5OS API. To view the current NTP setting use the following API call.
GET https://{{rseries_appliance1_ip}}:8888/restconf/data/openconfig-system:system/ntp
The output will display the current NTP configuration state including authentication and keys.
{
    "openconfig-system:ntp": {
        "config": {
            "enabled": true,
            "enable-ntp-auth": true
        },
        "state": {
            "enabled": true,
            "enable-ntp-auth": true
        },
        "ntp-keys": {
            "ntp-key": [
                {
                    "key-id": 11,
                    "config": {
                        "key-id": 11,
                        "key-type": "f5-system-ntp:F5_NTP_AUTH_SHA1",
                        "key-value": "$8$IIACWGpGPUYzian06FdH5PpH/sbSNQmre6DVsBZ2zxCv6S5vM3cXUkn8NwD0BABSeT3Drnmm\npLCQibKafAFFPg=="
                    },
                    "state": {
                        "key-id": 11,
                        "key-type": "F5_NTP_AUTH_SHA1",
                        "key-value": "$8$IIACWGpGPUYzian06FdH5PpH/sbSNQmre6DVsBZ2zxCv6S5vM3cXUkn8NwD0BABSeT3Drnmm\npLCQibKafAFFPg=="
                    }
                }
            ]
        },
        "servers": {
            "server": [
                {
                    "address": "10.255.0.139",
                    "config": {
                        "address": "10.255.0.139",
                        "port": 123,
                        "version": 4,
                        "association-type": "SERVER",
                        "iburst": false,
                        "prefer": false,
                        "f5-openconfig-system-ntp:key-id": 11
                    },
                    "state": {
                        "address": "10.255.0.139",
                        "port": 123,
                        "version": 4,
                        "association-type": "SERVER",
                        "iburst": false,
                        "prefer": false,
                        "f5-openconfig-system-ntp:key-id": 11,
                        "f5-openconfig-system-ntp:authenticated": false
                    }
                },
                {
                    "address": "time.f5net.com",
                    "config": {
                        "address": "time.f5net.com",
                        "port": 123,
                        "version": 4,
                        "association-type": "SERVER",
                        "iburst": false,
                        "prefer": false
                    },
                    "state": {
                        "address": "time.f5net.com",
                        "port": 123,
                        "version": 4,
                        "association-type": "SERVER",
                        "iburst": false,
                        "prefer": false,
                        "f5-openconfig-system-ntp:authenticated": false
                    }
                }
            ]
        }
    }
}
To enable NTP authentication via the F5OS API use the following API call.
PATCH https://{{rseries_appliance1_ip}}:8888/restconf/data/openconfig-system:system/ntp
In the body of the API call you can enable NTP authentication, add keys, and associate those keys with an NTP server using the key-id.
{
    "openconfig-system:ntp": {
        "config": {
            "enabled": true,
            "enable-ntp-auth": true
        },
        "ntp-keys": {
            "ntp-key": [
                {
                    "key-id": 11,
                    "config": {
                        "key-id": 11,
                        "key-type": "f5-system-ntp:F5_NTP_AUTH_SHA1",
                        "key-value": "$8$IIACWGpGPUYzian06FdH5PpH/sbSNQmre6DVsBZ2zxCv6S5vM3cXUkn8NwD0BABSeT3Drnmm\npLCQibKafAFFPg=="
                    }
                }
            ]
        },
        "servers": {
            "server": [
                {
                    "address": "10.255.0.139",
                    "config": {
                        "address": "10.255.0.139",
                        "port": 123,
                        "version": 4,
                        "association-type": "SERVER",
                        "iburst": false,
                        "prefer": false,
                        "f5-openconfig-system-ntp:key-id": 11
                    }
                }
            ]
        }
    }
}
Configurable Management Ciphers
You can configure which ciphers are used when connecting to the F5OS management interface using SSH or HTTPS.
Configuring Management Ciphers via CLI
F5OS-A 1.4.0 added the ability to display and configure the ciphers used for the management interface of F5OS. The show system security CLI command will display the ssl-ciphersuite for the webUI/httpd management interface. It will also display the ciphers and kexalgorithms for the sshd service. Below is an example of the default settings.
r5900-1-gsa# show system security
system security firewall state logging disabled
system security state deny-root-ssh disabled
system security services service httpd
state ssl-ciphersuite ECDHE-RSA-AES256-GCM-SHA384:ECDHE-ECDSA-AES256-GCM-SHA384:ECDHE-RSA-AES256-SHA384:ECDHE-ECDSA-AES256-SHA384:ECDHE-RSA-AES256-SHA:ECDHE-ECDSA-AES256-SHA:DHE-DSS-AES256-GCM-SHA384:DHE-RSA-AES256-GCM-SHA384:DHE-RSA-AES256-SHA256:DHE-DSS-AES256-SHA256:DHE-RSA-AES256-SHA:DHE-DSS-AES256-SHA:DHE-RSA-CAMELLIA256-SHA:DHE-DSS-CAMELLIA256-SHA:ECDH-RSA-AES256-GCM-SHA384:ECDH-ECDSA-AES256-GCM-SHA384:ECDH-RSA-AES256-SHA384:ECDH-ECDSA-AES256-SHA384:ECDH-RSA-AES256-SHA:ECDH-ECDSA-AES256-SHA:AES256-GCM-SHA384:AES256-SHA256:AES256-SHA:CAMELLIA256-SHA:PSK-AES256-CBC-SHA:ECDHE-RSA-AES128-GCM-SHA256:ECDHE-ECDSA-AES128-GCM-SHA256:ECDHE-RSA-AES128-SHA256:ECDHE-ECDSA-AES128-SHA256:ECDHE-RSA-AES128-SHA:ECDHE-ECDSA-AES128-SHA:DHE-DSS-AES128-GCM-SHA256:DHE-RSA-AES128-GCM-SHA256:DHE-RSA-AES128-SHA256:DHE-DSS-AES128-SHA256:DHE-RSA-AES128-SHA:DHE-DSS-AES128-SHA:DHE-RSA-CAMELLIA128-SHA:DHE-DSS-CAMELLIA128-SHA:ECDH-RSA-AES128-GCM-SHA256:ECDH-ECDSA-AES128-GCM-SHA256:ECDH-RSA-AES128-SHA256:ECDH-ECDSA-AES128-SHA256:ECDH-RSA-AES128-SHA:ECDH-ECDSA-AES128-SHA:AES128-GCM-SHA256:AES128-SHA256:AES128-SHA:CAMELLIA128-SHA:PSK-AES128-CBC-SHA
system security services service sshd
state ciphers [ aes128-cbc aes128-ctr aes128-gcm@openssh.com aes256-cbc aes256-ctr aes256-gcm@openssh.com ]
state kexalgorithms [ diffie-hellman-group14-sha1 diffie-hellman-group14-sha256 diffie-hellman-group16-sha512 ecdh-sha2-nistp256 ecdh-sha2-nistp384 ecdh-sha2-nistp521 ]
r5900-1-gsa#
You can change the ciphers offered by F5OS to clients connecting to the httpd service by using the system security services service httpd config ssl-ciphersuite CLI command, and then choosing the ciphers you would like to enable. Be sure to commit any changes.
r5900-1-gsa(config)# system security services service httpd config ssl-ciphersuite ?
Possible completions:
ECDHE-RSA-AES256-GCM-SHA384:ECDHE-ECDSA-AES256-GCM-SHA384:ECDHE-RSA-AES256-SHA384:ECDHE-ECDSA-AES256-SHA384:ECDHE-RSA-AES256-SHA:ECDHE-ECDSA-AES256-SHA:DHE-DSS-AES256-GCM-SHA384:DHE-RSA-AES256-GCM-SHA384:DHE-RSA-AES256-SHA256:DHE-D
SS-AES256-SHA256:DHE-RSA-AES256-SHA:DHE-DSS-AES256-SHA:DHE-RSA-CAMELLIA256-SHA:DHE-DSS-CAMELLIA256-SHA:ECDH-RSA-AES256-GCM-SHA384:ECDH-ECDSA-AES256-GCM-SHA384:ECDH-RSA-AES256-SHA384:ECDH-ECDSA-AES256-SHA384:ECDH-RSA-AES256-SHA:ECDH-E
CDSA-AES256-SHA:AES256-GCM-SHA384:AES256-SHA256:AES256-SHA:CAMELLIA256-SHA:PSK-AES256-CBC-SHA:ECDHE-RSA-AES128-GCM-SHA256:ECDHE-ECDSA-AES128-GCM-SHA256:ECDHE-RSA-AES128-SHA256:ECDHE-ECDSA-AES128-SHA256:ECDHE-RSA-AES128-SHA:ECDHE-ECDS
A-AES128-SHA:DHE-DSS-AES128-GCM-SHA256:DHE-RSA-AES128-GCM-SHA256:DHE-RSA-AES128-SHA256:DHE-DSS-AES128-SHA256:DHE-RSA-AES128-SHA:DHE-DSS-AES128-SHA:DHE-RSA-CAMELLIA128-SHA:DHE-DSS-CAMELLIA128-SHA:ECDH-RSA-AES128-GCM-SHA256:ECDH-ECDSA-
AES128-GCM-SHA256:ECDH-RSA-AES128-SHA256:ECDH-ECDSA-AES128-SHA256:ECDH-RSA-AES128-SHA:ECDH-ECDSA-AES128-SHA:AES128-GCM-SHA256:AES128-SHA256:AES128-SHA:CAMELLIA128-SHA:PSK-AES128-CBC-SHA
r5900-1-gsa(config)#
You can change the ciphers and kexalgorithms offered by F5OS to clients connecting to the sshd service by using the system security services service sshd config ssl-ciphersuite CLI command, and then choosing the ciphers you would like to enable. Be sure to commit any changes.
r10900-1(config)# system security services service sshd config ?
Possible completions:
    ciphers         User specified ciphers.
    kexalgorithms   User specified kexalgorithms.
    macs            User specified MACs.
Below are the current options for sshd ciphers, kexalgorithms and macs. You may configure which ciphers F5OS will use for the sshd service by using the system security services service sshd config ciphers command.
  appliance-1(config)# system security services service sshd config ciphers ?
  Description: User specified ciphers.
  Possible completions:
[
[ 3des-cbc blowfish-cbc cast128-cbc arcfour arcfour128 arcfour256 aes128-cbc aes192-cbc aes256-cbc rijndael-cbc@lysator.liu.se aes128-ctr aes192-ctr aes256-ctr aes128-gcm@openssh.com aes256-gcm@openssh.com chacha20-poly1305@openssh.com ]
  appliance-1(config)# system security services service sshd config ciphers [ 3des-cbc blowfish-cbc cast128-cbc arcfour arcfour128 arcfour256 aes128-cbc aes192-cbc aes256-cbc rijndael-cbc@lysator.liu.se ]
  appliance-1(config-service-sshd)# commit
  The following warnings were generated:
  'system security services service sshd': Changing SSH configuration will restart the SSHD service.
  Proceed? [yes,no] yes
  Commit complete.
You may configure which kexalgorithms F5OS will use for the sshd service by using the system security services service sshd config kexalgorithms command.
appliance-1(config)# system security services service sshd config kexalgorithms ?
Description: User specified kexalgorithms.
Possible completions:
[ diffie-hellman-group1-sha1 diffie-hellman-group14-sha1 diffie-hellman-group14-sha256 diffie-hellman-group16-sha512 diffie-hellman-group18-sha512 diffie-hellman-group-exchange-sha1 diffie-hellman-group-exchange-sha256 ecdh-sha2-nistp256 ecdh-sha2-nistp384 ecdh-sha2-nistp521 curve25519-sha256 curve25519-sha256@libssh.org gss-gex-sha1- gss-group1-sha1- gss-group14-sha1- ]
appliance-1(config)#
You may configure which macs F5OS will use for the sshd service by using the system security services service sshd config macs command.
appliance-1(config)# system security services service sshd config macs ?
Description: User specified MACs.
Possible completions:
[
[ hmac-sha1 mac-sha1-96 hmac-sha2-512 hmac-sha1 hmac-sha1-96 hmac-sha2-256 hmac-md5 hmac-md5-96 hmac-ripemd160 hmac-ripemd160 hmac-ripemd160@openssh.com umac-64@openssh.com umac-128@openssh.com hmac-sha1-etm@openssh.com hmac-sha1-96-etm@open
ssh.com hmac-sha2-256-etm@openssh.com hmac-sha2-512-etm@openssh.com hmac-md5-etm@openssh.com hmac-md5-96-etm@openssh.com hmac-ripemd160-etm@openssh.com umac-64-etm@openssh.com umac-128-etm@openssh.com ]
appliance-1(config)#
Configuring Management Ciphers via webUI
You can configure which ciphers are used when connecting to the F5OS managment interface using SSH or HTTPS. Go to the System Settings -> System Security page to configure both httpd and sshd ciphers suites, sshd KEX algorithms, sshd MAC algorithms, and sshd host key algorithms.

Configuring Management Ciphers via API
You can configure which ciphers are used when connecting to the F5OS managment interface using SSH or HTTPS. Use the following API call to configure both httpd and sshd ciphers suites, sshd KEX algorithms, sshd MAC algorithms, and sshd host key algorithms.
PATCH https://{{rseries_appliance1_ip}}:8888/restconf/data/openconfig-system:system/f5-security-ciphers:security
In the body of the API call enter your httpd and sshd ciphers suites, sshd KEX algorithms, sshd MAC algorithms, and sshd host key algorithms.
{
    "f5-security-ciphers:security": {
        "services": {
            "service": [
                {
                    "name": "httpd",
                    "config": {
                        "name": "httpd",
                        "ssl-ciphersuite": "ECDHE-RSA-AES256-GCM-SHA384:ECDHE-ECDSA-AES256-GCM-SHA384:ECDHE-RSA-AES256-SHA384:ECDHE-ECDSA-AES256-SHA384:ECDHE-RSA-AES256-SHA:ECDHE-ECDSA-AES256-SHA:DHE-DSS-AES256-GCM-SHA384:DHE-RSA-AES256-GCM-SHA384:DHE-RSA-AES256-SHA256:DHE-DSS-AES256-SHA256:DHE-RSA-AES256-SHA:DHE-DSS-AES256-SHA:DHE-RSA-CAMELLIA256-SHA:DHE-DSS-CAMELLIA256-SHA:ECDH-RSA-AES256-GCM-SHA384:ECDH-ECDSA-AES256-GCM-SHA384:ECDH-RSA-AES256-SHA384:ECDH-ECDSA-AES256-SHA384:ECDH-RSA-AES256-SHA:ECDH-ECDSA-AES256-SHA:AES256-GCM-SHA384:AES256-SHA256:AES256-SHA:CAMELLIA256-SHA:PSK-AES256-CBC-SHA:ECDHE-RSA-AES128-GCM-SHA256:ECDHE-ECDSA-AES128-GCM-SHA256:ECDHE-RSA-AES128-SHA256:ECDHE-ECDSA-AES128-SHA256:ECDHE-RSA-AES128-SHA:ECDHE-ECDSA-AES128-SHA:DHE-DSS-AES128-GCM-SHA256:DHE-RSA-AES128-GCM-SHA256:DHE-RSA-AES128-SHA256:DHE-DSS-AES128-SHA256:DHE-RSA-AES128-SHA:DHE-DSS-AES128-SHA:DHE-RSA-CAMELLIA128-SHA:DHE-DSS-CAMELLIA128-SHA:ECDH-RSA-AES128-GCM-SHA256:ECDH-ECDSA-AES128-GCM-SHA256:ECDH-RSA-AES128-SHA256:ECDH-ECDSA-AES128-SHA256:ECDH-RSA-AES128-SHA:ECDH-ECDSA-AES128-SHA:AES128-GCM-SHA256:AES128-SHA256:AES128-SHA:CAMELLIA128-SHA:PSK-AES128-CBC-SHA"
                    }
                },
                {
                    "name": "sshd",
                    "config": {
                        "name": "sshd",
                        "ciphers": [
                            "aes128-cbc",
                            "aes128-ctr",
                            "aes128-gcm@openssh.com",
                            "aes256-cbc",
                            "aes256-ctr",
                            "aes256-gcm@openssh.com"
                        ],
                        "kexalgorithms": [
                            "diffie-hellman-group14-sha1",
                            "diffie-hellman-group14-sha256",
                            "diffie-hellman-group16-sha512",
                            "ecdh-sha2-nistp256",
                            "ecdh-sha2-nistp384",
                            "ecdh-sha2-nistp521"
                        ]
                    }
                }
            ]
        }
    }
}
You can then view the current configuration by issuing the folowing API call.
GET https://{{rseries_appliance1_ip}}:8888/restconf/data/openconfig-system:system/f5-security-ciphers:security
The output will look similar to the response below.
{
    "f5-security-ciphers:security": {
        "services": {
            "service": [
                {
                    "name": "httpd",
                    "config": {
                        "name": "httpd",
                        "ssl-ciphersuite": "ECDHE-RSA-AES256-GCM-SHA384:ECDHE-ECDSA-AES256-GCM-SHA384:ECDHE-RSA-AES256-SHA384:ECDHE-ECDSA-AES256-SHA384:ECDHE-RSA-AES256-SHA:ECDHE-ECDSA-AES256-SHA:DHE-DSS-AES256-GCM-SHA384:DHE-RSA-AES256-GCM-SHA384:DHE-RSA-AES256-SHA256:DHE-DSS-AES256-SHA256:DHE-RSA-AES256-SHA:DHE-DSS-AES256-SHA:DHE-RSA-CAMELLIA256-SHA:DHE-DSS-CAMELLIA256-SHA:ECDH-RSA-AES256-GCM-SHA384:ECDH-ECDSA-AES256-GCM-SHA384:ECDH-RSA-AES256-SHA384:ECDH-ECDSA-AES256-SHA384:ECDH-RSA-AES256-SHA:ECDH-ECDSA-AES256-SHA:AES256-GCM-SHA384:AES256-SHA256:AES256-SHA:CAMELLIA256-SHA:PSK-AES256-CBC-SHA:ECDHE-RSA-AES128-GCM-SHA256:ECDHE-ECDSA-AES128-GCM-SHA256:ECDHE-RSA-AES128-SHA256:ECDHE-ECDSA-AES128-SHA256:ECDHE-RSA-AES128-SHA:ECDHE-ECDSA-AES128-SHA:DHE-DSS-AES128-GCM-SHA256:DHE-RSA-AES128-GCM-SHA256:DHE-RSA-AES128-SHA256:DHE-DSS-AES128-SHA256:DHE-RSA-AES128-SHA:DHE-DSS-AES128-SHA:DHE-RSA-CAMELLIA128-SHA:DHE-DSS-CAMELLIA128-SHA:ECDH-RSA-AES128-GCM-SHA256:ECDH-ECDSA-AES128-GCM-SHA256:ECDH-RSA-AES128-SHA256:ECDH-ECDSA-AES128-SHA256:ECDH-RSA-AES128-SHA:ECDH-ECDSA-AES128-SHA:AES128-GCM-SHA256:AES128-SHA256:AES128-SHA:CAMELLIA128-SHA:PSK-AES128-CBC-SHA"
                    },
                    "state": {
                        "name": "httpd",
                        "ssl-ciphersuite": "ECDHE-RSA-AES256-GCM-SHA384:ECDHE-ECDSA-AES256-GCM-SHA384:ECDHE-RSA-AES256-SHA384:ECDHE-ECDSA-AES256-SHA384:ECDHE-RSA-AES256-SHA:ECDHE-ECDSA-AES256-SHA:DHE-DSS-AES256-GCM-SHA384:DHE-RSA-AES256-GCM-SHA384:DHE-RSA-AES256-SHA256:DHE-DSS-AES256-SHA256:DHE-RSA-AES256-SHA:DHE-DSS-AES256-SHA:DHE-RSA-CAMELLIA256-SHA:DHE-DSS-CAMELLIA256-SHA:ECDH-RSA-AES256-GCM-SHA384:ECDH-ECDSA-AES256-GCM-SHA384:ECDH-RSA-AES256-SHA384:ECDH-ECDSA-AES256-SHA384:ECDH-RSA-AES256-SHA:ECDH-ECDSA-AES256-SHA:AES256-GCM-SHA384:AES256-SHA256:AES256-SHA:CAMELLIA256-SHA:PSK-AES256-CBC-SHA:ECDHE-RSA-AES128-GCM-SHA256:ECDHE-ECDSA-AES128-GCM-SHA256:ECDHE-RSA-AES128-SHA256:ECDHE-ECDSA-AES128-SHA256:ECDHE-RSA-AES128-SHA:ECDHE-ECDSA-AES128-SHA:DHE-DSS-AES128-GCM-SHA256:DHE-RSA-AES128-GCM-SHA256:DHE-RSA-AES128-SHA256:DHE-DSS-AES128-SHA256:DHE-RSA-AES128-SHA:DHE-DSS-AES128-SHA:DHE-RSA-CAMELLIA128-SHA:DHE-DSS-CAMELLIA128-SHA:ECDH-RSA-AES128-GCM-SHA256:ECDH-ECDSA-AES128-GCM-SHA256:ECDH-RSA-AES128-SHA256:ECDH-ECDSA-AES128-SHA256:ECDH-RSA-AES128-SHA:ECDH-ECDSA-AES128-SHA:AES128-GCM-SHA256:AES128-SHA256:AES128-SHA:CAMELLIA128-SHA:PSK-AES128-CBC-SHA"
                    }
                },
                {
                    "name": "sshd",
                    "config": {
                        "name": "sshd",
                        "ciphers": [
                            "aes128-cbc",
                            "aes128-ctr",
                            "aes128-gcm@openssh.com",
                            "aes256-cbc",
                            "aes256-ctr",
                            "aes256-gcm@openssh.com"
                        ],
                        "kexalgorithms": [
                            "diffie-hellman-group14-sha1",
                            "diffie-hellman-group14-sha256",
                            "diffie-hellman-group16-sha512",
                            "ecdh-sha2-nistp256",
                            "ecdh-sha2-nistp384",
                            "ecdh-sha2-nistp521"
                        ]
                    },
                    "state": {
                        "name": "sshd",
                        "ciphers": [
                            "aes128-cbc",
                            "aes128-ctr",
                            "aes128-gcm@openssh.com",
                            "aes256-cbc",
                            "aes256-ctr",
                            "aes256-gcm@openssh.com"
                        ],
                        "kexalgorithms": [
                            "diffie-hellman-group14-sha1",
                            "diffie-hellman-group14-sha256",
                            "diffie-hellman-group16-sha512",
                            "ecdh-sha2-nistp256",
                            "ecdh-sha2-nistp384",
                            "ecdh-sha2-nistp521"
                        ]
                    }
                }
            ]
        },
        "firewall": {
            "config": {
                "logging": {
                    "enabled": false
                }
            },
            "state": {
                "logging": {
                    "enabled": false
                }
            }
        },
        "config": {
            "deny-root-ssh": {
                "enabled": false
            }
        },
        "state": {
            "deny-root-ssh": {
                "enabled": false
            }
        }
    }
}
Client Certificate Based Auth
You can configure client certificate-based authentication to the F5OS management interfaces.
Configuring Client Certificate Authentication via CLI
Before you can log in to the webUI using client certificate authentication, you must have configured client certificate authentication from the CLI and imported the certificate to your browser.
Configuring Client Certificate Authentication via webUI
Although you can enable client certificate authentication via the webUI, you must upload or create your certificate via the CLI or API first. Otherwise, you will end up being locked out of the webUI, until the full configraton is completed.
See the section above about configuration of the certificate before moving on. If you have loaded a certificate, then you can enable client certificate authentication via the webUI as seen below.

More Details to Come
Configuring Client Certificate Authentication via API
Proxy Server Configuration
F5OS supports the ability to capture detailed logs and configuration using the qkView utility. To speed up support case resolution, the qkView can be uploaded directly to F5’s iHealth service, which will give F5 support personnel access to the detailed information to aid problem resolution. In some environments, F5 devices may not have the ability to access the Internet without going through a proxy. The F5OS-A 1.3.0 release added the ability to upload qkViews directly to iHealth through a proxy device and F5OS-A 1.8.0 added support for activating a license via proxy.
Proxy Server via CLI for Licensing and Qkview Uploads to iHealth
To add a proxy server via the CLI which can be used for iHealth uploads or license activation, use the system diagnostics proxy command.
r10900(config)# system diagnostics proxy config proxy-username myusername proxy-server https://myproxy.com:3128 proxy-password
(<AES encrypted string>): **************
r10900(config)#
In F5OS-A 1.8.0 the system licensing command has been extended to accept proxy configuration details as seen below.
r10900-1-gsa(config)# system licensing install registration-key F9832-03399-18781-56079-7591756 proxy-server https://myproxy.com:3128 proxy-username user1 proxy-password
Value for 'proxy-password' (<AES encrypted string>): **************
result License installed successfully.
r10900-1-gsa(config)#
Proxy Server via webUI for Licensing and Qkview Uploads to iHealth
To add a proxy server for iHealth uploads via the webUI, go to the Diagnostics -> iHealth Configuration page.
To add a proxy server for license activation via the webUI, go to the System Settings -> Licensing page.

Proxy Server via API for Licensing and Qkview Uploads to iHealth
To add a proxy server for iHealth uploads via the API, use the following API call.
PATCH https://{{rseries_appliance1_ip}}:8888/restconf/data/openconfig-system:system/f5-system-diagnostics-qkview:diagnostics/f5-system-diagnostics-proxy:proxy
In the body of the API call add the username, password, and proxy server configuration.
{
    "f5-system-diagnostics-proxy:proxy": {
        "config": {
            "proxy-username": "username2",
            "proxy-password": "$8$8FudCujBpUpoTBaQQw4QaTeyUU8UHdkYAv90Dfx43SA=",
            "proxy-server": "https://myproxy2.demo.f5net"
        }
    }
}
To view the current proxy configuration via the API use the following call.
GET https://{{rseries_appliance1_ip}}:8888/restconf/data/openconfig-system:system/f5-system-diagnostics-qkview:diagnostics/f5-system-diagnostics-proxy:proxy
The API call should return output similar to what is seen below.
{
    "f5-system-diagnostics-proxy:proxy": {
        "state": {
            "proxy-username": "username",
            "proxy-server": "https://myproxy.demo.f5net"
        },
        "config": {
            "proxy-username": "username",
            "proxy-password": "$8$8FudCujBpUpoTBaQQw4QaTeyUU8UHdkYAv90Dfx43SA=",
            "proxy-server": "https://myproxy.demo.f5net"
        }
    }
}
Audit Logging
F5OS can log all configuration changes and access to the F5OS layer in audit logs. In versions prior to F5OS-A 1.4.0, all access and configuration changes are logged in one of two separate audit.log files. The files reside in the in one of the following paths in the F5OS filesystem when logged in as root; /var/F5/system/log/audit.log or /var/log/audit/audit.log. If you are logged into the F5OS CLI as admin, then the actual paths are simplified to log/system/audit.log and /log/host/audit/audit.log.
In versions prior to F5OS-A 1.4.0, the audit.log files may only be viewed locally within the F5OS layer, the audit logs cannot be sent to a remote syslog location. F5OS-A 1.4.0 adds the ability to allow audit.log entries to be redirected to a remote syslog location, as well as changing the log format to conform to standard F5OS syslog format of all audit related events. Details on the two different implementations are below.
Configuration of Audit Logs via F5OS CLI (F5OS-A 1.4.0 and Later)
Any information related to login/logout or configuration changes are logged in the log/system/audit.log location. By default, these events are not sent to a configured remote syslog location. If you would like to send informational audit level messages to a remote syslog server, then you must explicitly enable audit events.
First you must configure the remote syslog destination. As part of that configuration, you will specify the IP address, port, and protocol of the remote syslog server. To send audit.log events to the remote server you must add the command selectors selector AUTHPRIV DEBUG as seen below.
r10900(config)# system logging remote-servers remote-server 10.255.0.139
r10900(config-remote-server-10.255.0.139)# config remote-port 514
r10900(config-remote-server-10.255.0.139)# config proto udp
r10900(config-remote-server-10.255.0.139)# selectors selector LOCAL0 INFORMATIONAL
r10900(config-remote-server-10.255.0.139)# selectors selector AUTHPRIV DEBUG
r10900(config-remote-server-10.255.0.139)# commit
% No modifications to commit.
r10900(config-remote-server-10.255.0.139)#
Then, you can control the level of events that will be logged to the local audit.log file by configuring the audit-service sw-component. By default, all audit events will be logged, but you can turn down the level of events.
r10900# show running-config system logging sw-components sw-component audit-service
system logging sw-components sw-component audit-service
config name audit-service
config description "Audit message handling service"
config severity DEBUG
!
The formatting of audit logs provides the date/time in UTC, the account and ID who performed the action, the type of event, the asset affected, the type of access, and success or failure of the request. Separate log entries provide details on user access (login/login failures) information such as IP address and port and whether access was granted or not.
Configuration of Audit Logs via F5OS webUI (F5OS-A 1.4.0 and Later)
Any information related to login/logout or configuration changes are logged in the log/system/audit.log location. By default, these events are not sent to a configured remote syslog location. If you would like to send informational audit level messages to a remote syslog server, then you must explicitly enable audit events.
First you must configure the remote syslog destination. As part of that configuration, you will specify the IP address, port, and protocol of the remote syslog server. To send audit.log events to the remote server you must add the command selectors selector AUTHPRIV DEBUG as seen below.

Configuration of Audit Logs via F5OS API (F5OS-A 1.4.0 and Later)
Any information related to login/logout or configuration changes are logged in the log/system/audit.log location. By default, these events are not sent to a configured remote syslog location. If you would like to send informational audit level messages to a remote syslog server, then you must explicitly enable audit events.
First you must configure the remote syslog destination. As part of that configuration, you will specify the IP address, port, and protocol of the remote syslog server. To send audit.log events to the remote server you must add the command selectors selector AUTHPRIV DEBUG as seen below.
Viewing Audit Logs
All configuration and login / logout events are recorded in the systems audit logs. Most audit events go to the log/system/audit.log location, while a few others such as CLI login failures are logged to log/host/audit.log.
Viewing Audit Logs via F5OS CLI
In the F5OS CLI, the paths are simplified so that you don’t have to know the underlying directory structure. You can use the file list path command to see the files inside the log/system/ directory; use the tab complete to see the options. You may choose either the log/system directory or the log/host directory. Note the audit.log file.
appliance-1# file list path log/
Possible completions:
confd/  host/  system/
Below are the log files in the /log/system directory.
appliance-1# file list path log/system/
Possible completions:
audit.log                      confd.log          devel.log     devel.log.1    lcd.log           lcd.log.1           lcd.log.2.gz
lcd.log.3.gz                   lcd.log.4.gz       lcd.log.5.gz  logrotate.log  logrotate.log.1   logrotate.log.2.gz  platform.log
reprogram_chassis_network.log  rsyslogd_init.log  snmp.log      startup.log    startup.log.prev  trace/              vconsole_auth.log
vconsole_startup.log           velos.log          webUI/
appliance-1# file list path log/system/
To view the contents of the audit.log file, use the command file show path /log/system/audit.log. This will show the entire log file from the beginning, but may not be the best way to troubleshoot a recent event:
r10900# file show log/system/audit.log
<INFO> 9-Dec-2021::17:13:57.506 appliance-1 confd[106]: audit user: admin/20518 assigned to groups: admin
<INFO> 9-Dec-2021::17:13:57.506 appliance-1 confd[106]: audit user: admin/20518 created new session via cli from 172.27.196.47:52582 with ssh
<INFO> 9-Dec-2021::17:13:57.589 appliance-1 confd[106]: audit user: admin/20518 terminated session (reason: normal)
<INFO> 9-Dec-2021::17:13:57.633 appliance-1 confd[106]: audit user: admin/20519 assigned to groups: admin
<INFO> 9-Dec-2021::17:13:57.633 appliance-1 confd[106]: audit user: admin/20519 created new session via cli from 172.27.196.47:52582 with ssh
<INFO> 9-Dec-2021::18:14:14.380 appliance-1 confd[106]: audit user: admin/20519 terminated session (reason: timeout)
<INFO> 9-Dec-2021::18:19:38.135 appliance-1 confd[106]: audit user: admin/0 external authentication succeeded via rest from 172.18.3.162:0 with http, member of groups: admin
<INFO> 9-Dec-2021::18:19:38.135 appliance-1 confd[106]: audit user: admin/0 logged in via rest from 172.18.3.162:0 with http using external authentication
<INFO> 9-Dec-2021::18:19:38.136 appliance-1 confd[106]: audit user: admin/21353 assigned to groups: admin
<INFO> 9-Dec-2021::18:19:38.136 appliance-1 confd[106]: audit user: admin/21353 created new session via rest from 172.18.3.162:0 with http
<INFO> 9-Dec-2021::18:19:38.136 appliance-1 confd[106]: audit user: admin/21353 RESTCONF: request with http: GET /restconf/ HTTP/1.1
<INFO> 9-Dec-2021::18:19:38.137 appliance-1 confd[106]: audit user: admin/21353 terminated session (reason: normal)
<INFO> 9-Dec-2021::18:19:38.137 appliance-1 confd[106]: audit user: admin/21353 RESTCONF: response with http: HTTP/1.1 /restconf/ 200 duration 62361 ms
There are options to manipulate the output of the file. Add | ? to the command to see the options available to manipulate the file output.
r10900# file show log/system/audit.log | ?
Possible completions:
append    Append output text to a file
begin     Begin with the line that matches
count     Count the number of lines in the output
exclude   Exclude lines that match
include   Include lines that match
linnum    Enumerate lines in the output
more      Paginate output
nomore    Suppress pagination
save      Save output text to a file
until     End with the line that matches
r10900# file show log/system/audit.log |
There are other file options that allow the user to tail the log file using file tail -f for a live tail, or
r10900# file tail -f log/system/audit.log
<INFO> 7-Dec-2022::15:05:01.996 appliance-1 confd[125]: audit user: admin/13692368 assigned to groups: admin
<INFO> 7-Dec-2022::15:05:01.996 appliance-1 confd[125]: audit user: admin/13692368 created new session via cli from 172.18.104.73:60301 with ssh
<INFO> 7-Dec-2022::15:05:02.007 appliance-1 confd[125]: audit user: admin/13692368 CLI 'show system state hostname'
<INFO> 7-Dec-2022::15:05:02.008 appliance-1 confd[125]: audit user: admin/13692368 CLI done
<INFO> 7-Dec-2022::15:05:02.009 appliance-1 confd[125]: audit user: admin/13692368 terminated session (reason: normal)
<INFO> 7-Dec-2022::15:05:02.052 appliance-1 confd[125]: audit user: admin/13692371 assigned to groups: admin
<INFO> 7-Dec-2022::15:05:02.053 appliance-1 confd[125]: audit user: admin/13692371 created new session via cli from 172.18.104.73:60301 with ssh
<INFO> 7-Dec-2022::15:05:19.428 appliance-1 confd[125]: audit user: admin/13692371 CLI 'file show log/system/audit.log'
<INFO> 7-Dec-2022::15:05:21.784 appliance-1 confd[125]: audit user: admin/13692371 CLI done
<INFO> 7-Dec-2022::15:08:59.462 appliance-1 confd[125]: audit user: admin/13692371 CLI 'file tail -f log/system/audit.log'
file tail -n <number of lines> to view a specific number of the most recent lines.
r10900# file tail -n 20 log/system/audit.log
<INFO> 7-Dec-2022::14:46:50.546 appliance-1 confd[125]: audit user: admin/13672920 RESTCONF: response with http: HTTP/1.1 /restconf/ 200 duration 37668 ms
<INFO> 7-Dec-2022::14:47:05.976 appliance-1 confd[125]: audit user: admin/0 external token authentication succeeded via rest from 172.18.104.73:0 with http, member of groups: admin session-id:admin1670421700
<INFO> 7-Dec-2022::14:47:05.976 appliance-1 confd[125]: audit user: admin/0 logged in via rest from 172.18.104.73:0 with http using externalvalidation authentication
<INFO> 7-Dec-2022::14:47:05.976 appliance-1 confd[125]: audit user: admin/13673201 assigned to groups: admin
<INFO> 7-Dec-2022::14:47:05.976 appliance-1 confd[125]: audit user: admin/13673201 created new session via rest from 172.18.104.73:0 with http
<INFO> 7-Dec-2022::14:47:05.977 appliance-1 confd[125]: audit user: admin/13673201 RESTCONF: request with http: GET /restconf/ HTTP/1.1
<INFO> 7-Dec-2022::14:47:05.980 appliance-1 confd[125]: audit user: admin/13673201 terminated session (reason: normal)
<INFO> 7-Dec-2022::14:47:05.981 appliance-1 confd[125]: audit user: admin/13673201 RESTCONF: response with http: HTTP/1.1 /restconf/ 200 duration 35923 ms
<INFO> 7-Dec-2022::15:05:01.996 appliance-1 confd[125]: audit user: admin/13692368 assigned to groups: admin
<INFO> 7-Dec-2022::15:05:01.996 appliance-1 confd[125]: audit user: admin/13692368 created new session via cli from 172.18.104.73:60301 with ssh
<INFO> 7-Dec-2022::15:05:02.007 appliance-1 confd[125]: audit user: admin/13692368 CLI 'show system state hostname'
<INFO> 7-Dec-2022::15:05:02.008 appliance-1 confd[125]: audit user: admin/13692368 CLI done
<INFO> 7-Dec-2022::15:05:02.009 appliance-1 confd[125]: audit user: admin/13692368 terminated session (reason: normal)
<INFO> 7-Dec-2022::15:05:02.052 appliance-1 confd[125]: audit user: admin/13692371 assigned to groups: admin
<INFO> 7-Dec-2022::15:05:02.053 appliance-1 confd[125]: audit user: admin/13692371 created new session via cli from 172.18.104.73:60301 with ssh
<INFO> 7-Dec-2022::15:05:19.428 appliance-1 confd[125]: audit user: admin/13692371 CLI 'file show log/system/audit.log'
<INFO> 7-Dec-2022::15:05:21.784 appliance-1 confd[125]: audit user: admin/13692371 CLI done
<INFO> 7-Dec-2022::15:08:59.462 appliance-1 confd[125]: audit user: admin/13692371 CLI 'file tail -f log/system/audit.log'
<INFO> 7-Dec-2022::15:09:22.907 appliance-1 confd[125]: audit user: admin/13692371 CLI done
<INFO> 7-Dec-2022::15:09:31.142 appliance-1 confd[125]: audit user: admin/13692371 CLI 'file tail -n 20 log/system/audit.log'
Within the bash shell if you are logged in as root, the path for the logging is different; /var/F5/system/log. Note that older audit.log files are gzipped and rotated.
[root@appliance-1(r10900.f5demo.net) ~]# ls -al /var/F5/system/log/
total 2541432
drwxr-xr-x.  4 root root       4096 Dec  6 20:14 .
drwxr-xr-x. 26 root root       4096 Nov 28 12:38 ..
-rw-r--r--.  1 root root   71290161 Dec  7 10:10 audit.log
-rw-r--r--.  1 root root    1743543 Dec  9  2021 audit.log.1
-rw-r--r--.  1 root root         20 Dec  7  2021 audit.log.2.gz
-rw-r--r--.  1 root root         20 Dec  7  2021 audit.log.3.gz
-rw-r--r--.  1 root root    1847232 Dec  7  2021 audit.log.4.gz
-rw-r--r--.  1 root root    9848782 Nov 28 12:35 confd.log
-rw-r--r--.  1 root root      29979 Dec  9  2021 confd.log.1
-rw-r--r--.  1 root root         20 Dec  7  2021 confd.log.2.gz
-rw-r--r--.  1 root root         20 Dec  7  2021 confd.log.3.gz
-rw-r--r--.  1 root root      33306 Dec  7  2021 confd.log.4.gz
-rw-r--r--.  1 root root   81663088 Dec  7 10:10 devel.log
-rw-r--r--.  1 root root  104858977 Nov 13 15:11 devel.log.1
-rw-r--r--.  1 root root    4541548 Oct 14 02:37 devel.log.2.gz
-rw-r--r--.  1 root root    4838903 Aug 23 01:14 devel.log.3.gz
-rw-r--r--.  1 root root    4747221 Jun 22 18:45 devel.log.4.gz
-rw-r--r--.  1 root root    4788922 Apr 13  2022 devel.log.5.gz
-rw-r--r--.  1 root root   24263778 Nov 28 13:40 k3s_events.log
-rw-r--r--.  1 root root  105344182 Nov 28 12:54 k3s_events.log.1
-rw-r--r--.  1 root root    8073081 Sep 19 11:30 k3s_events.log.2.gz
-rw-r--r--.  1 root root   68972233 Jan 23  2022 lacp_out_132
-rw-r--r--.  1 root root   50821845 Dec  7 10:10 lcd.log
-rw-r--r--.  1 root root  104858247 Oct  6 23:13 lcd.log.1
-rw-r--r--.  1 root root    6501076 Jun 27 10:24 lcd.log.2.gz
-rw-r--r--.  1 root root    6518411 Jun  8 00:41 lcd.log.3.gz
-rw-r--r--.  1 root root    6541114 May 19  2022 lcd.log.4.gz
-rw-r--r--.  1 root root    6561702 Apr 22  2022 lcd.log.5.gz
-rw-r--r--.  1 root root    1909130 Dec  7 10:10 logrotate.log
-rw-r--r--.  1 root root    5244641 Dec  6 20:14 logrotate.log.1
-rw-r--r--.  1 root root      31197 Dec  5 05:57 logrotate.log.2.gz
-rw-r--r--.  1 root root  607087556 Dec  7 10:09 platform.log
-rw-r--r--.  1 root root 1073833624 Jan 12  2022 platform.log.1
-rw-r--r--.  1 root root   60136728 Jan  4  2022 platform.log.2.gz
-rw-r--r--.  1 root root     454400 Dec  8  2021 platform.log.3.gz
-rw-r--r--.  1 root root        621 Dec  7  2021 platform.log.4.gz
-rw-r--r--.  1 root root       7841 Dec  7  2021 platform.log.5.gz
-rw-r--r--.  1 root root       7734 Dec  7  2021 platform.log.6.gz
-rw-r--r--.  1 root root  152724547 Dec  7  2021 platform.log.7.gz
-rw-r--r--.  1 root root          0 Sep 30  2021 reprogram_chassis_network.log
-rw-r--r--.  1 root root      41122 Nov 28 12:34 rsyslogd_init.log
-rw-r--r--.  1 root root   16070999 Dec  5 23:48 snmp.log
-rw-r--r--.  1 root root          0 Dec  9  2021 snmp.log.1
-rw-r--r--.  1 root root         20 Dec  7  2021 snmp.log.2.gz
-rw-r--r--.  1 root root         20 Dec  7  2021 snmp.log.3.gz
-rw-r--r--.  1 root root         20 Dec  7  2021 snmp.log.4.gz
-rw-r--r--.  1 root root        435 Nov 28 12:34 startup.log
-rw-r--r--.  1 root root        190 Nov 28 12:27 startup.log.prev
drwxr-xr-x.  2 root root       4096 Sep 28  2021 trace
-rw-r--r--.  1 root root       8424 Nov 28 12:34 vconsole_auth.log
-rw-r--r--.  1 root root      31966 Nov 28 12:34 vconsole_startup.log
-rw-r--r--.  1 root root          0 Dec  9  2021 velos.log
-rw-r--r--.  1 root root          0 Dec  7  2021 velos.log.1
-rw-r--r--.  1 root root         20 Dec  7  2021 velos.log.2.gz
-rw-r--r--.  1 root root    5960344 Oct 18  2021 velos.log.3.gz
-rw-r--r--.  1 root root       4096 Oct 15  2021 .velos.log.swp
drwxr-xr-x.  2 root root       4096 Nov 28 12:34 webui
[root@appliance-1(r10900.f5demo.net) ~]#
Some audit events don’t make it into the main audit.log file in the /log/system directory. An example would be certain login failure events that happen at a lower layer, and are instead captured in the /log/host/audit/audit.log file.
r10900-1-gsa# file show log/host/audit/audit.log
type=USER_LOGIN msg=audit(1730821588.346:269): pid=25235 uid=0 auid=1000 ses=69895 subj=system_u:system_r:sshd_t:s0-s0:c0.c1023 msg='op=login id=1000 exe="/usr/sbin/sshd" hostname=172.18.11.38 addr=172.18.11.38 terminal=/dev/pts/1 res=success'
type=USER_LOGOUT msg=audit(1730823436.684:270): pid=25235 uid=0 auid=1000 ses=69895 subj=system_u:system_r:sshd_t:s0-s0:c0.c1023 msg='op=login id=1000 exe="/usr/sbin/sshd" hostname=? addr=? terminal=/dev/pts/1 res=success'
type=USER_LOGIN msg=audit(1730824052.749:271): pid=8910 uid=0 auid=1000 ses=70022 subj=system_u:system_r:sshd_t:s0-s0:c0.c1023 msg='op=login id=1000 exe="/usr/sbin/sshd" hostname=172.18.11.38 addr=172.18.11.38 terminal=/dev/pts/0 res=success'
type=USER_LOGOUT msg=audit(1730825355.788:272): pid=8910 uid=0 auid=1000 ses=70022 subj=system_u:system_r:sshd_t:s0-s0:c0.c1023 msg='op=login id=1000 exe="/usr/sbin/sshd" hostname=? addr=? terminal=/dev/pts/0 res=success'
type=USER_LOGIN msg=audit(1730840593.268:273): pid=42201 uid=0 auid=1000 ses=70865 subj=system_u:system_r:sshd_t:s0-s0:c0.c1023 msg='op=login id=1000 exe="/usr/sbin/sshd" hostname=172.27.192.120 addr=172.27.192.120 terminal=/dev/pts/0 res=success'
type=USER_LOGOUT msg=audit(1730842988.585:274): pid=42201 uid=0 auid=1000 ses=70865 subj=system_u:system_r:sshd_t:s0-s0:c0.c1023 msg='op=login id=1000 exe="/usr/sbin/sshd" hostname=? addr=? terminal=/dev/pts/0 res=success'
type=USER_LOGIN msg=audit(1730843105.828:275): pid=10063 uid=0 auid=1000 ses=70993 subj=system_u:system_r:sshd_t:s0-s0:c0.c1023 msg='op=login id=1000 exe="/usr/sbin/sshd" hostname=172.27.192.120 addr=172.27.192.120 terminal=/dev/pts/0 res=success'
type=USER_LOGOUT msg=audit(1730844656.179:276): pid=10063 uid=0 auid=1000 ses=70993 subj=system_u:system_r:sshd_t:s0-s0:c0.c1023 msg='op=login id=1000 exe="/usr/sbin/sshd" hostname=? addr=? terminal=/dev/pts/0 res=success'
type=USER_LOGIN msg=audit(1730844667.844:277): pid=38080 uid=0 auid=1012 ses=71074 subj=system_u:system_r:sshd_t:s0-s0:c0.c1023 msg='op=login id=1012 exe="/usr/sbin/sshd" hostname=172.27.192.120 addr=172.27.192.120 terminal=/dev/pts/0 res=success'
type=USER_LOGOUT msg=audit(1730844859.612:278): pid=38080 uid=0 auid=1012 ses=71074 subj=system_u:system_r:sshd_t:s0-s0:c0.c1023 msg='op=login id=1012 exe="/usr/sbin/sshd" hostname=? addr=? terminal=/dev/pts/0 res=success'
type=USER_LOGIN msg=audit(1730844871.745:279): pid=957 uid=0 auid=1000 ses=71084 subj=system_u:system_r:sshd_t:s0-s0:c0.c1023 msg='op=login id=1000 exe="/usr/sbin/sshd" hostname=172.27.192.120 addr=172.27.192.120 terminal=/dev/pts/0 res=success'
type=USER_LOGOUT msg=audit(1730846789.291:280): pid=957 uid=0 auid=1000 ses=71084 subj=system_u:system_r:sshd_t:s0-s0:c0.c1023 msg='op=login id=1000 exe="/usr/sbin/sshd" hostname=? addr=? terminal=/dev/pts/0 res=success'
type=USER_LOGIN msg=audit(1730848953.986:281): pid=4018 uid=0 auid=1000 ses=71293 subj=system_u:system_r:sshd_t:s0-s0:c0.c1023 msg='op=login id=1000 exe="/usr/sbin/sshd" hostname=172.27.192.120 addr=172.27.192.120 terminal=/dev/pts/0 res=success'
r10900-1-gsa#
Viewing Logs from the webUI
In the current F5OS releases, you cannot view the F5OS audit.log file directly from the webUI, although you can download it from the webUI. To view the audit.log, you can use the CLI or API, or download the files and then view. To download log files from the webUI, go to the System Settings -> File Utilities page. Here there are various logs directories you can download files from. You have the option to Export files to a remote HTTPS server, or Download the files directly to your client machine through the browser.
If you want to download the main audit.log, select the directory /log/system.

Viewing Audit Logs via F5OS API
You cannot view audit logs fomr the API, but you may download them from the system.
Example Audit Logging for Login, Logout, Login Failure, and Account Lockout
Below are examples seen on a remote syslog server for various login, logout, login failure, and account lockout events for F5OS. These examples are based on F5OS-A 1.4.0 or later.
Login Audit Logs
Below is an example of a client logging into the F5OS webUI. Note that the logs identify which user has logged in as well as what IP address they have logged in from.
2023-01-06T16:56:17.475631-05:00 appliance-1 audit-service[12]: priority="Notice" version=1.0 msgid=0x1f03000000000002 msg="audit" user="admin/0" cmd="external token authentication succeeded via rest from 172.18.104.40:0 with http, member of groups: admin session-id:admin1673042162".
2023-01-06T16:56:17.475645-05:00 appliance-1 audit-service[12]: priority="Notice" version=1.0 msgid=0x1f03000000000002 msg="audit" user="admin/0" cmd="logged in via rest from 172.18.104.40:0 with http using externalvalidation authentication".
2023-01-06T16:56:17.475855-05:00 appliance-1 audit-service[12]: priority="Notice" version=1.0 msgid=0x1f03000000000002 msg="audit" user="admin/14985364" cmd="assigned to groups: admin".
2023-01-06T16:56:17.476077-05:00 appliance-1 audit-service[12]: priority="Notice" version=1.0 msgid=0x1f03000000000002 msg="audit" user="admin/14985364" cmd="created new session via rest from 172.18.104.40:0 with http".
2023-01-06T16:56:17.477346-05:00 appliance-1 audit-service[12]: priority="Info" version=1.0 msgid=0x1f03000000000001 msg="audit" user="admin/14985364" cmd="RESTCONF: request with http: GET /restconf/ HTTP/1.1".
2023-01-06T16:56:17.479784-05:00 appliance-1 audit-service[12]: priority="Notice" version=1.0 msgid=0x1f03000000000002 msg="audit" user="admin/14985364" cmd="terminated session (reason: normal)".
2023-01-06T16:56:17.480672-05:00 appliance-1 audit-service[12]: priority="Info" version=1.0 msgid=0x1f03000000000001 msg="audit" user="admin/14985364" cmd="RESTCONF: response with http: HTTP/1.1 /restconf/ 200 duration 50243 ms".
Below is an example of a client logging into the F5OS CLI. Note that the logs identify which user has logged in as well as what IP address they have logged in from.
2023-01-06T17:06:57.717699-05:00 appliance-1 audit-service[12]: priority="Notice" version=1.0 msgid=0x1f03000000000002 msg="audit" user="admin/15001237" cmd="assigned to groups: admin".
2023-01-06T17:06:57.717714-05:00 appliance-1 audit-service[12]: priority="Notice" version=1.0 msgid=0x1f03000000000002 msg="audit" user="admin/15001237" cmd="created new session via cli from 172.18.104.40:61769 with ssh".
2023-01-06T17:06:57.728956-05:00 appliance-1 audit-service[12]: priority="Info" version=1.0 msgid=0x1f03000000000001 msg="audit" user="admin/15001237" cmd="CLI 'show system state hostname'".
2023-01-06T17:06:57.730238-05:00 appliance-1 audit-service[12]: priority="Info" version=1.0 msgid=0x1f03000000000001 msg="audit" user="admin/15001237" cmd="CLI done".
2023-01-06T17:06:57.732901-05:00 appliance-1 audit-service[12]: priority="Notice" version=1.0 msgid=0x1f03000000000002 msg="audit" user="admin/15001237" cmd="terminated session (reason: normal)".
2023-01-06T17:06:57.775152-05:00 appliance-1 audit-service[12]: priority="Notice" version=1.0 msgid=0x1f03000000000002 msg="audit" user="admin/15001242" cmd="assigned to groups: admin".
2023-01-06T17:06:57.775243-05:00 appliance-1 audit-service[12]: priority="Notice" version=1.0 msgid=0x1f03000000000002 msg="audit" user="admin/15001242" cmd="created new session via cli from 172.18.104.40:61769 with ssh".
Below is an example of a client authentication to the F5OS REST API. Note that the logs identify which user has accessed the API as well as what IP address they have sent the request from.
2023-01-06T17:09:23.296905-05:00 appliance-1 audit-service[12]: priority="Notice" version=1.0 msgid=0x1f03000000000002 msg="audit" user="admin/0" cmd="external authentication succeeded via rest from 172.18.104.40:0 with http, member of groups: admin session-id:admin1673042963".
2023-01-06T17:09:23.296919-05:00 appliance-1 audit-service[12]: priority="Notice" version=1.0 msgid=0x1f03000000000002 msg="audit" user="admin/0" cmd="logged in via rest from 172.18.104.40:0 with http using external authentication".
2023-01-06T17:09:23.296926-05:00 appliance-1 audit-service[12]: priority="Notice" version=1.0 msgid=0x1f03000000000002 msg="audit" user="admin/15004795" cmd="assigned to groups: admin".
2023-01-06T17:09:23.296969-05:00 appliance-1 audit-service[12]: priority="Notice" version=1.0 msgid=0x1f03000000000002 msg="audit" user="admin/15004795" cmd="created new session via rest from 172.18.104.40:0 with http".
2023-01-06T17:09:23.297161-05:00 appliance-1 audit-service[12]: priority="Info" version=1.0 msgid=0x1f03000000000001 msg="audit" user="admin/15004795" cmd="RESTCONF: request with http: GET /restconf/data/openconfig-system:system/aaa HTTP/1.1".
2023-01-06T17:09:23.389320-05:00 appliance-1 audit-service[12]: priority="Info" version=1.0 msgid=0x1f03000000000001 msg="audit" user="admin/15004795" cmd="RESTCONF: response with http: HTTP/1.1 /restconf/data/openconfig-system:system/aaa 200 duration 151730 ms".
2023-01-06T17:09:23.390141-05:00 appliance-1 audit-service[12]: priority="Notice" version=1.0 msgid=0x1f03000000000002 msg="audit" user="admin/15004795" cmd="terminated session (reason: normal)".
Logout Audit Logs
Below is an example of a client logging out of the F5OS CLI. Note that the logs identify which user has logged out as well as what IP address they have logged out from.
2023-01-06T17:16:05.536108-05:00 appliance-1 audit-service[12]: priority="Info" version=1.0 msgid=0x1f03000000000001 msg="audit" user="admin/15014425" cmd="CLI 'logout'".
2023-01-06T17:16:05.736047-05:00 appliance-1 audit-service[12]: priority="Notice" version=1.0 msgid=0x1f03000000000002 msg="audit" user="admin/15014425" cmd="terminated session (reason: normal)".
Account Lockout Audit Logs
In order to capture all events related to account lockout, you will need to configure F5OS to send both standard syslog events as well as host audit log events to a remote server. This is because some of the audit events related to account lockout are captured before the F5OS layer in the host/audit.log and by default that log is not sent remotely.
To forward the contents of the host audit logs add config files file audit/audit.log to the system logging host-logs configuration as seen below.
default-1# show running-config system logging host-logs
system logging host-logs
config remote-forwarding enabled
config selectors selector AUTHPRIV DEBUG
config files file audit/audit.log
!
In addition, you’ll want to ensure that selectors selector AUTHPRIV INFORMATIONAL is added to the system logging remote-servers configuration for your configured syslog location.
default-1# show running-config system logging remote-servers
system logging remote-servers remote-server 10.255.85.182
config remote-port 514
config proto udp
selectors selector LOCAL0 DEBUG
selectors selector AUTHPRIV INFORMATIONAL
!
Below is remote syslog example of a client logging into the F5OS CLI and entering an invalid password multiple times, resulting in an account lockout event. The configured password-policy for max-login-failures has been set to two, meaning once the client issues two invalid passwords the account will be temporarily locked for the unlock-time of sixty seconds.
r10900-1# show running-config system aaa password-policy
system aaa password-policy config min-length 6
system aaa password-policy config required-numeric 0
system aaa password-policy config required-uppercase 0
system aaa password-policy config required-lowercase 0
system aaa password-policy config required-special 0
system aaa password-policy config required-differences 8
system aaa password-policy config reject-username true
system aaa password-policy config apply-to-root true
system aaa password-policy config retries 3
system aaa password-policy config max-login-failures 2
system aaa password-policy config unlock-time 60
system aaa password-policy config root-lockout true
system aaa password-policy config root-unlock-time 60
system aaa password-policy config max-age 0
r10900-1#
In the logs below, a local user testuser has entered two consecutive bad passwords resulting in a temporary lock of the account.
2023-02-21T12:23:10.495053-05:00 appliance-1 unix_chkpwd[45741]:  password check failed for user (testuser)
2023-02-21T12:23:10.495481-05:00 appliance-1 sshd[45026]:  pam_unix(sshd:auth): authentication failure; logname= uid=0 euid=0 tty=ssh ruser= rhost=172.18.105.83  user=testuser
2023-02-21T12:23:18.298137-05:00 appliance-1 unix_chkpwd[46717]:  password check failed for user (testuser)
2023-02-21T12:23:18.298942-05:00 appliance-1 sshd[45026]:  pam_faillock(sshd:auth): Consecutive login failures for user testuser account temporarily locked
2023-02-21T12:23:20.223386-05:00 appliance-1 sshd[46957]:  pam_unix(sshd:session): session opened for user root by (uid=0)
2023-02-21T12:23:20.274338-05:00 appliance-1 sshd[46957]:  pam_unix(sshd:session): session closed for user root
2023-02-21T12:23:20.416710-05:00 appliance-1 HOST-audit/audit.log:  type=RESP_ACCT_UNLOCK_TIMED msg=audit(1677000190.495:250): pid=45026 uid=0 auid=4294967295 ses=4294967295 subj=system_u:system_r:sshd_t:s0-s0:c0.c1023 msg='pam_faillock uid=1003  exe="/usr/sbin/sshd" hostname=172.18.105.83 addr=172.18.105.83 terminal=ssh res=success'
2023-02-21T12:23:20.416724-05:00 appliance-1 HOST-audit/audit.log:  type=ANOM_LOGIN_FAILURES msg=audit(1677000198.297:251): pid=45026 uid=0 auid=4294967295 ses=4294967295 subj=system_u:system_r:sshd_t:s0-s0:c0.c1023 msg='pam_faillock uid=1003  exe="/usr/sbin/sshd" hostname=? addr=? terminal=? res=success'
2023-02-21T12:23:20.416727-05:00 appliance-1 HOST-audit/audit.log:  type=RESP_ACCT_LOCK msg=audit(1677000198.297:252): pid=45026 uid=0 auid=4294967295 ses=4294967295 subj=system_u:system_r:sshd_t:s0-s0:c0.c1023 msg='pam_faillock uid=1003  exe="/usr/sbin/sshd" hostname=? addr=? terminal=? res=success'
Example Audit Logging of Configuration Changes
Below is an example audit log of the user jim-test entering config mode via the CLI and then changing the description for interface 20.0 and then committing the change.
2023-01-06T17:44:16.790917-05:00 appliance-1 audit-service[12]: priority="Info" version=1.0 msgid=0x1f03000000000001 msg="audit" user="jim-test/15056017" cmd="CLI 'config'".
2023-01-06T17:44:16.791664-05:00 appliance-1 audit-service[12]: priority="Info" version=1.0 msgid=0x1f03000000000001 msg="audit" user="jim-test/15056017" cmd="CLI done".
2023-01-06T17:44:54.864806-05:00 appliance-1 audit-service[12]: priority="Info" version=1.0 msgid=0x1f03000000000001 msg="audit" user="jim-test/15056017" cmd="CLI 'interfaces interface 20.0 config description "This is a test"'".
2023-01-06T17:44:54.864822-05:00 appliance-1 audit-service[12]: priority="Info" version=1.0 msgid=0x1f03000000000001 msg="audit" user="jim-test/15056017" cmd="CLI done".
2023-01-06T17:44:59.392050-05:00 appliance-1 audit-service[12]: priority="Info" version=1.0 msgid=0x1f03000000000001 msg="audit" user="jim-test/15056017" cmd="CLI 'commit'".
2023-01-06T17:44:59.412077-05:00 appliance-1 audit-service[12]: priority="Notice" version=1.0 msgid=0x1f03000000000005 msg="audit modify" ctx="CLI" user="jim-test/15056017" path="/interfaces/interface{20.0}".
2023-01-06T17:44:59.412156-05:00 appliance-1 audit-service[12]: priority="Notice" version=1.0 msgid=0x1f03000000000006 msg="audit value set" ctx="CLI" user="jim-test/15056017" path="/interfaces/interface{20.0}/config/description" value="This is a test".
2023-01-06T17:44:59.413541-05:00 appliance-1 audit-service[12]: priority="Info" version=1.0 msgid=0x1f03000000000001 msg="audit" user="jim-test/15056017" cmd="CLI done".
Example Audit Logging of webUI Changes
Below is an example audit log of the user jim-test using the webUI and then changing the VLAN membership for interface 20.0 and then committing the change.
2023-01-06T17:50:43.011201-05:00 appliance-1 audit-service[12]: priority="Notice" version=1.0 msgid=0x1f03000000000002 msg="audit" user="jim-test/0" cmd="external token authentication succeeded via rest from 172.18.104.40:0 with http, member of groups: admin session-id:jim-test1673045408".
2023-01-06T17:50:43.011215-05:00 appliance-1 audit-service[12]: priority="Notice" version=1.0 msgid=0x1f03000000000002 msg="audit" user="jim-test/0" cmd="logged in via rest from 172.18.104.40:0 with http using externalvalidation authentication".
2023-01-06T17:50:43.014087-05:00 appliance-1 audit-service[12]: priority="Notice" version=1.0 msgid=0x1f03000000000002 msg="audit" user="jim-test/15065552" cmd="assigned to groups: admin".
2023-01-06T17:50:43.014185-05:00 appliance-1 audit-service[12]: priority="Notice" version=1.0 msgid=0x1f03000000000002 msg="audit" user="jim-test/15065552" cmd="created new session via rest from 172.18.104.40:0 with http".
2023-01-06T17:50:43.014470-05:00 appliance-1 audit-service[12]: priority="Info" version=1.0 msgid=0x1f03000000000001 msg="audit" user="jim-test/15065552" cmd="RESTCONF: request with http: GET /restconf/ HTTP/1.1".
2023-01-06T17:50:43.015325-05:00 appliance-1 audit-service[12]: priority="Notice" version=1.0 msgid=0x1f03000000000002 msg="audit" user="jim-test/15065552" cmd="terminated session (reason: normal)".
2023-01-06T17:50:43.016496-05:00 appliance-1 audit-service[12]: priority="Info" version=1.0 msgid=0x1f03000000000001 msg="audit" user="jim-test/15065552" cmd="RESTCONF: response with http: HTTP/1.1 /restconf/ 200 duration 42906 ms".
2023-01-06T17:50:46.109658-05:00 appliance-1 audit-service[12]: priority="Notice" version=1.0 msgid=0x1f03000000000002 msg="audit" user="jim-test/0" cmd="external token authentication succeeded via rest from 172.18.104.40:0 with http, member of groups: admin session-id:jim-test1673045408".
2023-01-06T17:50:46.110048-05:00 appliance-1 audit-service[12]: priority="Notice" version=1.0 msgid=0x1f03000000000002 msg="audit" user="jim-test/0" cmd="logged in via rest from 172.18.104.40:0 with http using externalvalidation authentication".
2023-01-06T17:50:46.110850-05:00 appliance-1 audit-service[12]: priority="Notice" version=1.0 msgid=0x1f03000000000002 msg="audit" user="jim-test/15065637" cmd="assigned to groups: admin".
2023-01-06T17:50:46.110956-05:00 appliance-1 audit-service[12]: priority="Notice" version=1.0 msgid=0x1f03000000000002 msg="audit" user="jim-test/15065637" cmd="created new session via rest from 172.18.104.40:0 with http".
2023-01-06T17:50:46.111225-05:00 appliance-1 audit-service[12]: priority="Info" version=1.0 msgid=0x1f03000000000001 msg="audit" user="jim-test/15065637" cmd="RESTCONF: request with http: PUT /restconf/data/openconfig-interfaces:interfaces/interface=19.0/openconfig-if-ethernet:ethernet/openconfig-vlan:switched-vlan HTTP/1.1".
2023-01-06T17:50:46.146634-05:00 appliance-1 audit-service[12]: priority="Notice" version=1.0 msgid=0x1f03000000000005 msg="audit modify" ctx="REST" user="jim-test/15065637" path="/interfaces/interface{19.0}".
2023-01-06T17:50:46.146728-05:00 appliance-1 audit-service[12]: priority="Notice" version=1.0 msgid=0x1f03000000000003 msg="audit create" ctx="REST" user="jim-test/15065637" path="/interfaces/interface{19.0}/ethernet/switched-vlan/config/trunk-vlans{503}".
2023-01-06T17:50:46.147281-05:00 appliance-1 audit-service[12]: priority="Notice" version=1.0 msgid=0x1f03000000000002 msg="audit" user="jim-test/15065637" cmd="terminated session (reason: normal)".
2023-01-06T17:50:46.148887-05:00 appliance-1 audit-service[12]: priority="Info" version=1.0 msgid=0x1f03000000000001 msg="audit" user="jim-test/15065637" cmd="RESTCONF: response with http: HTTP/1.1 /restconf/data/openconfig-interfaces:interfaces/interface=19.0/openconfig-if-ethernet:ethernet/openconfig-vlan:switched-vlan 204 duration 69082 ms".
2023-01-06T17:50:46.207531-05:00 appliance-1 audit-service[12]: priority="Notice" version=1.0 msgid=0x1f03000000000002 msg="audit" user="jim-test/0" cmd="external token authentication succeeded via rest from 172.18.104.40:0 with http, member of groups: admin session-id:jim-test1673045408".
2023-01-06T17:50:46.207564-05:00 appliance-1 audit-service[12]: priority="Notice" version=1.0 msgid=0x1f03000000000002 msg="audit" user="jim-test/0" cmd="logged in via rest from 172.18.104.40:0 with http using externalvalidation authentication".
2023-01-06T17:50:46.208310-05:00 appliance-1 audit-service[12]: priority="Notice" version=1.0 msgid=0x1f03000000000002 msg="audit" user="jim-test/15065642" cmd="assigned to groups: admin".
2023-01-06T17:50:46.208414-05:00 appliance-1 audit-service[12]: priority="Notice" version=1.0 msgid=0x1f03000000000002 msg="audit" user="jim-test/15065642" cmd="created new session via rest from 172.18.104.40:0 with http".
2023-01-06T17:50:46.208908-05:00 appliance-1 audit-service[12]: priority="Info" version=1.0 msgid=0x1f03000000000001 msg="audit" user="jim-test/15065642" cmd="RESTCONF: request with http: GET /restconf/data/openconfig-interfaces:interfaces HTTP/1.1".
2023-01-06T17:50:46.404290-05:00 appliance-1 audit-service[12]: priority="Info" version=1.0 msgid=0x1f03000000000001 msg="audit" user="jim-test/15065642" cmd="RESTCONF: response with http: HTTP/1.1 /restconf/data/openconfig-interfaces:interfaces 200 duration 227159 ms".
2023-01-06T17:50:46.404731-05:00 appliance-1 audit-service[12]: priority="Notice" version=1.0 msgid=0x1f03000000000002 msg="audit" user="jim-test/15065642" cmd="terminated session (reason: normal)".
Example Audit Logging of API Changes
Below is an example audit log of the user admin using the API and then adding a new VLAN to the configuration. In F5OS release prior to F5OS-A 1.4.0 API audit logs captured configuration changes but did not log the full configuration payload.
2023-02-17T17:28:10.290541-05:00 appliance-1 audit-service[11]: priority="Notice" version=1.0 msgid=0x1f03000000000002 msg="audit" user="admin/3104052" cmd="created new session via rest from 172.18.104.20:0 with http".
2023-02-17T17:28:10.290769-05:00 appliance-1 audit-service[11]: priority="Info" version=1.0 msgid=0x1f03000000000001 msg="audit" user="admin/3104052" cmd="RESTCONF: request with http: PATCH /restconf/data/openconfig-vlan:vlans HTTP/1.1".
2023-02-17T17:28:10.308174-05:00 appliance-1 audit-service[11]: priority="Notice" version=1.0 msgid=0x1f03000000000003 msg="audit create" ctx="REST" user="admin/3104052" path="/vlans/vlan{600}".
2023-02-17T17:28:10.308217-05:00 appliance-1 audit-service[11]: priority="Notice" version=1.0 msgid=0x1f03000000000006 msg="audit value set" ctx="REST" user="admin/3104052" path="/vlans/vlan{600}/vlan-id" value="600".
2023-02-17T17:28:10.308280-05:00 appliance-1 audit-service[11]: priority="Notice" version=1.0 msgid=0x1f03000000000006 msg="audit value set" ctx="REST" user="admin/3104052" path="/vlans/vlan{600}/config/vlan-id" value="600".
2023-02-17T17:28:10.308319-05:00 appliance-1 audit-service[11]: priority="Notice" version=1.0 msgid=0x1f03000000000006 msg="audit value set" ctx="REST" user="admin/3104052" path="/vlans/vlan{600}/config/name" value="TEST600-VLAN".
2023-02-17T17:28:10.308819-05:00 appliance-1 audit-service[11]: priority="Notice" version=1.0 msgid=0x1f03000000000002 msg="audit" user="admin/3104052" cmd="terminated session (reason: normal)".
2023-02-17T17:28:10.310149-05:00 appliance-1 audit-service[11]: priority="Info" version=1.0 msgid=0x1f03000000000001 msg="audit" user="admin/3104052" cmd="RESTCONF: response with http: HTTP/1.1 /restconf/data/openconfig-vlan:vlans 204 duration 57569 ms".
Downloading Audit Logs via CLI
Audit logs can be sent to a remote server as outlined above, but they can also be downloaded from the system if needed. Before transferring a file using the CLI, use the file list command to see the contents of the directory and ensure the file is there. There are two audit.log locations: log/system/audit.log where most of the audit.log events are logged, and log/host/audit/audit.log where some lower-level events are logged.
The path below is the main audit.log.
r10900-1# file list path log/system/audit.log
entries {
    name audit.log
    date Sat Feb 25 21:38:45 UTC 2023
    size 11MB
}
r10900-1#
The path below is for lower level audit log events like account lockouts.
r10900-1# file list path log/host/audit/audit.log
entries {
    name audit.log
    date Thu Feb 23 05:05:14 UTC 2023
    size 50MB
}
r10900-1#
To export copies of these files off the system you can use the file export command to transfer the file to a remote HTTPS server, or to a remote server using SFTP, or SCP. Below is an example of transferring the log/system/audit.log to a remote HTTPS server:
r10900-1# file export local-file log/system/audit.log remote-host 10.255.0.142 remote-file /upload/upload.php username corpuser insecure
Value for 'password' (<string>): ********
result File transfer is initiated.(log/system/audit.log)
r10900-1#
To check on status of the export use the file transfer-status command:
r10900-1# file transfer-status
result
S.No.|Operation  |Protocol|Local File Path                                             |Remote Host         |Remote File Path                                            |Status            |Time
1    |Export file|HTTPS   |log/system/audit.log                                        |10.255.0.142        |/upload/upload.php                                          |         Completed|Sat Feb 25 16:46:28 2023

r10900-1#
You may also transfer from the CLI using SCP or SFTP protocols. Below is an example using SCP:
r10900-1# file export local-file log/system/audit.log remote-host 10.255.0.142 protocol scp insecure remote-file r109001-audit.log username root
Value for 'password' (<string>): *******
result File transfer is initiated.(log/system/audit.log)
r10900-1#
The file transfer-status command will show the upload of the SCP transfer as well as HTTPS or SFTP:
r10900-1# file transfer-status
result
S.No.|Operation  |Protocol|Local File Path                                             |Remote Host         |Remote File Path                                            |Status            |Time
1    |Export file|HTTPS   |log/system/audit.log                                        |10.255.0.142        |/upload/upload.php                                          |         Completed|Sat Feb 25 16:46:28 2023
2    |Export file|SCP     |log/system/audit.log                                        |10.255.0.142        |r109001-audit.log                                           |         Completed|Sat Feb 25 16:50:06 2023

r10900-1#
Downloading Audit Logs via API
To copy the audit.log files from the appliance to a remote https server use the following API call, you can change the local-file path depending on which audit.log you want to export. Below is an API POST call to export the log/system/audit.log to a remote server.
POST https://{{rseries_appliance1_ip}}:8888/restconf/data/f5-utils-file-transfer:file/export
The JSON body of the API call should contain the following syntax.
{
    "f5-utils-file-transfer:insecure": "",
    "f5-utils-file-transfer:protocol": "https",
    "f5-utils-file-transfer:username": "corpuser",
    "f5-utils-file-transfer:password": "password",
    "f5-utils-file-transfer:remote-host": "10.255.0.142",
    "f5-utils-file-transfer:remote-file": "/upload/upload.php",
    "f5-utils-file-transfer:local-file": "log/system/audit.log"
}
You can then check on the status of the export via the following API call:
POST https://{{rseries_appliance1_ip}}:8888/restconf/data/f5-utils-file-transfer:file/transfer-status
In the response the latest file transfer status will be displayed.
{
    "f5-utils-file-transfer:output": {
        "result": "\nS.No.|Operation  |Protocol|Local File Path                                             |Remote Host         |Remote File Path                                            |Status            |Time                \n1    |Export file|HTTPS   |log/system/audit.log                                        |10.255.0.142        |/upload/upload.php                                          |         Completed|Sat Feb 25 17:06:00 2023\n2    |Export file|SCP     |log/system/audit.log                                        |10.255.0.142        |r109001-audit.log                                           |         Completed|Sat Feb 25 16:50:06 2023\n"
    }
}
Downloading Audit Logs via webUI
You can download either of the audit.log files from the System -> File Utilities page in the webUI. In the drop-down menu for the Base Directory select log/host, and then you can select the audit directory as seen below.
Inside the audit directory you can then select the audit.log and then either Download to copy the file to your local machine via the browser or select Export to copy to a remote HTTPS server.
You can also select the log/system path to download the system audit.log.