F5 BIG-IP SSL Orchestrator Training Lab > All SSL Orchestrator Lab Guides > SSL Orchestrator with Secure Web Gateway (SWG) as a Service > 5. Create a Transparent Forward Proxy SSLO Source | Edit on
5.6. Configuring custom SWG Per-Request Policies and URL Category Filters
Important Points
- SWG must be licensed and provisioned
- To get SWG reporting, URL Request logging must be configured
- Per-Session Access Profiles with a simple start - allow are sufficient since the Per-Request policy handles the bulk of SWG processing
- Access Profile Scope - For this lab we will simply be using Named scopes
- The first task will be to create a custom URL category filter
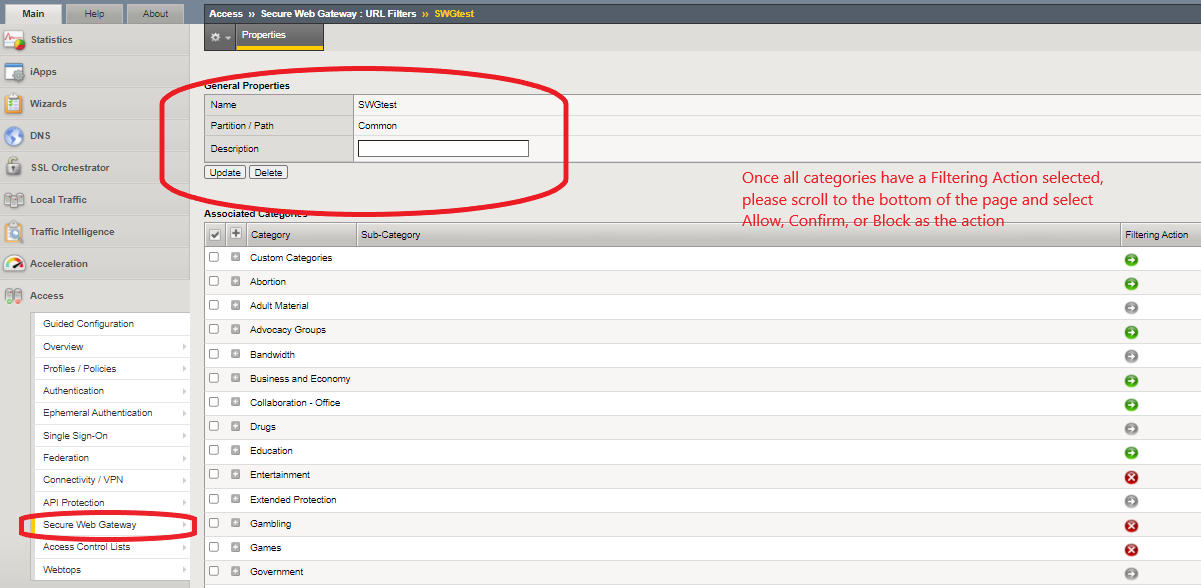
You configure a URL filter to specify whether to allow, block, or confirm requests for URLs in URL categories. You can also configure multiple URL filters. Default URL filters, such as block-all and basic-security, are available.
On the Main tab, click Access, Policy, Secure Web Gateway, URL Filters.
You can click the name of any filter to view its settings.
The URL Filters screen displays.
To configure a new URL filter, click one of these options.
Create button Click to start with a URL filter that allows all categories.
In the Name field, type a unique name for the URL filter.
Click Finished.
The screen redisplays. An Associated Categories table displays. It includes each URL category and the filtering action that is currently assigned to it. The table includes a Sub-Category column. Any URL categories that were added by administrators are subcategories within Custom Categories. To block access to particular categories or subcategories, select them and click Block. When you select a category, you also select the related subcategories. You can expand the category and clear any subcategory selections. Expand the category Miscellaneous, select Uncategorized, and then click Block. To allow access to particular categories or subcategories, select them and click Allow. To indicate that you want a user to confirm that access is work-related or otherwise justified before obtaining access to the URLs in a category, select the categories or subcategories and click Confirm.
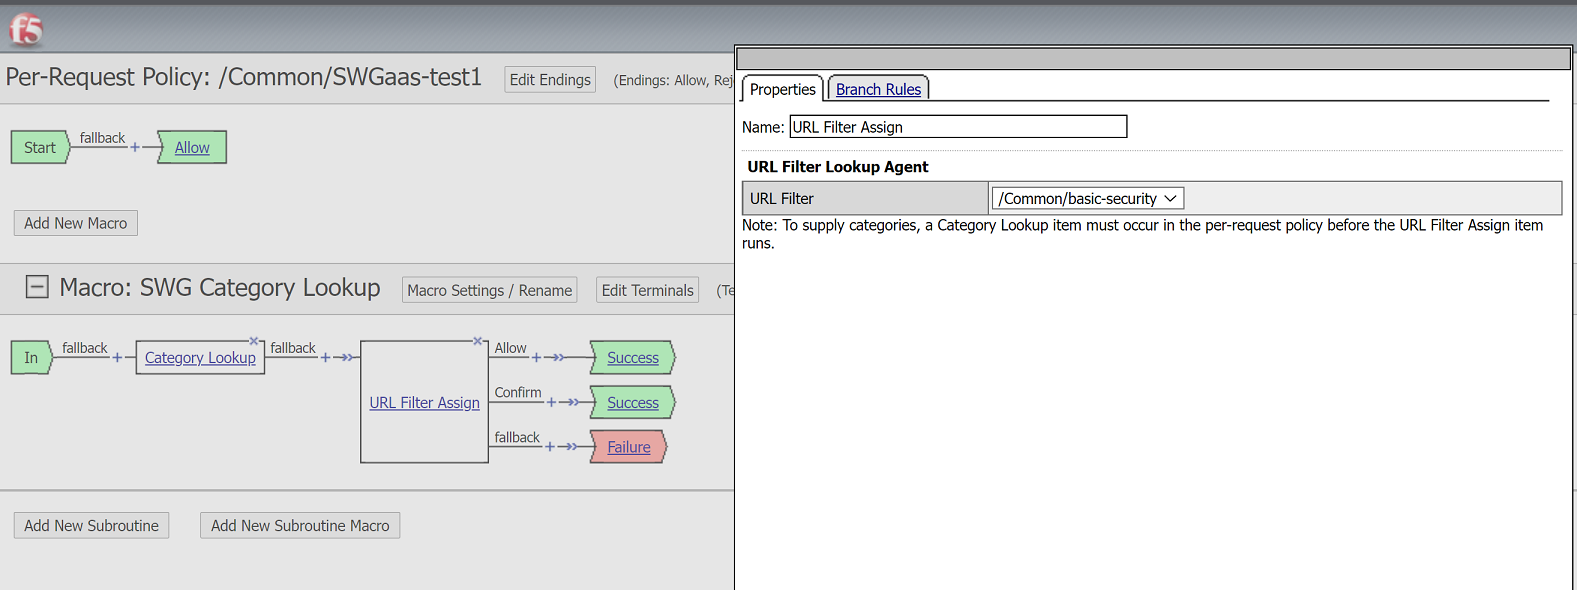
To put a URL filter into effect, you must assign it in a per-request policy which runs each time a user makes a URL request.
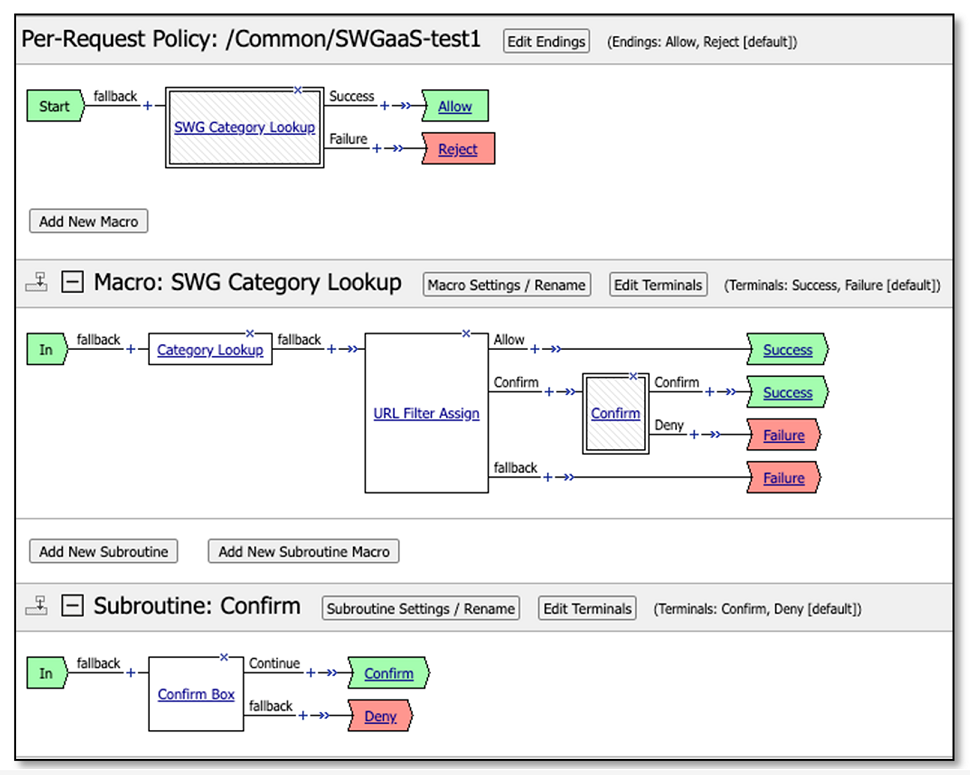
5.7. Creating an SWG per-request policy
From the left-hand menu, navigate to Access, Profiles/Policies, Per-Request Policies. Click the Create button.
Name enter a unique name
Policy Type select SSL Orchestrator
Incomplete Action select All
Customization Type select the appropriate language(s)
Once complete, edit the new SWG per-request policy VPE. You can begin adding functionality directly, or you can start with one of the pre-built macro templates. Click the Add New Macro button and select from one of the three templates and click save. Now add that macro to the primary policy flow to enable it. Make any additional modifications as requred.
- While most options are possible within the SWG per-request policy several are not appropriate for an inline SWG service including the list below.
- Assignment
- Pool Assignment
- General
- IP Based SSL Bypass Set, Server Cert Response Control, Server Cert Status, SSL Check, SSL Intercept Set, SSL Configuration Select
- Traffic Management
- Proxy Select, Service Connect, Session Check
5.8. Applying the new Per-Request policy to SSL Orchestrator
- Once the new Per-Request policy has been configured it can then be applied to the SSL Orchestrator Topology.
5.9. Testing URL filtering
- establish an XRDP session to the Ubuntu14.04 Desktop Outbound client
- Launch either a web browser of your choice (Firefox, Chrome) and test various URL's to ensure the URL Filters are being applied correctly
5.10. This concludes the SSL Orchestrator lab
For detailed instructions on creating SWG policies, please see the following resources: