F5 Application Delivery Controller Solutions > Building the F5 Fabric > Module 1: BIG-IP Device Service Cluster Configuration Source | Edit on
Lab 3: Device Service Cluster Automation
We'll be using POSTMAN and it is built upon Chrome libraries, therefore, you must use Chrome to visit every BIG-IP login page (i.e. http://10.128.1.245/) and bypass the security warning - otherwise the REST calls will fail. If you fail to bypass these security warnings because of the untrusted SSL certificate on the BIG-IP management interface you will receive an error when attempting to send REST calls.
Pre-lab work
To start this lab, we'll want to start with a blank state again - erasing all that hard work you've done. In order to do so, go to "SYSTEM -> Archives" and then click on the UCS archive shown. Once it is up, click to restore and start the process on both BIG-IP's in order to go back to the default Lab configuration.
Objective: At a high level, we'll be building a simple active/standby device service cluster (DSC). With some new DevOps oriented packages created by F5, the heavy lifting will be taken away, and we have some simple REST API calls to make to accomplish the DSC creation. The high levelsteps to do this are as follows:
- Authenticate. We'll show basic and token based authentication - but we'll then use token authentication throughout the rest of the exercises.
- Installation of the DevOps packages. We'll SCP the packages to the BIG-IP's, then via API, install them and verify they are installed.
- Execute the device settings package in order to set the hostname, device name, NTP server and NTP timezone.
- Execute the DSC configuration package in order to create an active/standby DSC.
Hint
Note that when working with API's, generally once you create an object it is done via a POST. If you try to modify an object by using the POST method again, you will create another instance of what you've done, or receive an error citing an object with that name already exists. The "Blocks" that you submit via POST will be duplicated if you use the POST method as they will each receive a unique ID upon creation.
Modification is done via the PATCH HTTP method calling out the same name/ID. There are a few "Optional" tasks created within POSTMAN which you can experiment Unbinding and deleting application blocks.
TASK 1 – Authentication
One of the many basic concepts related to interaction with REST API’s is how a particular consumer is authenticated to the system. BIG-IP and iWorkflow support two types of authentication: HTTP BASIC and Token based. It’s important to understand both of these authentication mechanisms, as consumers of the API will often make use of both types depending on the use case. This lab will demonstrate how to interact with both types of authentication.
Open Postman from the Desktop and make sure the Environment is set to
Lab3_DevOps_Automation
TASK 2 – HTTP BASIC Authentication
In this task we will use the Postman tool to send API requests using
HTTP BASIC authentication. As its name implies this method of
authentication encodes the user credentials via the existing BASIC
authentication method provided by the HTTP protocol. The mechanism this
method uses is to insert an HTTP header named Authorization with a
value that is built by Base 64 encoding the
string <username>:<password>. The resulting header takes this form:
Authorization: Basic YWRtaW46YWRtaW4=
It should be noted that cracking the method of authentication is TRIVIAL; as a result API calls should always be performed using HTTPS (F5 default) rather than HTTP.
Perform the following steps to complete this task:
Open the Postman application from the link on the Desktop. Click the ‘Collections’ tab on the left side of the screen, expand the
Lab3_DevOps_Automationcollection on the left side of the screen, expand theLab 3 Task 2/3 – API Authentication & ‘example’folder: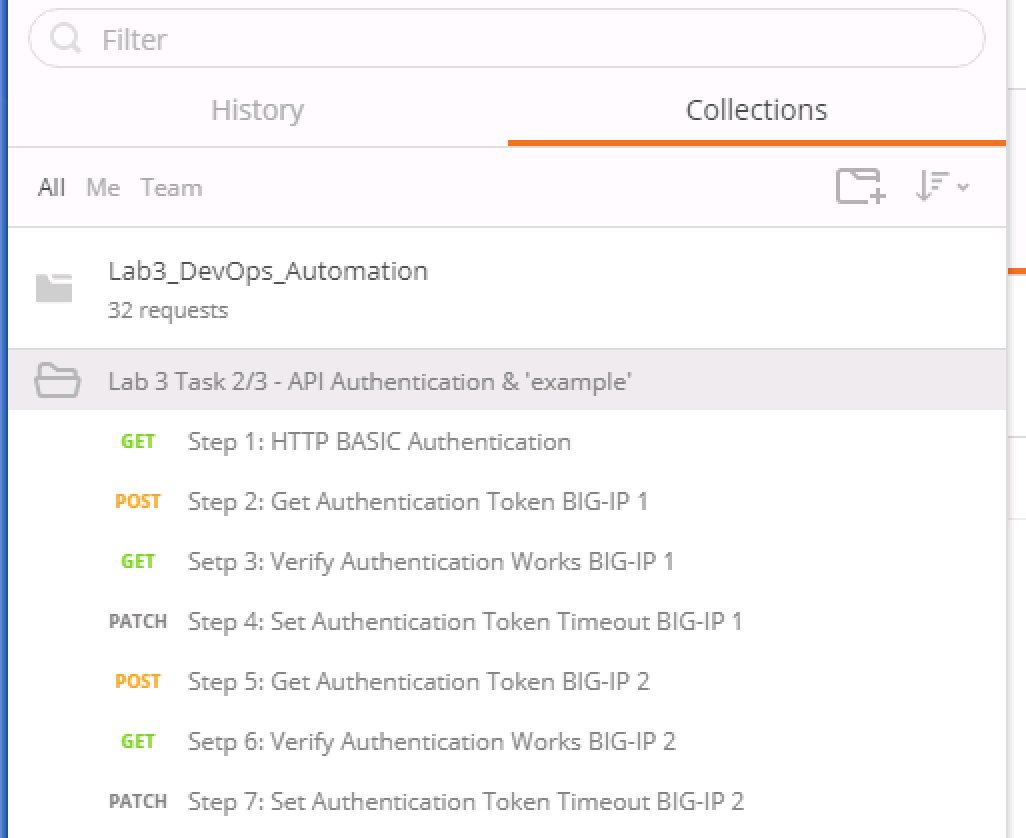
Click the
Step 1: HTTP BASIC Authenticationitem. Click the ‘Authorization’ tab and selectBasic Authas the Type. Fill in the username and password (admin/admin) and click the ‘Update Request’ button. Notice that the number of Headers in the Headers tab changed from 1 to 2. This is because Postman automatically created the HTTP header and updated your request to include it. Click the ‘Headers’ tab and examine the HTTP header: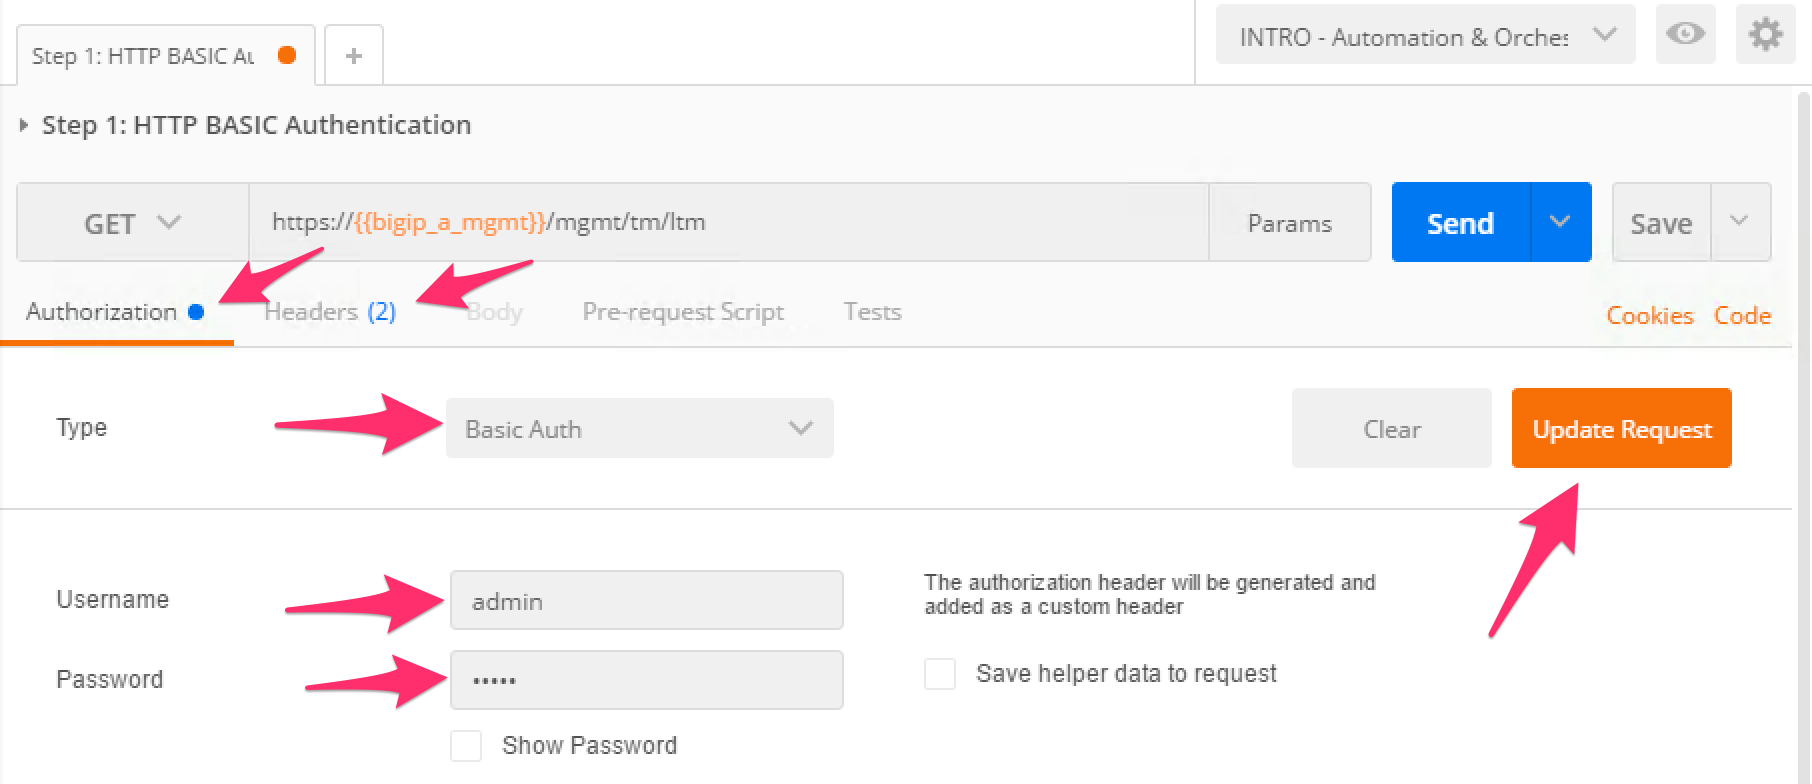
Click the ‘Send’ button to send the request. If the request succeeds you should be presented with a listing of the /mgmt/tm/ltm Organizing Collection.
Update the credentials and specify an INCORRECT password. Send the request again and examine the response:

TASK 3 – Token Based Authentication
One of the disadvantages of BASIC Authentication is that credentials are sent with each and every request. This can result in a much greater attack surface being exposed unnecessarily. As a result Token Based Authentication (TBA) is preferred in many cases. This method only sends the credentials once, on the first request. The system then responds with a unique token for that session and the consumer then uses that token for all subsequent requests. Both BIG-IP and iWorkflow support token-based authentication that drops down to the underlying authentication subsystems available in TMOS. As a result the system can be configured to support external authentication providers (RADIUS, TACACS, AD, etc) and those authentication methods can flow through to the REST API. In this task we will demonstrate TBA using the local authentication database, however, authentication to external providers is fully supported.
Hint
For more information about external authentication providers see the section titled About external authentication providers with iControl REST in the iControl REST API User Guide available at https://devcentral.f5.com
Perform the following steps to complete this task:
Click the ‘Step 2: Get Authentication Token’ item in the Lab 3.1 Postman Collection
Notice that we send a POST request to the
/mgmt/shared/auth/loginendpoint.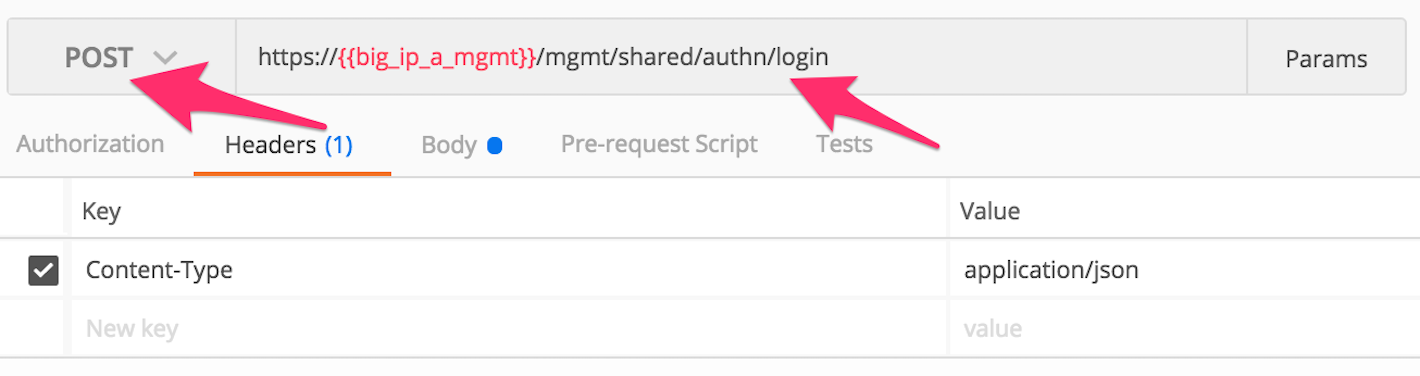
Click the ‘Body’ tab and examine the JSON that we will send to BIG-IP to provide credentials and the authentication provider:
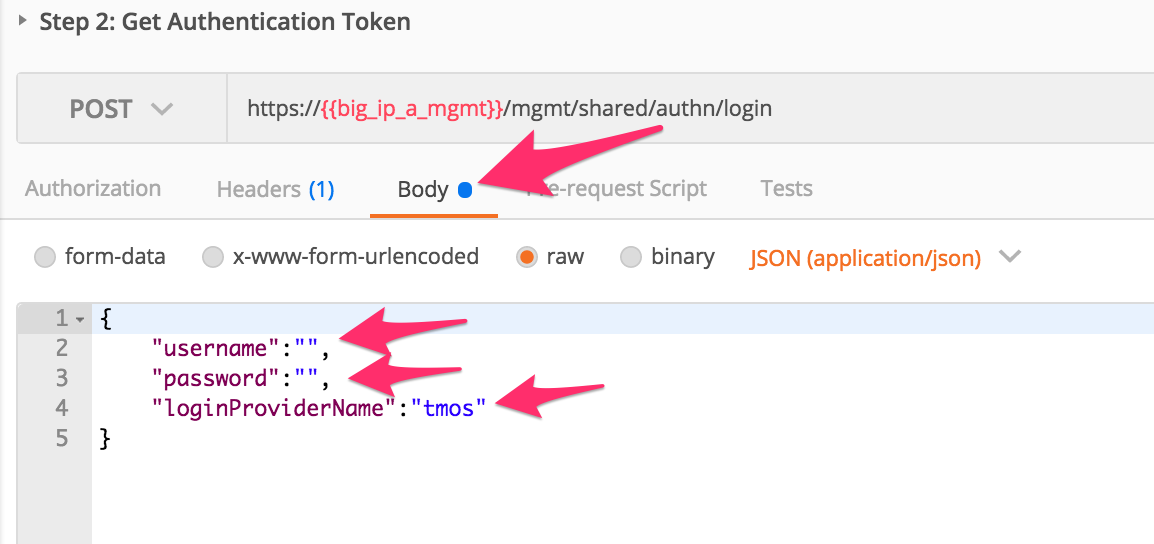
Modify the JSON body and add the required credentials (admin/admin). Then click the ‘Send’ button.
Examine the response status code. If authentication succeeded and a token was generated the response will have a 200 OK status code. If the status code is 401 then check your credentials:
Successful:

Unsuccessful:
Once you receive a 200 OK status code examine the response body. The various attributes show the parameters assigned to the particular token. Find the ‘token’ attribute and copy it into your clipboard (
Ctrl+c) for use in the next step: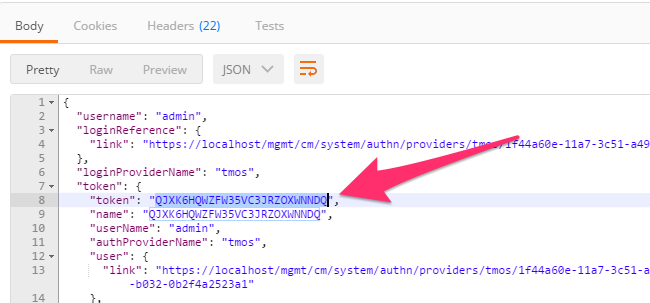
Click the 'Step 3: Verify Authentication Works' item in the Lab 3.1 Postman collection. Click the 'Headers' tab and paste the token value copied above as the VALUE for the
X-F5-Auth-Tokenheader. This header is required to be sent on all requests when using token based authentication.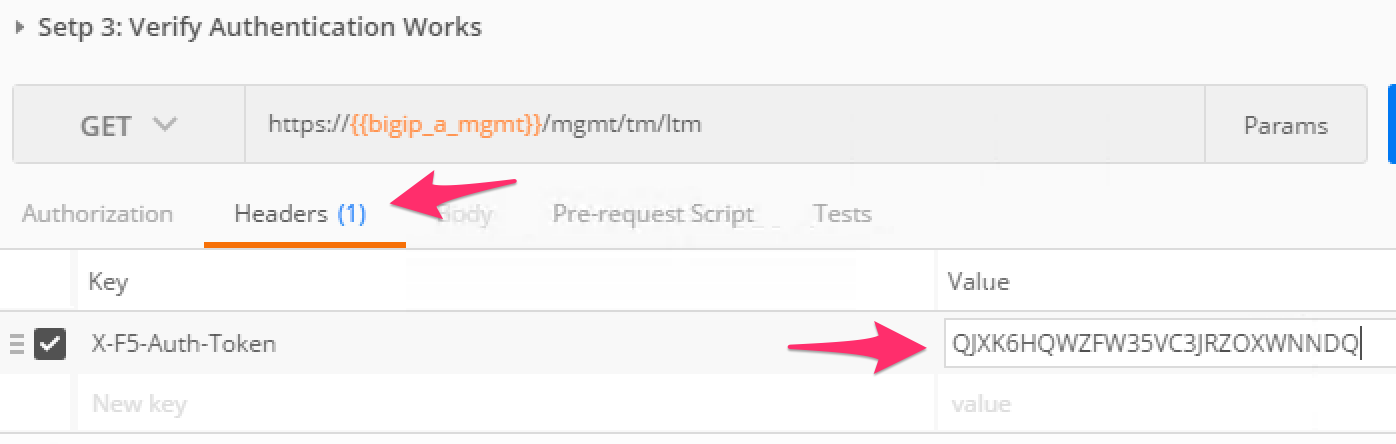
Click the ‘Send’ button. If your request is successful you should see a ‘200 OK’ status and a listing of the
ltmOrganizingCollection.We will now update your Postman environment to use this auth token for the remainder of the lab. Click the Environment menu in the top right of the Postman window and click ‘Manage Environments’:
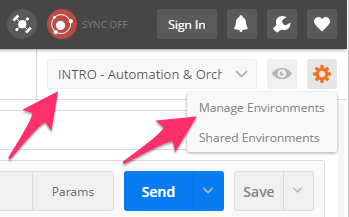
Click the
Lab3_DevOps_AutomationitemUpdate the value for
bigip_a_auth_tokenby Pasting (Ctrl-v) in your auth token: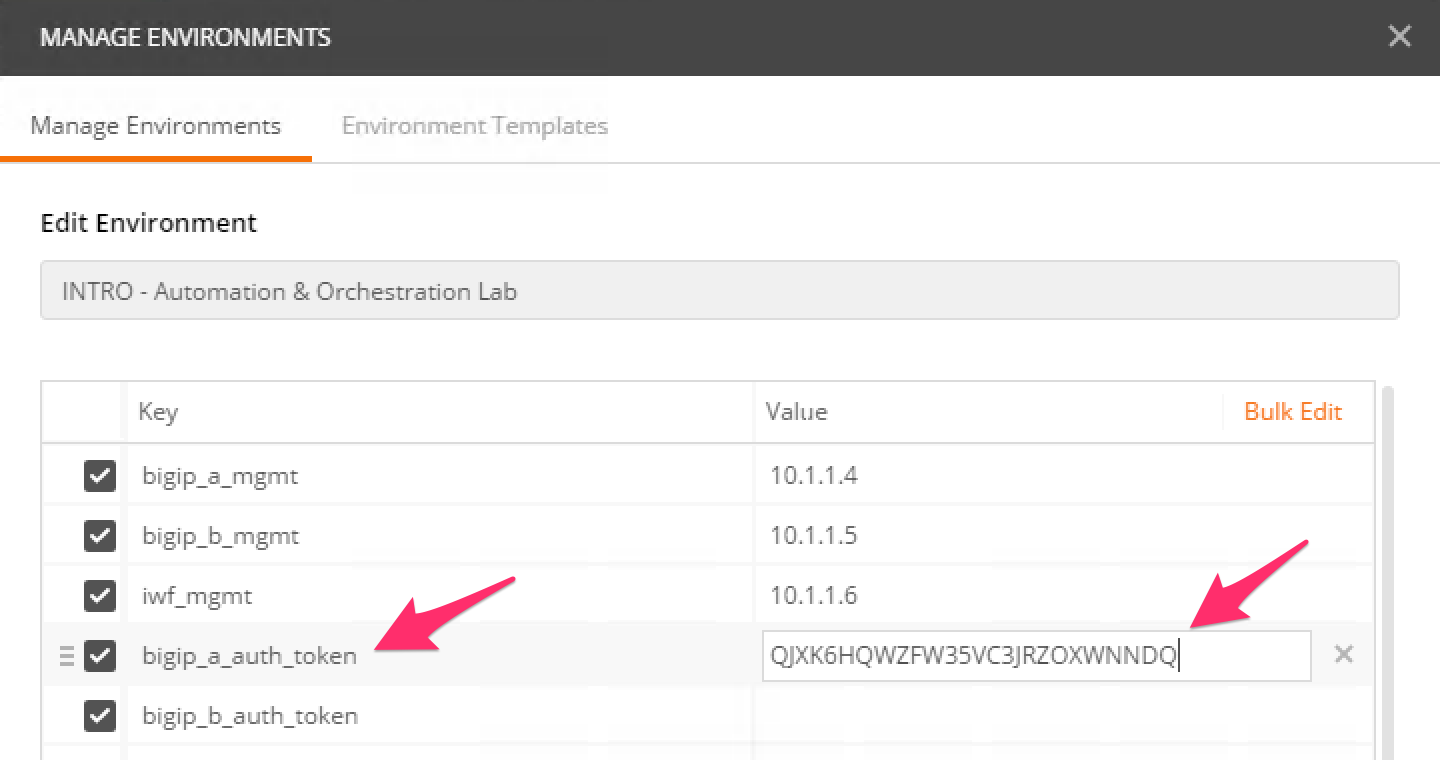
Click the ‘Update’ button and then close the ‘Manage Environments’ window. You’re subsequent requests will now automatically include the token.
Click the ‘Step 4: Set Authentication Token Timeout’ item in the Lab 3.1 Postman collection. This request will
PATCHyour token Resource (check the URI) and update the timeout attribute so we can complete the lab easily. Examine the request type and JSON Body and then click the ‘Send’ button. Verify that the timeout has been changed to36000in the response: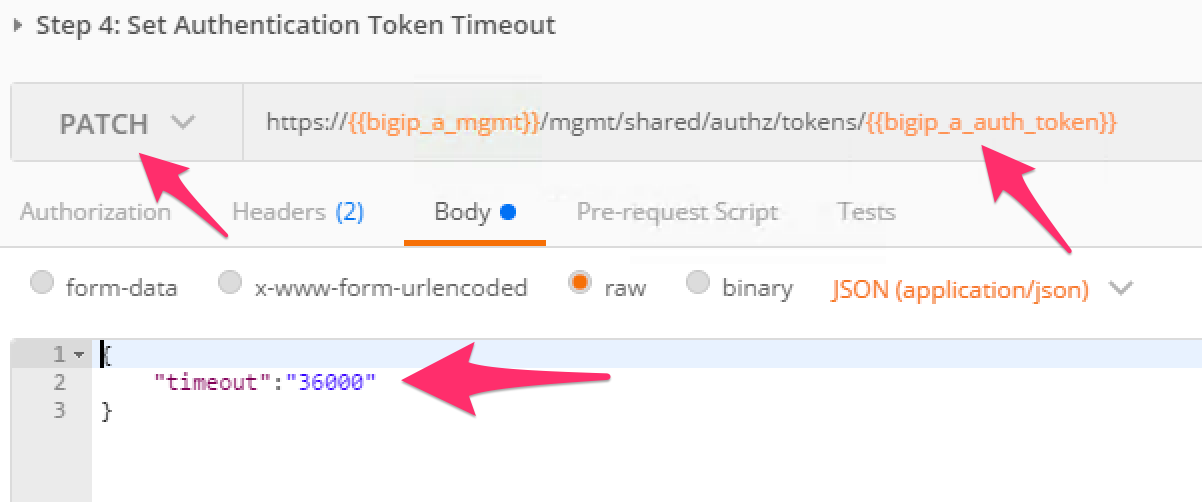
Repeat the same steps for setting the authentication token for BIG-IP 2 into the environment variable
bigip_b_auth_token, ensuring the set the timeout as well.
TASK 4 – Install iApp RPM Packages
In this Task you’ll be installing two DevOps packages developed by F5 built for the express purpose of quickly and easily taking a new set of BIG-IP’s and bringing them online programmatically. You will install the packages on the two BIG-IP’s using SCP, and then interact with the BIG-IP API.
Use WinSCP to SCP from
~\Documents\LabFiles\*.rpmto/var/config/rest/downloadson BIG-IP 1 and BIG-IP 2.The user is
rootand the password isdefault. WinSCP has been preconfigured for both BIG-IP's. You can exclude the DSC RPM on BIG-IP 2 if you desire, as we won’t install it there.Expand the Lab 3 Task 4 ‘Install RPM Packages’ collection in Postman and click Step 2: "Install device settings RPM package on BIGIP1".
Click the Body tab and note the command.
Click Send
You should receive a
200 OKresponseExpand the Lab 3 Task 4 ‘Install RPM Packages’ collection in Postman and click Step 3: "Install DSC RPM package on BIGIP1."
Click the Body tab and note the command.
Click Send
You should receive a 202 Accepted response
Expand the Lab 3 Task 4 ‘Install RPM Packages’ collection in Postman and click Step 4: "Install device settings RPM package on BIGIP 2".
Click the Body tab and note the command.
Click Send
You should receive a 202 Accepted response
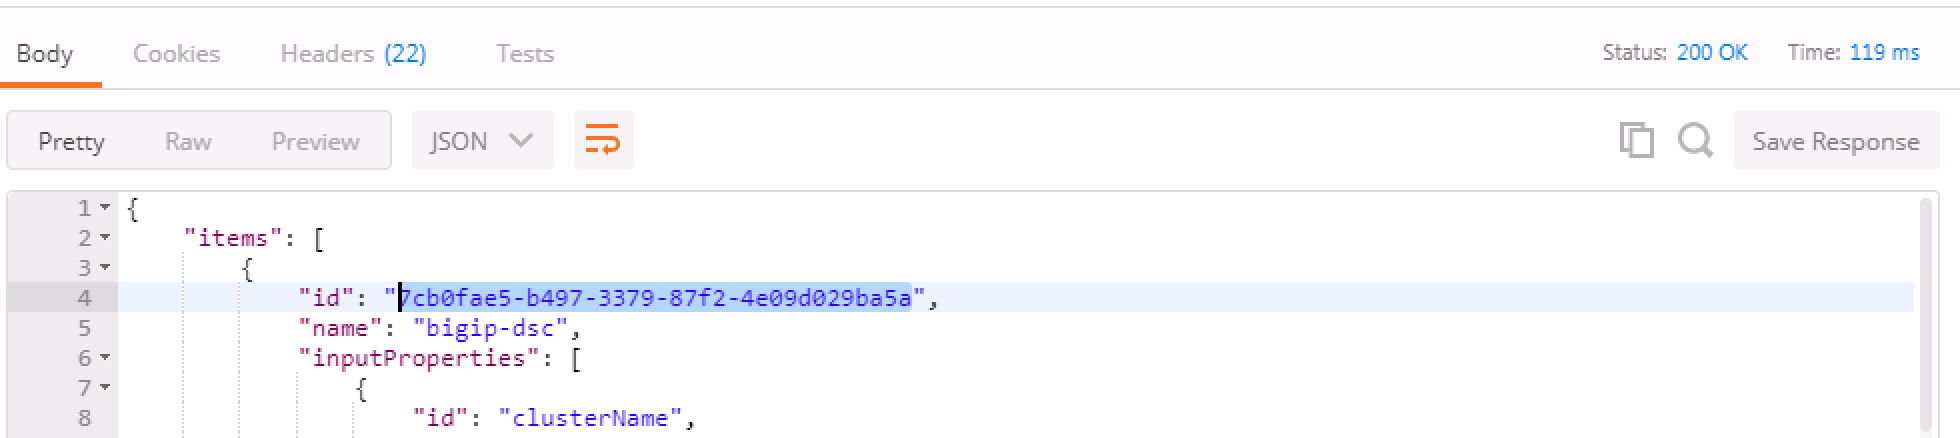
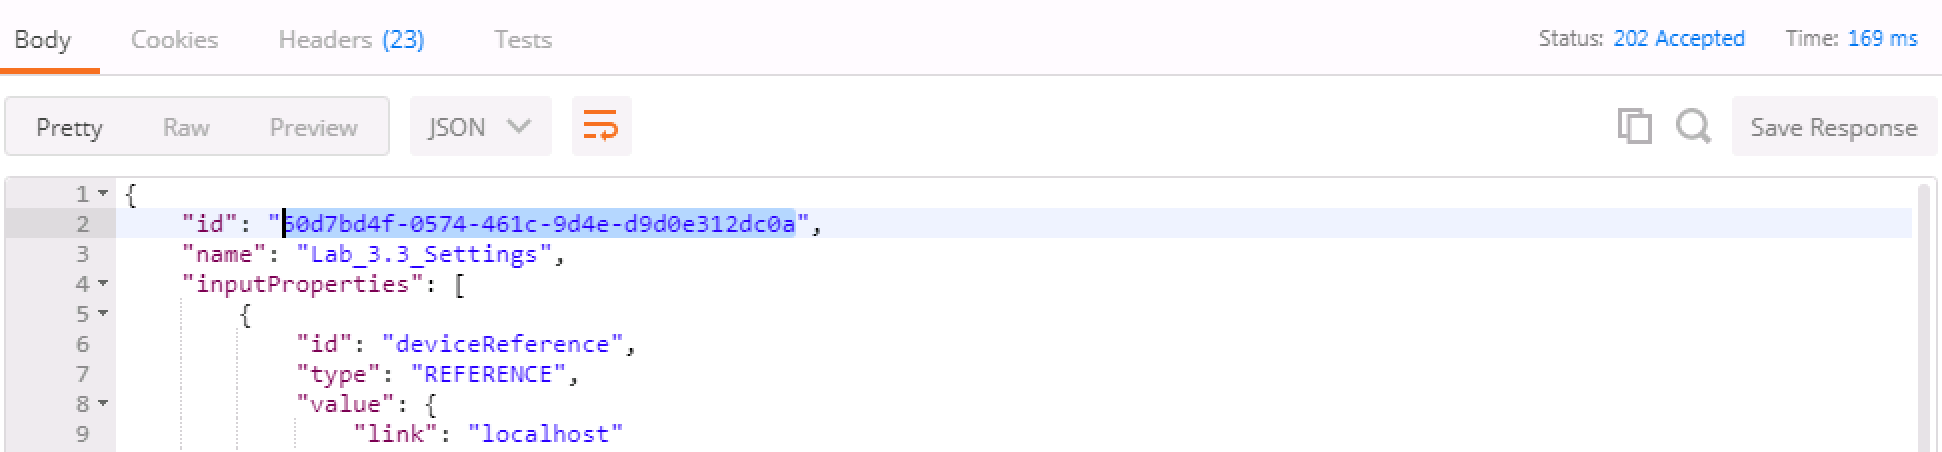
Run Step 5 "Get Block Template IDs on BIG-IP 1." The output of this command will return two JSON templates, one for each package that was installed. At the top of the JSON payload is the field
id. Capture the unique ID for theidkey and put it into the Environment Variablesbigip_a_settings_idandbigip_a_dsc_id. Ensure that these ID’s are mapped from the correct template to the correct environment variable or later calls will fail. If you get zero, or just one TEMPLATE result back, there are "OPTIONAL" calls as part of Task 4.Run Step 6 "Get Block Template IDs on BIG-IP 2." Just like the previous step, take the "id" output for the device-settings TEMPLATE and put it into the environment variable
bigip_b_settings_id. The DSC package was not installed on BIG-IP 2 so you will only see one block template.Error
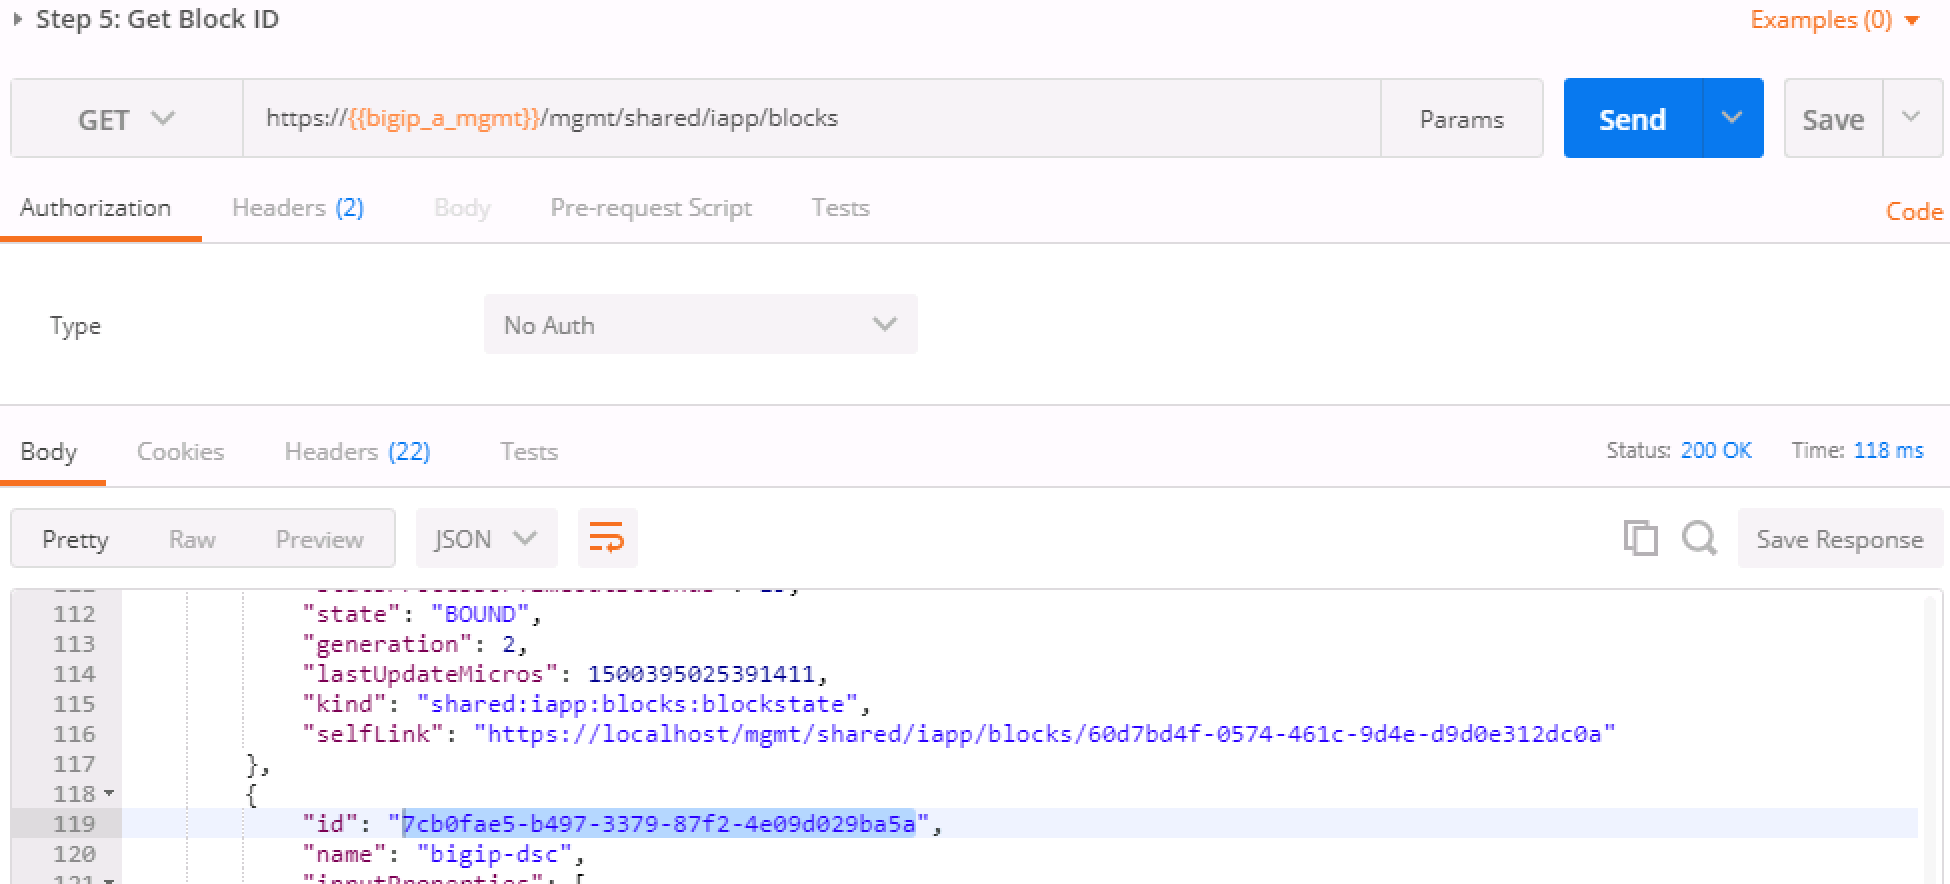
Running the "OPTIONAL" REST calls if you ran into trouble. There are three calls, one for each of the packages that get installed in the event you need to delete a "block". In order to run them, we require the task ID from the installation REST Call. The graphic below shows that ID. Take that ID and then move to the requisite task and put the ID at the end of the URI replacing
{guid}and run the call. The resulting output will tell you what has happened. Most likely, the package isn’t in the right directory and cannot be installed. If that’s the case, move the file in place and run the install REST call again.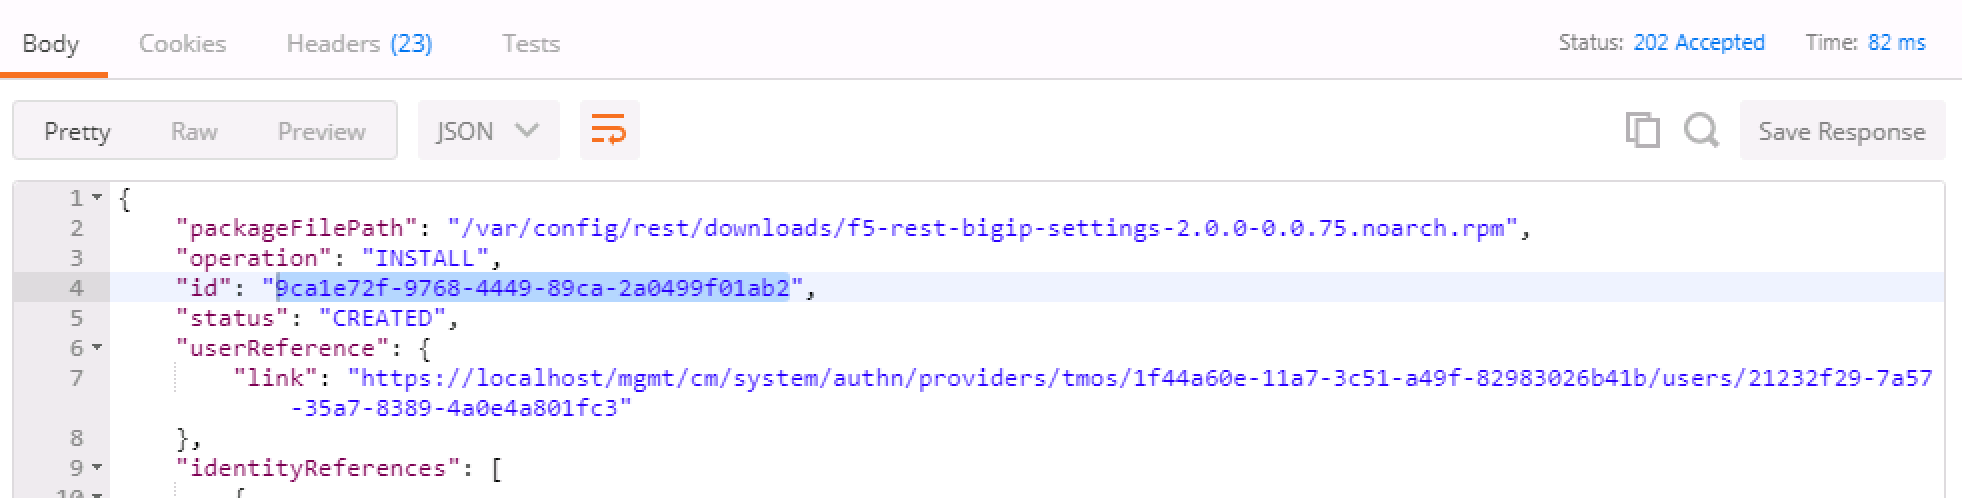
The response contains the updated status of the package management task. The JSON in the response contains the status property. When the value of status updates to "FINISHED", the package installation is complete. You can then find the added package at
/var/config/rest/iapps/f5-rest-bigip-settingson the command line.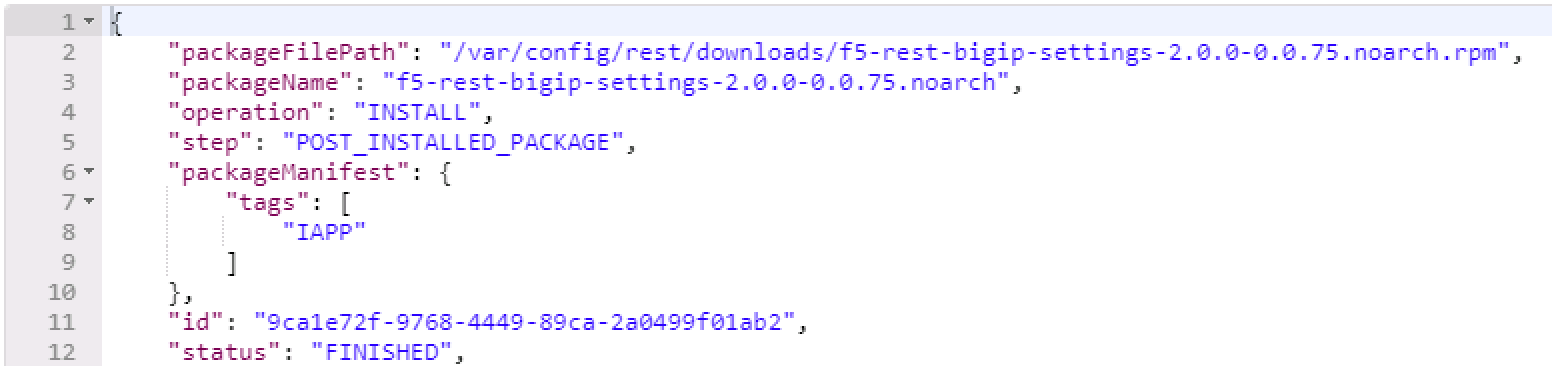
TASK 5 – Configure Device Settings
This taks modifies base device settings. The DSC package requires NTP, DNS, and hostname to be set before it will work, so that is what this exercise is doing. This package can also license/re-license a device, or default the configuration in one REST call. Because of the lab setup, we will not be doing the licensing portion in the lab.
Expand the Lab 3 Task 5 ‘Device Settings – NTP/DNS/License’ collection.
This step lists the specific "block" identified by
{{bigip_a_settings_id}}, meaning the installed iApp packages and their associated properties. If you were to remove the/{{bigip_a_settings_id}}from the URI, you could see all configured blocks, Those withTEMPLATEas the status, as well as any inBINDING,BOUNDorERRORstate.To formulate your own call, you'd take the output of the TEMPLATE block and create your own "block" in order to change settings. We've already done that in Step 2, and the environment variables are being used to identify the parent TEMPLATE/package.
We've formulated a valid call to BIG-IP 1 here, and we've modified settings like hostname, timezone, NTP and DNS (server) and search domain. Feel free to change some of these settings if you'd like, but make the changes simple as syntax is vitally important to the success of the call. We're using IP addresses that will have no meaning in a real configuration (IP address of
127.27.1.1), but are required to be set for the DSC RPM.One item to note is the
selfLinkvariable at the bottom of the call body. The correct ID needs to be identified and we do that by utilizing the{{bigip_a_settings_id}}. property.The response for this call will give you a ID as the top line of the response. Capture that ID and move to Step 3.
In step 3 you will need to paste the ID captured in step 2 in place of the
{guid}at the end of the URI.
We are interested to see the state "BOUND" which is found near the end of the response. If the state still shows "BINDING," continue to re-run this call until you see BOUND or an error. The errors should be self explanatory, but if you have trouble, see one of the proctors.

Steps 4,5,6 - Repeat steps 1, 2, and 3 for bigip2, but use the POSTMAN steps 4, 5, and 6 that have been pre-set for BIG-IP 2.
Close all open tabs (Don’t Save if prompted) at the top of POSTMAN to avoid unexpected crashes.

TASK 6 – Create the Device Service Cluster
Hint
The rest of the queries will be run against BIG-IP 1.
In this portion of the lab we'll be creating the DSC.
Expand the Lab 3.4 ‘Device Service Cluster’ collection.
This step adds a device group called
lab3_4_group. Run this step and ensure you get a200 OKresponse code.In Steps 2 and 3 we'll add both BIG-IP's to this group. Run these steps and ensure you get a
200 OKresponse code.Run Step 2 REST call
Run Step 3 REST call
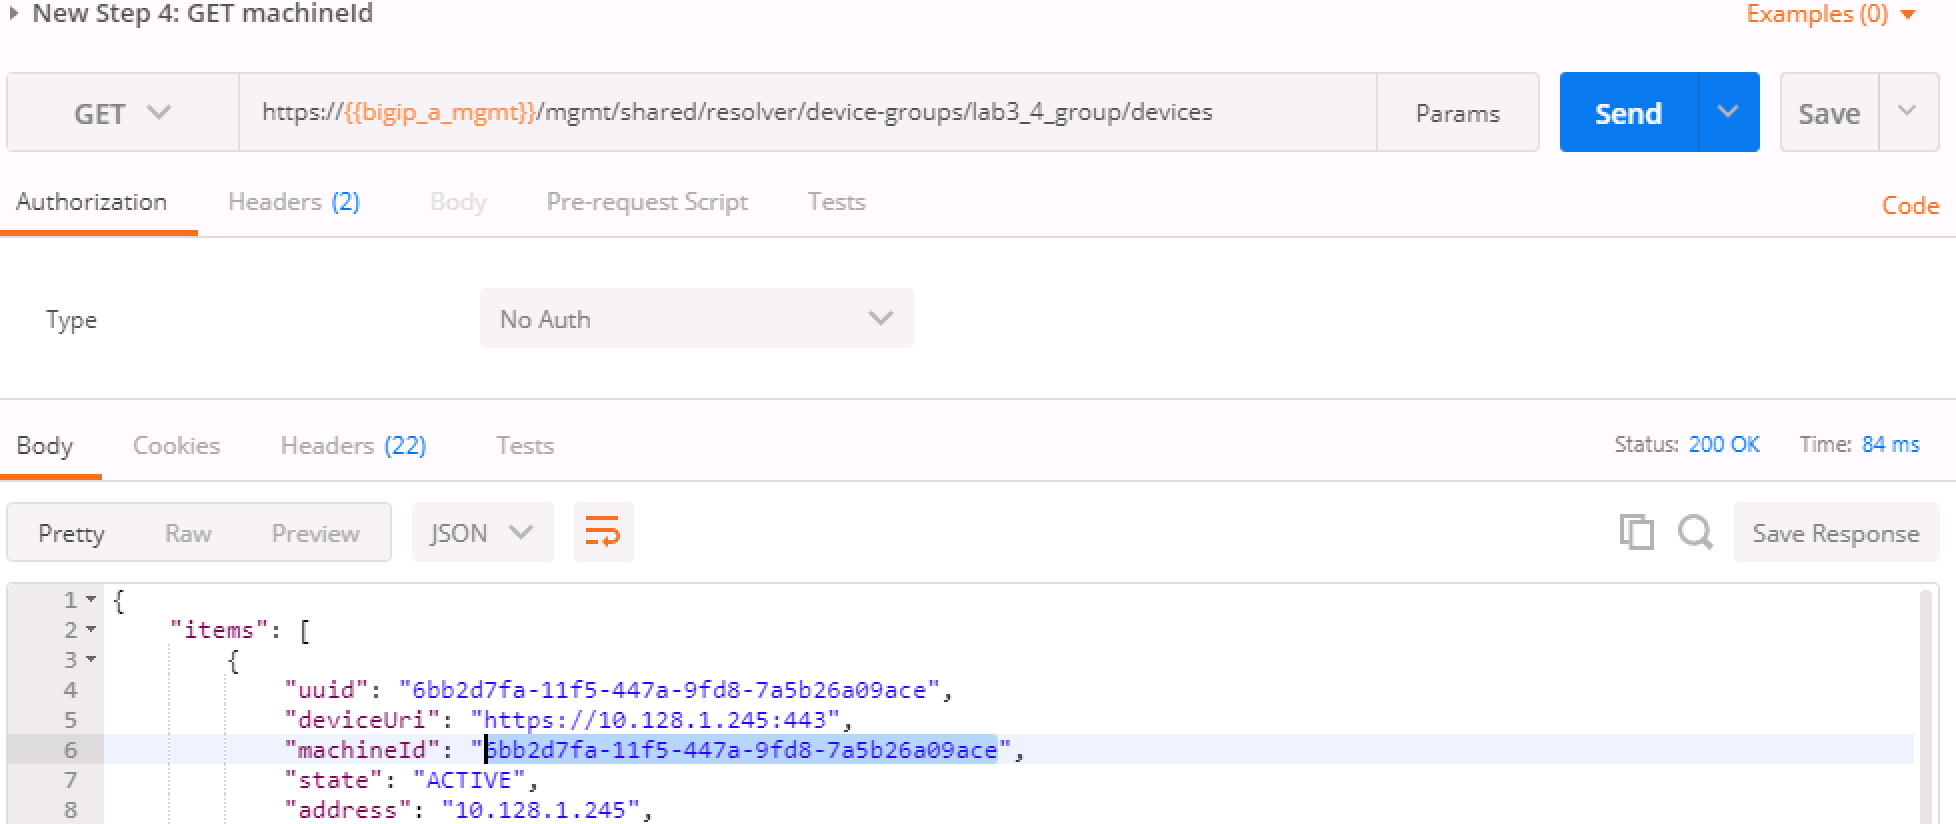
In Step 4 we'll query this device-group we just created and we'll verify that it was created with both devices in the group and we’ll also need to grab the machineId values from the output and copy them into the BODY of the call in Step 6.
This step is a formality as we've already created a call for you, but this is how you’d gain the body of a call you formulated yourself. We’ve done that in Step 6, so go ahead and move to the next step.
In this step, we'll be creating the sync-failover group
Lab_3.4_failover-cluster, adding aHA_VLANon interface1.3and creating Self-IP's for those VLANS on both BIG-IP's.You'll need to capture the machineId from step 4 for both BIG-IP's and paste it into the
deviceReferenceunder the section for each BIG-IP. The item to replace will be labeled as{machineId_BIGIP_X}where X is 1 or 2.
Once you have these two properties updated, then please run the REST call. Take the ID from the top line of the response as we'll use that to verify that the status is
BOUNDin the following step.Take the ID saved from the response from Step 6 and pasted it at the end of the URI, replacing
{guid}as you've done before. Run this step until you see thestateshow asBOUND. If it shows asBINDING, then you can continue to run this command until you seeBOUNDorERROR. The error should be self explanatory, but if you have trouble, please see a proctor.
Note
At this point, you should have a valid DSC in active/standby state.
Verify that you have a new VLAN (HA_VLAN) and SelfIP for that VLAN
and the cluster should be "In-Sync."