SPK Egress Between Single Stack IPv4 and Single Stack IPv6 Services
Prerequisites
OpenShift using ovn-kubernetes CNI.
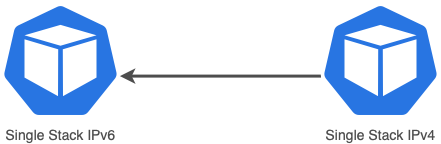
A situation you may encounter is when an application (client) is configured with a single stack IPv4 address but the service (server) it is trying to reach is configured with a single stack IPv6 address. The goal would be to establish connection between these two endpoints but the application and service will not be able to communicate with each other because these are two completely different protocols.
A high level diagram of showing this situation is below.
In order to establish communication between these services, assuming dual-stack is not possible, there are three components from SPK that must be installed and/or configured which this document will detail. These components are:
Distributed Session State Management (dSSM)
DNS IPv4 to IPv6 (DNS46)
NAT IPv6 to IPv6 (NAT46)
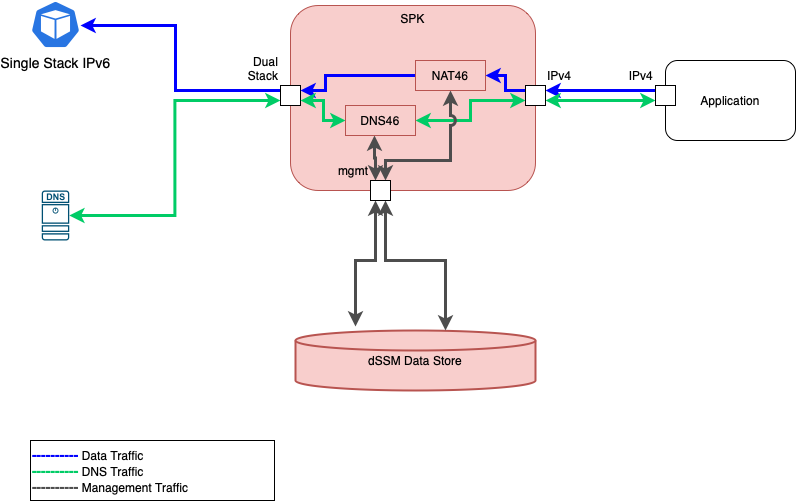
A diagram showing all components installed to enable IPv4 to IPv6 traffic is shown below.
In red shows the 3 additional SPK infrastructure components that enables traffic.
Shown in blue is the data traffic.
Shown in green is the DNS traffic.
Shown in gray is the cluster’s mgmt traffic to either get or set the IPv4 to IPv6 mapping from a data store.
Distributed Session State Management (dSSM)
The IPv4 to IPv6 egress use case will be making use of this component which is a session-state store for SPK. In the case here, it will be used to store all IPv4 to IPv6 translation mappings.
There will be 3 main parts that need to happen in order to successfully connect dSSM with the SPK Controller.
Create secret resources that contains SSL Certificates
Install dSSM
The SPK Controller config to establish a connection to dSSM.
Creating dSSM Secrets (SSL Certificates)
You can ask your system administrator if dSSM is already installed and ready to be used by your SPK Controller.
If there isn’t dSSM installed that SPK Controller can use, take the following steps below.
Get your SSL certificates and private key per your company policy.
Create dSSM secrets in the namespace where dSSM will be deployed to. Remember to base64 encode the certificates and key.
Create dSSM secrets (the same one as step #2 right above) in the namespace where f5ingress will be installed.
If you need a reference for additional details of creating dSSM SSL secrets, take a look at the install the secrets for dSSM section.
An example of a secret containing dSSM certs is below.
apiVersion: v1
kind: Secret
metadata:
 name: dssm-certs-secret
data:
 dssm-ca.crt: <base64EncodedCa>
 dssm-cert.crt: <base64EncodedCert>
 dhparam2048.pem: <base64EncodedPem>
An example of a secret containing dSSM secrets is below.
apiVersion: v1
kind: Secret
metadata:
 name: dssm-keys-secret
data:
 dssm-key.key: <base64EncodedKey>
Note: The two secrets above will need to be created in both your dSSM and SPK Controller namespaces.
You can check if they are create by running the following commands.
oc get secrets -n <namespaceOfDssm>
oc get secrets -n <namespaceOfSpkController>
Install dSSM
Installing dSSM will require the following pre-requisite:
Grant Security Context Constraint (SCC) permissions in dSSM namespace
Grant SCC permissions for dSSM Namespace
After creating and installing the dSSM secrets, we will need to add the f5-dssm ServiceAccount from the dSSM namespace to the privileged SCC.
oc adm policy add-scc-to-user privileged -n <dssmNamespace> -z f5-dssm
NOTE: The ServiceAccount name above is f5-dssm which will be created during dSSM install. This is also the name of the installed f5-dssm helm chart.
Installing dSSM
To see the default values used in the f5-dssm helm chart we can extract them using helm show values.
helm show values f5-dssm-0.22.18.tgz
The command below will install dSSM which will take about 2 minutes for all the pods to be fully ready. If you are updating the default values, you can change them from the helm CLI or providing an override.yaml file.
helm install f5-dssm f5-dssm-0.22.18.tgz -n <namespaceOfDssm>
oc -n <namespaceOfDssm> get pods
NOTE: We are not using an override file during the
helm installin the example here.
NOTE: Notice the f5-dssm name for the helm install is the same as the ServiceAccount used to grant SCC permissions. This f5-dssm chart also creates a ServiceAccount using the name of this installed chart.
dSSM uses Persistance Volume to keep data persistent for all SPK Controllers connecting to this dSSM instance. When the persistent volume is created on install, you can see the Persistance Volume Claim using the command below.
oc -n <dssmNamespace> get pvc
SPK Controller Configuration
In order to connect the SPK Controller to dSSM, there are additional configurations in the override file. They all will be under the tmm section of the file. The configurations that must be present are:
sessiondb- This key must be presentEnvironment variables
REDIS_CA_FILE: The TLS CA file. The filename here should correspond to the dSSM ca key defined in your dSSM cert secret. In this example for this document, it is dssm-ca.crt.REDIS_AUTH_CERT: The TLS certificate. The filename here should correspond to the dSSM ca key defined in your dSSM cert secret. In this example for this document, it is dssm-cert.crt.REDIS_AUTH_KEY: They TLS private key. The filename here should correspond to the dSSM ca key defined in your dSSM cert secret. In this example for this document, it is dssm-key.key.SESSIONDB_EXTERNAL_STORAGE: This value must be set totrue.SESSIONDB_DISCOVERY_SENTINEL: This value must be set totrue.SESSIONDB_EXTERNAL_SERVICE: This is the service’s external url of dSSM which looks something like f5-dssm-sentinel.. The f5-dssm-sentinel portion shown here depends on the dSSM helm chart name used at install. You can find the dSSM service name by running oc get services -n <namespaceOfDssm>.
An snippet of the override file that contains the configuration used to connect SPK Controller to dSSM is below.
tmm:
  # Sections below required to connect f5-tmm to f5-dssm.
  sessiondb:
    useExternalStorage: "true"
  customEnvVars:
    - name: REDIS_CA_FILE
      value: "/etc/ssl/certs/dssm-ca.crt"
    - name: REDIS_AUTH_CERT
      value: "/etc/ssl/certs/dssm-cert.crt"
    - name: REDIS_AUTH_KEY
      value: "/etc/ssl/private/dssm-key.key"
    - name: SESSIONDB_EXTERNAL_STORAGE
      value: "true"
    - name: SESSIONDB_EXTERNAL_SERVICE
      value: "<nameOfDssmSentinelService>.<namespaceOfDssm>"
    - name: SESSIONDB_DISCOVERY_SENTINEL
      value: "true"
DNS46 and NAT46 in SPK Controller
The section here will go into detail about enabling the DNS46/NAT46 feature. The areas we will be going into detail are:
DNS46
NAT46
Additional config to enable DNS46 and NAT46 in the SPK Controller.
DNS46
This component is responsible for handling the DNS logic and DNS traffic when an application (client) is doing a DNS query to a single stack IPv6 service. The main parts of this are to:
Confirm the hostname is really a single stack IPv6 address.
Set/get the IPv4 to IPv6 mapping to/from the data store (dSSM).
Return the translated IPv4 address to the application (client).
From the application point of view (the one configured with single stack IPv4), it should see an IPv4 address in the returning DNS response.
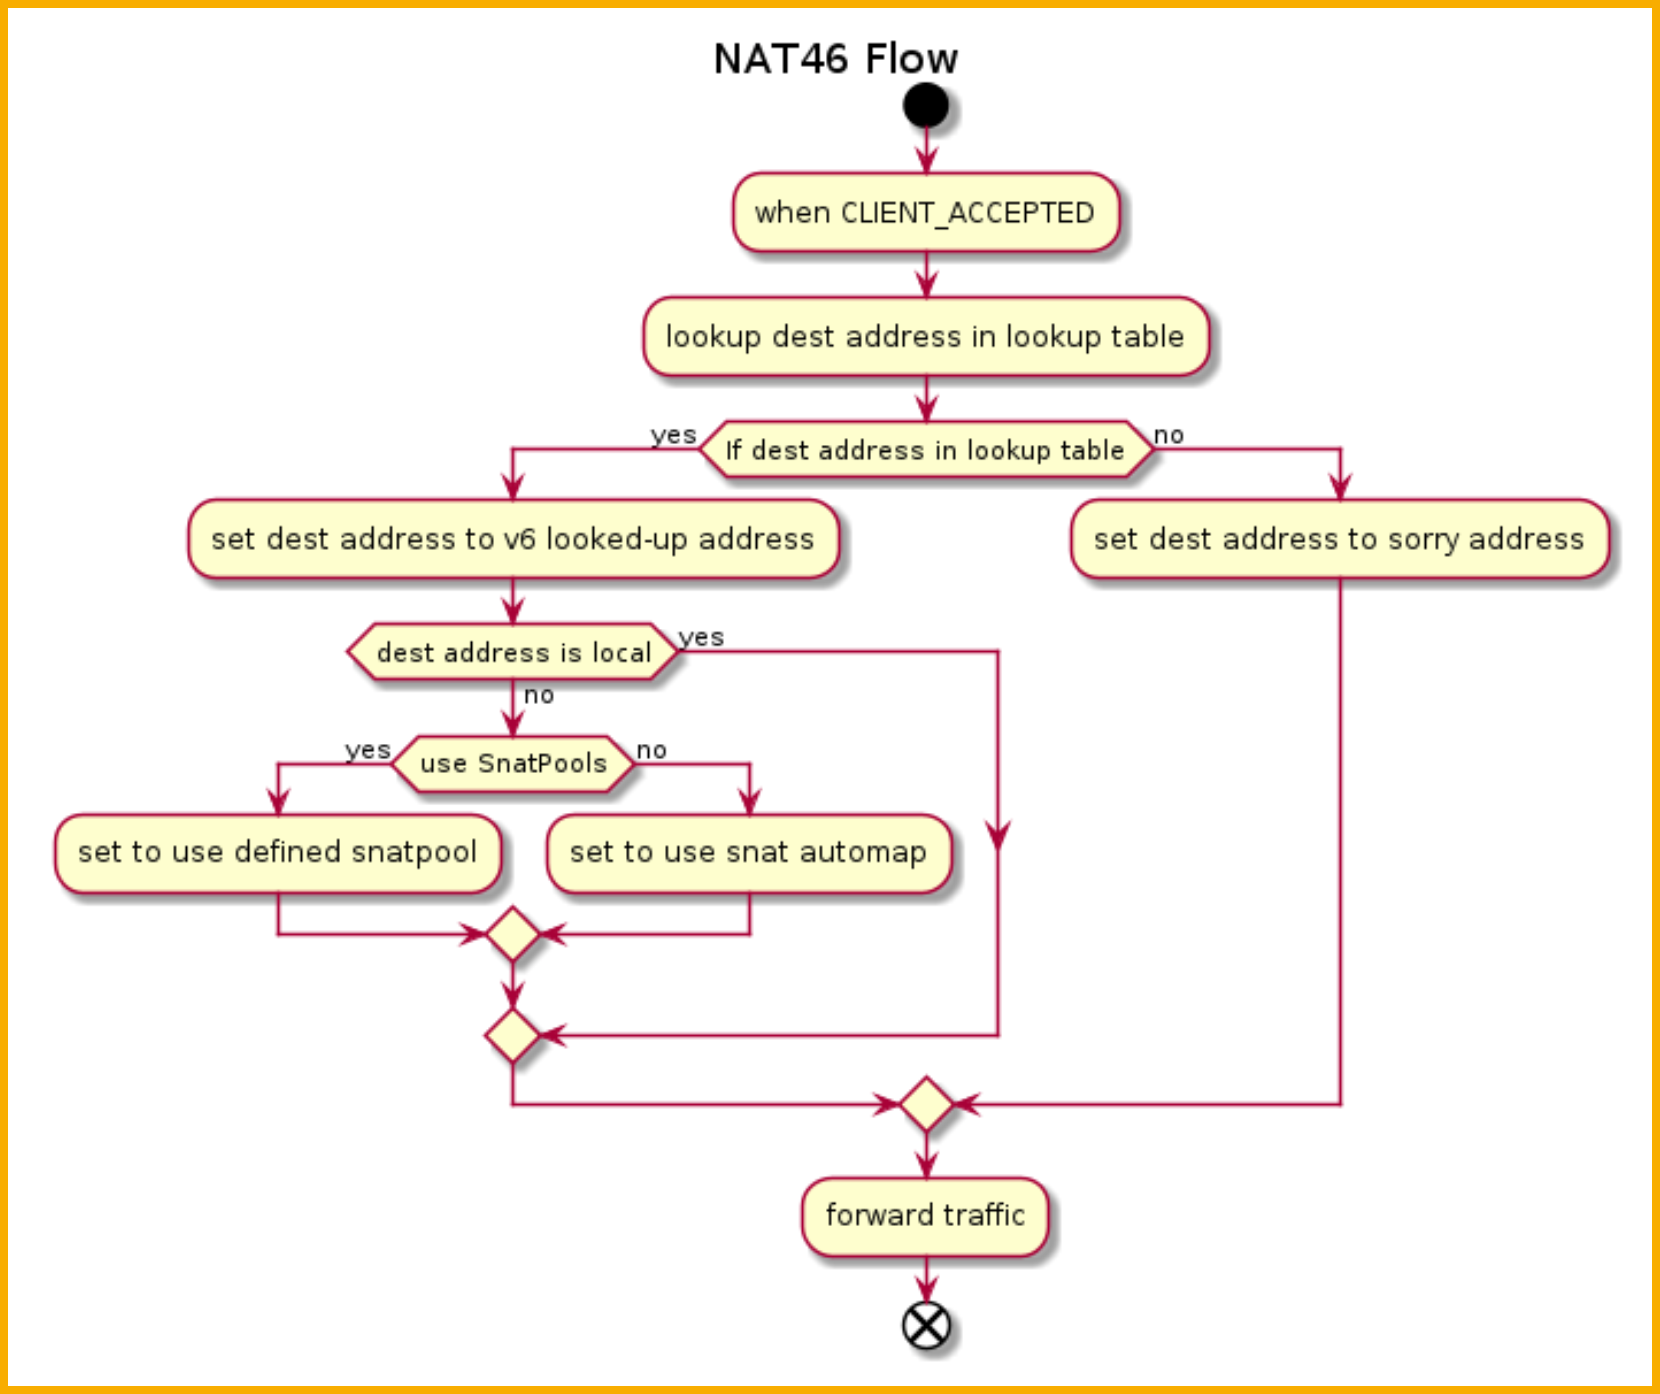
Below shows the DNS46 iRule flow diagram when it receives a response from the upstream DNS server.
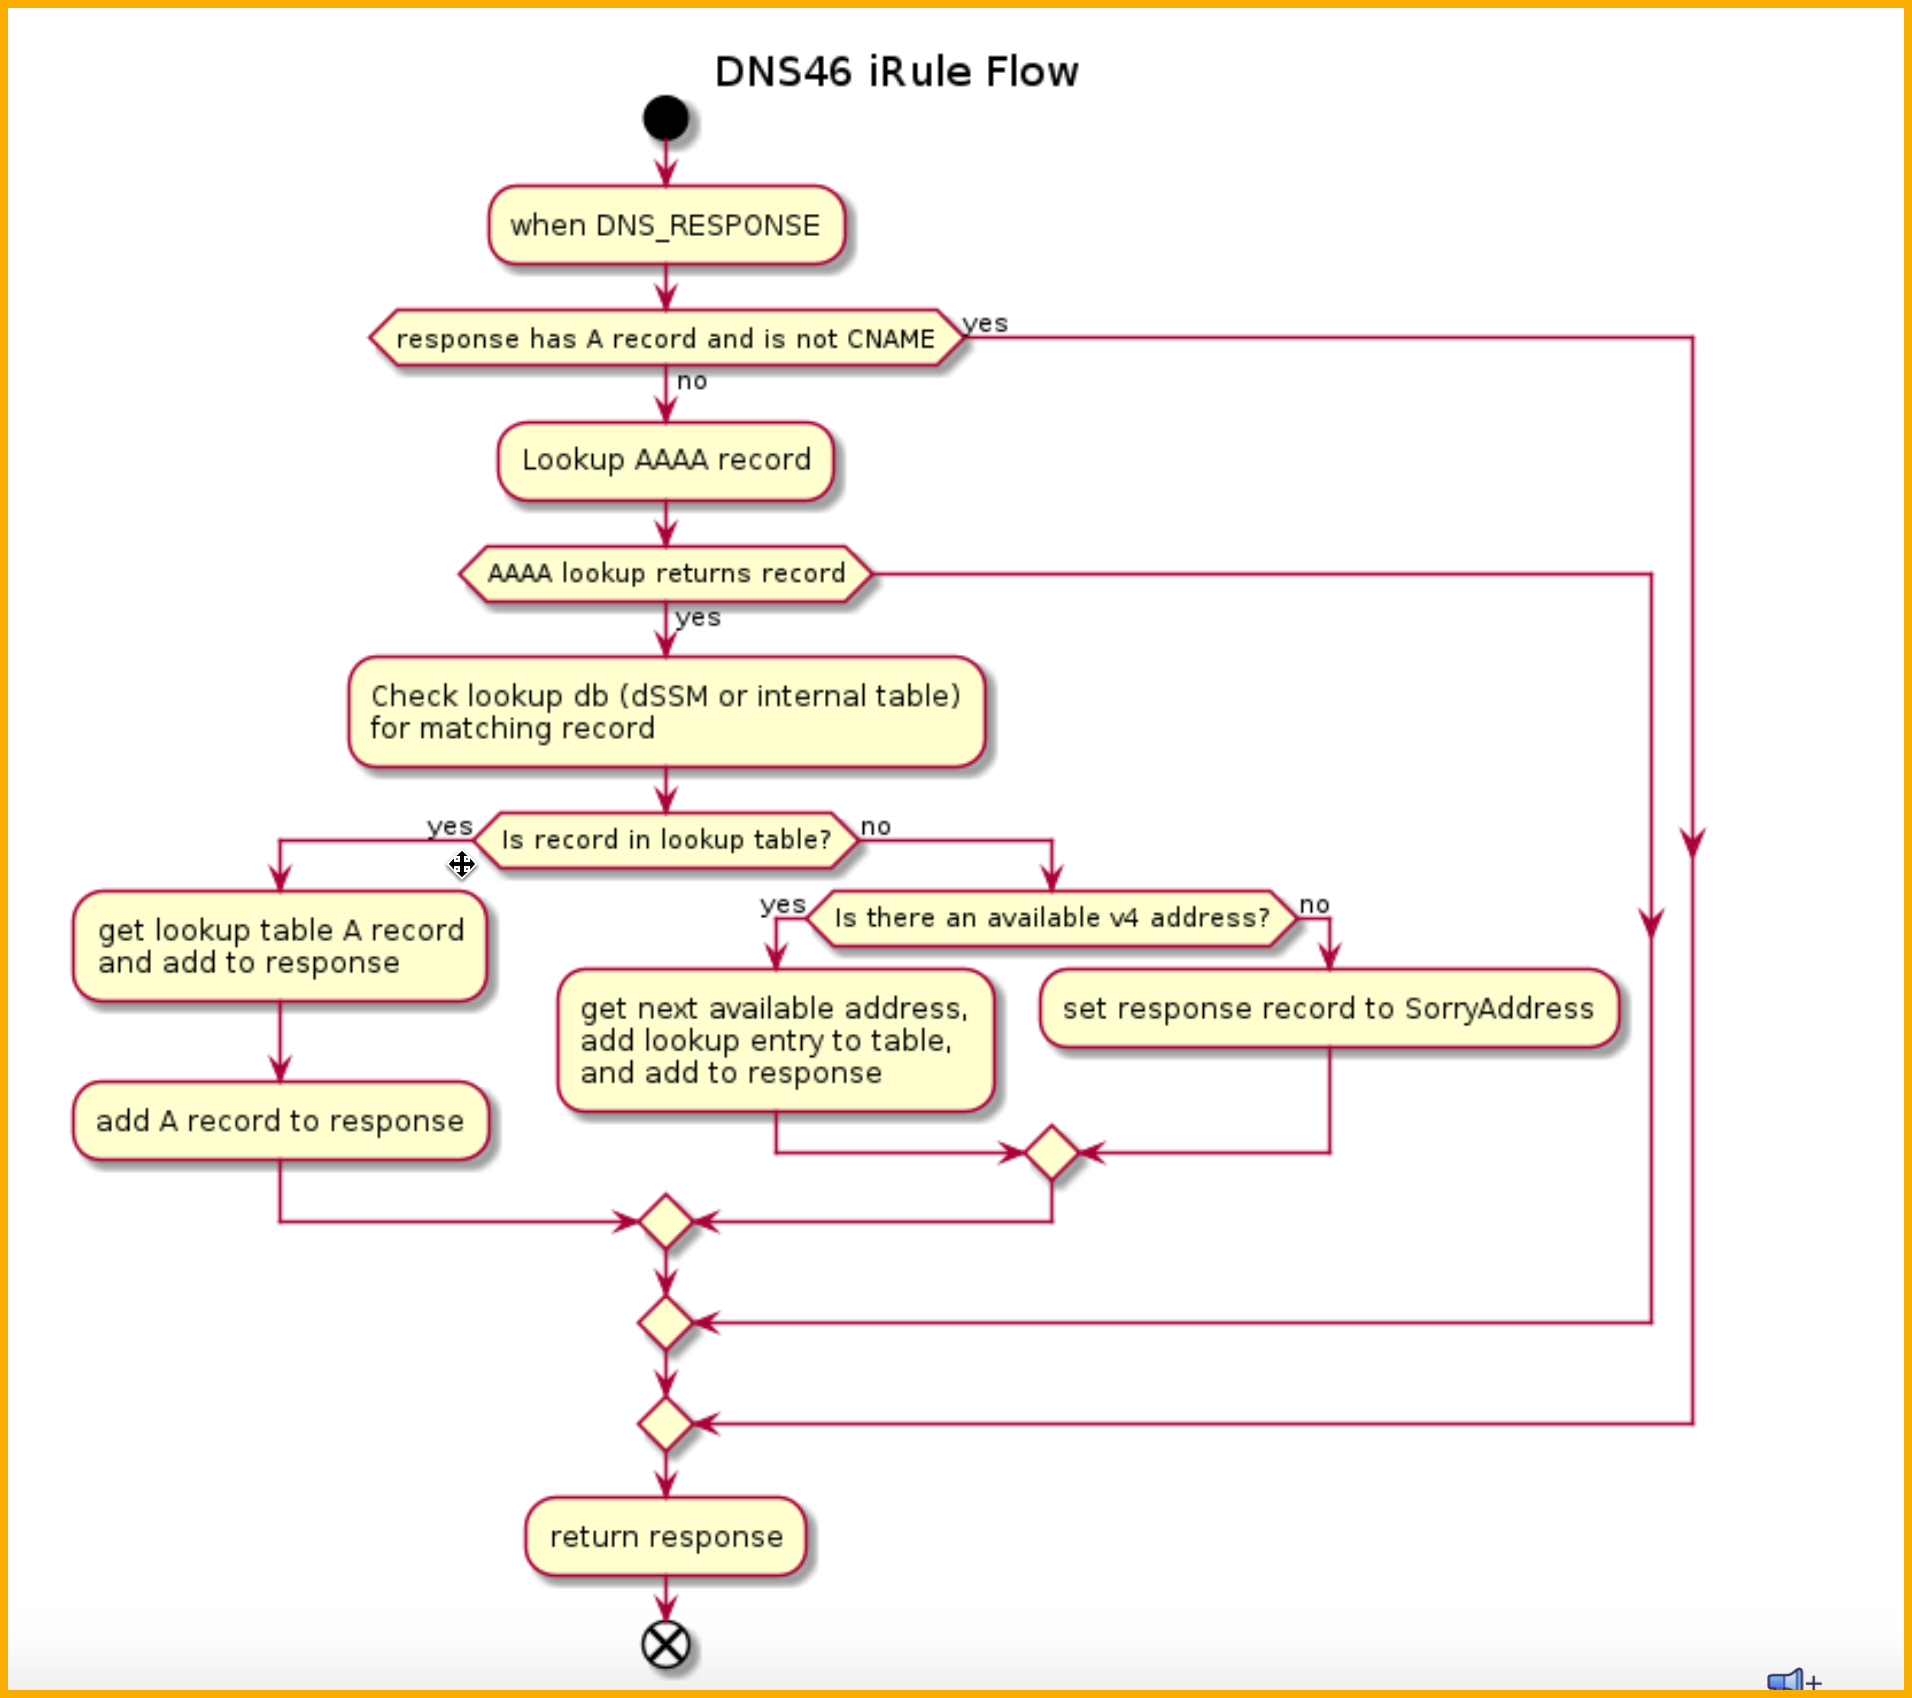
NOTE: The translation logic will only occur if the response doesn’t contain an A record and contains a AAAA record. In other words, the hostname is configured with a single stack IPv6 address.
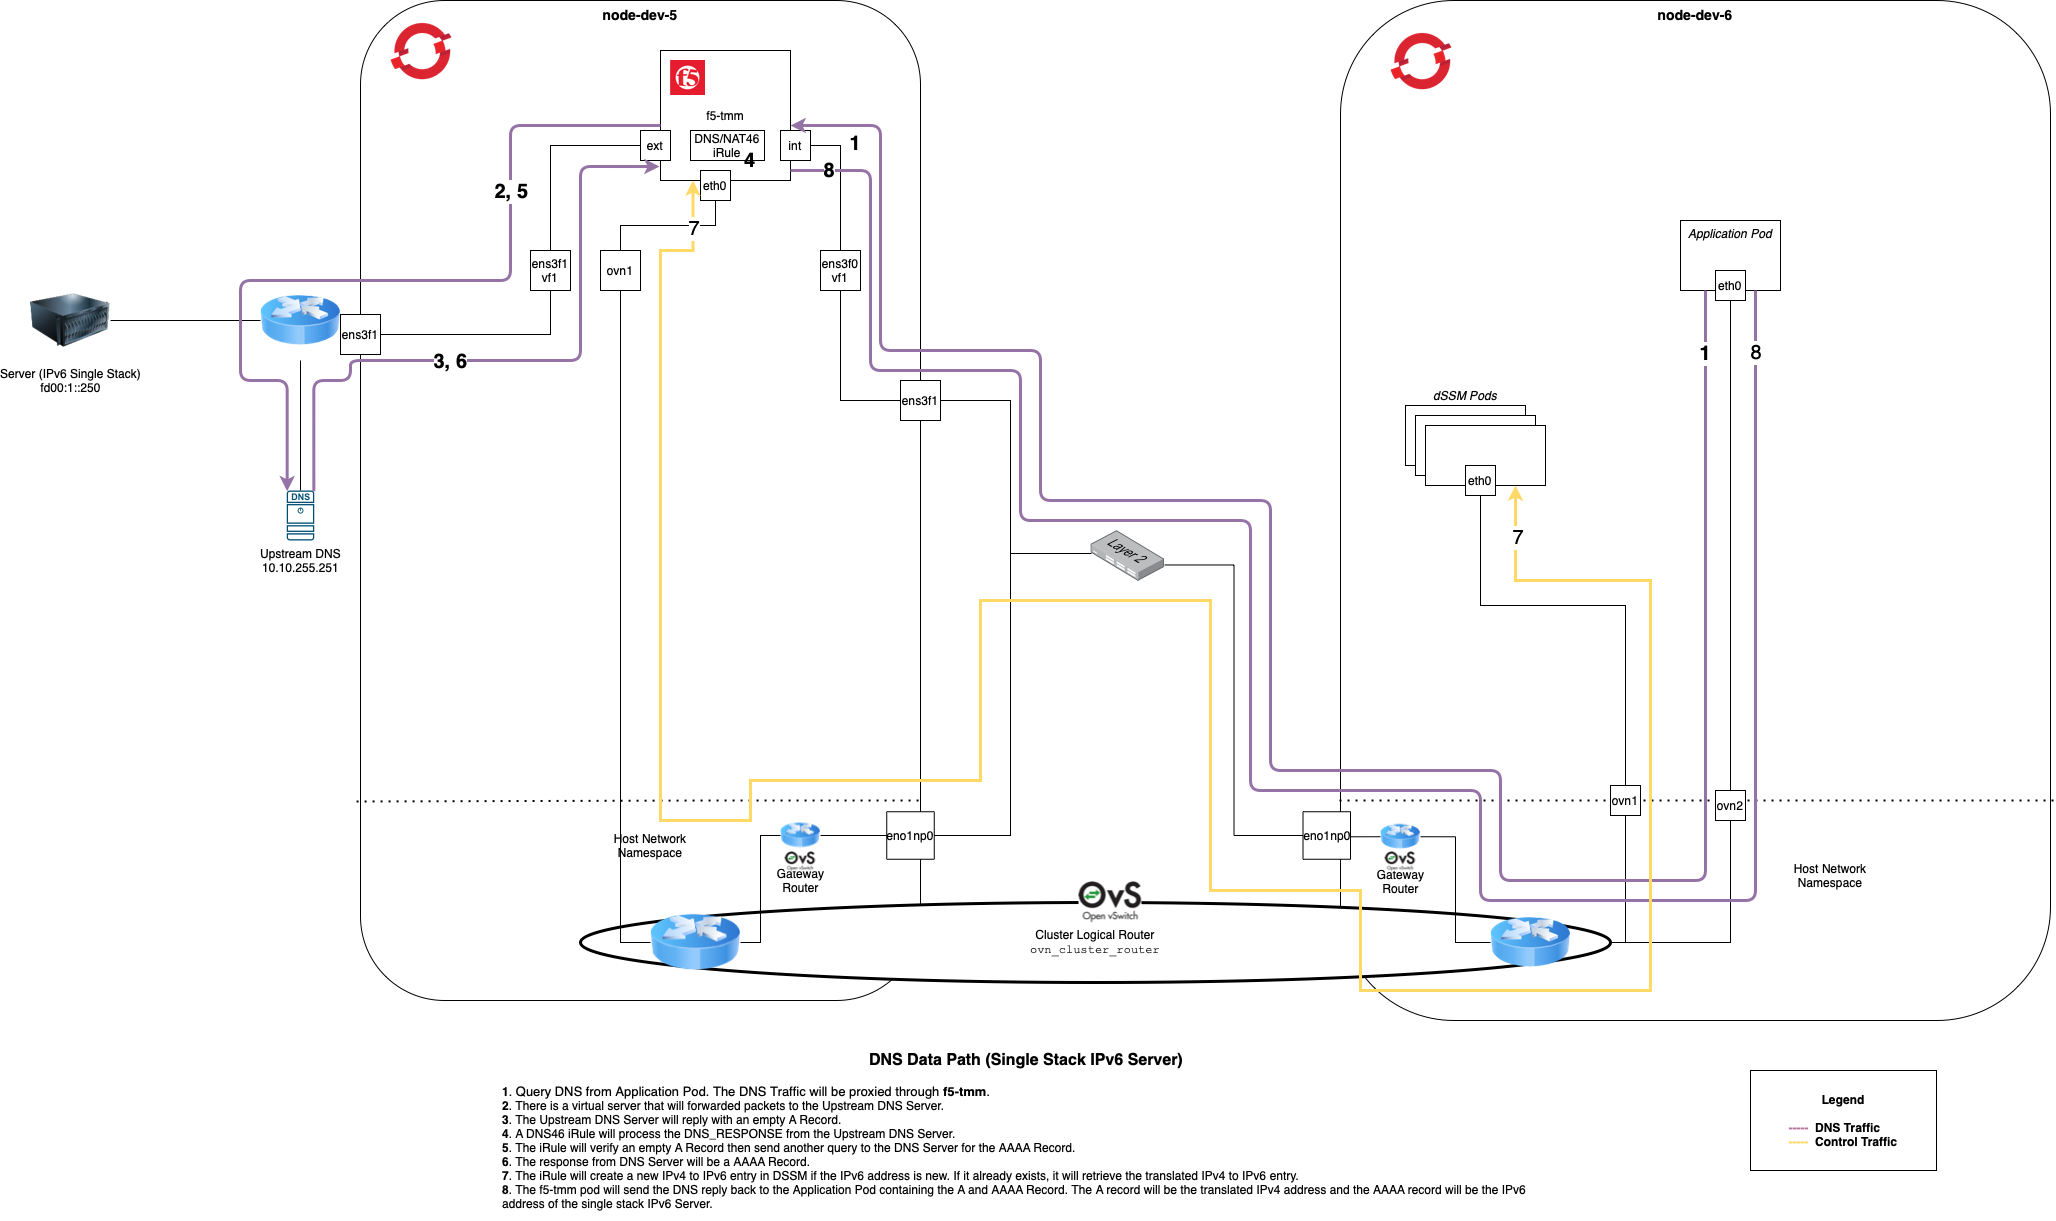
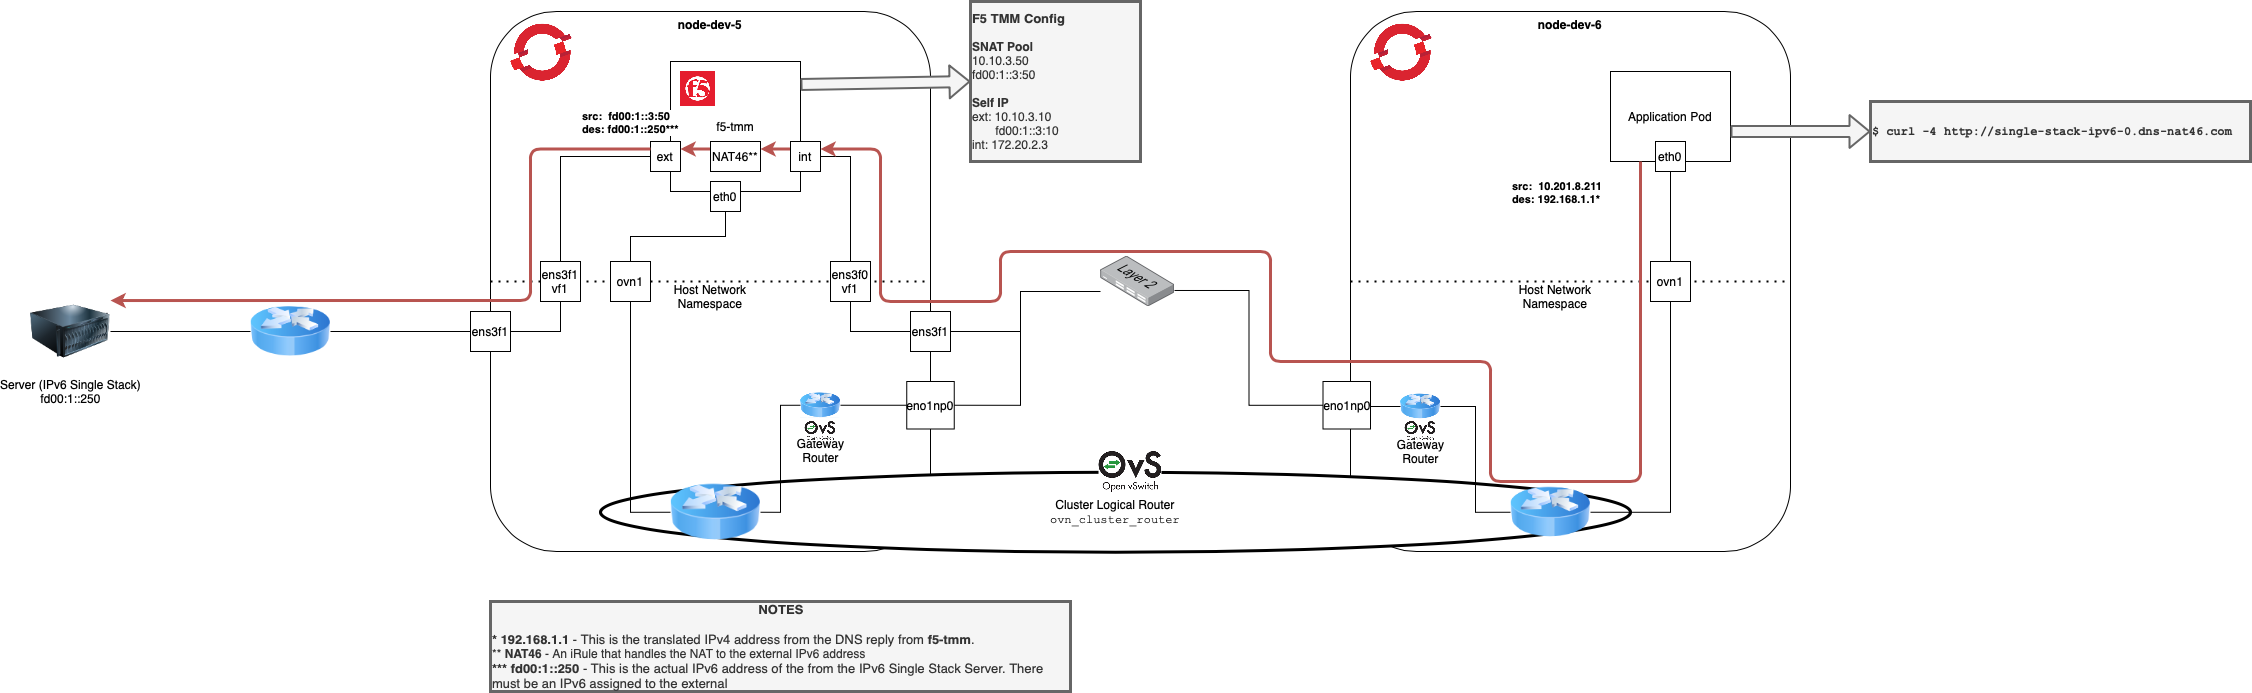
Below show the DNS lookup traffic. For the DNS46 portion to work, the DNS lookup traffic MUST go through f5-tmm which has DNS46 configured. The diagram also shows the management traffic when the DNS46 iRule is saving or retrieving the translated IPv4 to IPv6 address.
The network information for this section are:
The IPv6 subnet is fd00:1::0/64
The IPv4 subnet is 10.10.0.0/16
Click image above to enlarge
Forcing DNS Traffic through f5-tmm
In order to force DNS Traffic through f5-tmm, the DNS namespace configured on the application (client) must be using a subnet that doesn’t belong to anything from the OpenShift Cluster. You will need to do this by one of the following:
Manually changing the dns namespace on the application (client).
Creating a mutating webhook
The point of this webhook is to change the default dns namespace for the application pod.
How this is done is outside the scope of this document.
NAT46
This component is used to establish the actual data traffic from the application to the service. It will do a lookup from dSSM to find the IPv4 to IPv6 mapping and use the IPv6 address to communicate to the IPv6 service.
There are a couple SPK configurations that must be properly set in order for NAT46 to fully work.
Vlan
SNATPool
The network information for this NAT46 section are:
The IPv6 subnet is fd00:1::0/64.
The IPv4 subnet is 10.10.0.0/16.
Host subnet is 172.20.2.0/24.
The IP address of the application pod is 10.201.8.211.
The translated IPv4 to IPv6 address from DNS46 is 192.168.1.1.
There is a single stack DNS record configured at
single-stack-ipv6-0.dns-net46.comwhich will returnfd00:1::250.
Vlan CR
The Vlan CR that corresponds to f5-tmm’s external facing interface must be configured with an IPv6 address in order to communicate to the single stack IPv6 service (server).
apiVersion: "k8s.f5net.com/v1"
kind: F5SPKVlan
metadata:
  namespace: <namespaceOfSpkController>
  name: "vlan-external"
spec:
  name: external
  interfaces:
    - "1.2"
  selfip_v4s:
    - 10.10.3.10
  prefixlen_v4: 16
  selfip_v6s:
    - fd00:1::3:10
  prefixlen_v6: 64
SNATPool CR
A SNATPool must also be configured to allow a connection between the single stack IPv4 and the single stack IPv6 service. Below is an example of this config.
apiVersion: "k8s.f5net.com/v1"
kind: IngressRouteSnatpool
metadata:
  name: spk-snatpool
  namespace: <namespaceOfSpkController>
spec:
  name: egress_snatpool
  addressList:
    - - 10.10.3.50
      - 10.10.3.51
      - fd00:1::3:50
      - fd00:1::3:51
Enabling DNS46 and NAT46 in SPK Controller
The configuration for SPK Controller enables both DNS46 and NAT46 components. In other words, you cannot just enable DNS46 or just NAT46, you get them both enabled or disabled.
A snippet of a config enabling these features is shown below. If you want more details regarding these parameters, take a look at the DNS46/NAT46 Parameter section.
apiVersion: "k8s.f5net.com/v1"
kind: F5SPKEgress
metadata:
  name: spk-egress-crd
  namespace: spk-ingress
spec:
  egressSnatpool: egress_snatpool
  dnsNat46Enabled: true
  dnsNat46PoolIps:
    - <IpOfUpstreamDNSServer>
  dnsNat46Ipv4Subnet: <subnetOfIpv4TranslatedAddress>
  nat64Enabled: true
Below shows the NAT46 iRule flow diagram on for all packets destined to the dnsNat46Ipv4Subnet.
The detailed traffic diagram for NAT46 is shown below.
Click image above to enlarge
Methods of Configuring DNS46/NAT46 Use Case
There are a couple ways of configuring the DNS46/NAT46 use case.
DNS and data traffic through one SPK instance
This also requires a unique dSSM instance per SPK.
Test only.
DNS and data traffic are on separate SPK Controller deployments.
DNS Traffic goes to one SPK Controller deployment reserved for only DNS traffic for DNS46.
Data traffic goes through another SPK Controller deployment for only data traffic for NAT46.
The remaining part of this guide will be focused on details for splitting out DNS and data traffic to different f5ingress deployments.
DNS and Data Traffic through same SPK Controller
You may want to have the DNS and data traffic going through one SPK Controller for testing. A summary of what you will need in order to enable this method are:
Install dSSM
Update SPK Controller config to allow the following:
Connection to dSSM
Enabling DNS46 and NAT46 feature
Changing the DNS namespace address on the application (client)
This is a good option when you are wanting to try out this use case for testing purposes.
Dedicated DNS Traffic
Note the following points when installing with this method.
This only requires one dSSM instance that can be shared.
You will need an SPKC Controller installed specifically for DNS traffic and one for data traffic.
Advantage here is there can be many SPK Controller instances for NAT46, and all of these can use one shared dSSM instance.
Need to setup infrastructure that forces DNS traffic to the one SPK Controller handing this request.
Mutating webhook
Another DNS service (CoreDNS)
Additional components for dedicated dns traffic
There are a few other components that must be in place in order to have dedicated DNS traffic.
Another DNS Server, in this case CoreDNS.
We cannot use the same DNS server used by the cluster.
-
This also requires a web server to handle the webhook and change the dns nameserver.
A separate SPK Controller installation specifically for DNS traffic.
Below is a diagram that shows how DNS and data traffic are routed between the different namespaces. The network information for this section are:
The IPv6 subnet is fd00:1::0/64.
The IPv4 subnet is 10.10.0.0/16.
Host subnet is 172.20.2.0/24.
The default DNS nameserver is 172.31.0.10.
The CoreDNS service created for this use case is 172.31.200.220.
IP 1.2.3.4 is a random IP that doesn’t being to any subnets in the OpenShift Cluster.
The translated IPv4 to IPv6 address from DNS46 is 192.168.40.1.
There is a single stack DNS record configured at
single-stack-ipv6-0.dns-net46.comwhich will returnfd00:1::250.
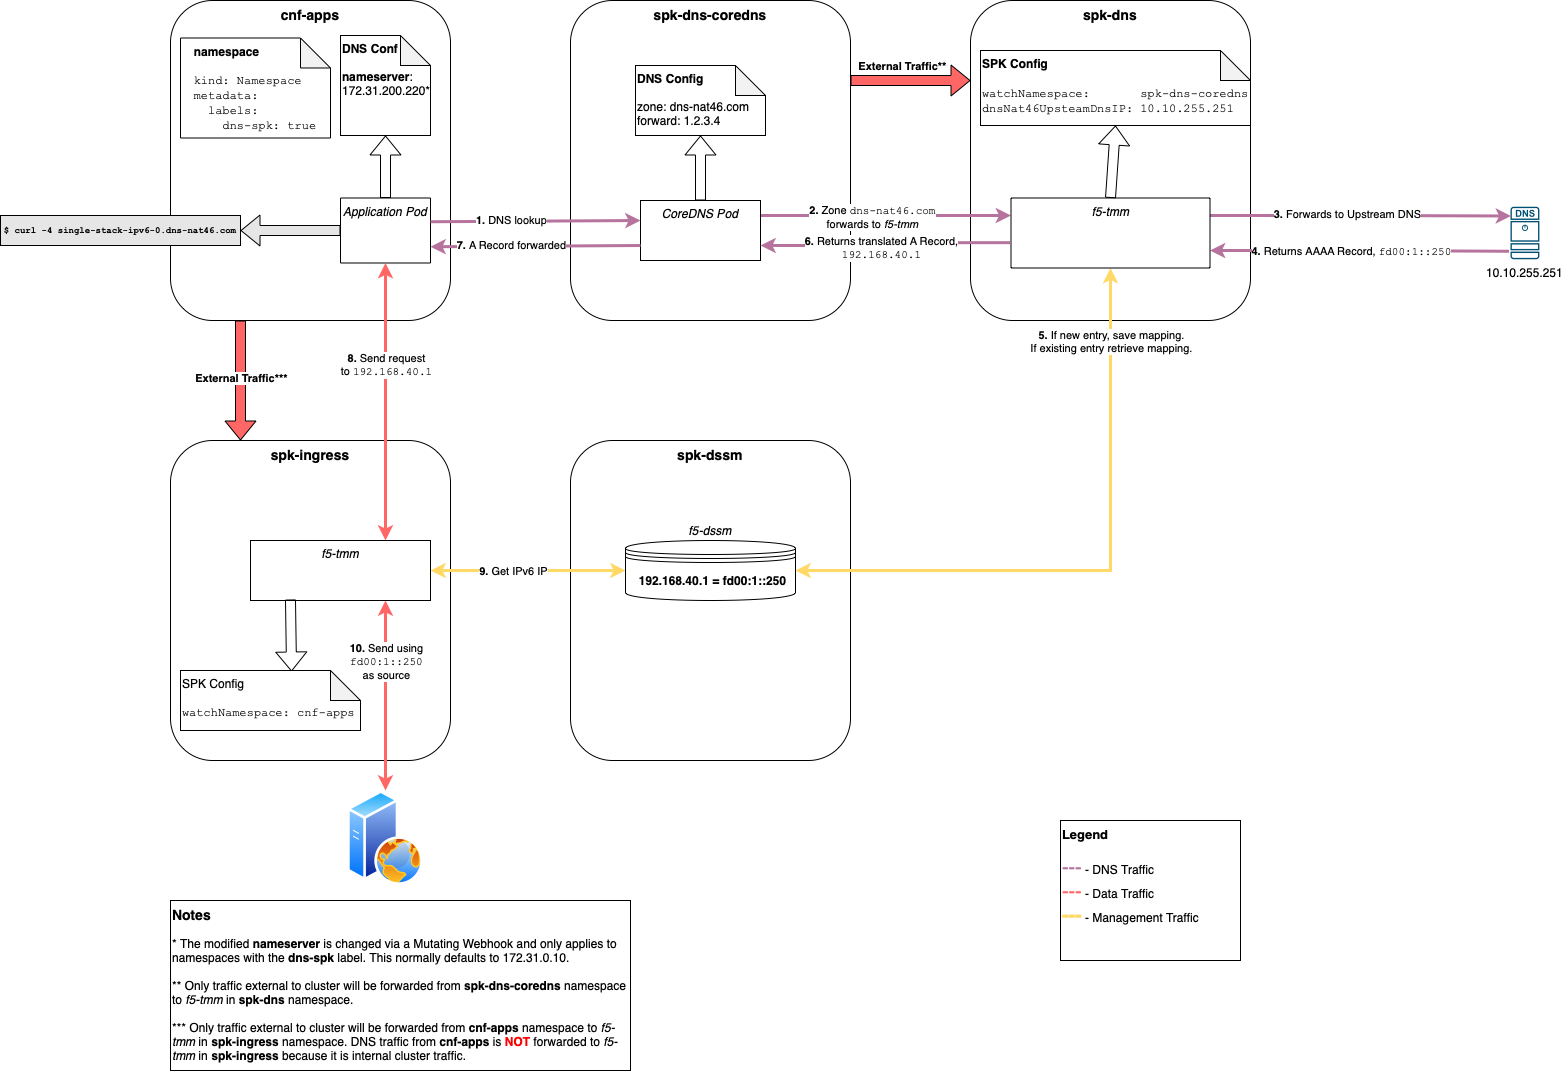
Click image above to enlarge
Separate DNS Server, CoreDNS
The install was based on using the CoreDNS Deployment on GitHub.
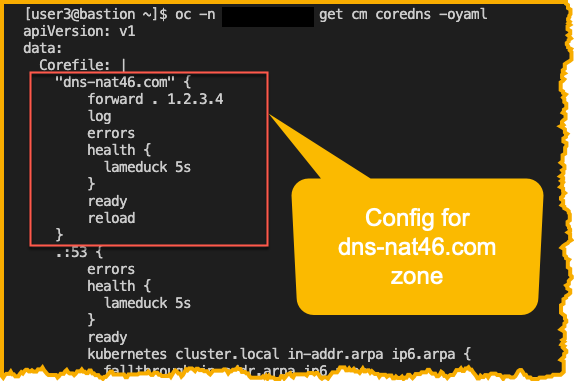
CoreDNS is configured using a file named Corefile. This file can be found in the configmap named coredns. Int he example used here, we’ve updated the config here so that DNS zone dns-nat46.com will be forwarded to a dummy IP, 1.2.3.4.
oc -n <secondCoreDnsNamespace> get cm coredns -oyaml
NOTE: The SPK instance from the namespace spk-dns will be installed using watchNamespace of secondCoreDnsNamespace, where the second CoreDNS is deployed. Since 1.2.3.4 will be treated like an external address, DNS traffic will be forwarded to the SPK instance in spk-dns.
Mutating Webhook
In order for all DNS traffic to be routed to the second CoreDNS instance, we must modify the nameserver config in the file /etc/resolv.conf on the application pod/s.
Below show both the dns and data traffic with ovn-kubernetes when using a dedicated SPK instance for DNS traffic.
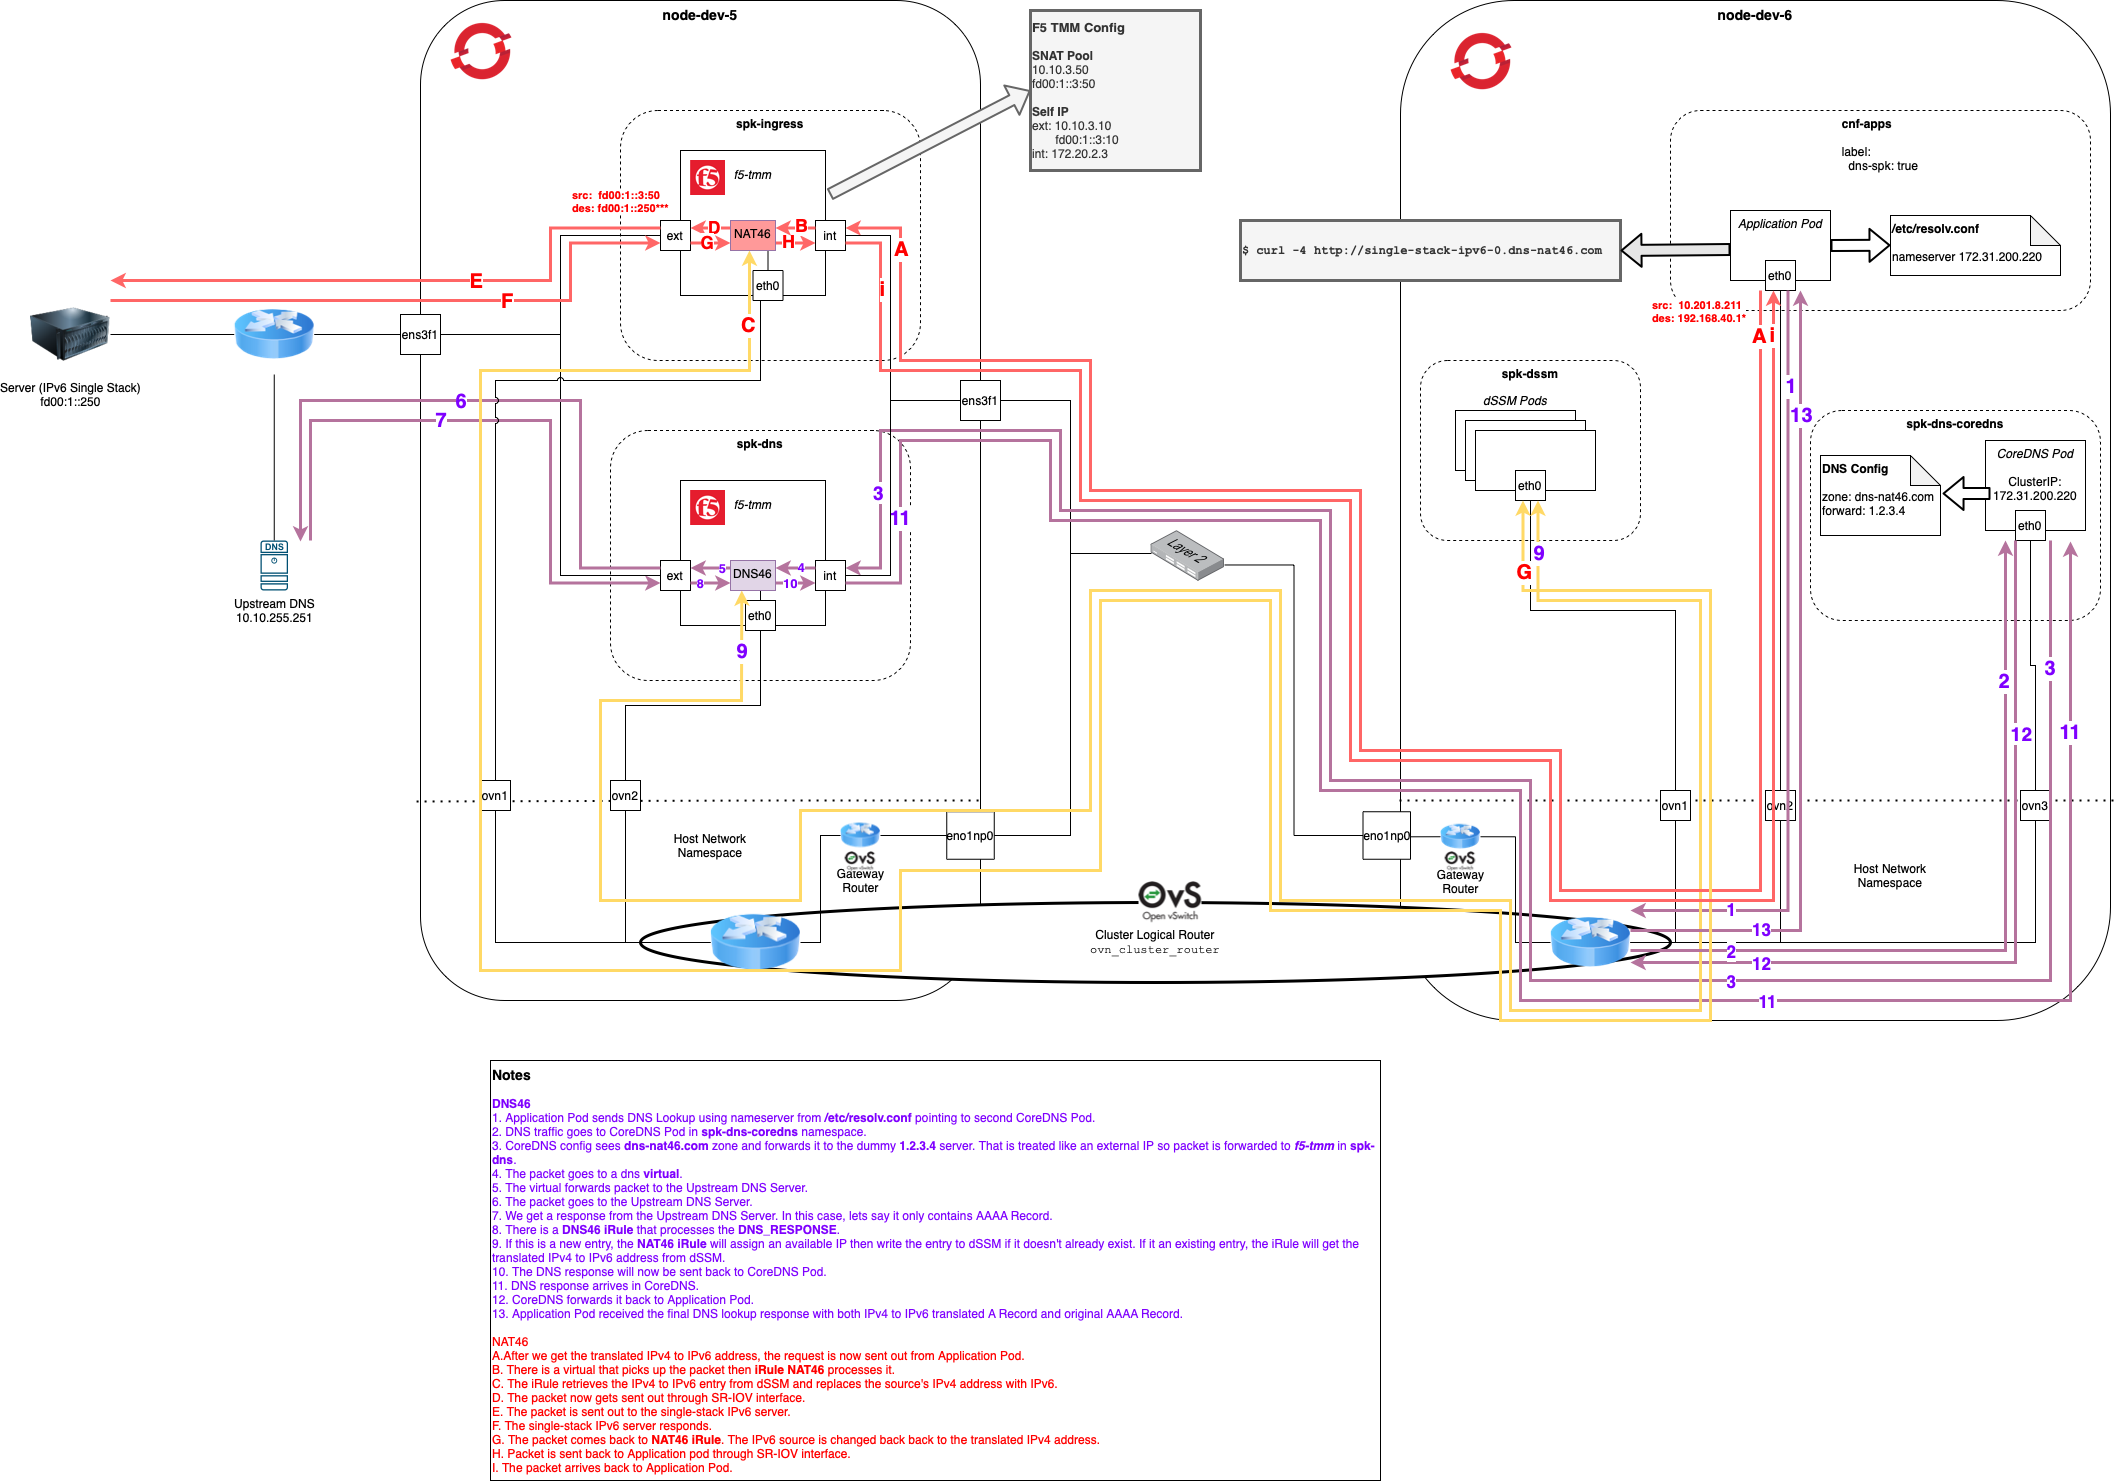
Click image above to enlarge