Macvlan Network Configuration
Overview
A need may arise to try a SPK use case without allocating the necessary hardware configuration to support SR-IOV. In such cases, deploying SPK using the OpenShift OVN-Kubernetes CNI plugin for macvlan may be a feasible alternative.
Limitations
While macvlan network configuration is potentially a viable alternative for labs and similar test cases, it should not be used in production environments and imposes the following limitations:
Use of the macvlan CNI plugin with SPK is not a supported configuration.
Networking limitations inherent to OpenShift (without SR-IOV), i.e., less performant than SR-IOV.
If your worker nodes are VMs in your private cloud, you must have privileges to enable promiscuous mode on the virtual networks attached to the VM.
You may or may not be able to enable promiscuous mode if your VMs are on a public cloud depending on the provider.
For production-ready network configuration, refer to the following documentation: https://clouddocs.f5.com/service-proxy/1.6.0/spk-network-overview.html
Macvlan Architecture
In OpenShift, containers run in PODs on Nodes in the cluster. Applications (services) may be configured to run in Namespaces. Each node (physical server) has one or more NICs. These nodes are assigned network IP addresses from the cluster network subnet. Independent IP addresses are typically assigned to containers, or PODs, running in a Namespace.
The OpenShift networking model allows the implementation of different networking models using CNI plugins. See https://docs.openshift.com/container-platform/4.4/networking/ovn_kubernetes_network_provider/about-ovn-kubernetes.html. for more information.
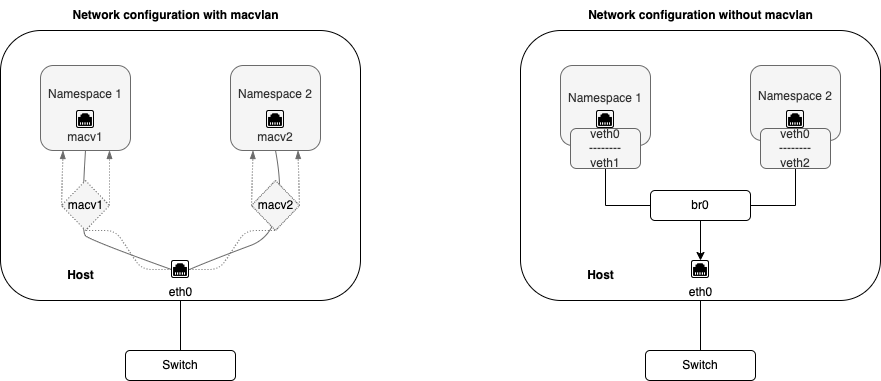
VLANs facilitate creating multiple interfaces on top of a single physical interface and filtering network traffic based on VLAN tags. Similarly, macvlan facilitates creating multiple interfaces with unique Layer (Ethernet Mac) address on top of a single physical interface.
Without macvlan, connecting to a physical network from a virtual machine or namespace requires creation of TAP/VETH devices which are attached to a bridge interface which is attached to the physical interface on the host.
Macvlan facilitates binding a physical interface directly to multiple namespaces without the need for a bridge. This allows Pods on a host to communicate with other hosts and their Pods using a single physical network interface. Each Pod that is attached to a macvlan-based additional network is provided a unique MAC address.
The following diagram illustrates network configurations with and without macvlan:
Assumptions / Prerequisites
This use case assumes the following:
A working knowledge of OpenShift and SPK
A functioning OpenShift cluster already installed and configured
The OpenShift cluster using OVN-Kubernetes as the default Container Network Interface (CNI)
If worker nodes are VMs, virtual network configured to enable promiscuous mode
For example on vCenter
Two additional network interfaces corresponding to internal and external networks on node where f5-tmm deployed
Configuration
Create OpenShift Network Attachment Definitions
Create new macvlan NetworkAttachmentDefinition as needed. Refer to the following document for further details: https://docs.openshift.com/container-platform/4.10/networking/multiple_networks/configuring-additional-network.html .
For SPK, you will need to create 2 NetworkAttachmentDefinition. One that corresponds to an internal network and one that corresponds to an external network.
For example:
Create a macvlan_example.yml file containing the network attachment
definition.
Note: In this example, ens224 and ens256 are the physical network interface
card on the node in question. “Bridge” is the default mode for new macvlan
interfaces. For information on other modes, refer to
https://docs.openshift.com/container-platform/4.10/networking/multiple_networks/configuring-additional-network.html#nw-multus-macvlan-object_configuring-additional-network.
---
apiVersion: "k8s.cni.cncf.io/v1"
kind: NetworkAttachmentDefinition
metadata:
  name: macvlan-internal
spec:
  config: '{
    "cniVersion": "0.3.0",
    "type": "macvlan",
    "master": "ens224",
    "mode": "bridge",
    "ipam": {}
    }'
---
apiVersion: "k8s.cni.cncf.io/v1"
kind: NetworkAttachmentDefinition
metadata:
  name: macvlan-external
spec:
  config: '{
    "cniVersion": "0.3.0",
    "type": "macvlan",
    "master": "ens256",
    "mode": "bridge",
    "ipam": {}
   }'
Note: There is no ipam config definition for SPK. You will be configuring these
by creating F5SPKVlan
CRs.
Create the new NetworkAttachmentDefinition custom resource (CR) in the desired namespace:
oc apply -n default -f macvlan_example.yml
Confirm the custom resource has been created:
oc get -n default network-attachment-definitions
Example output
NAME               AGE
macvlan-internal   30s
macvlan-external   30s
Get the network attachment definition details - the output should be very similar to your yaml file:
oc get -n default network-attachment-definitions macvlan-internal -o yaml
Example output
apiVersion: k8s.cni.cncf.io/v1
kind: NetworkAttachmentDefinition
metadata:
  annotations:
    kubectl.kubernetes.io/last-applied-configuration: |
      {"apiVersion":"k8s.cni.cncf.io/v1","kind":"NetworkAttachmentDefinition","metadata":{"annotations":{},"name":"macvlan-internal","namespace":"default"},"spec":{"config":"{ \"cniVersion\": \"0.3.0\", \"type\": \"macvlan\", \"master\": \"ens224\", \"mode\": \"bridge\", \"ipam\": {} }"}}
  creationTimestamp: "2023-01-11T05:58:41Z"
  generation: 1
  name: macvlan-internal
  namespace: default
  resourceVersion: "22351109"
  uid: 39378401-1821-4d3c-8e88-2e8eaaeee5d0
spec:
  config: '{ "cniVersion": "0.3.0", "type": "macvlan", "master": "ens224", "mode":
    "bridge", "ipam": {} }'
Traffic flow over the macvlan interface may be viewed from the OpenShift node itself if the tcpdump application is installed.
For example:
sudo tcpdump -i cni0
Example output:
16:17:54.972934 IP worker1.36308 > 10.42.0.5.10250: Flags [P.], seq 230:265, ack 1938, win 6181, options [nop,nop,TS val 4161270865 ecr 1731266921], length 35
16:17:54.972939 IP 10.42.0.5.10250 > worker1.36308: Flags [.], ack 265, win 501, options [nop,nop,TS val 1731266921 ecr 4161270865], length 0
16:17:54.972951 IP worker1.36308 > 10.42.0.5.10250: Flags [P.], seq 265:300, ack 1938, win 6181, options [nop,nop,TS val 4161270865 ecr 1731266921], length 35
16:17:54.973188 IP worker1.36308 > 10.42.0.5.10250: Flags [P.], seq 300:335, ack 1938, win 6181, options [nop,nop,TS val 4161270865 ecr 1731266921], length 35
16:17:54.973199 IP worker1.36308 > 10.42.0.5.10250: Flags [P.], seq 335:370, ack 1938, win 6181, options [nop,nop,TS val 4161270866 ecr 1731266921], length 35
16:17:54.973779 IP 10.42.0.5.10250 > worker1.36308: Flags [.], ack 370, win 501, options [nop,nop,TS val 1731266922 ecr 4161270865], length 0
Install SPK
Before proceeding to the SPK installation, make the following configuration changes:
Replace the tmm environment variables with the one shown below. This flag will enable the use of F5SPKVlan CRs to configure F5 Vlan and Self-IPs.
tmm:
  customEnvVars:
    - name: TMM_MAPRES_ADDL_VETHS_ON_DP
      value: "TRUE"
Verify topology manager is disabled.
tmm:
  topologyManager: false
Update the names of your NetworkAttachmentDefinition that corresponds to your internal and external networks. The example belows assume SPK is installed in the default namespace.
tmm:
  cniNetworks: default/macvlan-internal,default/macvlan-external
(Optional) SPK’s default CPU count for the f5-tmm container in the f5-tmm pod is 2. In a test environment, you can use 1. Make the following changes in the
values.yamlfile. Notice the hugepages memory allocation also reduces when you use a smaller cpu count.tmm: resources: limits: cpu: 1 hugepages-2Mi: "1572Mi" memory: "2Gi" requests: cpu: 1 hugepages-2Mi: "1572Mi" memory: "2Gi"
Proceed to install SPK as usual:
https://clouddocs.f5.com/service-proxy/1.6.0/spk-software-install.html
TMM will automatically discover available network interfaces and map these to SPK VLANs accordingly, so no special macvlan-related configuration is needed.
Debugging
TMM Debug Sidecar
The TMM Debug Sidecar may be used for traffic and route diagnostics and troubleshooting. Details may be found here:
https://clouddocs.f5.com/service-proxy/1.6.0/spk-tmm-debug.html
View and Troubleshoot OVN Routing
Details on troubleshooting OVN DB routes may be found here:
https://clouddocs.f5.com/service-proxy/1.6.0/spk-network-overview.html#ovn-kubernetes
Supplemental
Supplemental documentation for the Macvlan OpenShift CNI plugin