Automation, Orchestration & DevOps > Class 1: Programmability BIG-IP Rest Structure and Concepts Documentation! > Module 1: Imperative Automation with the BIG-IP and iControl Rest Source | Edit on
Lab 1.2: REST API Authentication & example Templates
One of the many fundamental concepts related to interaction with REST APIs is how a particular consumer is authenticated to the system. BIG-IP supports two types of authentication: HTTP BASIC and Token-Based (TBA). It is important to understand both of these authentication mechanisms, as consumers of the API will often make use of both types depending on the use case. This lab will demonstrate how to interact with both types of authentication.
Throughout this and other classes in the series, we will make use of the Postman REST API Client. You can find more information about Postman at https://getpostman.com
Task 1 - Import the Postman Collection & Environment
In this task, you will Import a Postman Collection & Environment for this lab. Perform the following steps to complete this task:
Open the Postman tool by clicking the
 icon of the desktop of your Windows Jump host. The initial window may take a few moments to appear.
Note
The Postman client receives frequent updates. If you are prompted to update the client please click the Remind me later button to skip updating the version installed in your lab environment
By default, the Postman client requires verification of SSL/TLS Certificates to a public Root Certificate Authority. However, by default, BIG-IP and many other devices use a self-signed certificate for SSL/TLS connections. To allow connections with self-signed certificates, we need to modify the default settings of Postman.
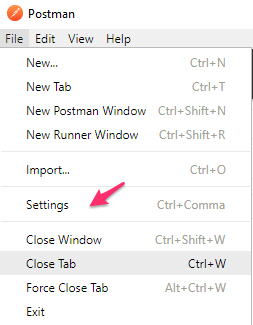
Open the Postman Settings windows by clicking :
Verify your client is configured to allow self-signed certificates by ensuring that the
SSL certificate verificationsetting is set toOFF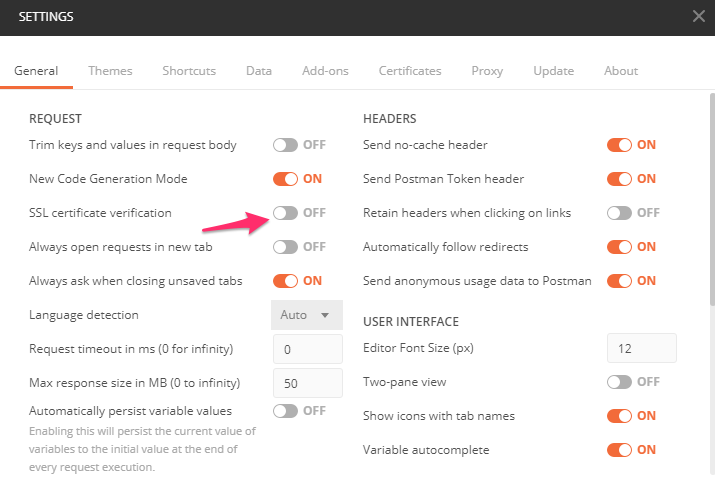
Click the X in the top right of the Settings window
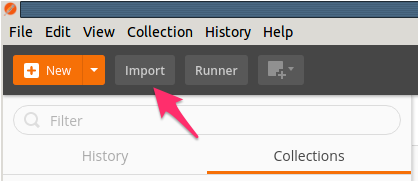
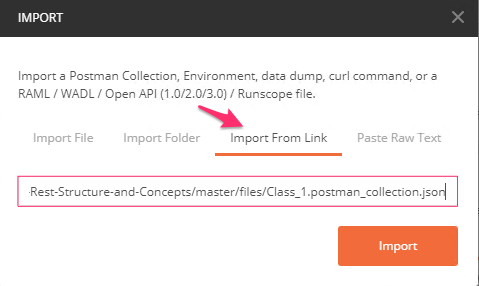
A Postman Collection lets you group individual REST requests. This Postman collection can then be shared and imported. To import a Postman Collection, click the Import button in the top left of the Postman window
Click the Import from Link tab. Paste the following URL into the text box and click Import
https://raw.githubusercontent.com/f5devcentral/f5-agility-labs-automation/master/docs/class01/files/Class_1.postman_collection.json
You should now see a collection named
F5 Programmability: Class 1in your Postman Collections sidebar. Postman automatically resizes its GUI depending on its window size. It might be necessary to use the shortCtrl + \(on Windows) or click the show sidebar icon at the bottom left corner of postman if you do not see the sidebar.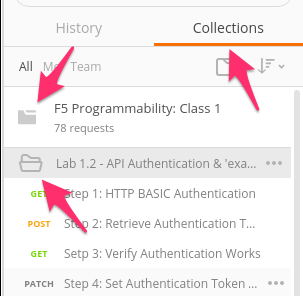
To assist in multi-step procedures, we make heavy use of the Environments capability in Postman. This capability allows us to set various global variables that are then substituted into the request before it is sent. Import the Environment file by clicking: menu selection:Import > Import from Link and pasting the following URL and clicking Import:
https://raw.githubusercontent.com/f5devcentral/f5-agility-labs-automation/master/docs/class01/files/Class_1.postman_environment.json
Set your environment to
F5 Programmability: Class 1by using the menu at the top right of your Postman window: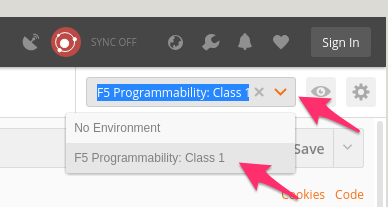
Task 2 - HTTP BASIC Authentication
In this task, we will use the Postman client to send API requests using
HTTP BASIC authentication. As its name implies, this method of
authentication encodes the user credentials via the existing BASIC
authentication method provided by the HTTP protocol. The mechanism this method uses is to insert an HTTP header named Authorization with a value that is built by Base 64 encoding the string <username>:<password>. The resulting header takes this form:
Authorization: Basic YWRtaW46YWRtaW4=
It should be noted that cracking this method of authentication is TRIVIAL; as a result, API calls should always be performed using HTTPS encryption (F5 default) with a certificate signed by authority rather than HTTP.
Perform the following steps to complete this task:
Click the Collections tab on the left side of the screen, expand the
F5 Programmability: Class 1collection on the left side of the screen, expand theLab 1.2 - API Authentication & `example` Templatesfolder:Click the
Step 1: HTTP BASIC Authenticationitem. Click the Authorization tab and selectBasic Authas the Type. Fill in the username and password (admin/Agility2020!) and click the Send button: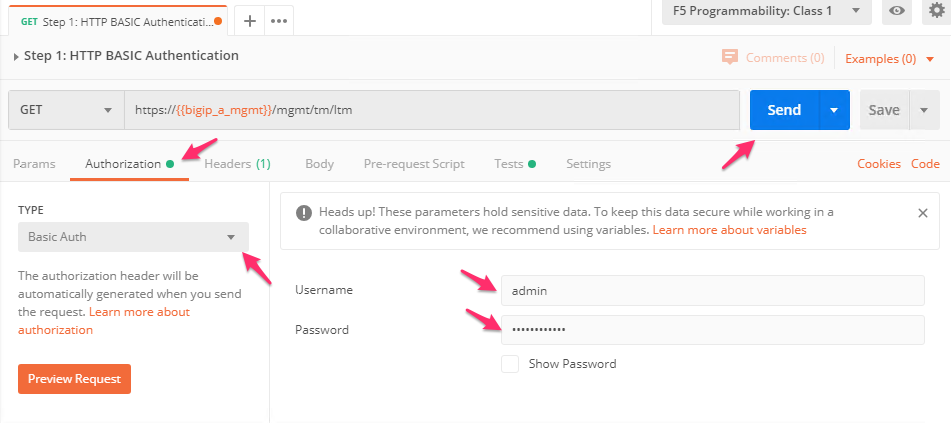
Click the Headers tab and examine the HTTP header. Notice that the number of Headers in the Headers tab changed from
1to9. This is because Postman automatically created the HTTP header and updated your request to include it.
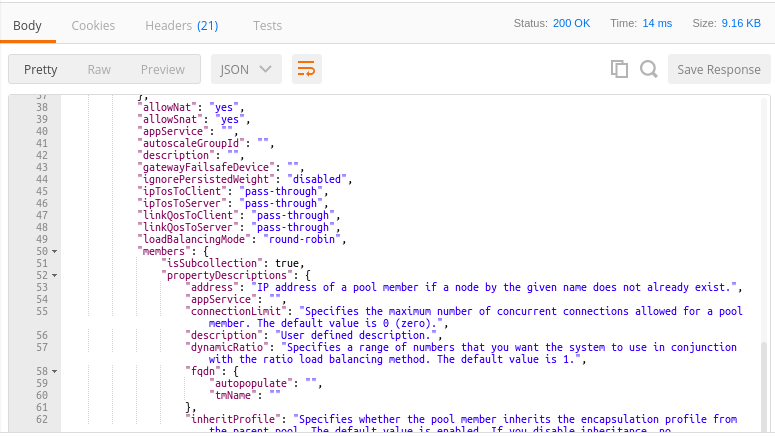
Click the Body tab, if the request succeeded you should be presented with a listing of the
/mgmt/tm/ltmOrganizing Collection: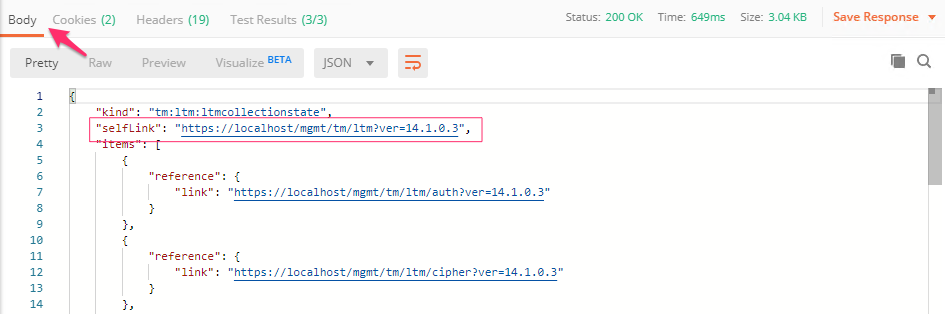
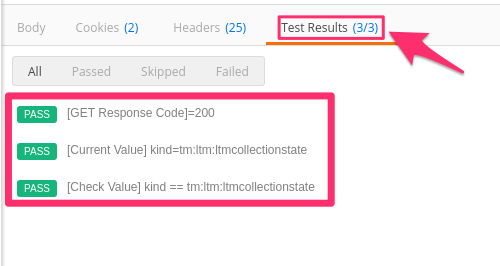
Click the Test Results tab and ensure all the tests for this request have passed:
Update the credentials and specify an INCORRECT password. Send the request again and examine the response:

Check the Test Results tab and notice that our Unit Tests for this request are now failing (as expected):

Important
As you progress through this lab be sure to check the Test Results tab. We have included Unit Tests where applicable to help you verify the requests being sent are succeeding. If you notice a test has failed, please double check your input or ask for help.
Task 3 - Token Based Authentication
One of the disadvantages of BASIC Authentication is that credentials are sent with every request. This can result in a much higher attack surface being exposed unnecessarily. As a result, Token Based Authentication (TBA) is preferred in many cases. TBA only sends the credentials once, on the first request. The system then responds with a unique token for that session, and the consumer then uses that token for all subsequent requests. BIG-IP supports token-based authentication that drops down to the underlying authentication subsystems available in TMOS. As a result, the system can be configured to support external authentication providers (Active Directory, RADIUS, TACACS, etc.), and those authentication methods can flow through to the REST API. In this task, we will demonstrate TBA using the local authentication database. However, authentication to external providers is fully supported.
Note
For more information about external authentication providers see the section titled About external authentication providers with iControl REST in the iControl REST API User Guide available at https://devcentral.f5.com/d/icontrolr-rest-api-user-guide-version-1300-241 (v13)
Perform the following steps to complete this task:
Click the
Step 2: Retrieve Authentication Tokenitem in the Lab 1.2 Folder.Notice that we send a
POSTrequest to the/mgmt/shared/authn/loginendpoint.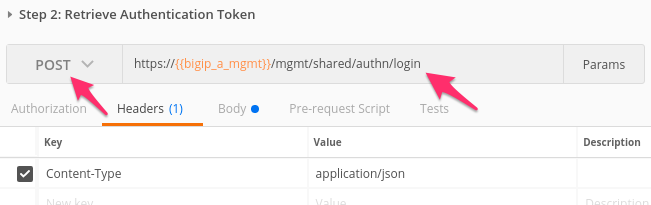
Click the Body tab and examine the JSON that we will send to BIG-IP to provide credentials and the authentication provider:
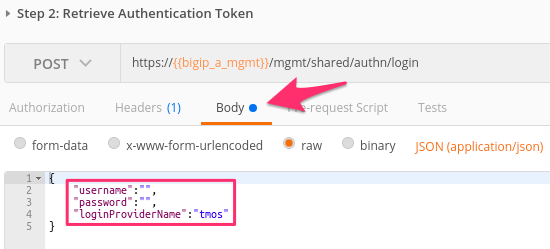
Modify the JSON Body and add the required credentials (
admin/Agility2020!). Then click the Send button.Examine the response status code. If authentication succeeded and a token was generated, the response will have a
200 OKstatus code. If the status code is401then check your credentials:Successful:

Unsuccessful:

Once you receive a
200 OKstatus code, examine the Response Body. The various attributes show the parameters assigned to the particular token. Find thetokenattribute and copy it into your clipboard (Ctrl + C) for use in the next step.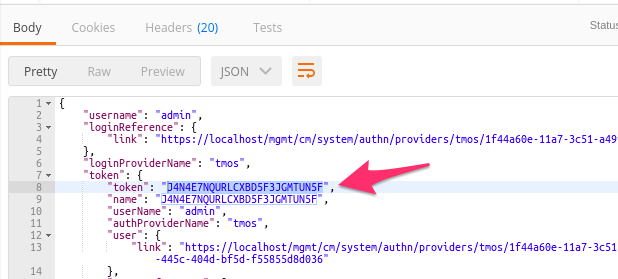
Click the
Step 3: Verify Authentication Worksitem in the Lab 1.2 Postman collection. Click the Headers tab and paste the token value copied above as the VALUE for theX-F5-Auth-Tokenheader. This header is required to be sent on all requests when using token-based authentication.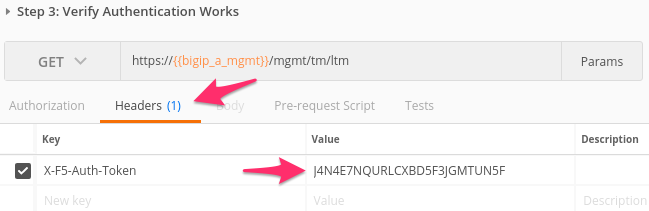
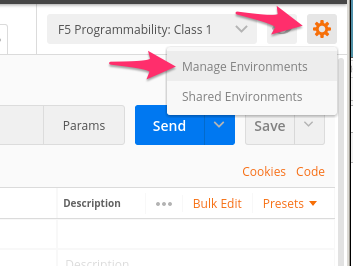
Click the Send button. If your request is successful, you should see a
200 OKstatus and a listing of theltmOrganizing Collection.We will now update your Postman environment to use this auth token for the remainder of the lab. Click the Environment menu in the top right of the Postman window and click Manage Environments:
Click the
F5 Programmability: Class 1item: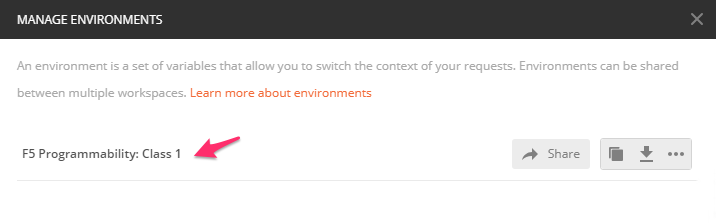
Update the value for
bigip_a_auth_tokenby Pasting (Ctrl + V) in your auth token:
Click the
Updatebutton and then close the Manage Environments window. Because the subsequent requests refer to the{{bigip_a_auth_token}}variable, you will not have to set the token in the header of the following requests.Click the
Step 4: Set Authentication Token Timeoutitem in the Lab 1.2 Postman folder. This request willPATCHyour token Resource (notice the URI) and update the timeout attribute so we can complete the lab easily. Examine the request type and JSON Body and then click the Send button. Verify that the timeout has been changed to36000in the response: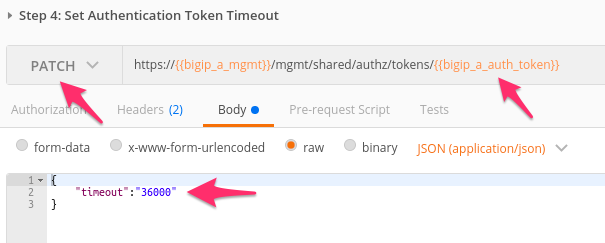
Task 4 - Get a pool example Template
In order to assist with REST API interactions, you can request a template of the various attributes of a Resource type in a Collection. This template can then be used as the body of a POST, PUT or PATCH request as needed.
Perform the following steps:
Click the
Step 5: Get `example` of a Pool Resourceitem in the Lab 1.2 Postman collection.Examine the URI. Notice the addition of
exampleat the end of the collection name:
Click Send and examine the FULL response. You will see descriptions and then all the attributes for the Pool resource type. The response also shows the default values for the attributes if applicable: