Planning for VELOS Guide Source |
Deploying a Tenant
Tenant Image Types
Tenant images for F5OS are available on downloads.f5.com. VELOS allows different packaging options for tenant images. It will be up to administrators to choose the image that is best suited for their environment. The main differences between the image types will be how much space they can consume on disk, and whether they allow in place upgrades. VELOS only supports specific TMOS releases: versions 14.1.4 and later, 15.1.4 and later, and 17.1.x and later are supported. There is no plan to support v16.0, 16.1, or 17.0 tenants. Tenant images for VELOS can be found on downloads.f5.com.
Select BIG-IP for Group, the Product Line, and the version of software you want to run as seen below.

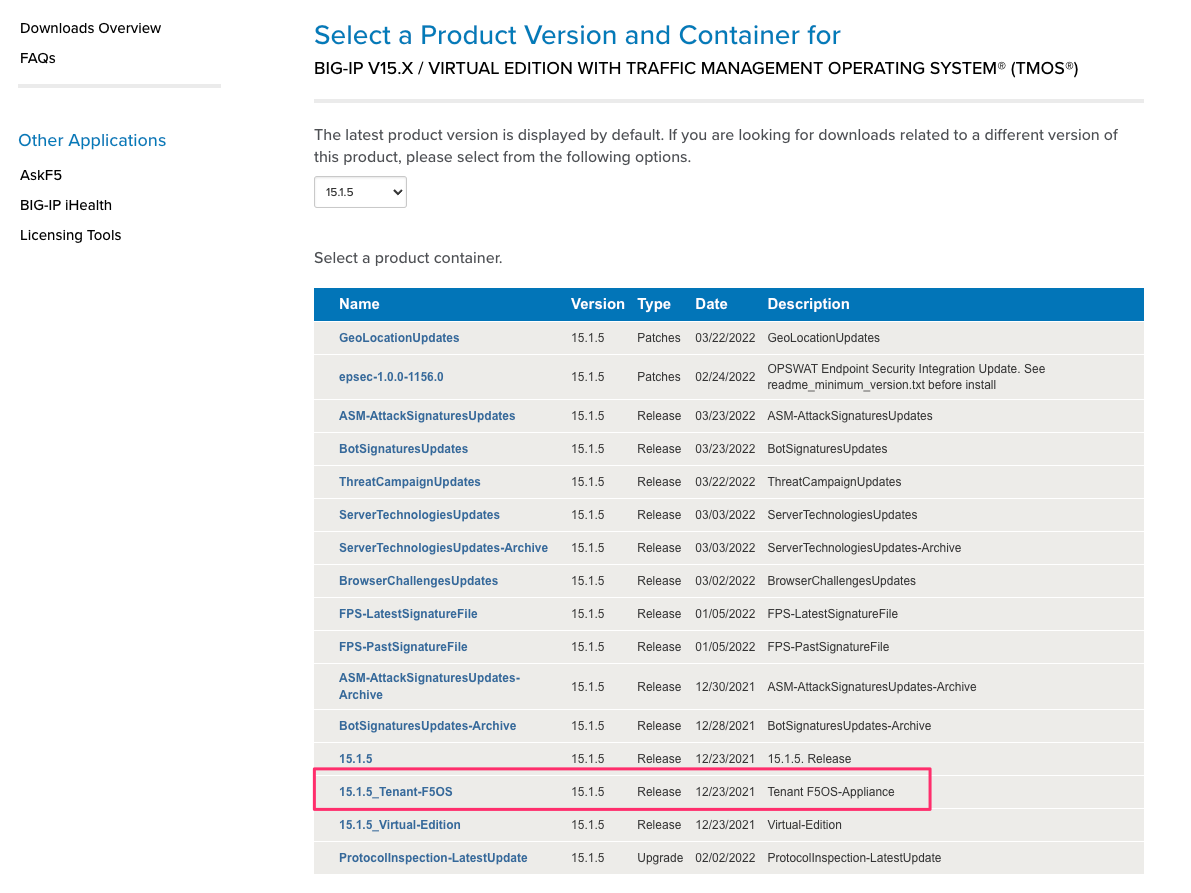
Choose the specific BIG-IP version you wish to download, to get access to the F5OS supported tenant images. Ensure you choose the option that is labeled specifically for F5OS Tenant. As an example, 17.1.2.1_Tenant-F5OS:

There are 4 different types of tenant images to choose from (ALL, T1, T2, T4) as seen below; please read the rest of this section to determine the best image type for your environment:

The T1-F5OS image type should be used with extreme caution. It is the smallest of the image sizes, but it only has one slot/volume for TMOS software, meaning it does not support upgrades (not even for hotfixes). This type of image is geared toward more modern environments where pave and nuke strategies are preferred over in-place upgrades.
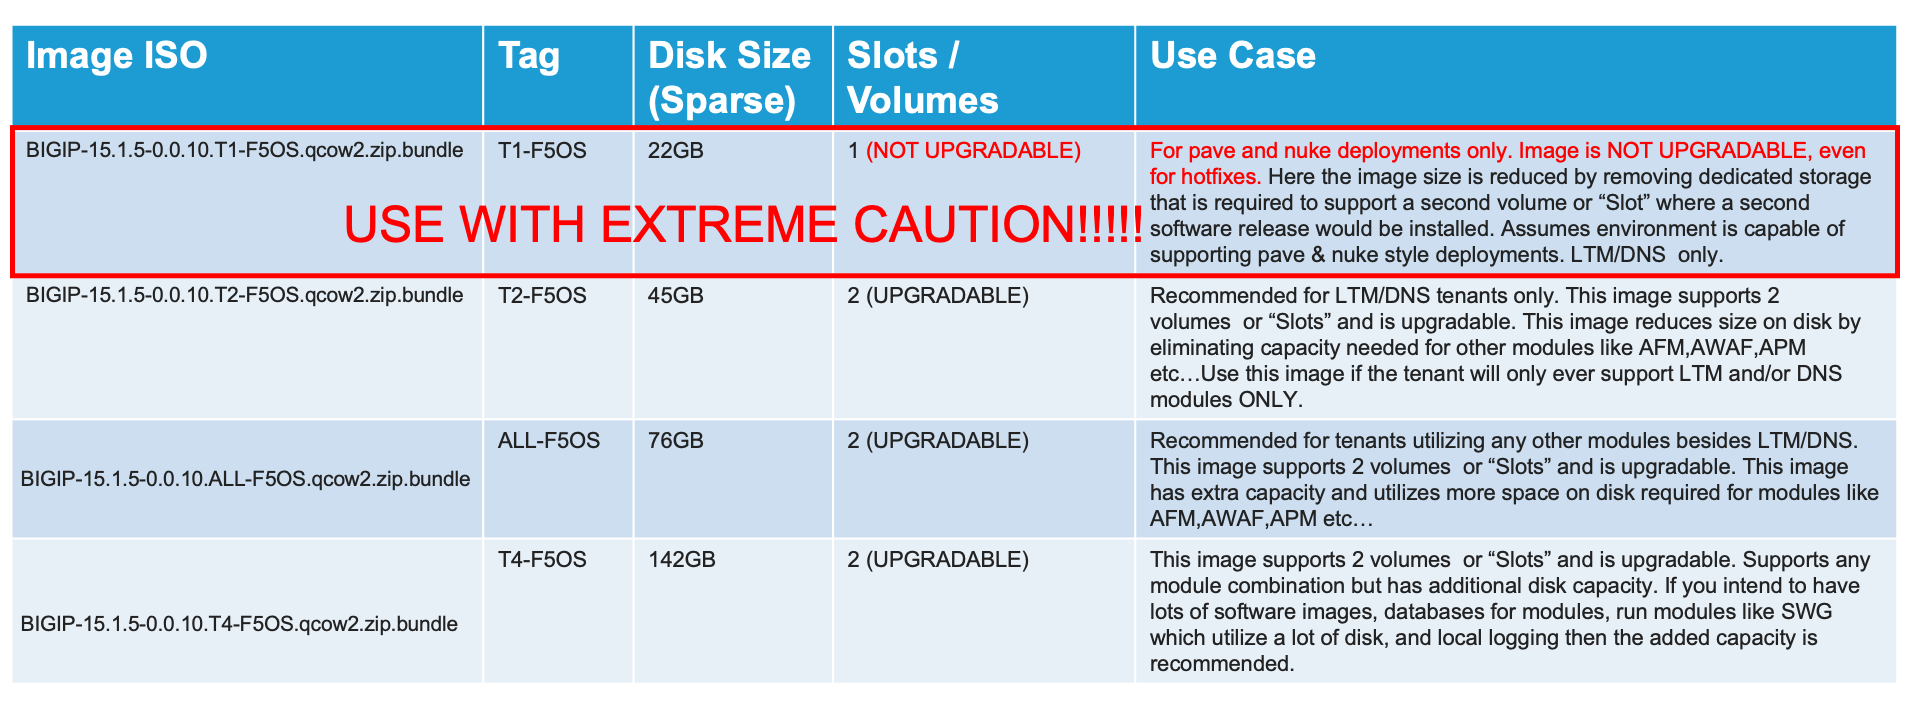
The remaining images (T2, ALL, T4) all support in place upgrades; however, they may limit the amount of disk space that can be used by the tenant. If more disk space is needed by the tenant in the future, the tenant can be moved to provisioned state and the disk can be expanded. There is no ability to decrease the disk space, so starting smaller and increasing will ensure there is adequate disk space for many tenants.
The T2-F5OS image is intended for a tenant that will run LTM and / or DNS only; it is not suitable for tenants needing other modules provisioned (AVR may be an exception). This type of image is best suited in a high-density tenant environment where the number of tenants is going to be high per blade and using minimum CPU resources (1 or 2 vCPUs per tenant). You may want to limit the amount of disk space each tenant can use as a means of ensuring the file system on the blade does not become full. As an example, there is 1TB of disk per blade, and 22 tenants each using the 142GB T4 image would lead to an over provisioning situation. Because tenants are deployed in sparse mode which allows over provisioning, this may not be an issue initially but could become a problem later in the tenant’s lifespan as it writes more data to disk. To keep the tenants in check, you can deploy smaller T2 images, which can consume 45GB each. LTM/DNS deployments use much less disk than other BIG-IP modules, which do extensive local logging and utilize databases on disk.
The All-F5OS image is suitable for any module configuration and supports a maximum of 76GB for the tenant. It is expected that the number of tenants per blade would be much less, as the module combinations that drive the need for more disk space typically require more CPU/memory, which will artificially reduce the tenant count per blade. Having a handful of 76GB or 156GB images per blade should not lead to an out of space condition. There are some environments where some tenants may need more disk space and the T4 image can provide for that. It may be best to default using the T4 image as that is essentially the default size for vCMP deployments today.
The T4-VELOS image also supports any module combination but has additional disk capacity. If you intend to have a lot of software images, databases for modules, run modules like SWG which utilize a lot of disk space, and local logging, then the added capacity is recommended. More detail on the image types can be found in the following solution article.
K45191957: Overview of the BIG-IP tenant image types
Note that the image sizes in the chart are the default amount of space a tenant could use, not necessarily what it will consume on the physical disk. rSeries tenants are deployed in sparse mode on the file system when they are created. That means that a tenant may think it has a certain amount of disk space, but most of the space that is unutilized is zeroed out and not consuming any space on the disk.
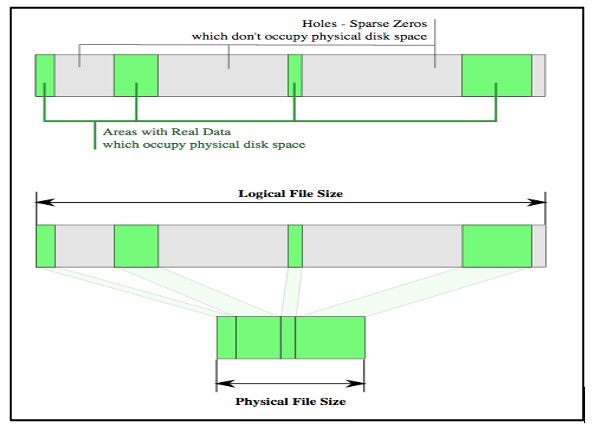
This means the disk consumption on the rSeries disk is much smaller than what appears inside the tenant. In the example below the tenant believes it has 77GB of disk allocated:
However, the 76GB image is allocated in a sparse manner meaning the tenant is only utilizing what it needs and on the filesystem of the appliance it is consuming only 6.4GB on the disk. You can confirm this by logging into the bash shell of F5OS as root. Then listing the contents of the directory /var/F5/system/cbip-disks, here you will see directories for each tenant. Enter the command ls -lsh <tenant-directory-name> and the output will show the size the tenant thinks it has (76GB) and the actual size used on disk (in this case 6.4GB).
This is analogous to thin provisioning in a hypervisor where you can over-allocate resources. vCMP as an example today uses an image similar in size to the T4-F5OS image. There may be rare instances where a tenant running in production for a long time can end up with a lot of extra space consumed on disk. This could be due to many in-place software upgrades, local logging, core files, database use etc… There is no utility available to reclaim that space that may have been used at one point but is no longer used. If the disk utilization becomes over-utilized, you could back up the tenant configuration, create a new fresh tenant, and restore the configuration from the old tenant, and then delete the old tenant. This would free up all the unused space again.
The Dashboard in the chassis partition webUI has been enhanced in F5OS-A 1.8.0 to provide more visibility into the tenants usage of disk vs. what they think they have available to them.

There is also more granularity showing Storage Utilization. In the below example, you can see that F5OS has utilized 6% of the 667.7GB of disk it has dedicated. This is the space shared by all BIG-IP Tenants virtual disks and F5OS. It is important to remember that TMOS based BIG-IP virtual disks utilize thin provisioning, so the TMOS tenant may think it has more storage but in reality, it is using much less capacity on the physical disk. You can see this by the BIG-IP Tenant utilizations. In the output below, there are two BIG-IP tenants (pub & test). Both have been allocated 82GB of disk, however the actual size on disk is much lower (~6-7GB each).

You may also view the storage utilization from the F5OS CLI using the command show components in the chassis partition CLI.
green-partition-chassis1-gsa-1# show components
components component blade-1
state serial-no      bld424551s
state part-no        "400-0086-02 REV 2"
state empty          false
state tpm-integrity-status Valid
state memory total    134734053376
state memory available 21912211456
state memory free     12608843776
state memory used-percent 83
state memory platform-total 26843971584
state memory platform-used 4496158720
state memory platform-used-percent 16
state temperature current 24.0
state temperature average 26.2
state temperature minimum 24.0
state temperature maximum 28.0
                                                                        USED
AREA              CATEGORY       TOTAL         FREE          USED         PERCENT
-----------------------------------------------------------------------------------
platform/sysroot  F5OS System    716948684800  639131893760  41374162944  6
tenant/pubtest    BIG-IP Tenant  88046829568   80455331840   7591497728   8
tenant/test       BIG-IP Tenant  88046829568   80451829760   7594999808   8

                                                                            UPDATE
NAME                       VALUE                              CONFIGURABLE  STATUS
------------------------------------------------------------------------------------
QAT0                       Lewisburg C62X Crypto/Compression  false         -
QAT1                       Lewisburg C62X Crypto/Compression  false         -
QAT2                       Lewisburg C62X Crypto/Compression  false         -
fw-version-bios            3.00.222.1                         false         none
fw-version-bios-me         4.0.4.736                          false         none
fw-version-cpld            05.04.00                           false         none
fw-version-drives-nvme0n1  EDA7602Q                           false         none
fw-version-lop-app         2.00.1100.0.1                      false         none
fw-version-lop-bootloader  1.02.868.0.1                       false         none
fw-version-sirr            1.1.58                             false         none

storage state disks disk nvme0n1
state model "SAMSUNG MZ1LB960HAJQ-00007"
state vendor Samsung
state version EDA7602Q
state serial-no S435NE0MA00227
state size 683.00GB
state type nvme
state disk-io total-iops 0
state disk-io read-iops 361436
state disk-io read-merged 0
state disk-io read-bytes 9558739968
state disk-io read-latency-ms 62243
state disk-io write-iops 275355559
state disk-io write-merged 277744138
state disk-io write-bytes 2711079364608
state disk-io write-latency-ms 16461804
cpu state cpu-utilization thread cpu
cpu state cpu-utilization current 3
cpu state cpu-utilization five-second-avg 4
cpu state cpu-utilization one-minute-avg 5
cpu state cpu-utilization five-minute-avg 5
cpu state cpu-utilization used-by ""
CPU               CORE                           THREAD
INDEX  CACHESIZE  CNT   FREQ           STEPPING  CNT     MODELNAME
--------------------------------------------------------------------------------------------------
0      19712(KB)  14    2053.540(MHz)  4         28      Intel(R) Xeon(R) D-2177NT CPU @ 1.90GHz

                        FIVE    ONE     FIVE
THREAD                   SECOND  MINUTE  MINUTE
INDEX   THREAD  CURRENT  AVG     AVG     AVG     USED BY
------------------------------------------------------------------
0       cpu0    2        4       8       8       test
1       cpu1    4        4       3       4       F5OS
2       cpu2    4        3       3       3       F5OS
3       cpu3    10       9       9       8       test
4       cpu4    2        3       3       3       F5OS
5       cpu5    2        2       3       3       F5OS
6       cpu6    4        4       3       3       F5OS
7       cpu7    4        2       3       3       F5OS
8       cpu8    2        2       3       3       F5OS
9       cpu9    4        3       3       3       F5OS
10      cpu10   1        2       3       3       F5OS
11      cpu11   4        5       6       6       F5OS Data Mover
12      cpu12   5        6       6       6       F5OS Data Mover
13      cpu13   7        7       6       6       F5OS Data Mover
14      cpu14   11       9       9       9       test
15      cpu15   2        2       5       5       F5OS
16      cpu16   1        1       3       4       F5OS
17      cpu17   2        8       9       11      test
18      cpu18   1        2       5       4       F5OS
19      cpu19   1        2       4       3       F5OS
20      cpu20   0        1       5       3       F5OS
21      cpu21   0        1       5       4       F5OS
22      cpu22   0        1       3       3       F5OS
23      cpu23   1        3       3       5       F5OS
24      cpu24   1        3       5       5       F5OS
25      cpu25   3        6       7       7       F5OS Dedicated
26      cpu26   3        7       7       8       F5OS Dedicated
27      cpu27   13       14      8       8       F5OS Dedicated

FPGA                            NUM  NUM
INDEX   VERSION  ID  SLOT  DID  DMS  SEPS
-------------------------------------------
atse_0  7.10.6   0   1     15   3    64
vqf_0   8.10.0

SOFTWARE INDEX      VERSION
---------------------------------
blade-os            1.8.0-19782
partition-services  1.8.0-19782

green-partition-chassis1-gsa-1#
Tenant Deployments
Tenants can easily be deployed via the F5OS CLI, webUI, or API.
Tenant Deployment via CLI
Uploading a Tenant Image via CLI
Tenant software images are loaded directly into the F5OS chassis partition layer. VELOS only supports specific TMOS releases: initially versions 14.1.4 and later, 15.1.4 and later were supported, but they are now End of Software Support. Currently versions 17.1.x and later are supported. There are no plans to support v16.0, 16.1, or 17.0 tenants. Tenant images for VELOS can be found on downloads.f5.com. No other TMOS versions are supported other than hotfixes or rollups based on those supported versions of software, and upgrades to newer versions happen within the tenant itself, not in the F5OS layer. The images inside F5OS are for initial deployment of tenants only. Supported software versions are constantly updated here:
K86001294: F5OS hardware/software support matrix
Before deploying any tenant, you must ensure you have a proper tenant software release loaded into the F5OS chassis partition layer. If an HTTPS/SCP/SFTP server is not available, you may upload a tenant image using scp directly to the F5OS platform layer. Simply SCP an image to the out-of-band management IP address using the admin account and a path of IMAGES. There are also other upload options available in the webUI (Upload from Browser) or API (HTTPS/SCP/SFTP). Below is an example of using SCP from a remote client to the IP address of the VELOS chassis partition.
prompt % scp -O BIGIP-15.1.10.6-0.0.6.ALL-F5OS.qcow2.zip.bundle admin@10.10.10.13:IMAGES
BIGIP-15.1.10.6-0.0.6.ALL-F5OS.qcow2.zip.bundle                                                                                                    100% 2215MB   5.7MB/s   06:29
prompt%
You may also import the tenant image file from the F5OS CLI. Use the file import command to get the tenant image file from a remote HTTPS server or from a remote server over SCP or SFTP. Below is an example of importing from a remote HTTPS server. Note the target directory should be images/tenant:
Production1# file import remote-host 10..10.10.142 remote-file /upload/BIGIP-15.1.4-0.0.47.ALL-VELOS.qcow2.zip.bundle local-file images/tenant/BIGIP-15.1.4-0.0.47.ALL-VELOS.qcow2.zip.bundle username corpuser insecure
Value for 'password' (<string>): ********
result File transfer is initiated.(images/tenant/BIGIP-15.1.4-0.0.47.ALL-VELOS.qcow2.zip.bundle)
If a remote HTTPS server is not available, you may also import the file from the CLI over SCP by adding the protocol scp option to the command line:
Production1# file import remote-host 10..10.10.142 remote-file /var/www/server/1/upload/BIGIP-15.1.4-0.0.47.ALL-VELOS.qcow2.zip.bundle local-file images/tenant/BIGIP-15.1.4-0.0.47.ALL-VELOS.qcow2.zip.bundle username root insecure protocol scp
Value for 'password' (<string>): ********
result File transfer is initiated.(images/tenant/BIGIP-15.1.4-0.0.47.ALL-VELOS.qcow2.zip.bundle)
The command show file transfer-operations will provide details of the transfer progress and any errors:
Production1# file import remote-host 10..10.10.142 remote-file /var/www/server/1/upload/BIGIP-15.1.4-0.0.47.ALL-VELOS.qcow2.zip.bundle local-file images/tenant/BIGIP-15.1.4-0.0.47.ALL-VELOS.qcow2.zip.bundle username root insecure protocol scp
Value for 'password' (<string>): ********
result File transfer is initiated.(images/tenant/BIGIP-15.1.4-0.0.47.ALL-VELOS.qcow2.zip.bundle)
Below is an example of the show file transfer-operations command.
Production-1# show file transfer-operations
file transfer-operations transfer-operation "" "" "" "" ""
status    "    HTTP Error 302"
timestamp "Wed Apr 26 15:53:38 2023"
file transfer-operations transfer-operation images/BIG-IP-Next-0.13.0-2.13.6.tar.bundle artifactory.f5net.com artifactory/f5-mbip-generic/releases/0.13.0/test-candidate/2.13.6/velos/BIG-IP-Next-0.13.0-2.13.6.tar.bundle "Import file" "HTTPS   "
status    "         Completed"
timestamp "Fri Apr 14 03:08:44 2023"
file transfer-operations transfer-operation images/BIG-IP-Next-0.14.0-2.29.0.tar.bundle sea.artifactory.f5net.com artifactory/f5-mbip-generic/releases/0.14.0/test-candidate/2.29.0/velos/BIG-IP-Next-0.14.0-2.29.0.tar.bundle "Import file" "HTTPS   "
status    "         Completed"
timestamp "Tue May 16 02:56:59 2023"
file transfer-operations transfer-operation images/BIG-IP-Next-0.14.0-2.45.3+0.0.12.tar.bundle artifactory.f5net.com artifactory/f5-mbip-generic/releases/0.14.0/release-candidate/2.45.3+0.0.12/velos/BIG-IP-Next-0.14.0-2.45.3+0.0.12.tar.bundle "Import file" "HTTPS   "
status    "         Completed"
timestamp "Thu Jun  8 13:42:22 2023"
file transfer-operations transfer-operation images/BIG-IP-Next-0.14.0-2.45.3+0.0.12.tgz.512.sig artifactory.f5net.com artifactory/f5-mbip-generic/releases/0.14.0/release-candidate/2.45.3+0.0.12/ve-upgrade/BIG-IP-Next-0.14.0-2.45.3+0.0.12.tgz.512.sig "Import file" "HTTPS   "
status    "         Completed"
timestamp "Thu Jun  8 13:38:55 2023"
file transfer-operations transfer-operation images/BIG-IP-Next-0.14.0-2.45.3+0.0.24.tar.bundle artifactory.f5net.com artifactory/f5-mbip-generic/releases/0.14.0/release-candidate/2.45.3+0.0.24/velos/BIG-IP-Next-0.14.0-2.45.3+0.0.24.tar.bundle "Import file" "HTTPS   "
status    "         Completed"
timestamp "Wed Jun 21 19:33:45 2023"
file transfer-operations transfer-operation images/BIG-IP-Next-0.15.0-2.94.0+0.0.1.tar.bundle sea.artifactory.f5net.com artifactory/f5-mbip-generic/releases/0.15.0/test-candidate/2.94.0+0.0.1/velos/BIG-IP-Next-0.15.0-2.94.0+0.0.1.tar.bundle "Import file" "HTTPS   "
status    "         Completed"
timestamp "Fri Jul 14 16:56:37 2023"
file transfer-operations transfer-operation images/BIG-IP-Next-0.15.0-2.94.0+0.0.3.tar.bundle artifactory.f5net.com artifactory/f5-mbip-generic/releases/0.15.0/test-candidate/2.94.0+0.0.3/velos/BIG-IP-Next-0.15.0-2.94.0+0.0.3.tar.bundle "Import file" "HTTPS   "
status    "         Completed"
timestamp "Wed Jul 19 19:48:46 2023"
file transfer-operations transfer-operation images/BIGIP-15.1.6.1-0.0.10.ALL-F5OS.qcow2.zip.bundle spkapexsrvc01.olympus.f5net.com v15.1.6.1/daily/build10.0/VM/BIGIP-15.1.6.1-0.0.10.ALL-F5OS.qcow2.zip.bundle "Import file" "HTTPS   "
status    "         Completed"
timestamp "Wed May  3 14:07:22 2023"
file transfer-operations transfer-operation images/BIGIP-17.1.0.1-0.0.2.ALL-F5OS.qcow2.zip.bundle nibs.olympus.f5net.com build/bigip/v17.1.0.1/daily/build2.0/VM/BIGIP-17.1.0.1-0.0.2.ALL-F5OS.qcow2.zip.bundle "Import file" "HTTPS   "
status    "    HTTP Error 302"
timestamp "Wed Apr 26 15:53:38 2023"
Production-1#
You can view the current tenant images and their status in the F5OS CLI by using the show images command:
green-partition-chassis1-gsa-1# show images
                                                IN
NAME                                             USE    TYPE                STATUS
----------------------------------------------------------------------------------------
BIG-IP-Next-20.3.0-2.716.2+0.0.50                false  helm-image          replicated
BIG-IP-Next-20.3.0-2.716.2+0.0.50.tar.bundle     false  helm-bundle         replicated
BIG-IP-Next-20.3.0-2.716.2+0.0.50.yaml           false  helm-specification  replicated
BIGIP-15.1.10.6-0.0.6.ALL-F5OS.qcow2.zip.bundle  false  vm-image            replicated
BIGIP-17.1.1.4-0.0.9.ALL-F5OS.qcow2.zip.bundle   true   vm-image            replicated

green-partition-chassis1-gsa-1#
Creating a Tenant via CLI
Tenant lifecycle can be fully managed via the CLI using the tenants command in config mode on the chassis partition. Using command tab completion and question marks will help display all the tenant options. Enter config mode and enter the command tenants tenant <tenant-name> where <tenant-name> is the name of the tenant you would like to create. This will put you into a mode for that tenant and you will be prompted for some basic information to create the tenant via a CLI wizard. After answering basic information you may configure additional tenant parameters by entering config ? within the tenant mode, and that will provide all the additional configuration options:
green-partition-chassis1-gsa-1(config)# tenants tenant tenant2
Value for 'config image' (<A file name accepts alphanumeric and any of
'( ) + - . _' characters>): BIGIP-17.1.1.4-0.0.9.ALL-F5OS.qcow2.zip.bundle
Value for 'config nodes' (list): 1
Value for 'config mgmt-ip' (<IP address>): 172.22.50.26
Value for 'config prefix-length' (<unsignedByte, 0 .. 128>): 26
Value for 'config gateway' (<IP address>): 172.22.50.62
green-partition-chassis1-gsa-1(config-tenant-tenant2)#
When you are inside the tenant mode you can enter each configuration item one line at a time using tab completion and question mark for help.
green-partition-chassis1-gsa-1(config-tenant-tenant2)# config ?
    Possible completions:
    appliance-mode           Appliance mode can be enabled/disabled at tenant level
    cryptos                  Enable crypto devices for the tenant.
    dag-ipv6-prefix-length   Tenant default value of IPv6 networking mask used by disaggregator algorithms
    gateway                  User-specified gateway for the tenant static mgmt-ip.
    image                    User-specified image for tenant.
    mac-data
    memory                   User-specified memory in MBs for the tenant.
    mgmt-ip                  User-specified mgmt-ip for the tenant management access.
    mgmt-vlan                Mgmt-vlan for tenant mgmt.
    nodes                    User-specified node-number(s) in the partition to schedule the tenant.
    prefix-length            User-specified prefix-length for the tenant static mgmt-ip.
    running-state            User-specified desired state for the tenant.
    storage                  User-specified storage information
    tenant-auth-support      Security can be enabled/disabled when tenant is Not in deployed state.
    type                     Tenant type.
    vcpu-cores-per-node      User-specified number of logical cpu cores for the tenant.
    virtual-wires            User-specified virtual-wires from virtual-wire table for the tenant.
    vlans                    User-specified vlan-id from vlan table for the tenant.
green-partition-chassis1-gsa-1(config-tenant-tenant2)# config cryptos enabled
green-partition-chassis1-gsa-1(config-tenant-tenant2)# config vcpu-cores-per-node 4
green-partition-chassis1-gsa-1(config-tenant-tenant2)# config type BIG-IP
green-partition-chassis1-gsa-1(config-tenant-tenant2)# config nodes 2
green-partition-chassis1-gsa-1(config-tenant-tenant2)# config vlans 444
green-partition-chassis1-gsa-1(config-tenant-tenant2)# config vlans 500
green-partition-chassis1-gsa-1(config-tenant-tenant2)# config vlans 555
green-partition-chassis1-gsa-1(config-tenant-tenant2)# config storage size 76
green-partition-chassis1-gsa-1(config-tenant-tenant2)# config running-state deployed
green-partition-chassis1-gsa-1(config-tenant-tenant2)# config memory 14848
Any changes must be committed for them to be executed:
green-partition-chassis1-gsa-1(config-tenant-tenant2)# commit
You may also put all the parameters on one line:
green-partition-chassis1-gsa-1(config)# tenants tenant tenant2 config image BIGIP-17.1.1.4-0.0.9.ALL-F5OS.qcow2.zip.bundle vcpu-cores-per-node 2 nodes [ 1 ] vlans [ 500 501 ] mgmt-ip 172.22.50.26 prefix-length 26 gateway 172.22.50.62 running-state deployed
green-partition-chassis1-gsa-1(config-tenant-tenant2)# commit
Commit complete.
green-partition-chassis1-gsa-1(config-tenant-tenant2)#
Validating Tenant Status via CLI
After the tenant is created you can run the command show running-config tenant to see what has been configured:
green-partition-chassis1-gsa-1# show running-config tenants
tenants tenant tenant2
config type            BIG-IP
config image           BIGIP-17.1.1.4-0.0.9.ALL-F5OS.qcow2.zip.bundle
config nodes           [ 1 ]
config mgmt-ip         172.22.50.26
config prefix-length   26
config gateway         172.22.50.62
config dag-ipv6-prefix-length 128
config vlans           [ 500 501 ]
config cryptos         enabled
config tenant-auth-support disabled
config vcpu-cores-per-node 2
config memory          7680
config storage size 82
config running-state   deployed
config mac-data mac-block-size one
config appliance-mode disabled
!
tenants tenant test
config type            BIG-IP
config image           BIGIP-17.1.1.4-0.0.9.ALL-F5OS.qcow2.zip.bundle
config nodes           [ 1 ]
config mgmt-ip         1.1.1.1
config prefix-length   24
config gateway         1.1.1.254
config dag-ipv6-prefix-length 128
config vlans           [ 500 501 502 505 ]
config cryptos         enabled
config tenant-auth-support disabled
config vcpu-cores-per-node 4
config memory          14848
config storage size 82
config running-state   deployed
config mac-data mac-block-size one
config appliance-mode disabled
!
green-partition-chassis1-gsa-1#
To see the actual status of the tenants, issue the CLI command show tenants to see all tenants, or show tenants <tenant-name> to see a specific tenant.
green-partition-chassis1-gsa-1# show tenants
tenants tenant tenant2
state unit-key-hash    Acr0sZ2u40KnjsZn4oyPVduaGpoGyR0Ic7W4JIpeAh/O5coyP5AieQtr+Dm83CXYh3TQ+NdSDtXQcAOPUfq9rg==
state type             BIG-IP
state image            BIGIP-17.1.1.4-0.0.9.ALL-F5OS.qcow2.zip.bundle
state nodes            [ 1 ]
state mgmt-ip          172.22.50.26
state prefix-length    26
state gateway          172.22.50.62
state dag-ipv6-prefix-length 128
state vlans            [ 500 501 ]
state cryptos          enabled
state tenant-auth-support disabled
state vcpu-cores-per-node 2
state qat-vf-count     3
state memory           7680
state storage size 82
state running-state    deployed
state appliance-mode disabled
state feature-flags stats-stream-capable false
state status           Starting
state mgmt-vlan        untagged
state mgmt-vlan-accessible true
state mac-data base-mac 00:94:a1:8e:d0:1b
state mac-data mac-pool-size 1
MAC
-------------------
00:94:a1:8e:d0:1b

                INSTANCE  TENANT                                                 CREATION  READY          MGMT
NODE  POD NAME   ID        SLOT    PHASE                                          TIME      TIME   STATUS  MAC
-----------------------------------------------------------------------------------------------------------------
1     tenant2-1  1         1       Allocating resources to tenant is in progress                           -

tenants tenant test
state unit-key-hash    St+r6xYMD91UYzcIEzNr/5Wpvn/OkdujicZ2QTPIGhyI+e72yoF5zH/9VtcY6d6HDfVDVFTb1BQJirhx9HRdpQ==
state type             BIG-IP
state image            BIGIP-17.1.1.4-0.0.9.ALL-F5OS.qcow2.zip.bundle
state nodes            [ 1 ]
state mgmt-ip          1.1.1.1
state prefix-length    24
state gateway          1.1.1.254
state dag-ipv6-prefix-length 128
state vlans            [ 500 501 502 505 ]
state cryptos          enabled
state tenant-auth-support disabled
state vcpu-cores-per-node 4
state qat-vf-count     6
state memory           14848
state storage size 82
state running-state    deployed
state appliance-mode disabled
state feature-flags stats-stream-capable true
state status           Running
state primary-slot     1
state image-version    "BIG-IP 17.1.1.4 0.0.9"
state mgmt-vlan        untagged
state mgmt-vlan-accessible true
state mac-data base-mac 00:94:a1:8e:d0:1a
state mac-data mac-pool-size 1
MAC
-------------------
00:94:a1:8e:d0:1a

NODE  CPUS
---------------------
1     [ 3 17 14 0 ]

    POD     INSTANCE  TENANT
NODE  NAME    ID        SLOT    PHASE    CREATION TIME         READY TIME            STATUS                   MGMT MAC
---------------------------------------------------------------------------------------------------------------------------------
1     test-1  1         1       Running  2025-02-11T16:21:57Z  2025-02-11T16:22:39Z  Started tenant instance  1a:2c:74:87:82:f1

green-partition-chassis1-gsa-1#
Tenant Deployment via webUI
Uploading a Tenant Image via webUI
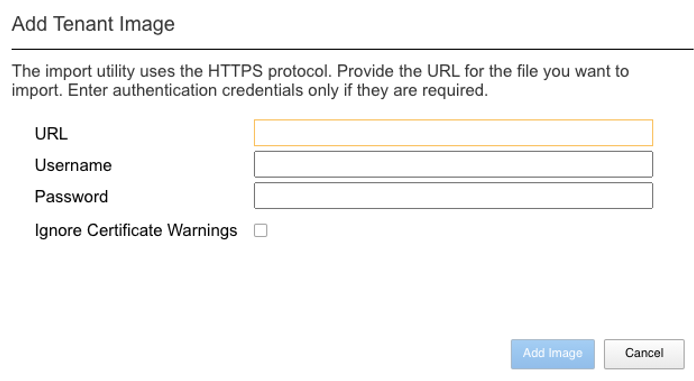
You can upload a tenant image via the webUI in two different places. The first is by going to the Tenant Management > Tenant Images page. Click the Add button and you will receive a pop-up asking for the URL of a remote HTTPS server with optional credentials, and the ability to ignore certificate warnings. There is also an option to upload directly from a computer via the browser using the Upload option.
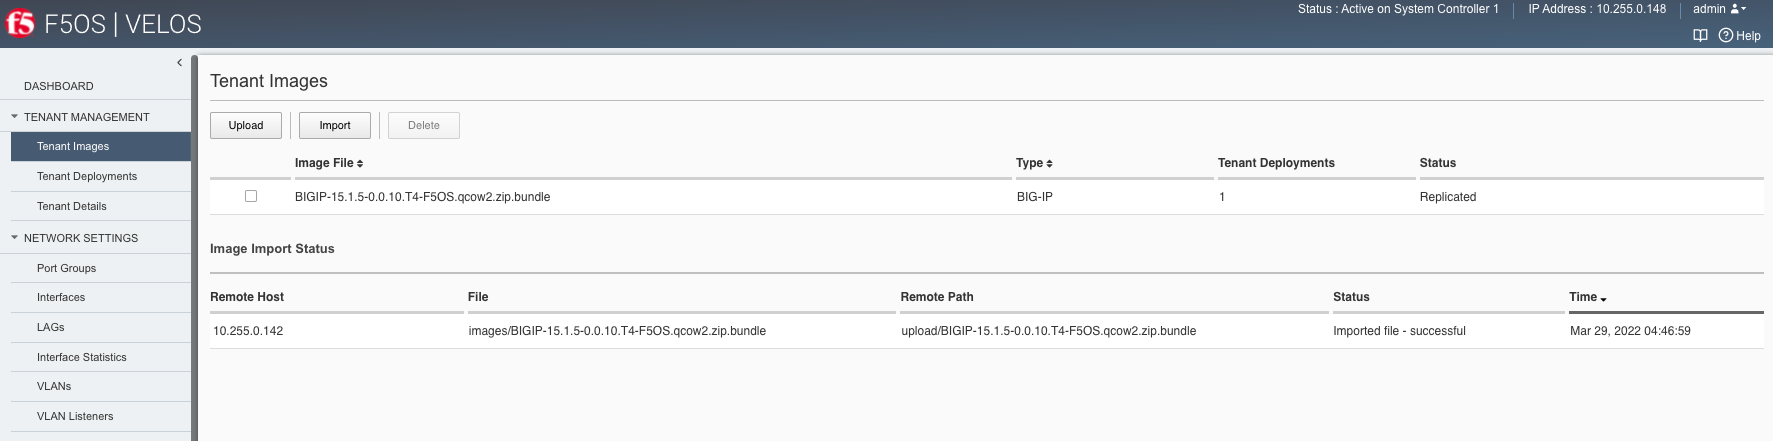
After the image is uploaded you need to wait until it shows Replicated status before deploying a tenant.
Alternatively, you can upload from the System Settings > File Utilities page, and then select the images directory from the drop-down list.

Creating a Tenant via webUI
You can deploy a tenant from the webUI using the Add button in the Tenant Management > Tenant Deployments screen.

The tenant deployment options are almost identical to deploying a vCMP guest, with a few minor differences. You’ll supply the tenant a name and choose the image for it to run. Next, you will pick what slots (blades) within the chassis partition you want the tenant to run on and assign an out-of-band management address, prefix, and gateway. There are Recommended and Advanced options for resource provisioning, Choosing Recommended will automatically adjust memory based on the vCPUs allocated to the tenant. Choosing Advanced will allow you to over-allocate memory which is something VIPRION did not support. You can choose different states (Configured, Provisioned, Deployed) just like vCMP, and there is an option to enable/disable hardware crypto acceleration (Enable is recommended). And finally, there is an option to enable Appliance mode which will disable root/bash access to the tenant.
Validating Tenant Status via webUI
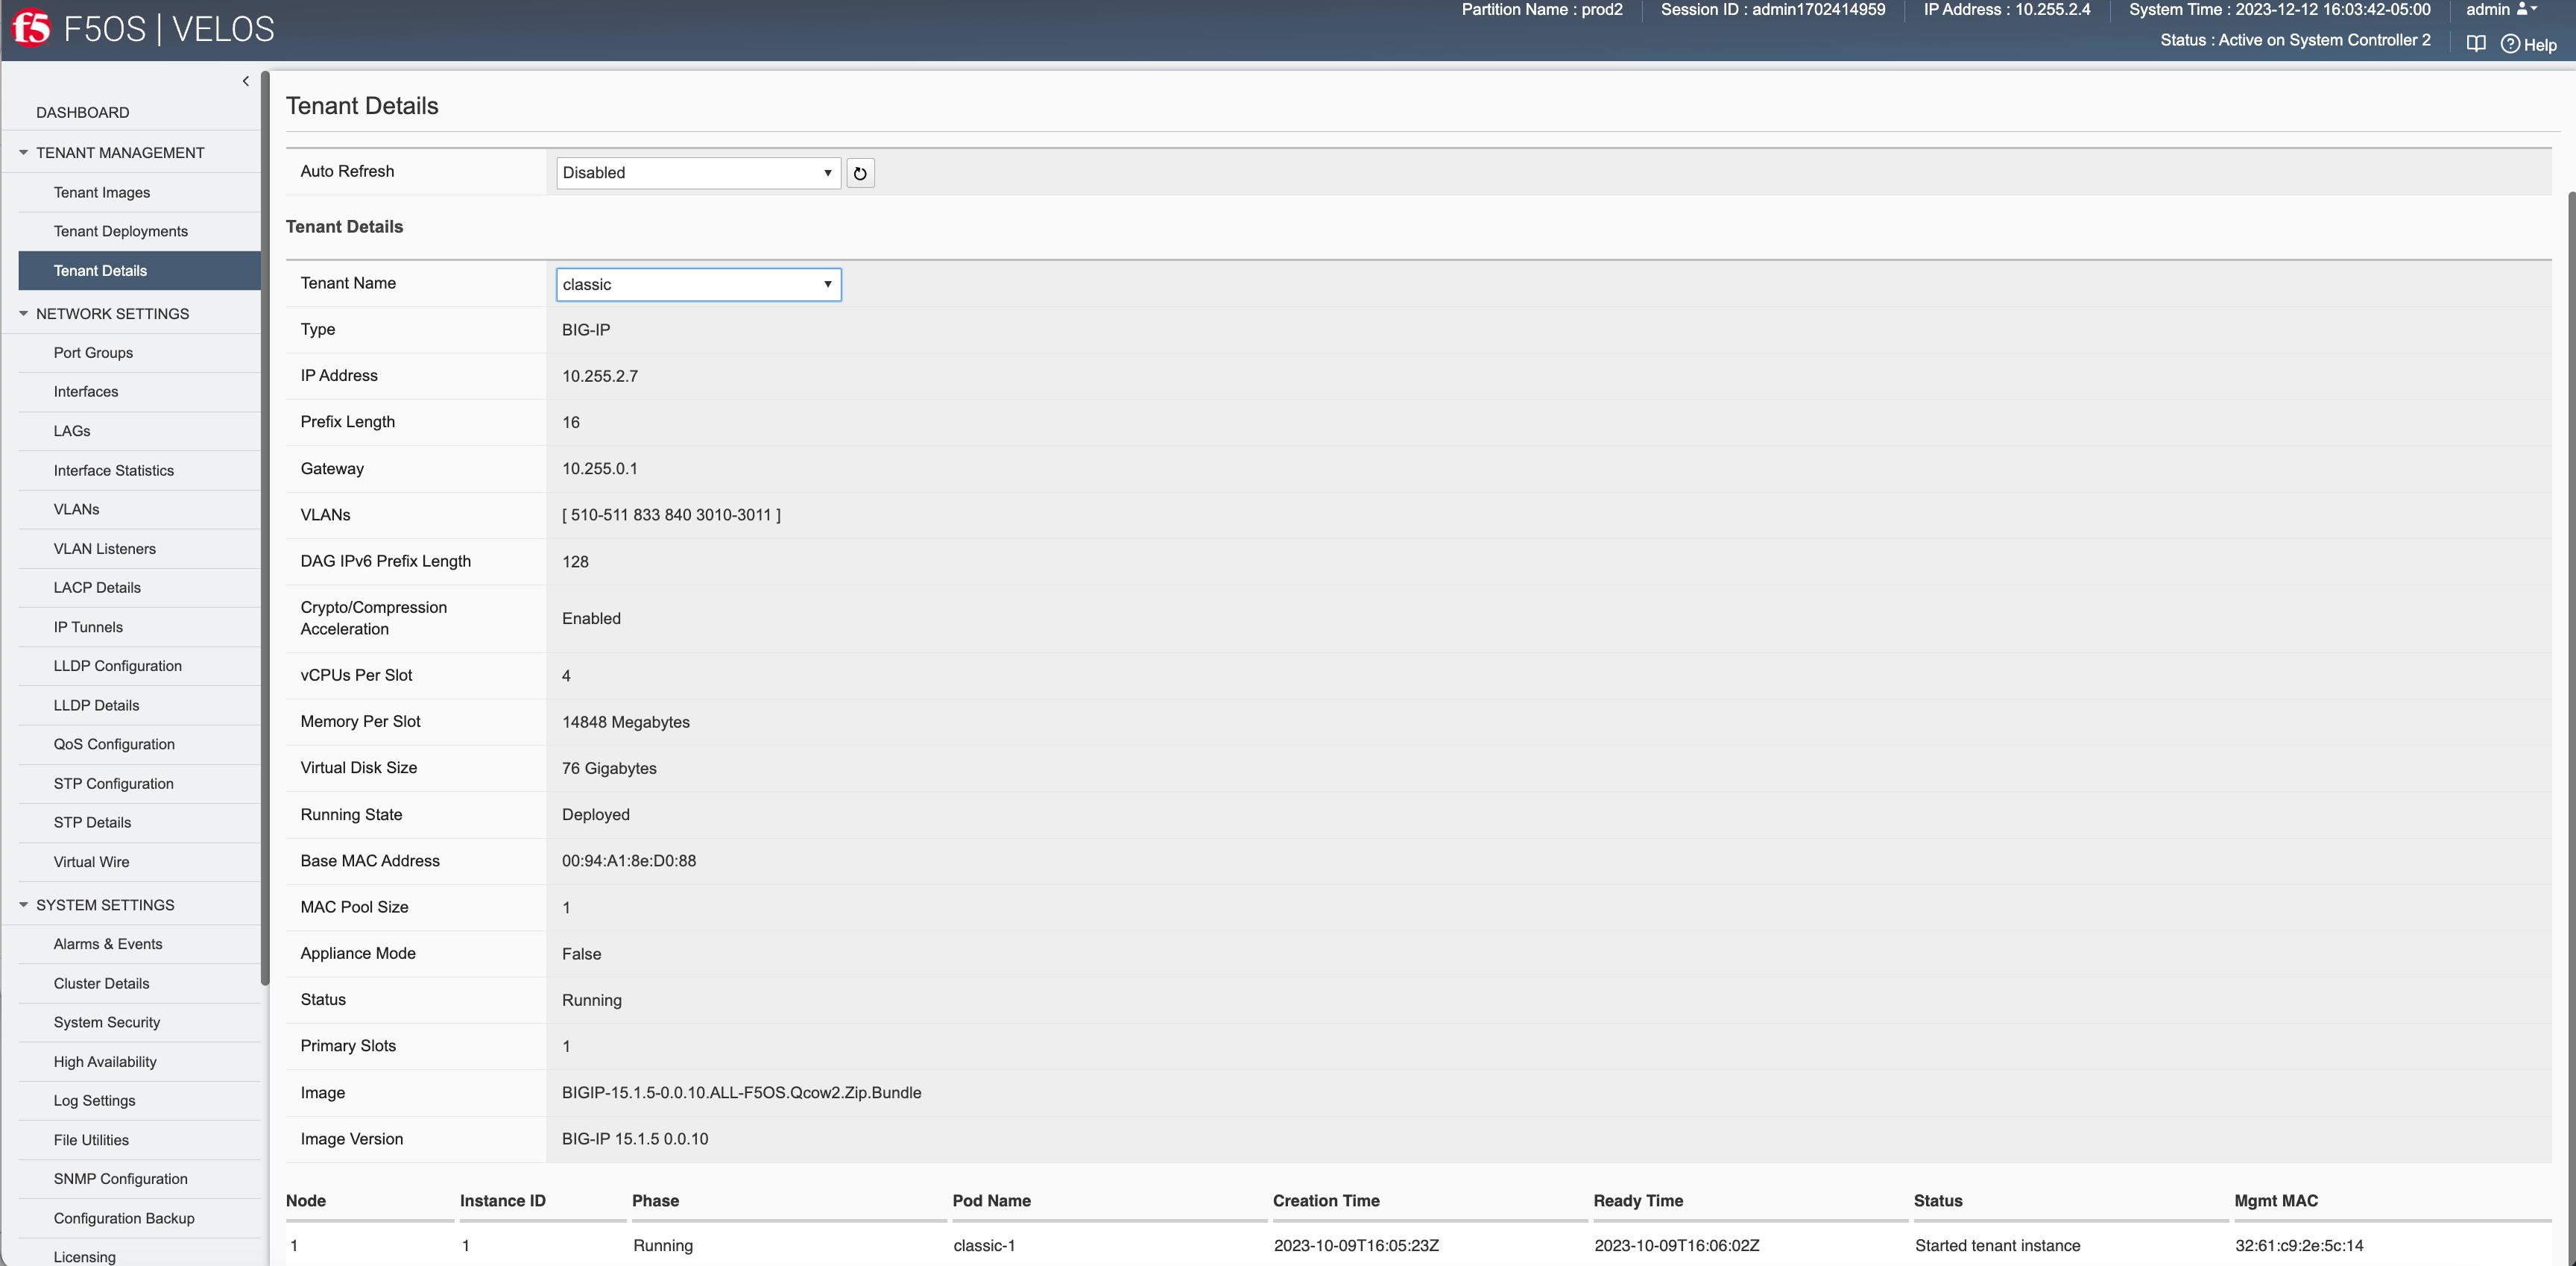
You can validate the current high-level status of a VELOS tenant in the webUI by clicking on the Tenant Management -> Tenant Deployments page. Here you can see the software version of the tenant (if it is running), as well as the high-level configuration for that tenant.

You can get further detail and status of the tenant by clicking on the Tenant Management -> Tenant Details page. If a tenant encountered an issue during startup, it would show details here, and sometimes hovering over the status will provide even more details.

Tenant Deployment via API
The VELOS tenant lifecycle is fully supported in the F5OS API. This section will cover common examples.
Loading Tenant Images from a Remote Server via API
To copy a tenant image into the chassis partition over the API, use the following API call to the chassis partition out-of-band management IP address. The example below copies a tenant image from a remote HTTPS server. You may also edit the API call to copy from remote SFTP or SCP servers by adding the proper protocol option.
POST https://{{velos_chassis1_chassis_partition1_ip}}:8888/api/data/f5-utils-file-transfer:file/import
In the body of the API request enter the following:
{
    "input": [
        {
            "remote-host": "10..10.10.142",
            "remote-file": "upload/{{Tenant_Image}}",
            "local-file": "images/{{Tenant_Image}}",
            "insecure": "",
            "f5-utils-file-transfer:username": "corpuser",
            "f5-utils-file-transfer:password": "Passw0rd!!"
        }
    ]
}
To list the current tenant images available on the chassis partition, use the following API Call:
GET https://{{velos_chassis1_chassis_partition1_ip}}:8888/restconf/data/f5-tenant-images:images
Below is output generated from the previous command:
{
    "f5-tenant-images:images": {
        "image": [
            {
                "name": "BIGIP-15.1.4-0.0.46.ALL-VELOS.qcow2.zip.bundle",
                "in-use": true,
                "status": "replicated"
            },
            {
                "name": "BIGIP-15.1.4-0.0.47.ALL-VELOS.qcow2.zip.bundle",
                "in-use": false,
                "status": "replicated"
            }
        ]
    }
}
Uploading Tenant Images from a Client Machine via the API
You can upload an F5OS tenant image from a client machine over the API. First you must obtain an upload-id using the following API call.
POST https://{{velos_chassis1_chassis_partition1_ip}}:8888/restconf/data/f5-utils-file-transfer:file/f5-file-upload-meta-data:upload/start-upload
In the body of the API call enter the size, name, and file-path as seen in the example below.
{
    "size":2239554028,
    "name": "BIGIP-15.1.10.1-0.0.9.ALL-F5OS.qcow2.zip.bundle",
    "file-path": "images/"
}
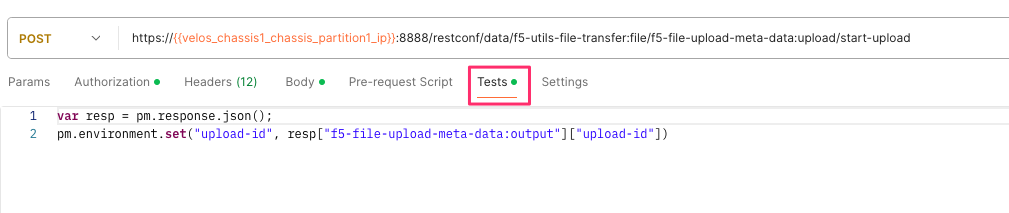
If you are using Postman, the API call above will generate an upload-id that will need to be captured so it can be used in the API call to upload the file. Below is an example of the code that should be added to the Test section of the API call so that the upload-id can be captured and saved to a variable called upload-id for subsequent API calls.
var resp = pm.response.json();
pm.environment.set("upload-id", resp["f5-file-upload-meta-data:output"]["upload-id"])
Below is an example of how this would appear inside the Postman interface under the Tests section.
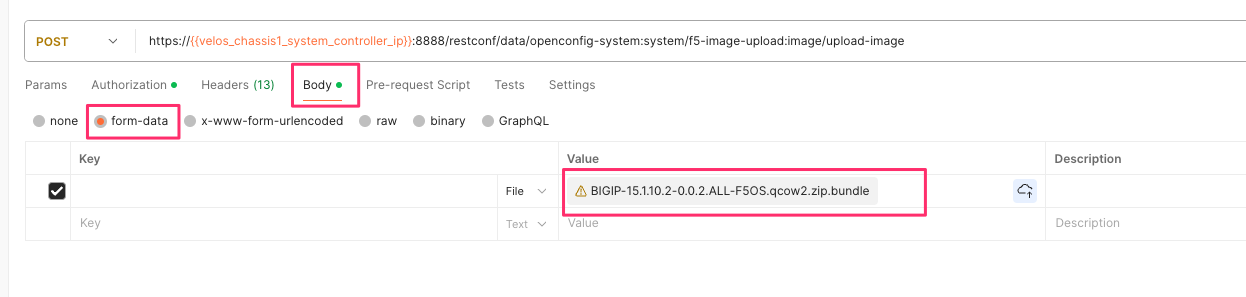
Once the upload-id is captured, you can then initiate a file upload of the F5OS TENANT_NAME image using the following API call.
POST https://{{velos_chassis1_chassis_partition1_ip}}:8888/restconf/data/openconfig-system:system/f5-image-upload:image/upload-image
In the body of the API call select form-data, and then in the Value section click Select Files and select the F5OS tenant image you want to upload as seen in the example below.
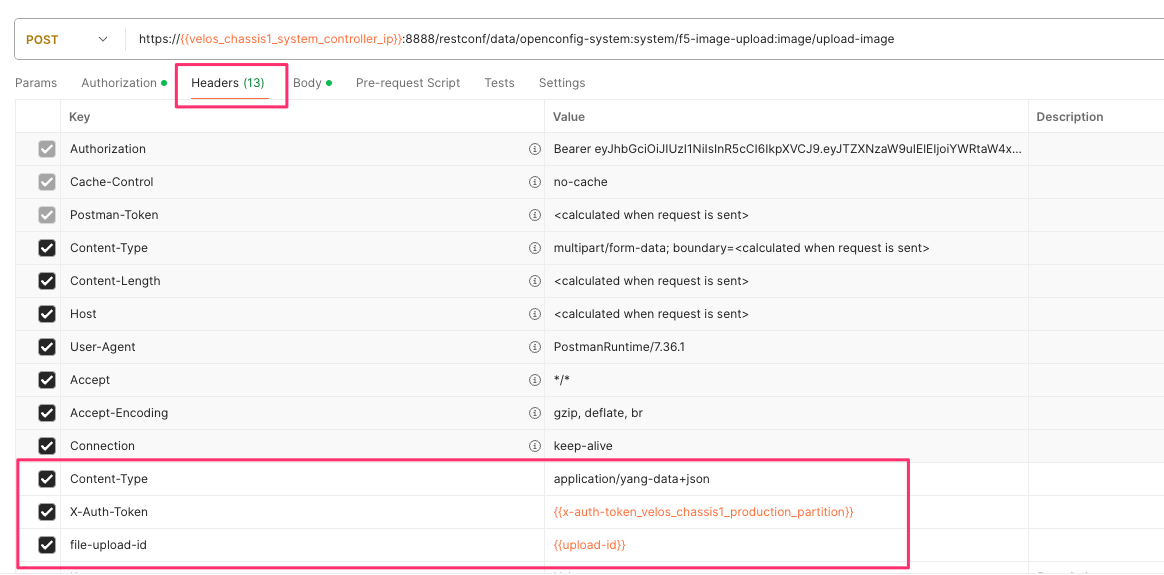
In the Headers section ensure you add the file-upload-id header, with the variable used to capture the id in the previous API call.
Creating a Tenant via API
Tenant creation via the API is as simple as defining the parameters below and sending the POST to the chassis partition.
POST https://{{velos_chassis1_chassis_partition1_ip}}:8888/restconf/data/f5-tenants:tenants
In the body of the API call enter the tenant details.
{
    "tenant": [
        {
            "name": "{{New_Tenant1_Name}}",
            "config": {
                "image": "{{Tenant_Image}}",
                "type": "BIG-IP",
                "nodes": [
                    1
                ],
                "mgmt-ip": "{{Chassis1_Tenant1_IP}}",
                "gateway": "{{OutofBand_DFGW}}",
                "prefix-length": 24,
                "vlans": [
                    3010,
                    501,
                    3011
                ],
                "vcpu-cores-per-node": 2,
                "memory": 7680,
                "cryptos": "enabled",
                "storage": {
                    "size": 76
                },
                "running-state": "deployed"
            }
        }
    ]
}
Validating Tenant Status via API
You can validate the status of all tenants within the chassis partition using the following API call.
GET https://{{velos_chassis1_chassis_partition1_ip}}:8888/restconf/data/f5-tenants:tenants
Below is an example output from a VELOS system:
{
    "f5-tenants:tenants": {
        "tenant": [
            {
                "name": "tenant1",
                "config": {
                    "name": "tenant1",
                    "type": "BIG-IP",
                    "image": "BIGIP-15.1.5-0.0.10.T4-F5OS.qcow2.zip.bundle",
                    "nodes": [
                        1
                    ],
                    "mgmt-ip": "10..10.10.149",
                    "prefix-length": 24,
                    "gateway": "10..10.10.1",
                    "vlans": [
                        501,
                        3010,
                        3011
                    ],
                    "cryptos": "enabled",
                    "tenant-auth-support": "disabled",
                    "vcpu-cores-per-node": 2,
                    "memory": "7680",
                    "storage": {
                        "size": 70
                    },
                    "running-state": "configured",
                    "appliance-mode": {
                        "enabled": false
                    }
                },
                "state": {
                    "name": "tenant1",
                    "unit-key-hash": "3LKG3f3UTbc5Talm3+D5uKodIC/LsO5w43m0n3EYHLOMEJM0E4E0Q27OK3WLWma4tBpY6Nu59i1m4HA+hR81hA==",
                    "type": "BIG-IP",
                    "image": "BIGIP-15.1.5-0.0.10.T4-F5OS.qcow2.zip.bundle",
                    "nodes": [
                        1
                    ],
                    "mgmt-ip": "10..10.10.149",
                    "prefix-length": 24,
                    "gateway": "10..10.10.1",
                    "mac-ndi-set": [
                        {
                            "ndi": "default",
                            "mac": "00:94:a1:8e:d0:09"
                        }
                    ],
                    "vlans": [
                        501,
                        3010,
                        3011
                    ],
                    "cryptos": "enabled",
                    "tenant-auth-support": "disabled",
                    "vcpu-cores-per-node": 2,
                    "memory": "7680",
                    "storage": {
                        "size": 70
                    },
                    "running-state": "configured",
                    "mac-data": {
                        "base-mac": "00:94:a1:8e:d0:0b",
                        "mac-pool-size": 1
                    },
                    "appliance-mode": {
                        "enabled": false
                    },
                    "status": "Configured"
                }
            },
            {
                "name": "tenant2",
                "config": {
                    "name": "tenant2",
                    "type": "BIG-IP",
                    "image": "BIGIP-15.1.5-0.0.10.T4-F5OS.qcow2.zip.bundle",
                    "nodes": [
                        1
                    ],
                    "mgmt-ip": "10..10.10.205",
                    "prefix-length": 24,
                    "gateway": "10..10.10.1",
                    "vlans": [
                        502,
                        3010,
                        3011
                    ],
                    "cryptos": "enabled",
                    "tenant-auth-support": "disabled",
                    "vcpu-cores-per-node": 6,
                    "memory": "22016",
                    "storage": {
                        "size": 76
                    },
                    "running-state": "deployed",
                    "appliance-mode": {
                        "enabled": false
                    }
                },
                "state": {
                    "name": "tenant2",
                    "unit-key-hash": "cDzVBaFAZD+kHosgnwjzteF9D13BsmvcgXCdz2xMi8kztd0uxouyTNkvPt8uSaNLu5i5VyTLSRFt8fkcJahEvg==",
                    "type": "BIG-IP",
                    "image": "BIGIP-15.1.5-0.0.10.T4-F5OS.qcow2.zip.bundle",
                    "nodes": [
                        1
                    ],
                    "mgmt-ip": "10..10.10.205",
                    "prefix-length": 24,
                    "gateway": "10..10.10.1",
                    "mac-ndi-set": [
                        {
                            "ndi": "default",
                            "mac": "00:94:a1:8e:d0:0a"
                        }
                    ],
                    "vlans": [
                        502,
                        3010,
                        3011
                    ],
                    "cryptos": "enabled",
                    "tenant-auth-support": "disabled",
                    "vcpu-cores-per-node": 6,
                    "memory": "22016",
                    "storage": {
                        "size": 76
                    },
                    "running-state": "deployed",
                    "mac-data": {
                        "base-mac": "00:94:a1:8e:d0:0c",
                        "mac-pool-size": 1
                    },
                    "appliance-mode": {
                        "enabled": false
                    },
                    "status": "Starting",
                    "instances": {
                        "instance": [
                            {
                                "node": 1,
                                "pod-name": "tenant2-1",
                                "instance-id": 1,
                                "phase": "Pending",
                                "creation-time": "2022-03-29T04:49:41Z",
                                "ready-time": "",
                                "status": "0/5 nodes are available: 2 Insufficient devices.kubevirt.io/kvm, 2 Insufficient devices.kubevirt.io/tun, 2 Insufficient devices.kubevirt.io/vhost-net, 2 Insufficient hugepages-2Mi, 4 node(s) didn't match node selector, 5 Insufficient f5.com/qat.",
                                "mgmt-mac": "00:00:00:00:00:00"
                            }
                        ]
                    }
                }
            },
            {
                "name": "tenant3",
                "config": {
                    "name": "tenant3",
                    "type": "BIG-IP",
                    "image": "BIGIP-15.1.5-0.0.10.T4-F5OS.qcow2.zip.bundle",
                    "nodes": [
                        1
                    ],
                    "mgmt-ip": "5.5.5.5",
                    "prefix-length": 24,
                    "gateway": "5.5.5.254",
                    "cryptos": "enabled",
                    "tenant-auth-support": "disabled",
                    "vcpu-cores-per-node": 2,
                    "memory": "7680",
                    "storage": {
                        "size": 76
                    },
                    "running-state": "configured",
                    "appliance-mode": {
                        "enabled": false
                    }
                },
                "state": {
                    "name": "tenant3",
                    "unit-key-hash": "LopnQ/ImnqSeOnTTraC84M9FITYVz2//d6lS4wpQxoc5AzQr/dtjy6aU2Q225JURT4viuWj9HwjB19KZSW6KEA==",
                    "type": "BIG-IP",
                    "image": "BIGIP-15.1.5-0.0.10.T4-F5OS.qcow2.zip.bundle",
                    "nodes": [
                        1
                    ],
                    "mgmt-ip": "5.5.5.5",
                    "prefix-length": 24,
                    "gateway": "5.5.5.254",
                    "cryptos": "enabled",
                    "tenant-auth-support": "disabled",
                    "vcpu-cores-per-node": 2,
                    "memory": "7680",
                    "storage": {
                        "size": 76
                    },
                    "running-state": "configured",
                    "mac-data": {
                        "base-mac": "00:94:a1:8e:d0:0d",
                        "mac-pool-size": 1
                    },
                    "appliance-mode": {
                        "enabled": false
                    },
                    "status": "Configured"
                }
            }
        ]
    }
}
Resizing a Tenant
VELOS tenants have static CPU and memory allocations. These can be changed after a tenant has been deployed, but the tenant will have to be temporarily suspended (put in the provisioned state), then the change to CPU and/or memory allocation can be made. A tenant can be expanded within a single blade, or it can be configured to extend across blades assuming adequate resources are available. Once the changes are completed the tenant can be put into the deployed state and returned to service.
Expanding a Tenant within the Same Blade via CLI
Expanding a tenant on the same blade via the CLI follows the same workflows as the webUI. You must first put the tenant in a provisioned state, and then make configuration changes, and then change back to deployed state. You can view the current configuration of the tenant by issuing the show running-config tenants command. Note the tenant currently has 2 vCPU, and 7680 MB of memory.
Production-1# show running-config tenants
tenants tenant tenant1
config type         BIG-IP
config image        BIGIP-14.1.4-0.0.654.ALL-VELOS.qcow2.zip.bundle
config nodes        [ 1 ]
config mgmt-ip      10..10.10.207
config prefix-length 24
config gateway      10..10.10.1
config vlans        [ 444 500 555 ]
config cryptos      enabled
config vcpu-cores-per-node 2
config memory       7680
config running-state deployed
config appliance-mode disabled
!
Production-1#
You can also view the tenant running status by issuing the CLI command show tenants.
Production-1# show tenants
tenants tenant tenant1
state type          BIG-IP
state mgmt-ip       10..10.10.207
state prefix-length 24
state gateway       10..10.10.1
state vlans         [ 444 500 555 ]
state cryptos       enabled
state vcpu-cores-per-node 2
state memory        7680
state running-state deployed
state mac-data base-mac 00:94:a1:8e:58:1b
state mac-data mac-pool-size 1
state appliance-mode disabled
state status        Running
state primary-slot  1
state image-version "BIG-IP 14.1.4 0.0.654"
NDI      MAC
----------------------------
default  00:94:a1:8e:58:19

      INSTANCE
NODE  ID        PHASE    IMAGE NAME                                       CREATION TIME         READY TIME            STATUS                   MGMT MAC
------------------------------------------------------------------------------------------------------------------------------------------------------------------
1     1         Running  BIGIP-14.1.4-0.0.654.ALL-VELOS.qcow2.zip.bundle  2021-02-04T22:02:22Z  2021-02-04T22:02:18Z  Started tenant instance  42:d9:d1:e5:a3:c0

Production-1#
To change the tenant configuration, you must first enter config mode and then change the tenant running state to provisioned. The change won’t take effect until the commit command is issued:
Production-1#  config
Entering configuration mode terminal
Production-1(config)# tenants tenant tenant1 config running-state provisioned
Production-1(config-tenant-tenant1)# commit
Commit complete.
You can monitor the tenant transition to provisioned state using the show commands above. Once in the provisioned state you can change the vCPU and memory configurations as well as the running-state back to deployed. Then issue the commit command to execute the changes.
Production-1(config-tenant-tenant1)# exit
Production-1(config)# tenants tenant tenant1 config vcpu-cores-per-node 4 memory 14848 running-state deployed
Production-1(config-tenant-tenant1)# commit
  Commit complete.
Expanding a Tenant within the Same Blade via webUI
Below is webUI output of a single tenant that is in the deployed and running state configured with 2 vCPUs per slot, 7680 memory per slot, and the tenant is allowed to run on only slot1. The workflow below will cover expanding the tenant from 2 to 4 vCPUs and the memory from 7680 to 14848 per slot. Click the check box next to the tenant, and then select the Provision button.
Click OK. This will move the tenant from deployed to provisioned state. You will see the tenant go from running, to stopping, to stopped.

Next click on the hyperlink for tenant1. This will bring you into the configuration page for that tenant. Change the vCPUs per slot to 4, and the Memory per Slot to 14848 and set the state back to deployed. When finished click Save and the tenant will start up again with the new configuration.


Expanding a Tenant within the Same Blade via API
First get the current tenant status via the API and note the current CPU Allocation. The tenant in the example below is currently configured to run on slot1 (node) and has 2 vCPUs and 7680 of memory per slot:
GET https://{{velos_chassis1_chassis_partition1_ip}}:8888/restconf/data/f5-tenants:tenants/tenant={{New_Tenant1_Name}}/config
The API output:
{
    "f5-tenants:config": {
        "name": "tenant1",
        "type": "BIG-IP",
        "image": "BIGIP-14.1.4-0.0.654.ALL-VELOS.qcow2.zip.bundle",
        "nodes": [
            1
        ],
        "mgmt-ip": "10..10.10.207",
        "prefix-length": 24,
        "gateway": "10..10.10.1",
        "vlans": [
            444,
            500,
            555
        ],
        "cryptos": "enabled",
        "vcpu-cores-per-node": "2",
        "memory": "7680",
        "running-state": "deployed",
        "appliance-mode": {
            "enabled": false
        }
    }
}
If you attempt to change the tenant configuration while it is in the deployed state, it will fail with an error like the one below notifying you that config changes when in the deployed state are not allowed:
{
    "errors": {
        "error": [
            {
                "error-message": "/tenants/tenant{tenant1}/config/vcpu-cores-per-node (value \"4\"): cannot change vcpu-cores-per-node when tenant is in deployed state",
                "error-path": "/f5-tenants:tenants/tenant=tenant1/config/vcpu-cores-per-node",
                "error-tag": "invalid-value",
                "error-type": "application"
            }
        ]
    }
}
The workflow to change the tenant configuration is to first change the tenant state to be provisioned then make the configuration change. Use the following API PATCH call to move the tenant to the provisioned state:
PATCH https://{{velos_chassis1_chassis_partition1_ip}}:8888/restconf/data/f5-tenants:tenants/tenant={{New_Tenant1_Name}}/config/running-state
And for the JSON body of the API call change the running-state to provisioned:
{
    "running-state": "provisioned"
}
Next issue the GET command above to obtain the tenant status and note that its running state has changed to provisioned:
"cryptos": "enabled",
"vcpu-cores-per-node": "2",
"memory": "7680",
"running-state": "provisioned",
"appliance-mode": {
    "enabled": false
Send a PATCH API command to change the CPU and memory configuration so the tenant can expand from 2 to 4 vCPUs, and from 7680 to 14848 GB of memory. It’s important to change both the CPU and memory allocation when expanding the tenant.
PATCH https://{{velos_chassis1_chassis_partition1_ip}}:8888/restconf/data/f5-tenants:tenants/tenant={{New_Tenant1_Name}}/config/vcpu-cores-per-node
In the body of the API call enter the desired vCPU and memory values.
{
    "vcpu-cores-per-node": 4,
    "memory": 14848
}
Finally change the tenant status back to deployed and then check the status again to confirm the change. The tenant should boot up with the expanded memory and CPU.
PATCH https://{{velos_chassis1_chassis_partition1_ip}}:8888/restconf/data/f5-tenants:tenants/tenant={{New_Tenant1_Name}}/config/running-state
Set running-state to deployed in the body of the API call.
{
    "running-state": "deployed"
}
Expanding a Tenant Across Blades via webUI
VELOS tenants can be configured to expand across multiple blades. You can pre-configure a tenant to span more than one blade, and as blades are added to a chassis partition the tenant should automatically expand and start using additional resources it has been configured for. Spanning tenants across two or more blades have advantages and disadvantages that need to be considered.
For tenants where the control plane is heavily utilized, spanning the tenant across blades can make the control plane performance worse, as it now needs to replicate its state between blades, and this adds additional overhead. Spanning tenants across blades also requires more IP addresses inside the tenants (one for each blade the tenant resides on) to ensure all failure cases are handled properly. A tenant can be configured to survive a blade failure and not failover to its peer, provided it has enough resources to run on a single blade. This is handled through HA group configuration within the tenant itself. It may be better in some cases to just failover to the tenant’s peer in another chassis if a blade failure occurs. Expanding a tenant across blades can provide much higher data plane performance for a single tenant, so all these considerations need to be examined to determine the best configuration.
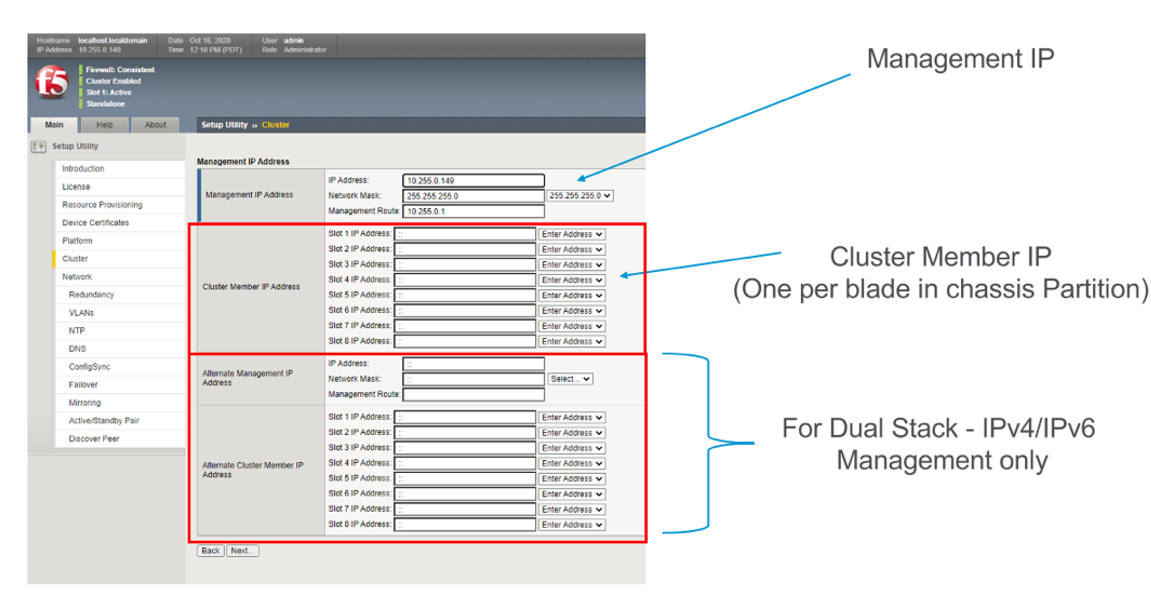
One consideration when expanding a tenant across more than one blade is that you will need to configure additional out-of-band IP addresses for each blade that the tenant will reside on. This is required for proper HA communication and failover to cover specific cases around blade failures. Below is a webUI screenshot inside a VELOS tenant that shows the out-of-band management IP address along with the Cluster Member IP Addresses. You should configure a Cluster Member IP Address for each slot that a tenant will span. The Alternate Management and Alternate Cluster Member IP addresses are for dual stack IPv4/IPv6 support, and you would configure IPv6 addresses here if the primary addresses were IPv4.
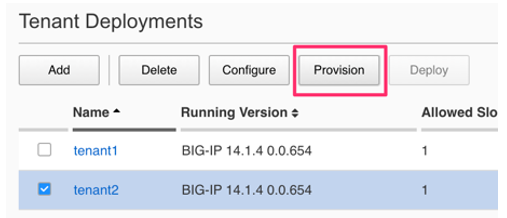
Next a tenant that currently exists on a single blade will be expanded to span two blades using the webUI. In the screenshot below tenant2 is currently configured to only run on slot/blade1 due to the Allowed Slots being configured for 1. This tenant is using 6 vCPUs and 22016 MB of memory on slot1.

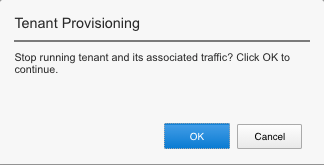
Select the checkbox next to tenant2 and then click the Provision button to move the tenant to the provisioned state so that configuration changes can occur. A pop-up will appear asking you to confirm. After confirming it will take a few seconds for the tenant to spin down into the provisioned state.
Next click on the hyperlink for tenant2 to change the configuration of the tenant. Change the Allowed Slots so that both 1 and 2 are now checked. Change the state from Provisioned to Deployed* and then click **Save. When prompted, confirm, and then watch the tenant start up.
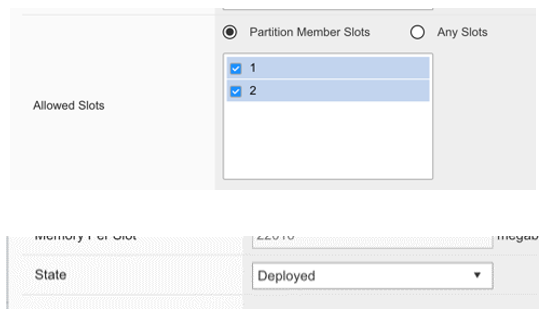
Note the tenant is now configured for both Slots 1 & 2 for Allowed Slots.
Expanding a Tenant Across Blades via CLI
The same workflow can be done in the CLI. A tenant that currently exists on a single blade will be expanded to span two blades using the CLI. First display the current tenant status:
Production-1# show tenants tenant tenant2
tenants tenant tenant2
state type          BIG-IP
state mgmt-ip       10..10.10.208
state prefix-length 24
state gateway       10..10.10.1
state vlans         [ 444 500 555 ]
state cryptos       enabled
state vcpu-cores-per-node 6
state memory        22016
state running-state deployed
state mac-data base-mac 00:94:a1:8e:58:1c
state mac-data mac-pool-size 1
state appliance-mode disabled
state status        Running
state primary-slot  1
state image-version "BIG-IP 14.1.4 0.0.654"
NDI      MAC
----------------------------
default  00:94:a1:8e:58:1a

      INSTANCE
NODE  ID        PHASE    IMAGE NAME                                       CREATION TIME         READY TIME            STATUS                   MGMT MAC
------------------------------------------------------------------------------------------------------------------------------------------------------------------
1     1         Running  BIGIP-14.1.4-0.0.654.ALL-VELOS.qcow2.zip.bundle  2021-02-05T18:10:47Z  2021-02-05T18:10:42Z  Started tenant instance  72:f1:75:fd:0e:5f
Production-1# show running-config tenants tenant tenant2
tenants tenant tenant2
config type         BIG-IP
config image        BIGIP-14.1.4-0.0.654.ALL-VELOS.qcow2.zip.bundle
config nodes        [ 1 ]
config mgmt-ip      10..10.10.208
config prefix-length 24
config gateway      10..10.10.1
config vlans        [ 444 500 555 ]
config cryptos      enabled
config vcpu-cores-per-node 6
config memory       22016
config running-state deployed
config appliance-mode disabled
!
Enter config mode and change the tenant running-state to provisioned so that changes can be made to its configuration. A commit is needed to make the change.
Production-1# config
Entering configuration mode terminal
Production-1(config)# tenants tenant tenant2 config running-state provisioned
Production-1(config-tenant-tenant2)# commit
Commit complete.
Next alter the nodes configuration to [ 1 2 ] so that the tenant will deploy onto both blades, and set the running-state back to deployed so that the tenant will start back up.
Production-1(config-tenant-tenant2)# exit
Production-1(config)# tenants tenant tenant2 config node [ 1 2 ] running-state deployed
Production-1(config-tenant-tenant2)# commit
Commit complete.
You can verify the tenant status using the show tenants command. Note that Node 1 and Node 2 have an instance of tenant2 running.
Production-1# show tenants tenant tenant2
tenants tenant tenant2
state type          BIG-IP
state mgmt-ip       10..10.10.208
state prefix-length 24
state gateway       10..10.10.1
state vlans         [ 444 500 555 ]
state cryptos       enabled
state vcpu-cores-per-node 6
state memory        22016
state running-state deployed
state mac-data base-mac 00:94:a1:8e:58:1c
state mac-data mac-pool-size 1
state appliance-mode disabled
state status        Running
state primary-slot  1
state image-version "BIG-IP 14.1.4 0.0.654"
NDI      MAC
----------------------------
default  00:94:a1:8e:58:1a

      INSTANCE
NODE  ID        PHASE    IMAGE NAME                                       CREATION TIME         READY TIME            STATUS                   MGMT MAC
------------------------------------------------------------------------------------------------------------------------------------------------------------------
1     1         Running  BIGIP-14.1.4-0.0.654.ALL-VELOS.qcow2.zip.bundle  2021-02-05T18:30:14Z  2021-02-05T18:30:11Z  Started tenant instance  de:b5:21:4c:1b:f6
2     2         Running  BIGIP-14.1.4-0.0.654.ALL-VELOS.qcow2.zip.bundle  2021-02-05T18:31:24Z  2021-02-05T18:31:21Z  Started tenant instance  26:4f:35:7f:5d:1b
Expanding a Tenant Across Blades via API
If the tenant is already deployed, then you must first change the tenant to a provisioned state before changes can be made. This will cause the tenant to shut down. The following API call will move the tenant to a provisioned state.
PATCH https://{{velos_chassis1_chassis_partition1_ip}}:8888//restconf/data/f5-tenants:tenants/tenant={{New_Tenant2_Name}}/config/running-state
In the body of the API call set the runnning-state to provisioned.
{
    "running-state": "provisioned"
}
Once the tenant is in the provisioned state you can issue another API call to modify its configuration. In this case the tenant will be expanded to run across slots 1 and 2, and also have its status changed back to deployed.
PATCH https://{{velos_chassis1_chassis_partition1_ip}}:8888//restconf/data/f5-tenants:tenants/tenant={{New_Tenant2_Name}}/config/vcpu-cores-per-node
In the body of the API call set the changes you would like to make and then set the runnning-state to deployed.
{
    "vcpu-cores-per-node": 6,
    "memory": 22016,
    "nodes": [
        1,
        2
    ],
    "running-state": "deployed"
}
The last part is to verify the tenant’s status, and that the config change has taken affect. Use the API call below and be sure to set the proper tenant name in the URL.
GET https://{{velos_chassis1_chassis_partition1_ip}}:8888/restconf/data/f5-tenants:tenants/tenant={{New_Tenant2_Name}}/config
The response should be similar to the output below, which will show the tenant’s configuration.
{
    "f5-tenants:config": {
        "name": "tenant2",
        "type": "BIG-IP",
        "image": "BIGIP-14.1.4-0.0.654.ALL-VELOS.qcow2.zip.bundle",
        "nodes": [
            1
        ],
        "mgmt-ip": "10..10.10.208",
        "prefix-length": 24,
        "gateway": "10..10.10.1",
        "vlans": [
            444,
            500,
            555
        ],
        "cryptos": "enabled",
        "vcpu-cores-per-node": "6",
        "memory": "22016",
        "running-state": "deployed",
        "appliance-mode": {
            "enabled": false
        }
    }
}
You can validate the status of all tenants within the chassis partition using the following API call.
GET https://{{velos_chassis1_chassis_partition1_ip}}:8888/restconf/data/f5-tenants:tenants
Below is an example output from a VELOS system:
{
    "f5-tenants:tenants": {
        "tenant": [
            {
                "name": "tenant1",
                "config": {
                    "name": "tenant1",
                    "type": "BIG-IP",
                    "image": "BIGIP-15.1.5-0.0.10.T4-F5OS.qcow2.zip.bundle",
                    "nodes": [
                        1
                    ],
                    "mgmt-ip": "10..10.10.149",
                    "prefix-length": 24,
                    "gateway": "10..10.10.1",
                    "vlans": [
                        501,
                        3010,
                        3011
                    ],
                    "cryptos": "enabled",
                    "tenant-auth-support": "disabled",
                    "vcpu-cores-per-node": 2,
                    "memory": "7680",
                    "storage": {
                        "size": 70
                    },
                    "running-state": "configured",
                    "appliance-mode": {
                        "enabled": false
                    }
                },
                "state": {
                    "name": "tenant1",
                    "unit-key-hash": "3LKG3f3UTbc5Talm3+D5uKodIC/LsO5w43m0n3EYHLOMEJM0E4E0Q27OK3WLWma4tBpY6Nu59i1m4HA+hR81hA==",
                    "type": "BIG-IP",
                    "image": "BIGIP-15.1.5-0.0.10.T4-F5OS.qcow2.zip.bundle",
                    "nodes": [
                        1
                    ],
                    "mgmt-ip": "10..10.10.149",
                    "prefix-length": 24,
                    "gateway": "10..10.10.1",
                    "mac-ndi-set": [
                        {
                            "ndi": "default",
                            "mac": "00:94:a1:8e:d0:09"
                        }
                    ],
                    "vlans": [
                        501,
                        3010,
                        3011
                    ],
                    "cryptos": "enabled",
                    "tenant-auth-support": "disabled",
                    "vcpu-cores-per-node": 2,
                    "memory": "7680",
                    "storage": {
                        "size": 70
                    },
                    "running-state": "configured",
                    "mac-data": {
                        "base-mac": "00:94:a1:8e:d0:0b",
                        "mac-pool-size": 1
                    },
                    "appliance-mode": {
                        "enabled": false
                    },
                    "status": "Configured"
                }
            },
            {
                "name": "tenant2",
                "config": {
                    "name": "tenant2",
                    "type": "BIG-IP",
                    "image": "BIGIP-15.1.5-0.0.10.T4-F5OS.qcow2.zip.bundle",
                    "nodes": [
                        1
                    ],
                    "mgmt-ip": "10..10.10.205",
                    "prefix-length": 24,
                    "gateway": "10..10.10.1",
                    "vlans": [
                        502,
                        3010,
                        3011
                    ],
                    "cryptos": "enabled",
                    "tenant-auth-support": "disabled",
                    "vcpu-cores-per-node": 6,
                    "memory": "22016",
                    "storage": {
                        "size": 76
                    },
                    "running-state": "deployed",
                    "appliance-mode": {
                        "enabled": false
                    }
                },
                "state": {
                    "name": "tenant2",
                    "unit-key-hash": "cDzVBaFAZD+kHosgnwjzteF9D13BsmvcgXCdz2xMi8kztd0uxouyTNkvPt8uSaNLu5i5VyTLSRFt8fkcJahEvg==",
                    "type": "BIG-IP",
                    "image": "BIGIP-15.1.5-0.0.10.T4-F5OS.qcow2.zip.bundle",
                    "nodes": [
                        1
                    ],
                    "mgmt-ip": "10..10.10.205",
                    "prefix-length": 24,
                    "gateway": "10..10.10.1",
                    "mac-ndi-set": [
                        {
                            "ndi": "default",
                            "mac": "00:94:a1:8e:d0:0a"
                        }
                    ],
                    "vlans": [
                        502,
                        3010,
                        3011
                    ],
                    "cryptos": "enabled",
                    "tenant-auth-support": "disabled",
                    "vcpu-cores-per-node": 6,
                    "memory": "22016",
                    "storage": {
                        "size": 76
                    },
                    "running-state": "deployed",
                    "mac-data": {
                        "base-mac": "00:94:a1:8e:d0:0c",
                        "mac-pool-size": 1
                    },
                    "appliance-mode": {
                        "enabled": false
                    },
                    "status": "Starting",
                    "instances": {
                        "instance": [
                            {
                                "node": 1,
                                "pod-name": "tenant2-1",
                                "instance-id": 1,
                                "phase": "Pending",
                                "creation-time": "2022-03-29T04:49:41Z",
                                "ready-time": "",
                                "status": "0/5 nodes are available: 2 Insufficient devices.kubevirt.io/kvm, 2 Insufficient devices.kubevirt.io/tun, 2 Insufficient devices.kubevirt.io/vhost-net, 2 Insufficient hugepages-2Mi, 4 node(s) didn't match node selector, 5 Insufficient f5.com/qat.",
                                "mgmt-mac": "00:00:00:00:00:00"
                            }
                        ]
                    }
                }
            },
            {
                "name": "tenant3",
                "config": {
                    "name": "tenant3",
                    "type": "BIG-IP",
                    "image": "BIGIP-15.1.5-0.0.10.T4-F5OS.qcow2.zip.bundle",
                    "nodes": [
                        1
                    ],
                    "mgmt-ip": "5.5.5.5",
                    "prefix-length": 24,
                    "gateway": "5.5.5.254",
                    "cryptos": "enabled",
                    "tenant-auth-support": "disabled",
                    "vcpu-cores-per-node": 2,
                    "memory": "7680",
                    "storage": {
                        "size": 76
                    },
                    "running-state": "configured",
                    "appliance-mode": {
                        "enabled": false
                    }
                },
                "state": {
                    "name": "tenant3",
                    "unit-key-hash": "LopnQ/ImnqSeOnTTraC84M9FITYVz2//d6lS4wpQxoc5AzQr/dtjy6aU2Q225JURT4viuWj9HwjB19KZSW6KEA==",
                    "type": "BIG-IP",
                    "image": "BIGIP-15.1.5-0.0.10.T4-F5OS.qcow2.zip.bundle",
                    "nodes": [
                        1
                    ],
                    "mgmt-ip": "5.5.5.5",
                    "prefix-length": 24,
                    "gateway": "5.5.5.254",
                    "cryptos": "enabled",
                    "tenant-auth-support": "disabled",
                    "vcpu-cores-per-node": 2,
                    "memory": "7680",
                    "storage": {
                        "size": 76
                    },
                    "running-state": "configured",
                    "mac-data": {
                        "base-mac": "00:94:a1:8e:d0:0d",
                        "mac-pool-size": 1
                    },
                    "appliance-mode": {
                        "enabled": false
                    },
                    "status": "Configured"
                }
            }
        ]
    }
}