Planning for VELOS Guide Source |
F5OS Configuration Backup and Restore
To completely backup the VELOS system, you’ll need to backup each tenant TMOS configuration, each F5OS chassis partition configuration, as well as the F5OS system controller configuration. Tenant backup utilizes the same backup and recovery procedures as existing BIG-IP devices/guests because the tenants themselves are running TMOS. For the F5OS layer (system controllers and chassis partitions), a different backup mechanism is utilized because F5OS configuration management is based on ConfD.
The ConfD process manages the F5OS configuration on a VELOS system. The system stores the configuration in its configuration database (CDB). There are separate ConfD databases for the system controller layer, and for each chassis partition.
At the chassis level, the F5OS configuration contains data that includes the following:
- DNS
- Network time protocol (NTP)
- Authentication servers
- Logging setup
- High availability (HA) setup
- Management IP addresses of the system controllers
- Product license
- Basic configuration of existing partitions, such as the partition name, floating management IP address, and the partition-to-slot mapping
At the chassis partition level, the F5OS configuration contains data that includes the following:
- Portgroups of the assigned slots/nodes/blades
- Virtual Local Area Networks (VLANs)
- Interfaces/LAGs
- Logging setup
- Authentication servers
- Product license
- HA setup
- Tenant configuration
Note: The tenant configuration contains tenant name, type, image, management IP address, gateway, VLANs, assigned vCPUs, memory, storage size, and so on. It does not include the BIG-IP configuration within the tenant. To create a backup copy of the BIG-IP configuration of the tenant, you must perform the backup in the tenant itself. For information, refer to:
K13132: Backing up and restoring BIG-IP configuration files with a UCS archive <https://support.f5.com/csp/article/K13132>_
To perform a complete backup of the VELOS system, you must:
- Back up the F5OS configuration data at the system controller layer
- Back up the F5OS configuration data at each chassis partition
- Back up any deployed tenants using the tenant’s backup mechanism (i.e. a UCS).
More detail is covered in the following solution article:
K50135154: Back up and restore the F5OS-C configuration on a VELOS system
Setting the Primary Key on F5OS
The F5 VELOS system uses a primary key to encrypt highly sensitive passwords/passphrases in the configuration database, such as:
- Tenant unit keys used for TMOS Secure Vault
- The F5OS API Service Gateway TLS key
- Stored iHealth credentials
- Stored AAA server credentials
The primary key is randomly generated by F5OS during initial installation. You should set the primary key to a known value prior to performing a configuration backup. If you restore a configuration backup on a different VELOS device, e.g. during an RMA replacement, you must first set the primary key passphrase and salt on the destination device to the same value as the source device. If this is not done correctly, the F5OS configuration restoration may appear to succeed but produce failures later when the system attempts to decrypt and use the secured parameters.
You should periodically change the primary key for additional security. If doing so, please note that a configuration backup is tied to the primary key at the time it was generated. If you change the primary key, you cannot restore older configuration backups without first setting the primary key to the previous value, if it is known. More details are provided in the solution article below.
IMPORTANT: Be sure to make note and save the salt and passphrase in a safe location, as these will be needed to restore the configuration on a replacement system.
syscon-1-active(config)# system aaa primary-key set passphrase
Value for 'passphrase' (<string, min: 6 chars, max: 255 chars>): **************
Value for 'confirm-passphrase' (<string, min: 6 chars, max: 255 chars>): **************
Value for 'salt' (<string, min: 6 chars, max: 255 chars>): **************
Value for 'confirm-salt' (<string, min: 6 chars, max: 255 chars>): **************
response Info: Key migration is initiated. Use 'show system aaa primary-key state status' to get status

syscon-1-active(config)#
You can view the status of the primary-key being set with the show system aaa primary-key state status CLI command.
syscon-1-active# show system aaa primary-key state status
system aaa primary-key state status "IN_PROGRESS        Initiated: Tue Apr  9 19:46:14 2024"

syscon-1-active# show system aaa primary-key state status
system aaa primary-key state status "COMPLETE        Initiated: Tue Apr  9 19:46:14 2024"
syscon-1-active#
Note that the hash key can be used to check and compare the status of the primary-key on both the source and the replacement devices if restoring to a different device. To view the current primary-key hash, issue the following CLI command.
syscon-1-active# show system aaa primary-key state
system aaa primary-key state hash aNSWX6Xl8+dFx94JMRbySD/d/AJ8RarqJ+fedD#57bDxRF0cTgGFcZvMY415eDeAJjZlXp1qGuKI7CDmxNrnhw==
system aaa primary-key state status "COMPLETE        Initiated: Tue Apr  9 19:46:14 2024"
syscon-1-active#
Backing Up the System Controller Database
Backing Up the System Controller Database via CLI
You can back up the system controller configuration database using the system database config-backup command when in config mode. The file will be saved in the path of /configs automatically. You can then list the contents of that directory to ensure the file is there using the file list path command.
syscon-1-active# config
Entering configuration mode terminal
syscon-1-active(config)# system database config-backup name GSA-Daily_GSA-VELOS-1_20230328070500
response Succeeded.
syscon-1-active(config)# exit


syscon-1-active# file list path configs/
entries {
    name GSA-Daily_GSA-VELOS-1_20230328070500
    date Thu Jan 25 03:53:06 UTC 2024
    size 69KB
}
entries {
    name GSA-Daily_GSA-VELOS-1_20230329070500
    date Thu Jan 25 03:53:06 UTC 2024
    size 69KB
}
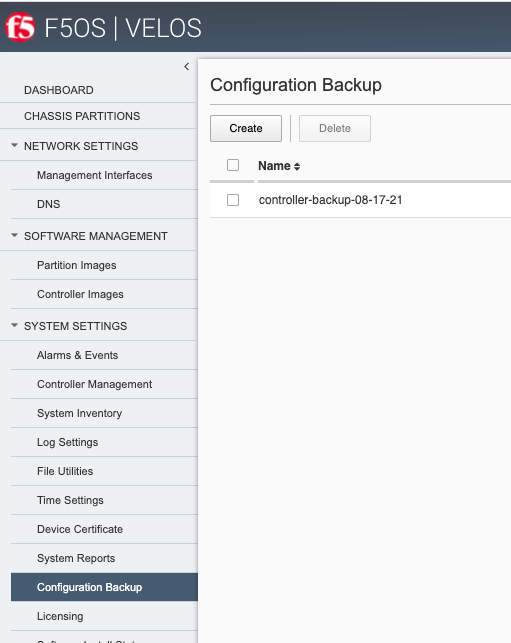
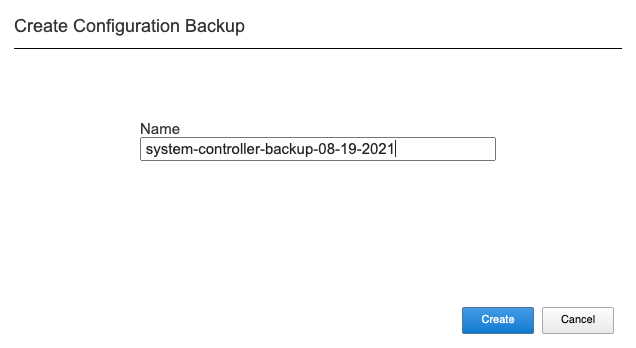
Backing Up the System Controller Database via webUI
Using the system controller webUI you can backup the ConfD configuration database using the System Settings -> Configuration Backup page. Click the Create button and provide a name for the backup file.
Backing Up the System Controller Database via API
The following API call will backup the system controller.
POST https://{{velos_chassis1_system_controller_ip}}:8888/restconf/data/openconfig-system:system/f5-database:database/f5-database:config-backup
In the body of the API call, supply the name of the file that you want to save.
{
    "f5-database:name": "SYSTEM-CONTROLLER-DB-BACKUP{{currentdate}}"
}
Note: In the current F5OS releases the ConfD system database can be backed up via CLI, webUI, or API but it cannot be restored using the F5OS webUI. This may be added in a subsequent release.
Copying System Controller Database Backup to an External Location
Once the database backup has been completed, you should copy the file to an external location so that the system can be restored in the case of a total failure. You can download the database configuration backup using the CLI, webUI, or API.
Copying System Controller Database Backup to an External Location via webUI
In the webUI use the System Settings -> File Utilities page and from the dropdown select configs to see the previously saved backup file. Here you can Import or Export, as well as Upload and Download configuration files. Note that the Import and Export options to transfer files requires an external HTTPS server, while the Upload and Download options will move files from your local browser.
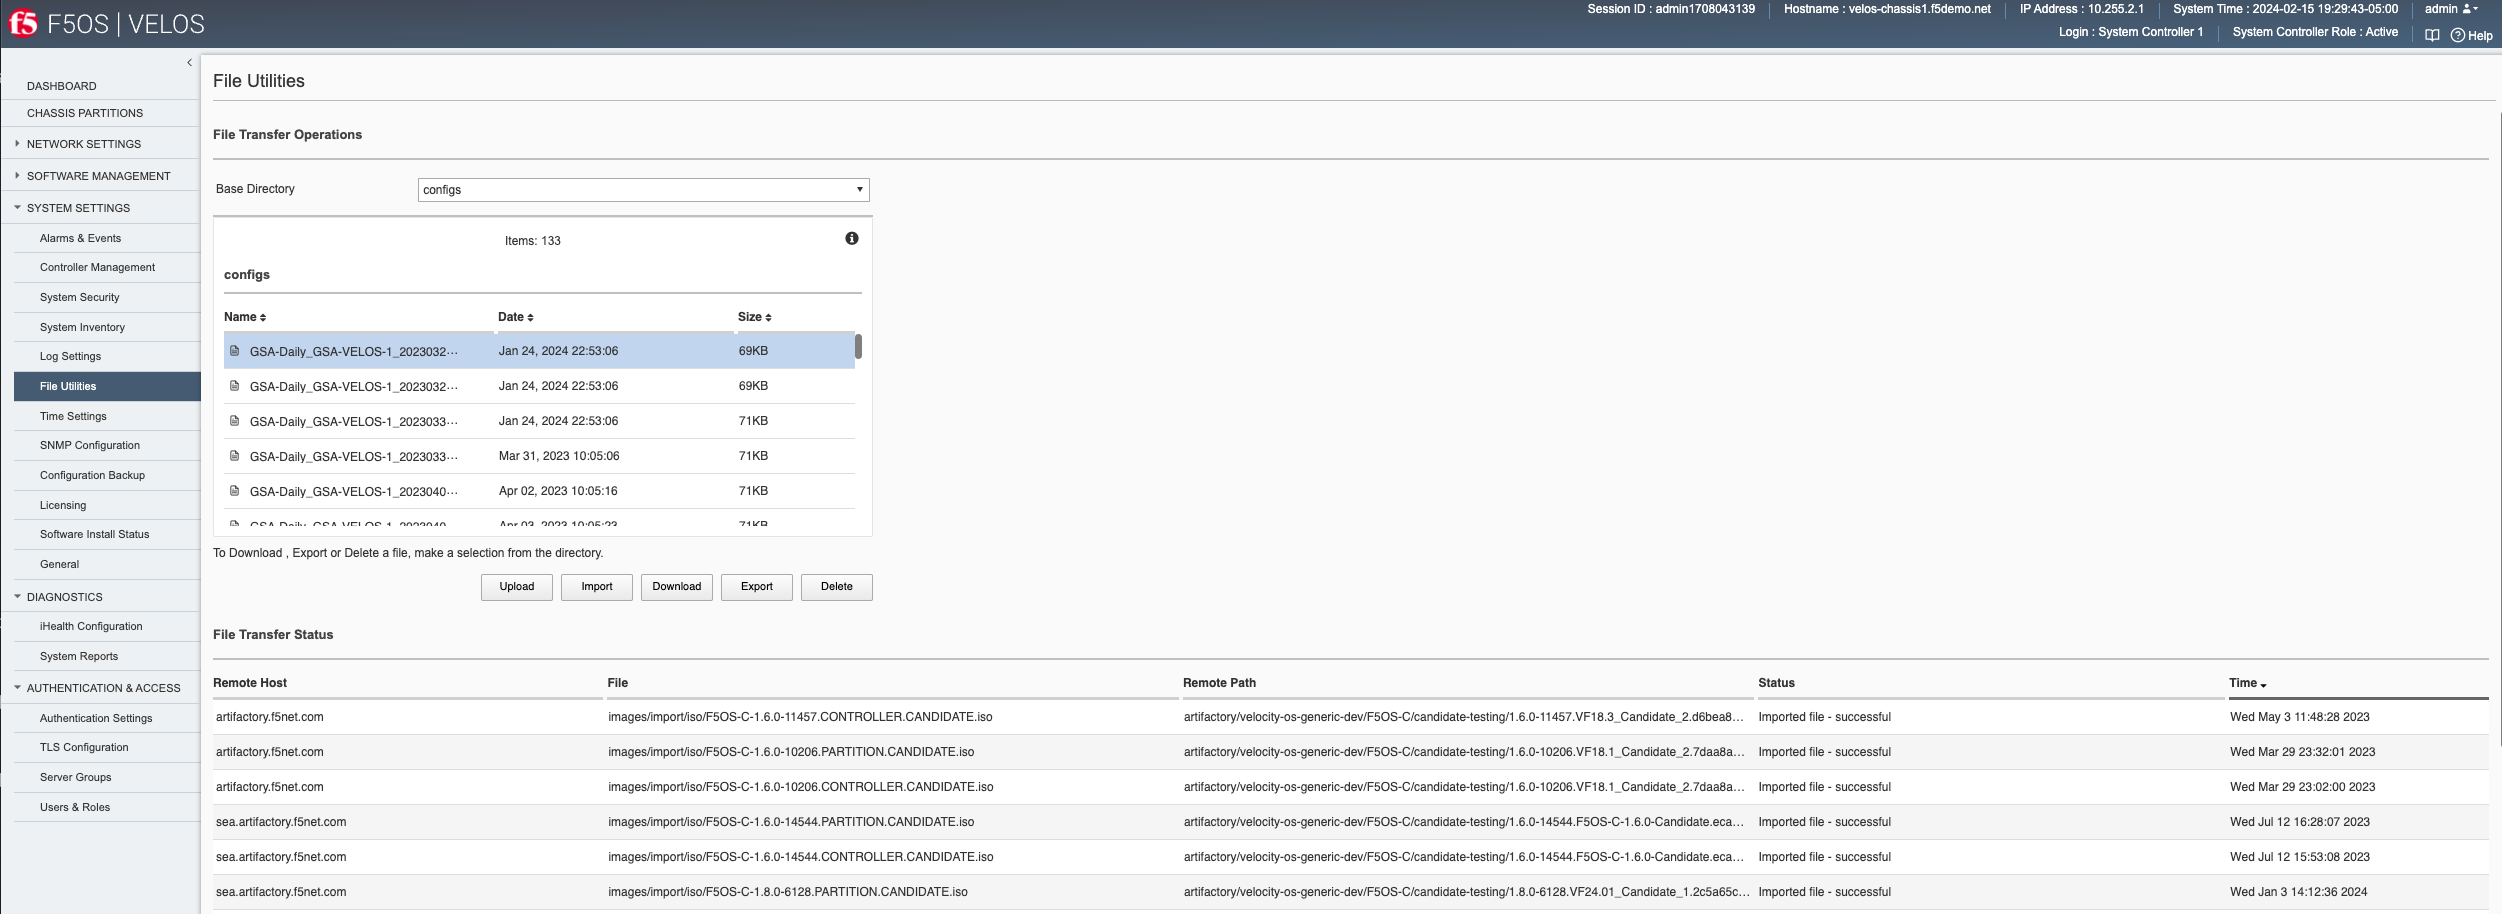
Additionally, you can Download individual files from within the System Settings -> Configuration Backup page starting with F5OS-C 1.8.0.
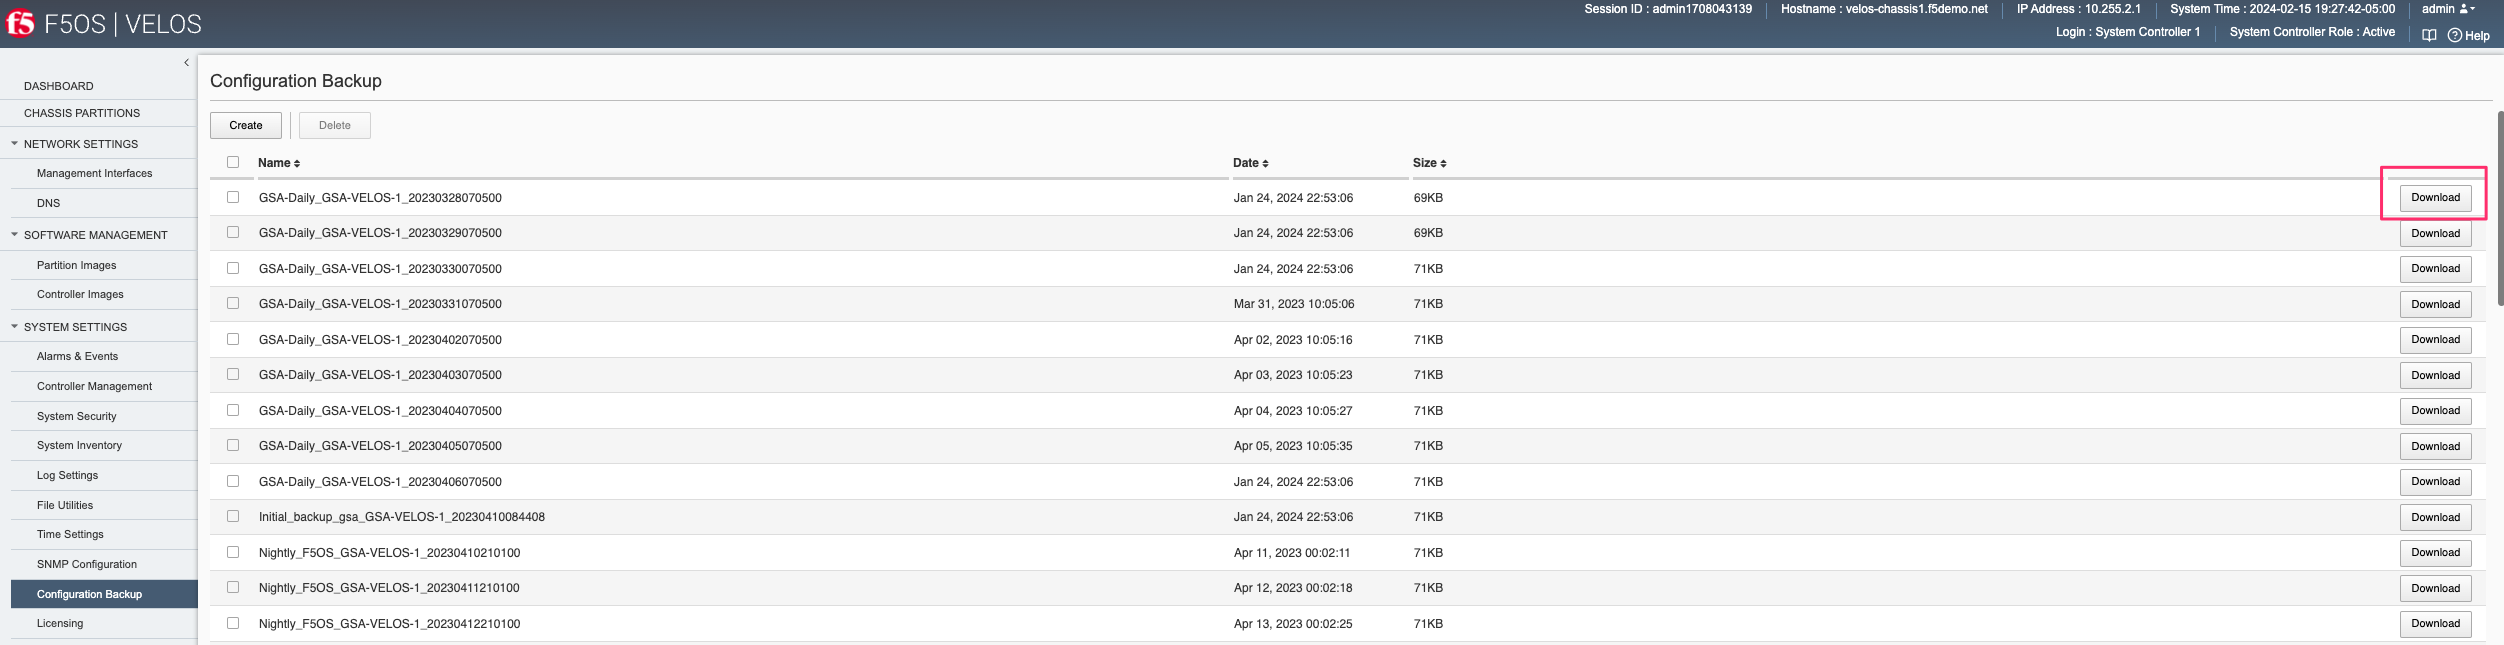
Copying System Controller Database Backup to an External Location via CLI
To transfer a file using the CLI use the file list command to see the contents of the configs directory. Note the previously saved file is listed.
syscon-1-active# file list path configs/
entries {
    name GSA-Daily_GSA-VELOS-1_20230328070500
    date Thu Jan 25 03:53:06 UTC 2024
    size 69KB
}
entries {
    name GSA-Daily_GSA-VELOS-1_20230329070500
    date Thu Jan 25 03:53:06 UTC 2024
    size 69KB
}
entries {
    name GSA-Daily_GSA-VELOS-1_20230330070500
    date Thu Jan 25 03:53:06 UTC 2024
    size 71KB
}
entries {
    name GSA-Daily_GSA-VELOS-1_20230331070500
    date Fri Mar 31 14:05:06 UTC 2023
    size 71KB
}
entries {
    name GSA-Daily_GSA-VELOS-1_20230402070500
    date Sun Apr  2 14:05:16 UTC 2023
    size 71KB
}
To transfer the file from the CLI you can use the file export command. The option below is exporting to a remote HTTPS server. there are options to transfer using SFTP, and SCP as well.
syscon-1-active# file export local-file configs/GSA-Daily_GSA-VELOS-1_20230328070500 remote-host 10.255.0.142 remote-file /upload/upload.php username corpuser insecure
Value for 'password' (<string>): ********
result File transfer is initiated.(configs/GSA-Daily_GSA-VELOS-1_20230328070500)
syscon-1-active#
To check on status of the export use the file transfer-status command:
syscon-1-active# file transfer-status
result
S.No.|Operation  |Protocol|Local File Path                                             |Remote Host         |Remote File Path                                            |Status
1    |Export file|HTTPS   |configs/GSA-Daily_GSA-VELOS-1_20230328070500                |10.255.0.142        |/upload/upload.php                                          |Completed|Fri Aug 27 19:48:41 2023
2    |Export file|HTTPS   |/mnt/var/confd/configs/chassis1-sys-controller-backup-2-26-21|10.255.0.142        |chassis1-sys-controller-backup-2-26-21                      |Failed to open/read local data from file/application
3    |Export file|HTTPS   |/mnt/var/confd/configs/chassis1-sys-controller-backup-2-26-21|10.255.0.142        |/backup                                                     |Failed to open/read local data from file/application
If you don’t have an external HTTPS server that allows uploads, then you can log into the system controllers floating IP address with root access and scp the file from the shell. Go to the /var/confd/configs directory and scp the file to an external location. Note in the CLI and webUI the path is simplified to configs, but in the underlying file system it is stored in the /var/confd/configs directory.
[root@controller-2 ~]# ls /var/confd/configs/
controller-backup-08-17-21  my-backup
[root@controller-2 ~]# scp /var/confd/configs/controller-backup-08-17-21 root@10.255.0.142:/var/www/server/1
Are you sure you want to continue connecting (yes/no)? yes
Warning: Permanently added '10.255.0.142' (ECDSA) to the list of known hosts.
root@10.255.0.142's password:
controller-backup-08-17-21                                                       100%   77KB  28.8MB/s   00:00
[root@controller-2 ~]#
Copying System Controller Database Backup to an External Location via API
To copy a ConfD configuration backup file from the system controller to a remote https server, use the following API call:
POST https://{{velos_chassis1_system_controller_ip}}:8888/restconf/data/f5-utils-file-transfer:file/export
In the body of the API call, enter the credentials and remote server information. You can optionally add other protocols such as SFTP, or SCP instead of HTTPS.
{
    "f5-utils-file-transfer:insecure": "",
    "f5-utils-file-transfer:protocol": "https",
    "f5-utils-file-transfer:username": "corpuser",
    "f5-utils-file-transfer:password": "Passw0rd!!",
    "f5-utils-file-transfer:remote-host": "10.255.0.142",
    "f5-utils-file-transfer:remote-file": "/upload/upload.php",
    "f5-utils-file-transfer:local-file": "configs/SYSTEM-CONTROLLER-DB-BACKUP{{currentdate}}"
}
Downloading System Controller Database Backup to a Client Machine via API
You can download configuration backup files from the F5OS system controller layer using the F5OS API. To list the current config files in the configs/ directory use the following API call.
POST https://{{velos_chassis1_system_controller_ip}}:8888/restconf/data/f5-utils-file-transfer:file/list
In the body of the API call, add the virtual path you want to list.
{
"f5-utils-file-transfer:path": "configs/"
}
You should see output like the example below.
{
    "f5-utils-file-transfer:output": {
        "entries": [
            {
                "name": "GSA-Daily_GSA-VELOS-1_20230328070500",
                "date": "Thu Jan 25 03:53:06 UTC 2024",
                "size": "69KB"
            },
            {
                "name": "GSA-Daily_GSA-VELOS-1_20230329070500",
                "date": "Thu Jan 25 03:53:06 UTC 2024",
                "size": "69KB"
            },
            {
                "name": "GSA-Daily_GSA-VELOS-1_20230330070500",
                "date": "Thu Jan 25 03:53:06 UTC 2024",
                "size": "71KB"
            },
            {
                "name": "GSA-Daily_GSA-VELOS-1_20230331070500",
                "date": "Fri Mar 31 14:05:06 UTC 2023",
                "size": "71KB"
            },
            {
                "name": "GSA-Daily_GSA-VELOS-1_20230402070500",
                "date": "Sun Apr  2 14:05:16 UTC 2023",
                "size": "71KB"
            },
            {
                "name": "GSA-Daily_GSA-VELOS-1_20230403070500",
                "date": "Mon Apr  3 14:05:23 UTC 2023",
                "size": "71KB"
            },
            {
                "name": "GSA-Daily_GSA-VELOS-1_20230404070500",
                "date": "Tue Apr  4 14:05:27 UTC 2023",
                "size": "71KB"
            },
            {
                "name": "GSA-Daily_GSA-VELOS-1_20230405070500",
                "date": "Wed Apr  5 14:05:35 UTC 2023",
                "size": "71KB"
            },
            {
                "name": "GSA-Daily_GSA-VELOS-1_20230406070500",
                "date": "Thu Jan 25 03:53:06 UTC 2024",
                "size": "71KB"
            },
            {
                "name": "Initial_backup_gsa_GSA-VELOS-1_20230410084408",
                "date": "Thu Jan 25 03:53:06 UTC 2024",
                "size": "71KB"
            }
            }
        ]
    }
}
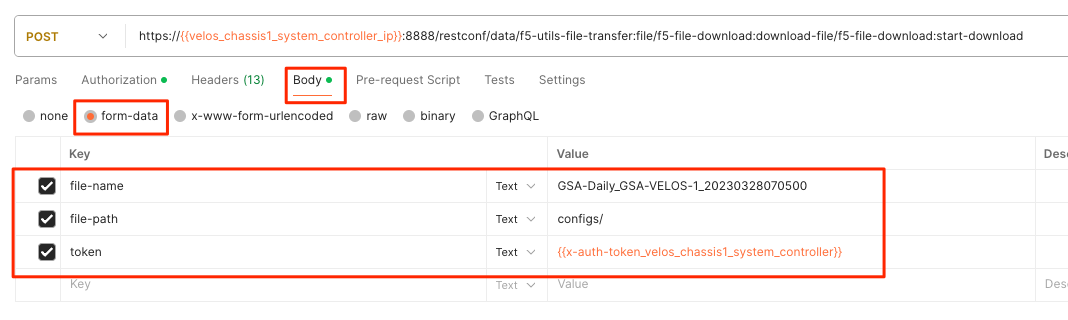
To download a specific config file, use the following API call.
POST https://{{velos_chassis1_system_controller_ip}}:8888/restconf/data/f5-utils-file-transfer:file/f5-file-download:download-file/f5-file-download:start-download
For the Headers secion of the Postman request be sure to add the following headers:

In the body of the API call select form-data, and then enter the key/value pairs as seen below. The example provided will download the configuration file named GSA-Daily_GSA-VELOS-1_20230328070500 file that resides in the configs/ directory.
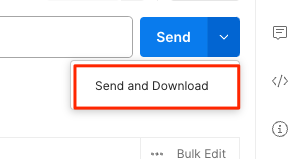
If you are using Postman, instead of clicking Send, click on the arrow next to Send, and then select Send and Download. You will then be prompted to save the file to your local file system.
Backing Up Chassis Partition Databases
In addition to backing up the system controller database, you should backup the configuration database on each chassis partition within the VELOS system. In the example below, there are two chassis partitions currently in use: Production and Development. Both must be backed up and archived off of the VELOS system.
Backing Up Chassis Partition Databases via CLI
Log directly into the chassis partition Production’s management IP address and enter config mode. Use the system database config-backup command to save a copy of the chassis partition config database. Then list the file using the file list command.
syscon-2-active# config
Entering configuration mode terminal
syscon-2-active(config)# system database config-backup name chassis-partition-production-02-15-2024
response Database backup successful. configs/chassis-partition-production-02-15-2024 is saved.
syscon-2-active(config)# exit


syscon-2-active# file list path configs/chassis-partition-production-02-15-2024
entries {
    name chassis-partition-production-02-15-2024
    date Fri Feb 16 00:27:51 UTC 2024
    size 64KB
}
syscon-2-active#
Log directly into the chassis partition development’s management IP address and enter config mode. Use the system database config-backup command to save a copy of the chassis partitions config database. Then list the file using the file list command.
syscon-2-active# config
Entering configuration mode terminal
syscon-2-active(config)# system database config-backup name chassis-partition-production-02-15-2024
response Database backup successful. configs/chassis-partition-production-02-15-2024 is saved.
syscon-2-active(config)# exit


syscon-2-active# file list path configs/chassis-partition-production-02-15-2024
entries {
    name chassis-partition-production-02-15-2024
    date Fri Feb 16 00:27:51 UTC 2024
    size 64KB
}
syscon-2-active#
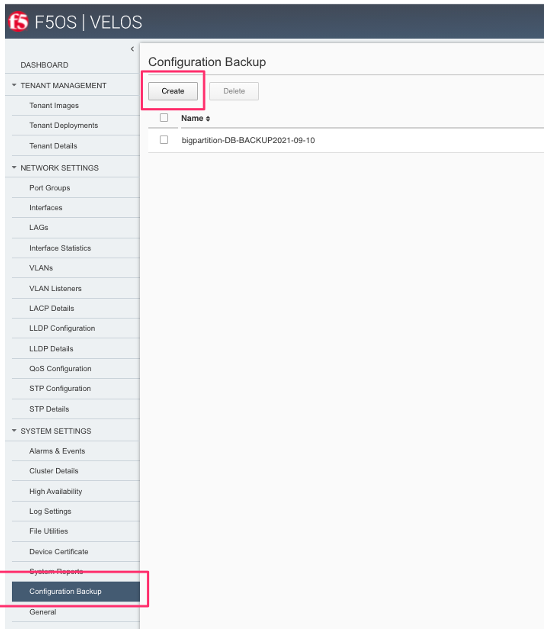
Backing Up Chassis Partition Databases via webUI
This can also be done from each chassis partition’s webUI interface. Log into the chassis partition webUI. Then go to System Utilities -> Configuration Backup. Click Create to save the ConfD database configuration and provide a name.
Backing Up Chassis Partition Databases via API
You’ll need to do this for each chassis partition in the system. To backup the chassis partition databases via API use the following API command:
POST https://{{velos_chassis1_chassis_partition1_ip}}:8888/restconf/data/openconfig-system:system/f5-database:database/f5-database:config-backup
In the body of the API call, provide the name of the backup.
{
    "f5-database:name": "Production-DB-BACKUP{{currentdate}}"
}
Repeat this for each chassis partition.
Export Backups From the Chassis Partitions
Copy the chassis partition backup files to a location outside of VELOS. The files can be copied off via the chassis partition CLI, webUI, or API.
Export Backup From the Chassis Partition webUI
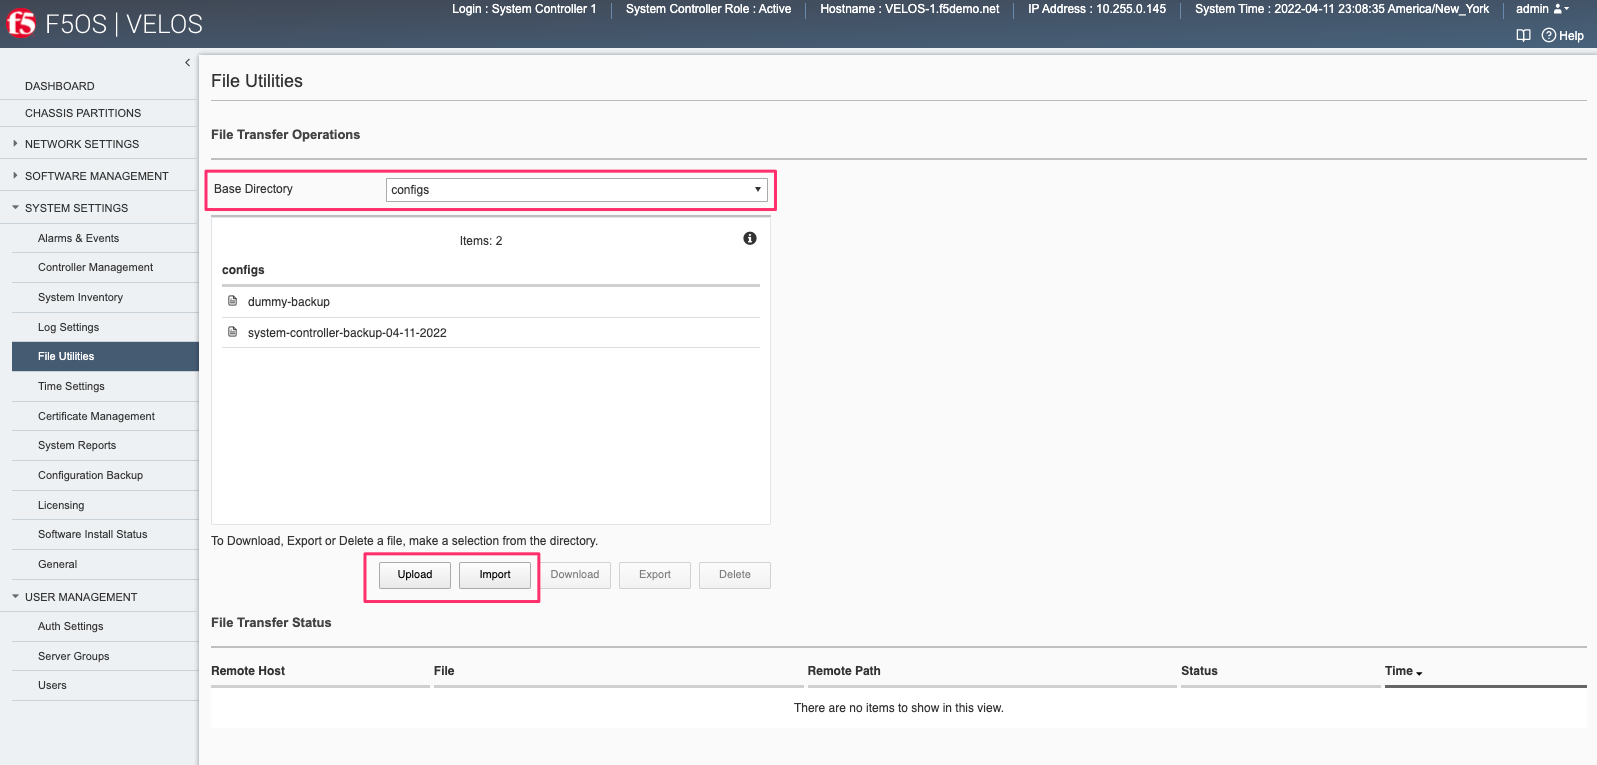
You can copy the backup file out of the chassis partition using the Systems Settings > File Utilities menu in the webUI. Use the Base Directory drop down menu to select configs directory, you should see a copy of the file created there:
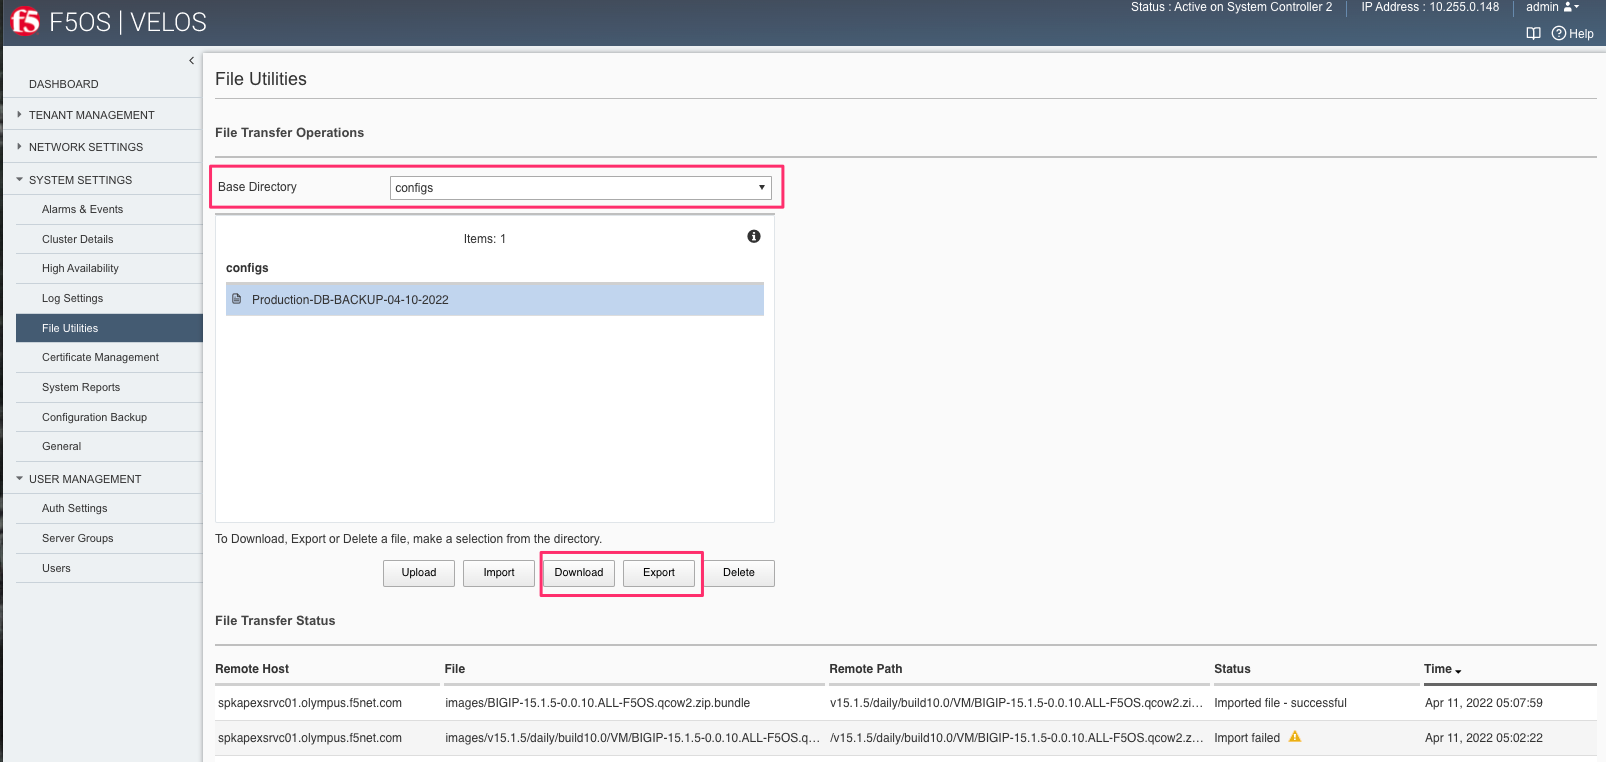
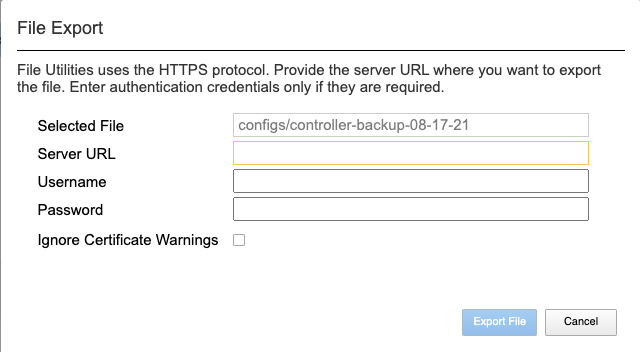
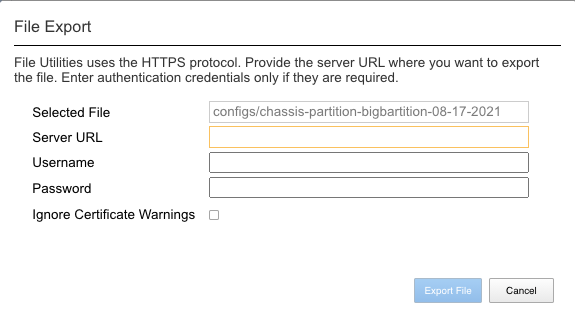
You can highlight the file, and then click the Export button. You wil then be prompted to enter the details for a remote HTTPS server so that the file can be copied out of the chassis partition:
If you select Download, then an option will appear to download through your browser to your local client machine.
Export Backup From the Chassis Partition CLI
To transfer a backup file using the CLI, use the file list command to see the contents of the configs directory. Note, the previously saved file is listed. You will need to repeat this for all chassis partitions in the VELOS system.
To export the backup for the chassis partition Production, first list the contents of the configs directory:
Production-1# file list path configs/
entries {
    name
chassis-partition-Production-08-17-2021
}
Production-1#
To transfer the file from the CLI, you can use the file export command. Note that the file export command requires either a remote HTTPS, SFTP, or SCP server that the file can be posted to.
Production-1# file export local-file configs/chassis-partition-Production-08-17-2021 remote-host 10.255.0.142 remote-file /upload/upload.php username corpuser insecure
Value for 'password' (<string>): ********
result File transfer is initiated.(configs/chassis-partition-Production-08-17-2021)
Production-1#
You can use the CLI command file transfer-status to see if the file was copied successfully or not:
Production-1# file transfer-status
result
S.No.|Operation  |Protocol|Local File Path                                             |Remote Host         |Remote File Path                                            |Status            |Time
1    |Export file|HTTPS   |configs/3-20-2021-Production-backup                       |10.255.0.142        |/upload/upload.php                                          |Failed to open/read local data from file/application|Fri Aug 27 20:05:34 2021
2    |Export file|HTTPS   |configs/chassis-partition-Production-08-17-2021           |10.255.0.142        |/upload/upload.php                                          |         Completed|Fri Aug 27 20:06:22 2021

Production-1#
If you do not have a remote HTTPS, SCP, or SFTP server with the proper access to POST files, then you can copy the chassis partition backups from the system controller shell (Note, there is no shell access via the chassis partition IP). You’ll need to login to the system controllers shell using the root account. Once logged in list the contents of the /var/F5 directory. You’ll notice partition<ID> directories, where <ID> equals the ID assigned to each partition.
[root@controller-2 ~]# ls -al /var/F5/
total 36
drwxr-xr-x. 10 root root 4096 Mar 10 21:43 .
drwxr-xr-x. 40 root root 4096 Mar  3 04:17 ..
drwxr-xr-x.  3 root root 4096 Feb  8 19:58 controller
drwxr-xr-x.  5 root root 4096 Feb  8 19:58 diagnostics
drwxr-xr-x.  2 root root 4096 Feb  8 19:58 fips
drwxr-xr-x. 24 root root 4096 Mar  3 04:27 partition1
drwxr-xr-x.  3 root root   20 Mar 10 17:54 partition2
drwxr-xr-x. 24 root root 4096 Mar  4 15:52 partition3
drwxr-xr-x. 22 root root 4096 Mar 10 21:45 partition4
drwxr-xr-x.  3 root root 4096 Feb  9 16:08 sirr
[root@controller-2 ~]#
The backup files for each partition are stored in the /var/F5/partition<ID>/configs directory. You will need to copy off each chassis partition backup file. You can use SCP to do this from the shell.
[root@controller-2 ~]# ls -al /var/F5/partition4/configs
total 52
drwxrwxr-x.  2 root admin    43 Mar 20 06:10 .
drwxr-xr-x. 22 root root   4096 Mar 10 21:45 ..
-rw-r--r--.  1 root root  46954 Mar 20 06:10 3-20-2021-Production-backup
[root@controller-2 ~]#
Below is an example using SCP to copy off the backup file from partition ID 4, you should do this for each of the partitions:
[root@controller-2 ~]# scp /var/F5/partition4/configs/3-20-2021-Production-backup root@10.255.0.142:/var/www/server/1/.
root@10.255.0.142's password:
3-20-2021-Production-backup                                                             100%   46KB  23.7MB/s   00:00
[root@controller-2 ~]#
Now repeat the same steps for each chassis partition in the system.
Export Backup From the Chassis Partition to a Remote Server via API
Each chassis partition in the system needs to be backed up independently. Below is an API example exporting the backup of the chassis partition Development. Note the API call is sent to the chassis partition IP address. Currently a remote HTTPS, SCP, or SFTP server is required to export the copy of the configuration backup using this method.
POST https://{{velos_chassis1_chassis_partition1_ip}}:8888/api/data/f5-utils-file-transfer:file/export
In the body of the API call enter the remote server crednetials and connectivity information.
{
    "f5-utils-file-transfer:insecure": "",
    "f5-utils-file-transfer:username": "corpuser",
    "f5-utils-file-transfer:password": "Passw0rd1!",
    "f5-utils-file-transfer:local-file": "configs/development-DB-BACKUP{{currentdate}}",
    "f5-utils-file-transfer:remote-host": "10.255.0.142",
    "f5-utils-file-transfer:remote-port": 0,
    "f5-utils-file-transfer:remote-file": "/upload/upload.php"
}
To check on the status of the file export you can use the following API call to check the transfer-status:
POST https://{{velos_chassis1_chassis_partition1_ip}}:8888/api/data/f5-utils-file-transfer:file/transfer-status
In the body of the POST, use the following json payload to denote the path and file name to be exported.
{
    "f5-utils-file-transfer:file-name": "configs/development-DB-BACKUP{{currentdate}}"
}
A status similar to the output below will be seen.
{
    "f5-utils-file-transfer:output": {
        "result": "\nS.No.|Operation  |Protocol|Local File Path |Remote Host  |Remote File Path   |Status  |Time  \n1    |Export file|HTTPS   |configs/development-DB-BACKUP2021-08-27 |10.255.0.142 |/upload/upload.php | Completed|Fri Aug 27 20:18:12 2021"
    }
}
Repeat this step for all the other chassis partitions in the system.
Download Backup From the Chassis Partition to a Client Machine via API
You can download configuration backup files from the F5OS layer using the F5OS API. To list the current config files in the configs/ directory use the following API call.
POST https://{{velos_chassis1_chassis_partition1_ip}}:8888/restconf/data/f5-utils-file-transfer:file/list
In the body of the API call, add the virtual path you want to list.
{
"f5-utils-file-transfer:path": "configs/"
}
You should see output like the example below.
{
    "f5-utils-file-transfer:output": {
        "entries": [
            {
                "name": "F5OS-BACKUP-APPLIANCE12022-04-19",
                "date": "Tue Apr 19 15:19:07 UTC 2022",
                "size": "81KB"
            },
            {
                "name": "F5OS-BACKUP-APPLIANCE12023-01-09",
                "date": "Mon Jan  9 16:31:10 UTC 2023",
                "size": "80KB"
            },
            {
                "name": "F5OS-BACKUP-APPLIANCE12023-11-17",
                "date": "Fri Nov 17 18:49:45 UTC 2023",
                "size": "88KB"
            },
            {
                "name": "F5OS-BACKUP-APPLIANCE12023-11-28",
                "date": "Wed Nov 29 00:21:07 UTC 2023",
                "size": "77KB"
            },
            {
                "name": "F5OS-BACKUP2022-01-20",
                "date": "Thu Jan 20 05:09:39 UTC 2022",
                "size": "60KB"
            },
            {
                "name": "jim-july",
                "date": "Wed Jul 13 15:35:15 UTC 2022",
                "size": "78KB"
            },
            {
                "name": "jim-test1",
                "date": "Wed Nov  8 21:09:09 UTC 2023",
                "size": "77KB"
            }
        ]
    }
}
To download a specific config file, use the following API call.
POST https://{{velos_chassis1_chassis_partition1_ip}}:8888/restconf/data/f5-utils-file-transfer:file/f5-file-download:download-file/f5-file-download:start-download
For the Headers secion of the Postman request be sure to add the following headers:
In the body of the API call select form-data, and then enter the key/value pairs as seen below. The example provided will download the configuration file named jim-july file that resides in the configs/ directory.
If you are using Postman, instead of clicking Send, click on the arrow next to Send, and then select Send and Download. You will then be prompted to save the file to your local file system.
test
Backing up Tenants
Back up all tenants using a UCS archive or other mechanism so that they can be restored after the F5OS layer has been restored. Another alternative to UCS backup/restore of tenants, is using Declarative Onboarding and AS3. If tenants are configured using DO and AS3 initially, and the declarations are saved, they can be replayed to restore a tenant. BIG-IQ could be used for this purpose as AS3 and DO declarations can be sent through BIG-IQ.
UCS Backup is covered in the following solution article on askf5:
K13132: Backing up and restoring BIG-IP configuration files with a UCS archive
As with any UCS backup and restore it is critical that you set and save the tenants master key, as you will need it when restoring the UCS if it contains encrypted configuration elements.
The following video provides a demo of backing up UCS files from the BIG-IP webUI; this is the same for VELOS tenants.
You can also use BIG-IQ to back up VELOS tenants.
BIG-IP Backup File Management from BIG-IQ
The following video provides a demo of backing up UCS files from the BIG-IQ webUI, this is the same for VELOS tenants.
Resetting the System (Not for Production)
For a proof-of-concept test, this section will provide steps to wipe out the entire system configuration in a graceful manner. This is not intended as a workflow for production environments, as you would not typically be deleting entire system configurations, instead you would be restoring pieces of the configuration in the case of failure.
The first step would be to ensure you have completed the previous sections, and have created backups for the system controllers, each chassis partition, and each tenant. These backups should have been copied out of the VELOS system to a remote server so that they can be copied back into the system and used to restore after it has been reset.
Remove Partitions and Reset Controller via CLI
The first step is to ensure each chassis partition’s ConfD database has been reset-to-default. This will wipe out all tenant configurations and networking as well as all the system parameters associated with each chassis partition.
For the Development chassis partition:
Development-1# config
Development-1(config)# system database reset-to-default proceed
Value for 'proceed' [no,yes]: yes
result Database reset-to-default successful.
Development-1(config)#
System message at 2021-03-02 22:51:54...
Commit performed by admin via tcp using cli.
Development-1(config)#
For the Production chassis partition:
Production-1# config
Entering configuration mode terminal
Production-1(config)# system database reset-to-default proceed
Value for 'proceed' [no,yes]: yes
result Database reset-to-default successful.
Production-1(config)#
System message at 2021-03-02 23:01:50...
Commit performed by admin via tcp using cli.
Production-1(config)#
Once the partition configurations have been cleared, you’ll need to login to the system controller CLI via the floating IP address. You’ll need to put all slots back into the none partition and commit the changes. This will allow the partitions to be deleted in the next step.
syscon-2-active(config)# slots slot 1-3 partition none
syscon-2-active(config-slot-1-3)# commit
Commit complete.
syscon-2-active(config-slot-1-3)#
Then remove the partitions from the system controller. In this case we will remove the chassis partitions called Production and Development.
syscon-2-active(config)# no partitions partition Production
syscon-2-active(config)# no partitions partition Development
syscon-2-active(config)# commit
Commit complete.
syscon-2-active(config)#
For the final step, reset the system controllers ConfD database. This will essentially wipe out all partitions and all of the system controller configuration essentially setting it back to factory default.
syscon-2-active(config)# system database config reset-default-config true
syscon-2-active(config)# commit
Once this has been committed, both controllers need to be rebooted manually and in quick succession of each other. Login to the active controller and enter config mode, and then issue the system reboot controllers controller standby command, this will reboot the standby controller first. Run the same command again but this time reboot the active controller immediately after resetting the primary controller. You don’t want any sort of long pause (minutes) between the resets. Ideally these commands should be run back-to-back.
syscon-1-active(config)# system reboot controllers controller standby

syscon-1-active(config)# system reboot controllers controller active
The system controllers should reboot, and their configurations will be completely wiped clean. You will need to login via the console / CLI to restore out-of-band networking connectivity, and then the previously archived configurations can be copied back and restored.
Remove Partitions and Reset Controller via API
The reset-to-default for the chassis partition database is not supported via the webUI. This can be done via an API call to the chassis partition IP address. Below is an example sending the database reset-to-default command to the chassis partition called Production:
POST https://{{velos_chassis1_chassis_partition1_ip}}:8888/restconf/data/openconfig-system:system/f5-database:database/f5-database:reset-to-default
The body of the API call must have the following:
{
"f5-database:proceed": "yes"
}
Repeat this for the other chassis partitions in the system, in this case send an API call to the IP address of the chassis partition Development:
POST https://{{velos_chassis1_chassis_partition2_ip}}:8888/restconf/data/openconfig-system:system/f5-database:database/f5-database:reset-to-default
The body of the API call must have the following:
{
"f5-database:proceed": "yes"
}
Next, send an API call to the system controller IP address to re-assign any slots that were previously part of a chassis partition to the partition none. In the example below slots 1-2 were assigned to the chassis partition Production, and slot3 was assigned to the chassis partition Development. All 3 slots will be moved to the partition none.
POST https://{{velos_chassis1_system_controller_ip}}:8888/restconf/data/
All 3 slots are assigned to partition none.
{
    "f5-system-slot:slots": {
        "slot": [
            {
                "slot-num": 1,
                "enabled": true,
                "partition": "none"
            },
            {
                "slot-num": 2,
                "enabled": true,
                "partition": "none"
            },
            {
                "slot-num": 3,
                "enabled": true,
                "partition": "none"
            }
        ]
    }
}
Once the slots have been removed from the partitions, you can Delete any chassis partitions that were configured. In this case both Production and Development chassis partitions will be deleted by sending API calls to the system controller IP address:
DELETE https://{{velos_chassis1_system_controller_ip}}:8888/restconf/data/f5-system-partition:partitions/partition=Production

DELETE https://{{velos_chassis1_system_controller_ip}}:8888/restconf/data/f5-system-partition:partitions/partition=Development
The last step in the reset procedure is to set the system controllers ConfD database back to default.
POST https://{{velos_chassis1_system_controller_ip}}:8888/restconf/data/openconfig-system:system/f5-database:database/f5-database:config
In the body of the API call, ensure the f5-database:reset-default-config is set to true.
{
"f5-database:reset-default-config": "true"
}
Once this has been committed, both controllers need to be rebooted manually and in quick succession of each other. Login to the active controller and enter config mode, and then issue the system reboot controllers controller standby command, this will reboot the standby controller first. Run the same command again but this time reboot the active controller immediately after resetting the primary controller. You don’t want any sort of long pause (minutes) between the resets. Ideally these commands should be run back-to-back.
The system controllers should reboot, and their configurations will be completely wiped clean. You will need to login via the CLI to restore out-of-band networking connectivity, and then the previously archived configurations can be copied back and restored.
Remove Partitions and Reset Controller via webUI
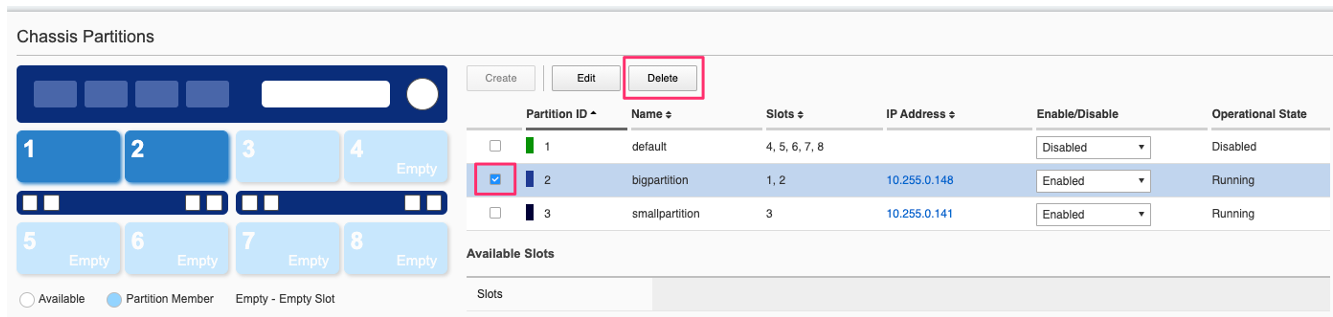
In the system controller webUI go to the Chassis Partitions page. Select the chassis partition you wish to delete by using the check box, then click the Delete button. The webUI will automatically remove the slots and return them to the none chassis partition before deleting the selected chassis partition. You should delete all partitions except for default.
There is no capability in the webUI currently to reset the system controller database. You’ll need to use the API or CLI to perform that function.
Restoring Out-of-Band Connectivity and Copying Archived Configs into the Controller
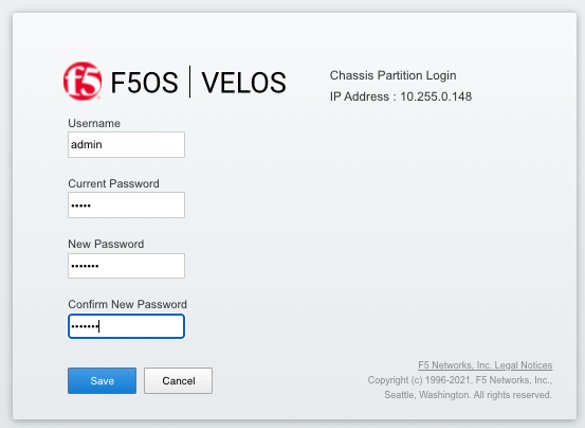
You will need to login to the system controller console port since all the networking configuration has now been wiped clean. You will login with the default username/password of admin/admin, since any previous accounts will have been wiped clean. On first login you will be prompted to change your password. Note below that the current console is connected to the standby controller, you’ll need to connect to the console of the active controller to make further changes:
controller-1 login: admin
Password:
You are required to change your password immediately (root enforced)
Changing password for admin.
(current) UNIX password: admin
New password: **************
Retype new password: **************
Last failed login: Fri Sep 10 14:49:55 UTC 2021 on ttyS0
There was 1 failed login attempt since the last successful login.
Last login: Thu Sep  2 14:09:57 on ttyS0
Welcome to the F5OS System Controller Management CLI
admin connected from 127.0.0.1 using console on syscon-1-standby
syscon-1-standby#
Logout of the system and login as root using the new password you just created for the admin account, you’ll be prompted to change the password again. There is a bug in the current F5OS version where the config directory is getting deleted on wiping out of the database, and it is not restored. Until that issue is resolved the recommended workaround is to create a new backup of the system controller configuration and that will create the required config directory. Note you will not restore from this backup, instead you will restore from the one taken earlier before the reset.
syscon-1-active# config
Entering configuration mode terminal
syscon-1-active(config)# system database config-backup name dummy-backup
response Succeeded.
syscon-1-active(config)# exit

syscon-1-active# file list path configs
entries {
    name
dummy-backup
test-backup
}
syscon-1-active#
To transfer files into the system controller you’ll have to manually configure the out-of-band networking first. In the case below the system controller out-of-band ethernet ports were aggregated into a LAG before the system was reset. This needs to be recreated, and then static and floating out-of-band IP addresses are assigned as well as a prefix length and gateway.
syscon-1-active# config
syscon-1-active(config)# interfaces interface mgmt-aggr
Value for 'config type' [a12MppSwitch,aal2,aal5,actelisMetaLOOP,...]: ieee8023adLag
syscon-1-active(config-interface-mgmt-aggr)# config name mgmt-aggr
syscon-1-active(config-interface-mgmt-aggr)# aggregation config lag-type LACP
syscon-1-active(config-interface-mgmt-aggr)# exit
syscon-1-active(config)# lacp interfaces interface mgmt-aggr
syscon-1-active(config-interface-mgmt-aggr)# config name mgmt-aggr
syscon-1-active(config-interface-mgmt-aggr)# exit
syscon-1-active(config)# interfaces interface 1/mgmt0
syscon-1-active(config-interface-1/mgmt0)# config name 1/mgmt0
syscon-1-active(config-interface-1/mgmt0)# config type ethernetCsmacd
syscon-1-active(config-interface-1/mgmt0)# ethernet config aggregate-id mgmt-aggr
syscon-1-active(config-interface-1/mgmt0)# exit
syscon-1-active(config)# exit
yscon-1-active(config)# interfaces interface 2/mgmt0
syscon-1-active(config-interface-2/mgmt0)# config name 2/mgmt0
syscon-1-active(config-interface-2/mgmt0)# config type ethernetCsmacd
syscon-1-active(config-interface-2/mgmt0)# ethernet config aggregate-id mgmt-aggr
syscon-1-active(config-interface-2/mgmt0)#
syscon-1-active(config)# system mgmt-ip config ipv4 controller-1 address 10.255.0.145
syscon-1-active(config)# system mgmt-ip config ipv4 controller-2 address 10.255.0.146
syscon-1-active(config)# system mgmt-ip config ipv4 floating address 10.255.0.147
syscon-1-active(config)# system mgmt-ip config ipv4 gateway 10.255.0.1
syscon-1-active(config)# system mgmt-ip config ipv4 prefix-length 24
syscon-1-active(config)# commit
Commit complete.
Importing System Controller Backups
Once the system is configured and out-of-band connectivity is restored, you can now copy the ConfD database archives back into the system controllers. If you are in the bash shell you can simply SCP the file into the /var/confd/configs directory. If it doesn’t exist, you can create it by creating a dummy backup of the system controller’s configuration as outlined earlier.
Next, SCP the file from a remote server:
scp root@10.255.0.142:/var/www/server/1/upload/SYSTEM-CONTROLLER-DB-BACKUP2021-09-10 .
Importing System Controller Backups via CLI
To import the file using the F5OS CLI you must have a remote HTTPS, SFTP, or SCP server to host the file. Use the file import command as seen below to import the file into the configs directory. You can then check the file transfer-status and list the contents of the config directory using the file list path configs command.
syscon-1-active# file import remote-host 10.255.0.142 remote-file /upload/SYSTEM-CONTROLLER-DB-BACKUP2021-09-10 local-file configs/SYSTEM-CONTROLLER-DB-BACKUP2021-09-10 username corpuser insecure
Value for 'password' (<string>): ********
result File transfer is initiated.(configs/SYSTEM-CONTROLLER-DB-BACKUP2021-09-10)


syscon-1-active# file transfer-status
result
S.No.|Operation  |Protocol|Local File Path                                             |Remote Host         |Remote File Path                                            |Status            |Time
1    |Import file|HTTPS   |configs/SYSTEM-CONTROLLER-DB-BACKUP2021-09-10               |10.255.0.142        |/upload/SYSTEM-CONTROLLER-DB-BACKUP2021-09-10               |         Completed|Wed Sep 15 01:57:39 2021


syscon-1-active# file list path configs/
entries {
    name
dummy-backup
SYSTEM-CONTROLLER-DB-BACKUP2021-09-10
}
syscon-1-active#
Importing System Controller Backups from a Remote Server via API
Post the following API call to the system controllers IP address to import the archived ConfD backup file from a remote HTTPS server to the configs directory on the system controller.
POST https://{{velos_chassis1_system_controller_ip}}:8888/restconf/data/f5-utils-file-transfer:file/import
In the body of the API call, enter the remote server credentials and connectivity information.
{
    "f5-utils-file-transfer:insecure": "",
    "f5-utils-file-transfer:protocol": "https",
    "f5-utils-file-transfer:username": "corpuser",
    "f5-utils-file-transfer:password": "Passw0rd!!",
    "f5-utils-file-transfer:remote-host": "10.255.0.142",
    "f5-utils-file-transfer:remote-file": "/upload/SYSTEM-CONTROLLER-DB-BACKUP{{currentdate}}",
    "f5-utils-file-transfer:local-file": "configs/SYSTEM-CONTROLLER-DB-BACKUP{{currentdate}}"
}
You may query the transfer status of the file via the following API command:
POST https://{{velos_chassis1_system_controller_ip}}:8888/api/data/f5-utils-file-transfer:file/transfer-status
In the body of the API call, enter the file name you want to query.
{
    "f5-utils-file-transfer:file-name": "configs/SYSTEM-CONTROLLER-DB-BACKUP{{currentdate}}"
}
If you want to list the contents of the config directory via API use the following API command:
POST https://{{velos_chassis1_system_controller_ip}}:8888/restconf/data/f5-utils-file-transfer:file/list
In the body of the API call, enter the path you want to query.
{
"f5-utils-file-transfer:path": "configs"
}
You’ll see the contents of the directory in the API response:
{
    "f5-utils-file-transfer:output": {
        "entries": [
            {
                "name": "\nSYSTEM-CONTROLLER-DB-BACKUP2021-09-10"
            }
        ]
    }
}
Uploading System Controller Backups from a Client Machine via API
Post the following API call to the system controllers IP address to upload the archived ConfD backup file from a client machine to the configs directory on the system controller.
POST https://{{velos_chassis1_system_controller_ip}}:8888/restconf/data/f5-utils-file-transfer:file/f5-file-upload-meta-data:upload/start-upload
In the body of the API call, enter the file name, size, and destination file-path.
{
    "size":65385,
    "name": "testrestore5",
    "file-path": "configs/"
}
If using Postman, you’ll want to setup a Test to capture the upload-id that can be used in the subsequent API call to upload the file. Below is the code to use in the Postman test to capture the upload-id as a variable.
var resp = pm.response.json();
pm.environment.set("upload-id", resp["f5-file-upload-meta-data:output"]["upload-id"])
Here is what it looks like inside of the Postman UI.

Once the upload-id has been obtained, you can now upload the file using the following API call.
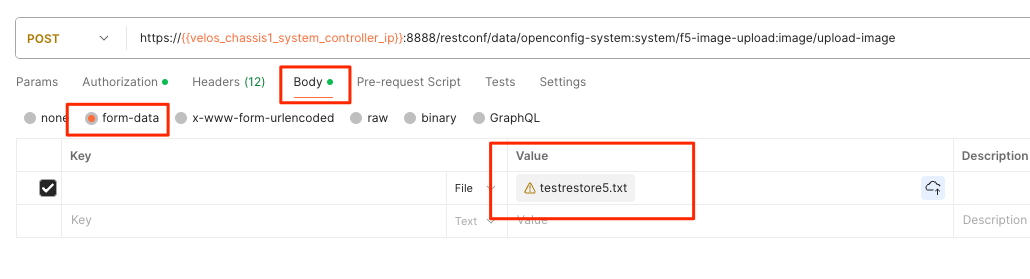
POST https://{{velos_chassis1_system_controller_ip}}:8888/restconf/data/openconfig-system:system/f5-image-upload:image/upload-image
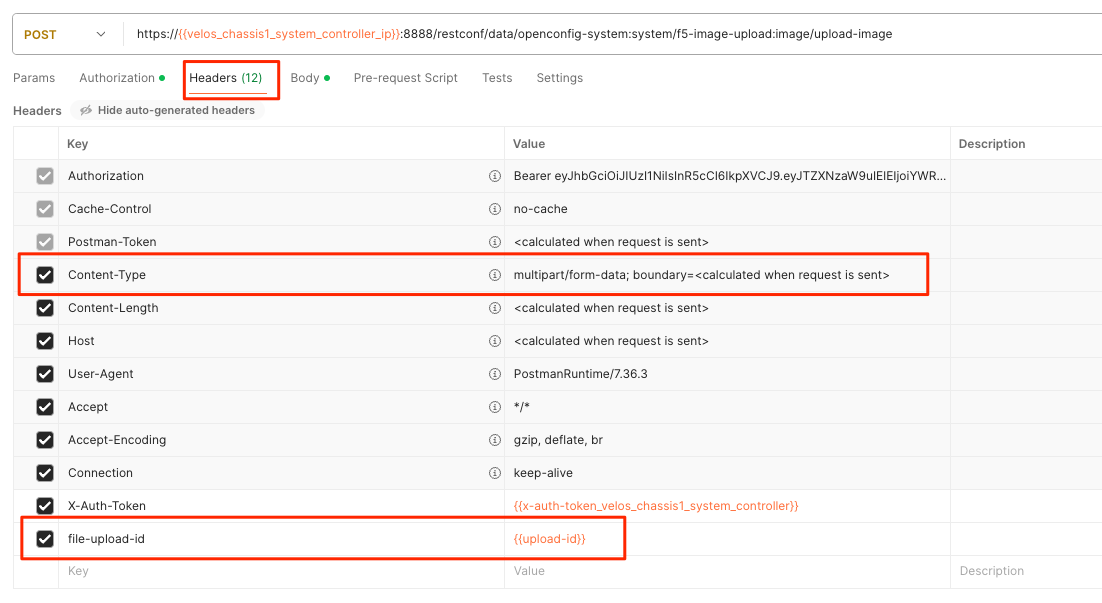
Ensure the following headers are set in the API call. You want to ensure the content-type and file-upload-id match what is seen below.
Finally, ensure the body is set for form-data, and you’ll want to browse your file system to select the file you are uploading.
Importing System Controller Backups via webUI
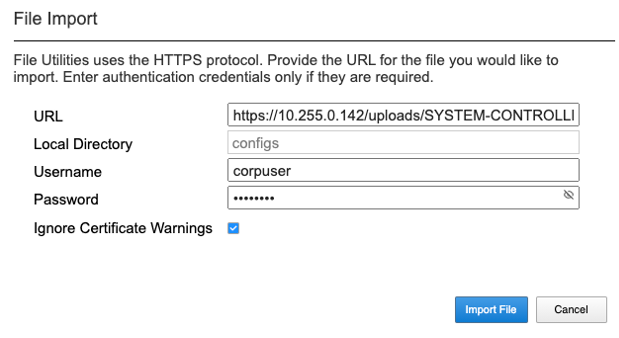
You can use the System Settings -> File Utilities page to import or upload an archived system controller backup from a remote HTTPS, SFTP, or SCP server. Use the drop-down option for Base Directory and choose configs to see the current files in that directory, and to import or export files. Choose the Import option and a popup will appear asking for the details of how to obtain the remote file. The Upload option will allow you to upload from you client machine via the browser.
Restoring the System Controller from a Database Backup
Restoring the System Controller from a Database Backup via CLI
Now that the system controller backup has been copied into the system, you can restore the previous backup using the system database config-restore command as seen below. You can use the file list command to verify the file name:
syscon-2-active# file list path configs/
entries {
    name
SYSTEM-CONTROLLER-DB-BACKUP2021-09-10
}
syscon-2-active#


syscon-2-active(config)# system database config-restore name SYSTEM-CONTROLLER-DB-BACKUP2021-09-10
response Succeeded.
syscon-2-active(config)#
Restoring the System Controller from a Database Backup via API
To restore the system controller ConfD database use the following API call:
POST https://{{velos_chassis1_system_controller_ip}}:8888/restconf/data/openconfig-system:system/f5-database:database/f5-database:config-restore
In the body of the API call, enter the file name.
{
"f5-database:name": "SYSTEM-CONTROLLER-DB-BACKUP{{currentdate}}"
}
Restoring the System Controller from a Database Backup via webUI
Currently there is no webUI support for restoration of the ConfD database, so you’ll need to use either the CLI or API to restore the system controller’s database.
Rebooting Blades
Rebooting Blades from the webUI
Once the database has been restored (you may need to wait a few minutes for the restoration to complete.) you’ll need to reboot the blades in-order for the config to be deployed successfully.
To reboot blades from the webUI log into each chassis partition. You will be prompted to change the password on first login.
Once logged in you’ll notice no configuration inside the chassis partition. Go to the System Settings -> General Page and reboot each blade. You’ll need to do the same procedure for other chassis partitions if they exist.
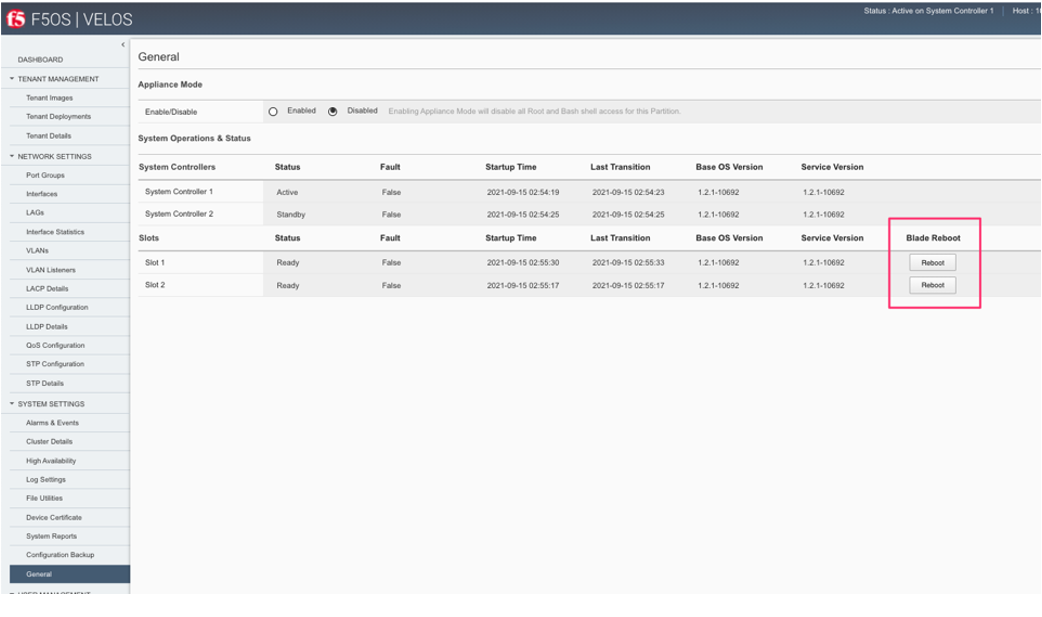
Wait for each blade to return to the Ready status before going onto the next step.
Rebooting Blades from the API
Once the database has been restored (you may need to wait a few minutes for the restoration to complete.) you’ll need to reboot the blades in-order for the config to be deployed successfully. You will have to change the default password on the partition first, once that is done follow the procedure below. To reboot blades from the API, using the following API commands to list nodes (Blades), and then reboot them. The command below will list the current nodes and their names that can then be used to reboot. Send the API call to the chassis partition IP address:
GET https://{{velos_chassis1_chassis_partition1_ip}}:8888/restconf/data/f5-cluster:cluster/nodes
The output will list all the nodes and blades.
{
    "f5-cluster:nodes": {
        "node": [
            {
                "name": "blade-1",
                "config": {
                    "name": "blade-1",
                    "enabled": true
                },
                "state": {
                    "name": "blade-1",
                    "enabled": true,
                    "node-running-state": "running",
                    "assigned": true,
                    "platform": {
                        "fpga-state": "FPGA_RDY",
                        "dma-agent-state": "DMA_AGENT_RDY"
                    },
                    "slot-number": 1,
                    "node-info": {
                        "creation-time": "2021-08-31T00:16:13Z",
                        "cpu": 28,
                        "pods": 250,
                        "memory": "131574100Ki"
                    },
                    "ready-info": {
                        "ready": true,
                        "last-transition-time": "2021-09-16T00:36:42Z",
                        "message": "kubelet is posting ready status"
                    },
                    "out-of-disk-info": {
                        "out-of-disk": false,
                        "last-transition-time": "2021-09-16T00:36:31Z",
                        "message": "kubelet has sufficient disk space available"
                    },
                    "disk-pressure-info": {
                        "disk-pressure": false,
                        "last-transition-time": "2021-09-16T00:36:31Z",
                        "message": "kubelet has no disk pressure"
                    },
                    "disk-data": {
                        "stats": [
                            {},
                            {},
                            {}
                        ]
                    },
                    "f5-disk-usage-threshold:disk-usage": {
                        "used-percent": 1,
                        "growth-rate": 0,
                        "status": "in-range"
                    }
                }
            },
            {
                "name": "blade-2",
                "config": {
                    "name": "blade-2",
                    "enabled": true
                },
                "state": {
                    "name": "blade-2",
                    "enabled": true,
                    "node-running-state": "running",
                    "assigned": true,
                    "platform": {
                        "fpga-state": "FPGA_RDY",
                        "dma-agent-state": "DMA_AGENT_RDY"
                    },
                    "slot-number": 2,
                    "node-info": {
                        "creation-time": "2021-08-31T00:16:12Z",
                        "cpu": 28,
                        "pods": 250,
                        "memory": "131574100Ki"
                    },
                    "ready-info": {
                        "ready": true,
                        "last-transition-time": "2021-09-16T00:36:44Z",
                        "message": "kubelet is posting ready status"
                    },
                    "out-of-disk-info": {
                        "out-of-disk": false,
                        "last-transition-time": "2021-09-16T00:36:34Z",
                        "message": "kubelet has sufficient disk space available"
                    },
                    "disk-pressure-info": {
                        "disk-pressure": false,
                        "last-transition-time": "2021-09-16T00:36:34Z",
                        "message": "kubelet has no disk pressure"
                    },
                    "disk-data": {
                        "stats": [
                            {},
                            {},
                            {}
                        ]
                    },
                    "f5-disk-usage-threshold:disk-usage": {
                        "used-percent": 1,
                        "growth-rate": 0,
                        "status": "in-range"
                    }
                }
            },
            {
                "name": "blade-3",
                "config": {
                    "name": "blade-3",
                    "enabled": true
                },
                "state": {
                    "name": "blade-3",
                    "enabled": true,
                    "node-running-state": "running",
                    "assigned": false,
                    "slot-number": 3
                }
            },
            {
                "name": "blade-4",
                "config": {
                    "name": "blade-4",
                    "enabled": true
                },
                "state": {
                    "name": "blade-4",
                    "enabled": true,
                    "node-running-state": "running",
                    "assigned": false,
                    "slot-number": 4
                }
            },
            {
                "name": "blade-5",
                "config": {
                    "name": "blade-5",
                    "enabled": true
                },
                "state": {
                    "name": "blade-5",
                    "enabled": true,
                    "node-running-state": "running",
                    "assigned": false,
                    "slot-number": 5
                }
            },
            {
                "name": "blade-6",
                "config": {
                    "name": "blade-6",
                    "enabled": true
                },
                "state": {
                    "name": "blade-6",
                    "enabled": true,
                    "node-running-state": "running",
                    "assigned": false,
                    "slot-number": 6
                }
            },
            {
                "name": "blade-7",
                "config": {
                    "name": "blade-7",
                    "enabled": true
                },
                "state": {
                    "name": "blade-7",
                    "enabled": true,
                    "node-running-state": "running",
                    "assigned": false,
                    "slot-number": 7
                }
            },
            {
                "name": "blade-8",
                "config": {
                    "name": "blade-8",
                    "enabled": true
                },
                "state": {
                    "name": "blade-8",
                    "enabled": true,
                    "node-running-state": "running",
                    "assigned": false,
                    "slot-number": 8
                }
            }
        ]
    }
}
You must reboot each blade that was previously assigned to a partition:
POST https://{{velos_chassis1_chassis_partition1_ip}}:8888/restconf/data/f5-cluster:cluster/nodes/node=blade-1/reboot

POST https://{{velos_chassis1_chassis_partition1_ip}}:8888/restconf/data/f5-cluster:cluster/nodes/node=blade-2/reboot

POST https://{{velos_chassis1_chassis_partition2_ip}}:8888/restconf/data/f5-cluster:cluster/nodes/node=blade-3/reboot
Rebooting Blades from the CLI
Once the database has been restored (you may need to wait a few minutes for the restoration to complete.) you’ll need to reboot the blades in-order for the config to be deployed successfully. You will have to change the default password on the partition first, once that is done follow the procedure below.
First, list the blades within the current chassis partition. In the example below, the production chassis partition has 2 blades (blade-1 & blade-2). You’ll need to reboot both these blades from within the chassis partition.
production-2# show cluster nodes summary
                                    NODE
                VIRTUAL            RUNNING           PLATFORM
NAME     ENABLED  SLOT     ASSIGNED  STATE    PRESENT  ID        SLOTS  NODE STATUS
------------------------------------------------------------------------------------------
blade-1  true     1        true      running  single   BX110     [ 1 ]  services running
blade-2  true     2        true      running  single   BX110     [ 2 ]  services running
blade-3  -        -        false     -        -        -         -      -
blade-4  -        -        false     -        -        -         -      -
blade-5  -        -        false     -        -        -         -      -
blade-6  -        -        false     -        -        -         -      -
blade-7  -        -        false     -        -        -         -      -
blade-8  -        -        false     -        -        -         -      -

production-2#
To reboot blade-1 and blade-2, use the following CLI commands.
production-2# cluster reboot node blade-1
result
blade-1 reboot requested.
production-2# cluster reboot node blade-2
result
blade-2 reboot requested.
production-2#
You can then use the command show cluster nodes summary to see the reboot status:
production-2# show cluster nodes summary
                                    NODE
                VIRTUAL            RUNNING           PLATFORM
NAME     ENABLED  SLOT     ASSIGNED  STATE    PRESENT  ID        SLOTS  NODE STATUS
--------------------------------------------------------------------------------------------
blade-1  true     1        true      running  single   BX110     [ 1 ]  reboot in-progress
blade-2  true     2        true      running  single   BX110     [ 2 ]  reboot in-progress
blade-3  -        -        false     -        -        -         -      -
blade-4  -        -        false     -        -        -         -      -
blade-5  -        -        false     -        -        -         -      -
blade-6  -        -        false     -        -        -         -      -
blade-7  -        -        false     -        -        -         -      -
blade-8  -        -        false     -        -        -         -      -

production-2#
Wait until the blades are back in services running node status before moving on. If you have additional chassis partitions repeat the same steps above.
Importing Archived Chassis Partition Configs
Importing Archived Chassis Partition Configs via CLI
Log directly into the chassis partition CLI and use the file import command to copy the archived image from a remote HTTPS server. You can then use the file transfer-status to see if the import succeeded, and then the file list command to see the file.
Production-1# file import remote-host 10.255.0.142 remote-file /upload/Production-DB-BACKUP2021-09-10 local-file configs/Production-DB-BACKUP2021-09-10 username corpuser insecure
Value for 'password' (<string>): ********
result File transfer is initiated.(configs/Production-DB-BACKUP2021-09-10)


Production-1# file transfer-status
result
S.No.|Operation  |Protocol|Local File Path                                             |Remote Host         |Remote File Path                                            |Status            |Time
1    |Import file|HTTPS   |configs/Production-DB-BACKUP2021-09-10                    |10.255.0.142        |/upload/Production-DB-BACKUP2021-09-10                    |         Completed|Wed Sep 15 03:15:43 2021


Production-1# file list path configs/
entries {
    name
Production-DB-BACKUP2021-09-10
}
Production-1#
Repeat this process for each chassis partition in the system.
development-1# file import remote-host 10.255.0.142 remote-file /upload/development-DB-BACKUP2021-09-10 local-file configs/development-DB-BACKUP2021-09-10 username corpuser insecure
Value for 'password' (<string>): ********
result File transfer is initiated.(configs/development-DB-BACKUP2021-09-10)


development-1# file transfer-status
result
S.No.|Operation  |Protocol|Local File Path                                             |Remote Host         |Remote File Path                                            |Status            |Time
1    |Import file|HTTPS   |configs/development-DB-BACKUP2021-09-10                  |10.255.0.142        |/upload/development-DB-BACKUP2021-09-10                  |         Completed|Wed Sep 15 03:21:40 2021


development-1# file list path configs/
entries {
    name
development-DB-BACKUP2021-09-10
}
development-1#
Importing Archived Chassis Partition Configs form a Remote Server via API
Archived ConfD database backups can be imported from a remote HTTPS, SFTP, or SCP server via the following API call to the chassis partition IP addresses. Each chassis partition will need to have its own archived database imported so that it may be restored:
POST https://{{velos_chassis1_chassis_partition2_ip}}:8888/restconf/data/f5-utils-file-transfer:file/import
In the body of the API call, enter the remote server credentials and connectivty information.
{
    "f5-utils-file-transfer:insecure": "",
    "f5-utils-file-transfer:protocol": "https",
    "f5-utils-file-transfer:username": "corpuser",
    "f5-utils-file-transfer:password": "Passw0rd!!",
    "f5-utils-file-transfer:remote-host": "10.255.0.142",
    "f5-utils-file-transfer:remote-file": "/upload/development-DB-BACKUP2021-09-10",
    "f5-utils-file-transfer:local-file": "configs/development-DB-BACKUP2021-09-10"
}
You can check on the file transfer status by issubg the following API call:
POST https://{{velos_chassis1_chassis_partition1_ip}}:8888/api/data/f5-utils-file-transfer:file/transfer-status
A status like the one below will show a status of completed if successful:
{
    "f5-utils-file-transfer:output": {
        "result": "\nS.No.|Operation  |Protocol|Local File Path                                             |Remote Host         |Remote File Path                                            |Status            |Time                \n1    |Import file|HTTPS   |configs/Production-DB-BACKUP2021-09-10                    |10.255.0.142        |/upload/Production-DB-BACKUP2021-09-10                    |         Completed|Thu Sep 16 01:33:50 2021"
    }
}
Repeat similar steps for remaining chassis partitions:
POST https://{{velos_chassis1_chassis_partition1_ip}}:8888/restconf/data/f5-utils-file-transfer:file/import
In the body of the API call, enter the remote server credentials and connectivty information.
{
    "f5-utils-file-transfer:insecure": "",
    "f5-utils-file-transfer:protocol": "https",
    "f5-utils-file-transfer:username": "corpuser",
    "f5-utils-file-transfer:password": "Passw0rd!!",
    "f5-utils-file-transfer:remote-host": "10.255.0.142",
    "f5-utils-file-transfer:remote-file": "/upload/Production-DB-BACKUP2021-09-10",
    "f5-utils-file-transfer:local-file": "configs/Production-DB-BACKUP2021-09-10"
}
Uploading Archived Chassis Partition Configs form a Client Machine via API
Post the following API call to the chassis partition IP address to upload the archived ConfD backup file from a client machine to the configs directory on the chassis partition.
POST https://{{velos_chassis1_system_controller_ip}}:8888/restconf/data/f5-utils-file-transfer:file/f5-file-upload-meta-data:upload/start-upload
In the body of the API call, enter the file name, size, and destination file-path.
{
    "size":65385,
    "name": "testrestore5",
    "file-path": "configs/"
}
If using Postman, you’ll want to setup a Test to capture the upload-id that can be used in the subsequent API call to upload the file. Below is the code to use in the Postman test to capture the upload-id as a variable.
var resp = pm.response.json();
pm.environment.set("upload-id", resp["f5-file-upload-meta-data:output"]["upload-id"])
Here is what it looks like inside of the Postman UI.
Once the upload-id has been obtained, you can now upload the file using the following API call.
POST https://{{velos_chassis1_system_controller_ip}}:8888/restconf/data/openconfig-system:system/f5-image-upload:image/upload-image
Ensure the following headers are set in the API call. You want to ensure the content-type and file-upload-id match what is seen below.
Finally, ensure the body is set for form-data, and you’ll want to browse your file system to select the file you are uploading.
Importing Archived Chassis Partition Configs via webUI
You can use the System Settings -> File Utilities page to import archives from a remote HTTPS server.

Restoring Chassis Partitions from Database Backups
Once the archived chassis partition configs have been copied into the partition, you can then restore them using the procedures in this section.
Restoring Chassis Partitions from Database Backups via CLI
To restore a configuration database backup within a chassis partition, use the system database config-restore command inside the chassis partition. Note that a newly restored chassis partition will not have any tenant images loaded so tenants will show a Pending status until the proper image is loaded for that tenant.
Production-1(config)# system database config-restore name Production-DB-BACKUP2021-09-10
A clean configuration is required before restoring to a previous configuration.
Please perform a reset-to-default operation if you have not done so already.
Proceed? [yes/no]: yes
result Database config-restore successful.
Production-1(config)#
System message at 2021-09-15 03:25:53...
Commit performed by admin via tcp using cli.
Production-1(config)#


Development-1(config)# system database config-restore name development-DB-BACKUP2021-09-10
A clean configuration is required before restoring to a previous configuration.
Please perform a reset-to-default operation if you have not done so already.
Proceed? [yes/no]: yes
result Database config-restore successful.
Development-1(config)#
System message at 2021-09-15 03:23:50...
Commit performed by admin via tcp using cli.
Development-1(config)#
The tenant is properly restored and deployed; however, its status is pending waiting on image:

This can be seen in the chassis partition CLI by using the show tenants command. Note the Phase will display: Tenant image not found.
Production-2# show tenants
tenants tenant tenant1
state unit-key-hash    dhDnf4YaHd+hkKuPm6qg0slHZooGjGa24PI3X9jAG4UFy1mRFn0T7N4ddcVP3gVdcrJbMo9coIDBPjWGkjwk0g==
state type             BIG-IP
state image            BIGIP-17.1.1.2-0.0.10.ALL-F5OS.qcow2.zip.bundle
state nodes            [ 1 2 ]
state mgmt-ip          10.255.2.27
state prefix-length    24
state dag-ipv6-prefix-length 128
state gateway          10.255.2.252
state vlans            [ 501 3010 3011 ]
state cryptos          enabled
state tenant-auth-support disabled
state vcpu-cores-per-node 22
state qat-vf-count     33
state memory           79360
state storage size 82
state running-state    deployed
state appliance-mode disabled
state feature-flags stats-stream-capable false
state status           Pending
state mac-data base-mac 00:94:a1:8e:58:09
state mac-data mac-pool-size 1
MAC
-------------------
00:94:a1:8e:58:09

                INSTANCE                                                                                           CREATION  READY                                 MGMT
NODE  POD NAME   ID        PHASE                                                                                    TIME      TIME   STATUS                         MAC
--------------------------------------------------------------------------------------------------------------------------------------------------------------------------
1     tenant1-1  1         Tenant image not found - Verify node is synchronized and image is present on the system                   Retrying tenant deployment...  -
2     tenant1-2  2         Tenant image not found - Verify node is synchronized and image is present on the system                   Retrying tenant deployment...  -

Production-2#
Copy the proper tenant image into each partition and the tenant should then deploy successfully. Below is a show images output before and after an image is successfully uploaded. Note the STATUS of not-present and then replicated after the image has been uploaded:
Production-2# show images
                                                 IN
NAME                                             USE    TYPE      STATUS
------------------------------------------------------------------------------
BIGIP-17.1.1.2-0.0.10.ALL-F5OS.qcow2.zip.bundle  false  vm-image  not-present

Production-2#


Production-2# show images
                                                IN
NAME                                             USE    TYPE      STATUS
------------------------------------------------------------------------------
BIGIP-17.1.1.2-0.0.10.ALL-F5OS.qcow2.zip.bundle  false  vm-image  replicated

Production-2#
Once the tenant is deployed and fully booted you may login, change the default password, and then upload and restore the tenant UCS image. Repeat this step for each tenant on the system.
Restoring Chassis Partitions from Database Backups via API
The following API commands will restore the database backups on the two chassis partitions:
POST https://{{velos_chassis1_chassis_partition1_ip}}:8888/restconf/data/openconfig-system:system/f5-database:database/f5-database:config-restore
Enter the backupfile to be restored in the body of the API call.
{
"f5-database:name": "Production-DB-BACKUP2021-09-10"
}
Repeat the same process for other partitions on the system.
POST https://{{velos_chassis1_chassis_partition2_ip}}:8888/restconf/data/openconfig-system:system/f5-database:database/f5-database:config-restore
Enter the backupfile to be restored in the body of the API call.
{
"f5-database:name": "development-DB-BACKUP2021-09-10"
}
The tenants are properly restored and deployed; however, its status is pending waiting on image. You can check the status of the images with the following API call:
GET https://{{velos_chassis1_chassis_partition1_ip}}:8888/restconf/data/f5-tenant-images:images
You will need to load the image that the tenant was running when it was archived. The following API call will import a tenant image from a remote HTTPS server:
POST https://{{velos_chassis1_chassis_partition1_ip}}:8888/api/data/f5-utils-file-transfer:file/import
Enter the remote server information.
{
    "input": [
        {
            "remote-host": "10.255.0.142",
            "remote-file": "upload/{{Tenant_Image}}",
            "local-file": "images/{{Tenant_Image}}",
            "insecure": "",
            "f5-utils-file-transfer:username": "corpuser",
            "f5-utils-file-transfer:password": "Passw0rd!!"
        }
    ]
}
You can verify the tenant has successfully started once the image has been loaded:
GET https://{{velos_chassis1_chassis_partition1_ip}}:8888/restconf/data/f5-tenants:tenants
The tenant status will be displayed.
{
    "f5-tenants:tenants": {
        "tenant": [
            {
                "name": "tenant1",
                "config": {
                    "name": "tenant1",
                    "type": "BIG-IP",
                    "image": "BIGIP-15.1.4-0.0.46.ALL-VELOS.qcow2.zip.bundle",
                    "nodes": [
                        1
                    ],
                    "mgmt-ip": "10.255.0.149",
                    "prefix-length": 24,
                    "gateway": "10.255.0.1",
                    "vlans": [
                        501,
                        3010,
                        3011
                    ],
                    "cryptos": "enabled",
                    "vcpu-cores-per-node": "4",
                    "memory": "14848",
                    "storage": {
                        "size": 76
                    },
                    "running-state": "deployed",
                    "appliance-mode": {
                        "enabled": false
                    }
                },
                "state": {
                    "name": "tenant1",
                    "unit-key-hash": "Y00du3mZxvi0UXGNV32NpCMLTRia8AbLvaHwAAuLxg2IS6EWppPwnSGSecfleaHh0lHXENQWKACz27xe9CyW5w==",
                    "type": "BIG-IP",
                    "image": "BIGIP-15.1.4-0.0.46.ALL-VELOS.qcow2.zip.bundle",
                    "nodes": [
                        1
                    ],
                    "mgmt-ip": "10.255.0.149",
                    "prefix-length": 24,
                    "gateway": "10.255.0.1",
                    "mac-ndi-set": [
                        {
                            "ndi": "default",
                            "mac": "00:94:a1:8e:d0:0b"
                        }
                    ],
                    "vlans": [
                        501,
                        3010,
                        3011
                    ],
                    "cryptos": "enabled",
                    "vcpu-cores-per-node": "4",
                    "memory": "14848",
                    "storage": {
                        "size": 76
                    },
                    "running-state": "deployed",
                    "mac-data": {
                        "base-mac": "00:94:a1:8e:d0:09",
                        "mac-pool-size": 1
                    },
                    "appliance-mode": {
                        "enabled": false
                    },
                    "status": "Running",
                    "primary-slot": 1,
                    "image-version": "BIG-IP 15.1.4 0.0.46",
                    "instances": {
                        "instance": [
                            {
                                "node": 1,
                                "instance-id": 1,
                                "phase": "Running",
                                "image-name": "BIGIP-15.1.4-0.0.46.ALL-VELOS.qcow2.zip.bundle",
                                "creation-time": "2021-09-16T01:57:11Z",
                                "ready-time": "2021-09-16T01:56:58Z",
                                "status": "Started tenant instance",
                                "mgmt-mac": "36:4d:6d:2d:a8:80"
                            }
                        ]
                    }
                }
            },
            {
                "name": "tenant2",
                "config": {
                    "name": "tenant2",
                    "type": "BIG-IP",
                    "image": "BIGIP-15.1.4-0.0.46.ALL-VELOS.qcow2.zip.bundle",
                    "nodes": [
                        1,
                        2
                    ],
                    "mgmt-ip": "10.255.0.205",
                    "prefix-length": 24,
                    "gateway": "10.255.0.1",
                    "vlans": [
                        502,
                        3010,
                        3011
                    ],
                    "cryptos": "enabled",
                    "vcpu-cores-per-node": "6",
                    "memory": "22016",
                    "storage": {
                        "size": 76
                    },
                    "running-state": "deployed",
                    "appliance-mode": {
                        "enabled": false
                    }
                },
                "state": {
                    "name": "tenant2",
                    "unit-key-hash": "fRO3SmBcQxURAjrANfv8u4J9EDH+kG1KevOn99rvDupNW2HMyoBeWqN4nhabnmAha/wbbNxAR9l2JW9LEF+7FQ==",
                    "type": "BIG-IP",
                    "image": "BIGIP-15.1.4-0.0.46.ALL-VELOS.qcow2.zip.bundle",
                    "nodes": [
                        1,
                        2
                    ],
                    "mgmt-ip": "10.255.0.205",
                    "prefix-length": 24,
                    "gateway": "10.255.0.1",
                    "mac-ndi-set": [
                        {
                            "ndi": "default",
                            "mac": "00:94:a1:8e:d0:0c"
                        }
                    ],
                    "vlans": [
                        502,
                        3010,
                        3011
                    ],
                    "cryptos": "enabled",
                    "vcpu-cores-per-node": "6",
                    "memory": "22016",
                    "storage": {
                        "size": 76
                    },
                    "running-state": "deployed",
                    "mac-data": {
                        "base-mac": "00:94:a1:8e:d0:0a",
                        "mac-pool-size": 1
                    },
                    "appliance-mode": {
                        "enabled": false
                    },
                    "status": "Running",
                    "primary-slot": 1,
                    "image-version": "BIG-IP 15.1.4 0.0.46",
                    "instances": {
                        "instance": [
                            {
                                "node": 1,
                                "instance-id": 1,
                                "phase": "Running",
                                "image-name": "BIGIP-15.1.4-0.0.46.ALL-VELOS.qcow2.zip.bundle",
                                "creation-time": "2021-09-16T01:58:41Z",
                                "ready-time": "2021-09-16T01:58:27Z",
                                "status": "Started tenant instance",
                                "mgmt-mac": "de:08:94:a8:1b:08"
                            },
                            {
                                "node": 2,
                                "instance-id": 2,
                                "phase": "Running",
                                "image-name": "BIGIP-15.1.4-0.0.46.ALL-VELOS.qcow2.zip.bundle",
                                "creation-time": "2021-09-16T01:58:37Z",
                                "ready-time": "2021-09-16T01:58:24Z",
                                "status": "Started tenant instance",
                                "mgmt-mac": "a6:fe:75:70:21:c8"
                            }
                        ]
                    }
                }
            }
        ]
    }
}
The final step is to restore the backups on each individual tenant. This will follow the normal BIG-IP UCS restore process.