F5 BIG-IQ Centralized Management Lab > BIG-IQ All Labs > Class 5: BIG-IQ Device Management > Module 8: Declarative Onboarding and VE Creation on AWS Source | Edit on
Lab 8.4: AWS BIG-IP HA VE Creation and Onboarding using the API
Note
Estimated time to complete: 30 minutes
In this lab, we are going to create and onboard from scratch a cluster of BIG-IPs in AWS using BIG-IQ.
Using what you learned in previous labs, you can run the same below steps using the BIG-IQ UI to create and onboard the VE.
Lab environment access
If you have not yet visited the page Getting Started, please do so.
Tasks
- Open Visual Studio Code, then use the Visual Studio code REST client extension and authenticate to BIG-IQ (follow instructions).
- If not already done, run through Lab 8.1 Prepare your AWS Account.
First, let’s get the Cloud Environment Reference. Using Visual Studio Code REST client, use the BIG-IQ API call and replace the method and URL with
GET https://10.1.1.4/mgmt/cm/cloud/environments.Save the selfLink value.
Example:
"selfLink": "https://localhost/mgmt/cm/cloud/environments/cbda6942-0224-391a-885f-681fec4f8b94"Click right and duplicate the tab. Replace the method and URL with
POST https://10.1.1.4/mgmt/cm/cloud/tasks/create-ve. Copy/Paste the below from the validator to the body under the call using the REST client VS code extension.
1 2 3 4 5 6 7 | {
"name": "bigipvm-cluster01",
"veName": "bigipvm-cluster01",
"environmentReference": {
"link": "https://localhost/mgmt/cm/cloud/environments/cbda6942-0224-391a-885f-681fec4f8b94"
}
}
|
Note
You MUST accept the terms of the instance in AWS before you can launch the image. Accept the EULA here
Let’s retrieve the privateKeyFilename by doing a GET on the same URI: GET https://10.1.1.4/mgmt/cm/cloud/tasks/create-ve.
Keep a note of it as we will need it later.
- Repeat previous step to create the 2nd VE. Don’t forget to update the veName.
1 2 3 4 5 6 7 | {
"name": "bigipvm-cluster02",
"veName": "bigipvm-cluster02",
"environmentReference": {
"link": "https://localhost/mgmt/cm/cloud/environments/cbda6942-0224-391a-885f-681fec4f8b94"
}
}
|
Let’s retrieve the privateKeyFilename by doing a GET on the same URI: GET https://10.1.1.4/mgmt/cm/cloud/tasks/create-ve.
Keep a note of it as we will need it later.
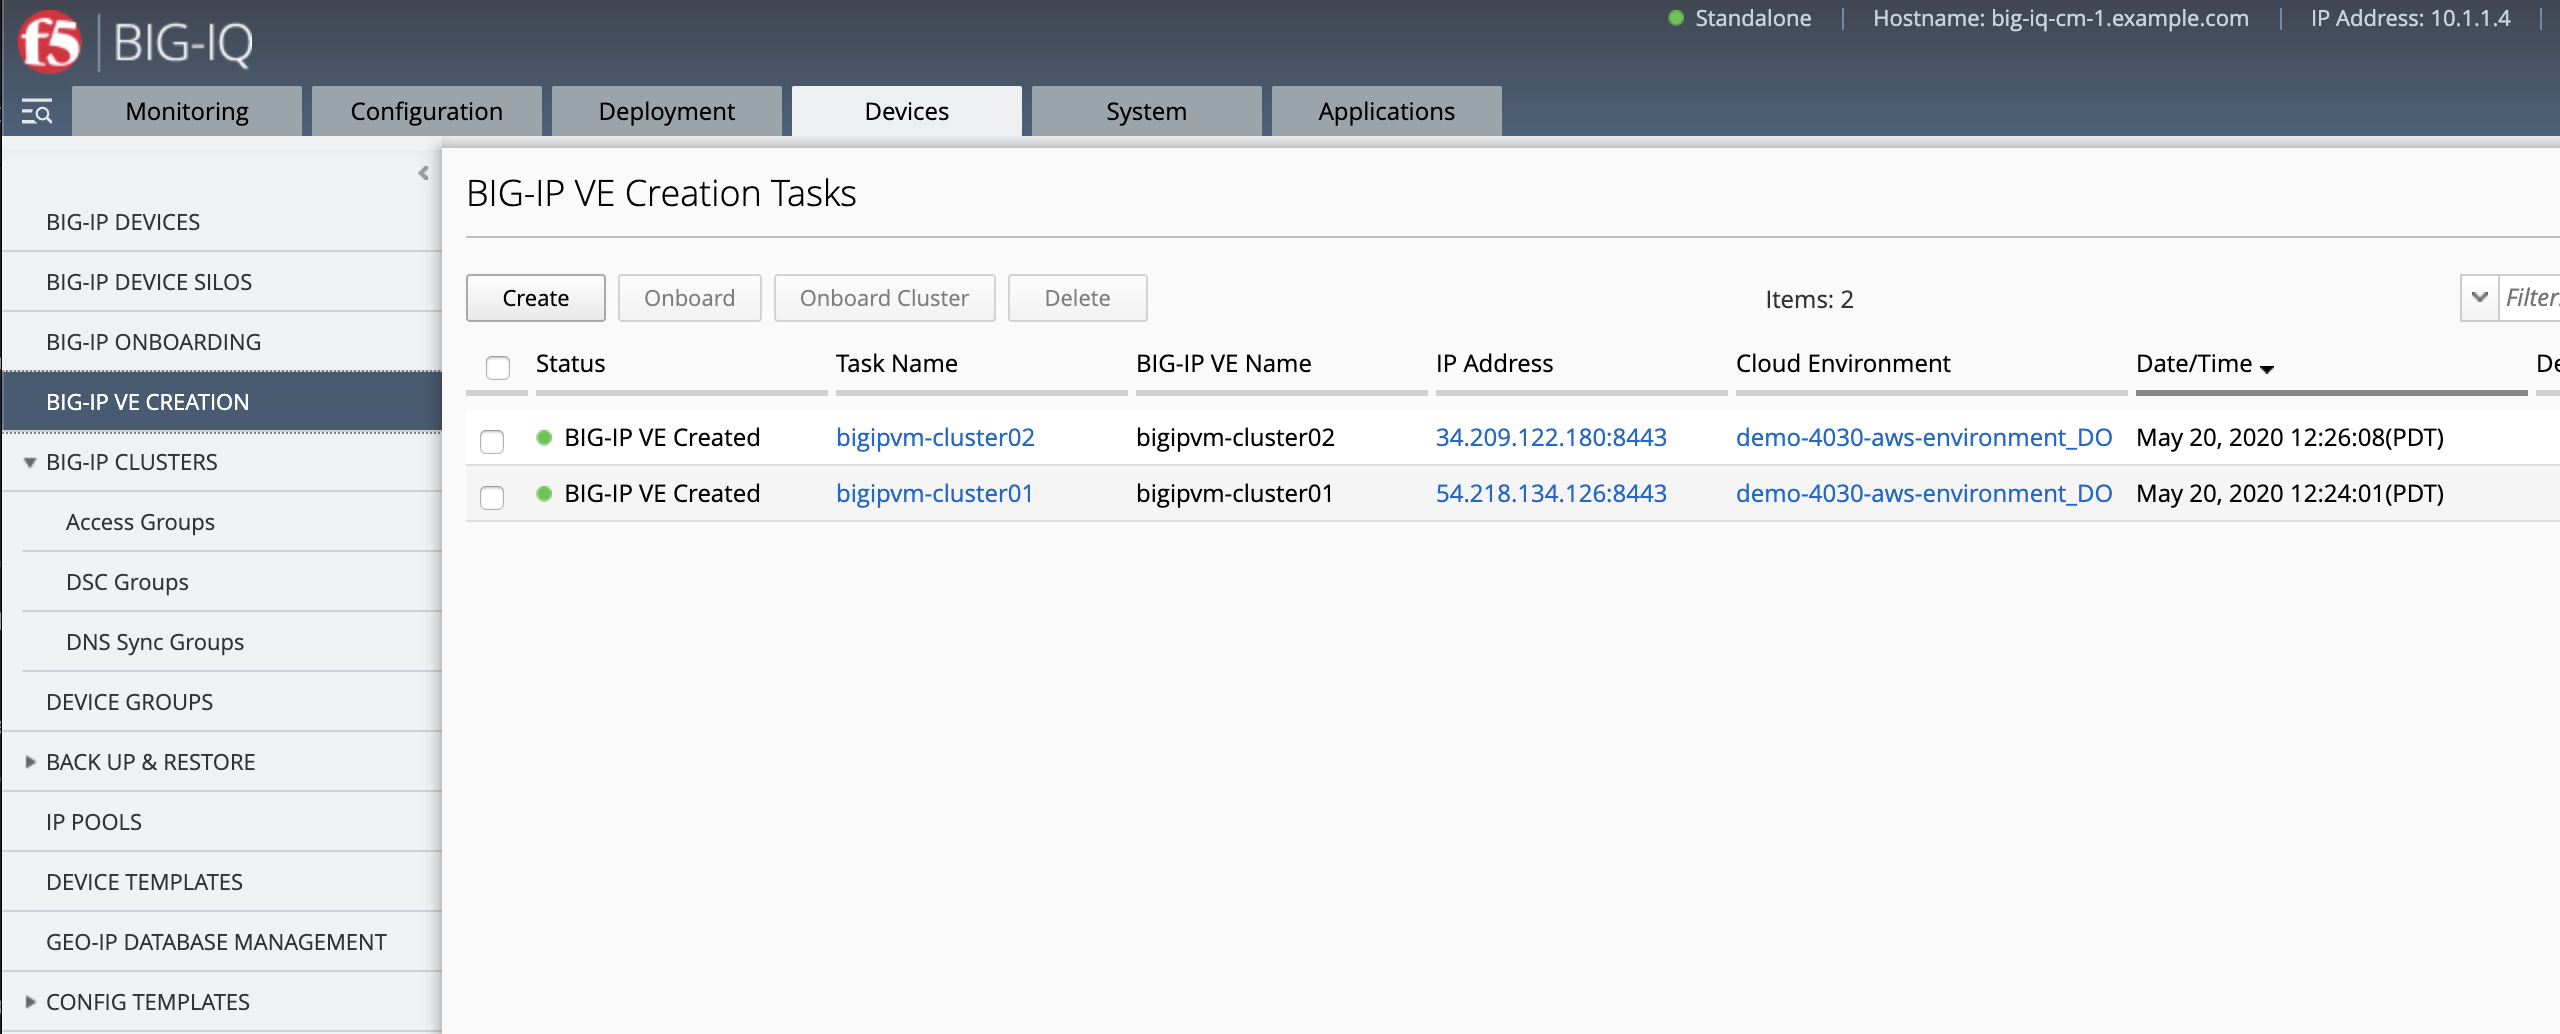
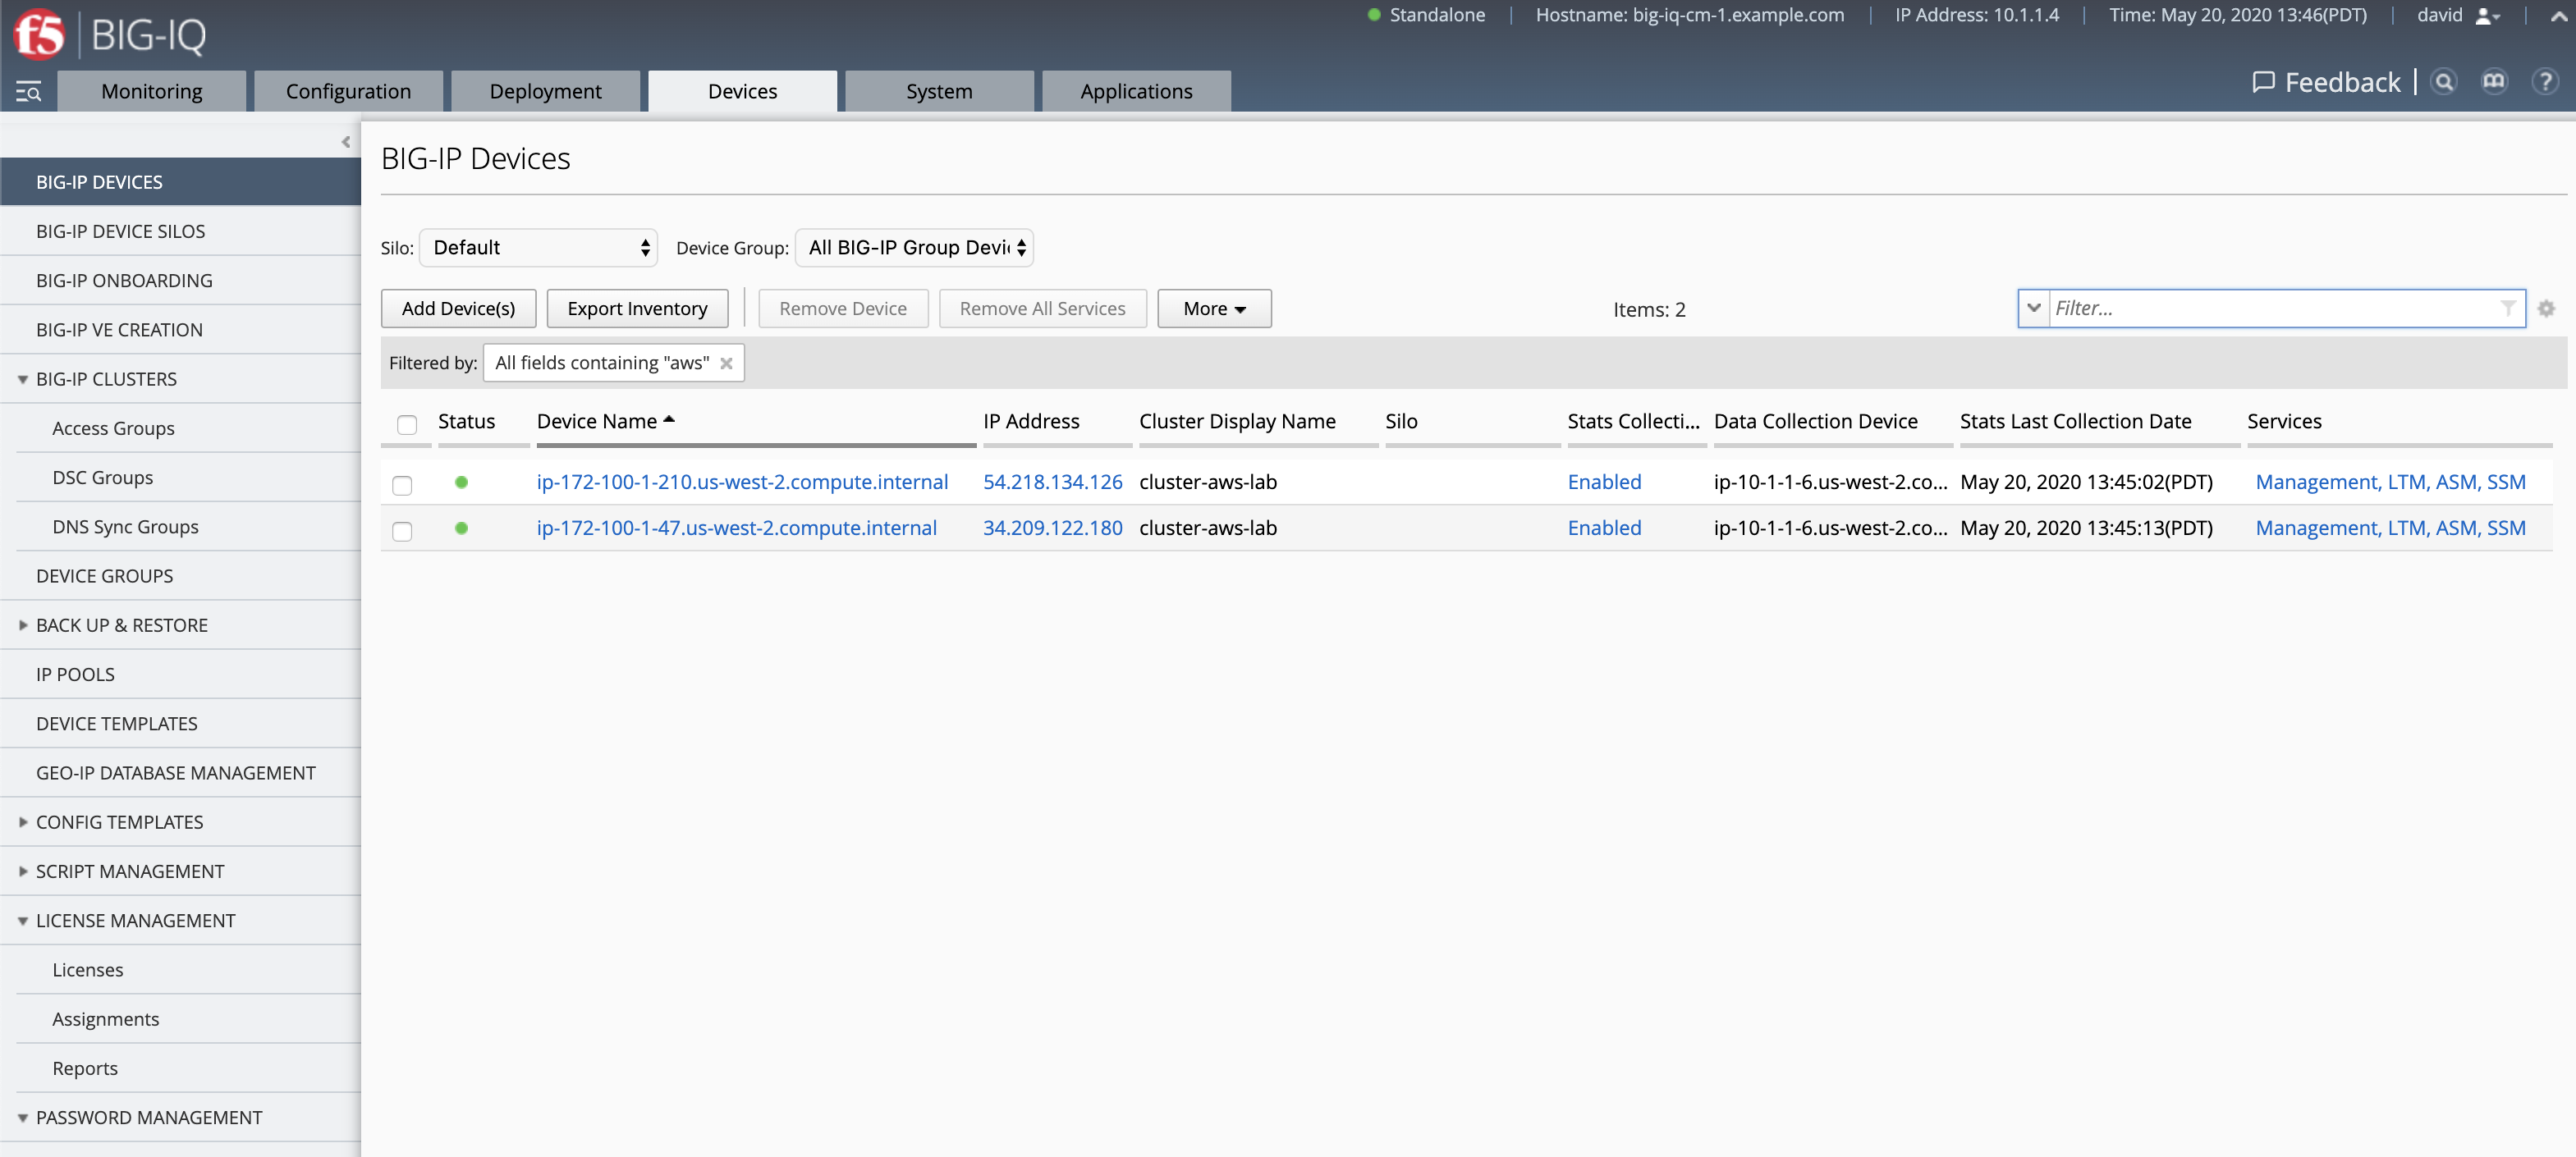
- Login as david and navigate to Devices > BIG-IP VE Creation and see the 2 BIG-IPs created in AWS using the BIG-IQ API.
- By logging into the AWS Console with your ephemeral account, you can see the newly created EC2 instances. BIG-IQ has also created a Network Interface Card, Security Group, Storage Account, and a Public IP Address.
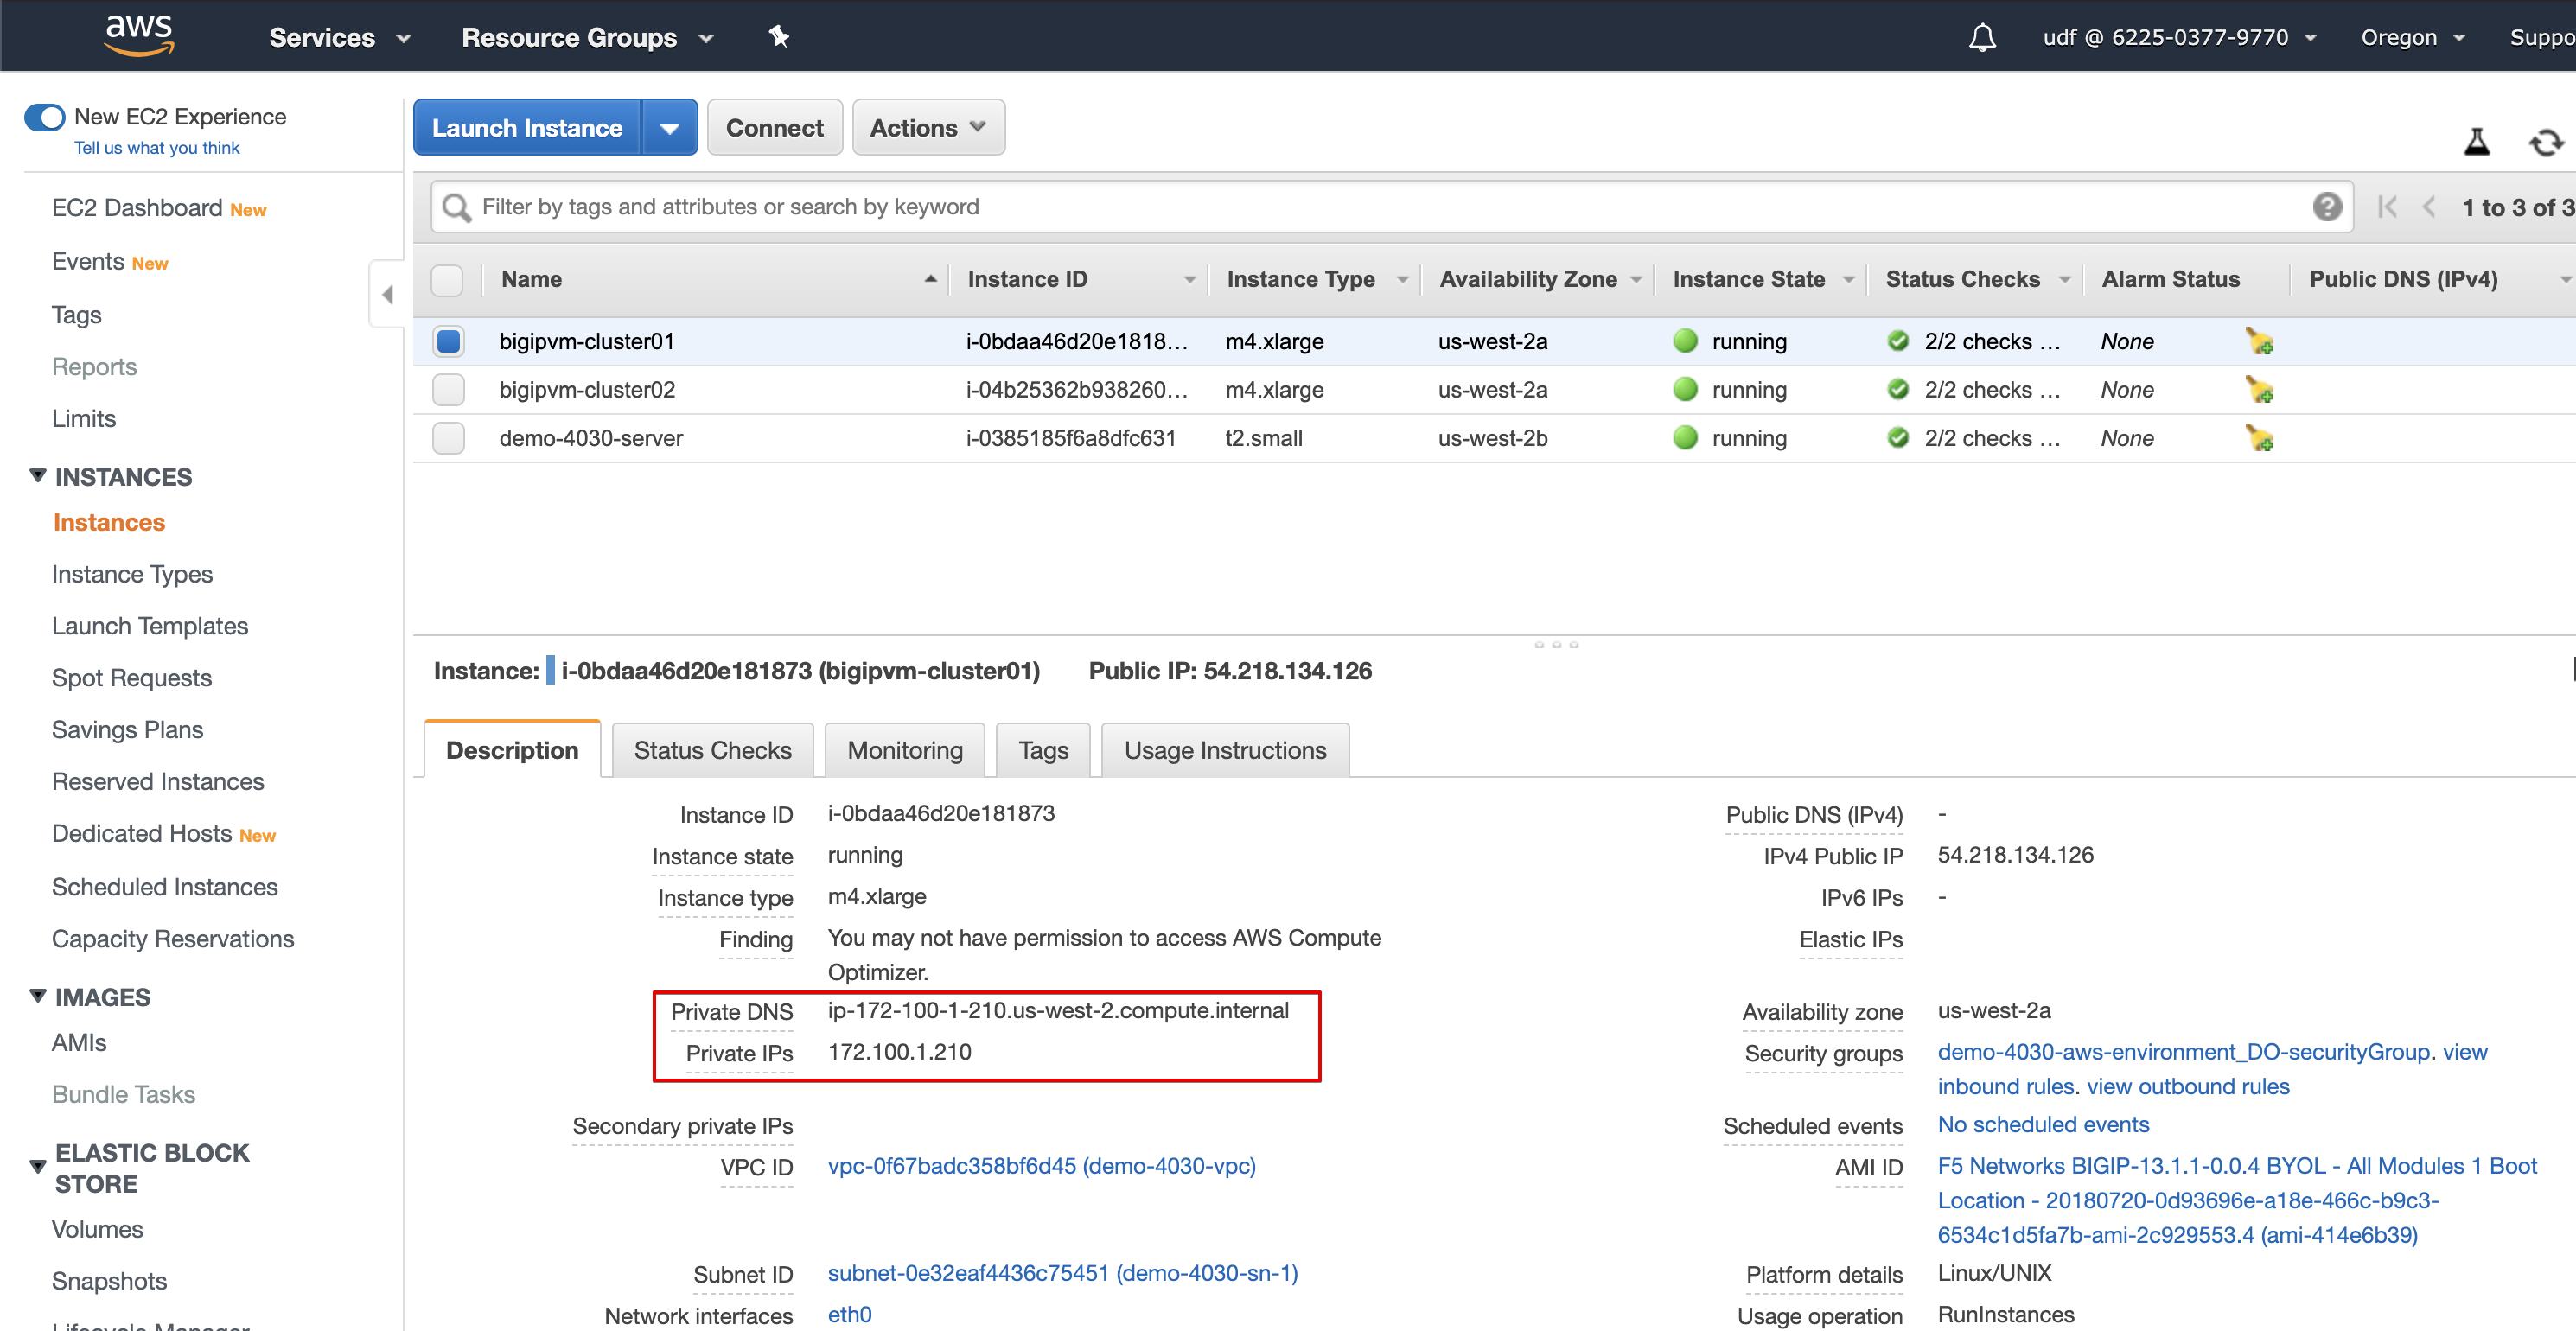
Note the Private DNS and IPs which will be used later. This information could be retrieved using the AWS API.
| BIG-IP VE Name | Public IP | Private DNS | Private IPs | Private Key Filename |
|---|---|---|---|---|
| bigipvm-cluster01 | 54.218.134.126 | ip-172-100-1-210.us-west-2.compute.internal | 172.100.1.210 | /var/ssh/restnoded/bigipvm-cluster01_57989.pem |
| bigipvm-cluster02 | 34.209.122.180 | ip-172-100-1-47.us-west-2.compute.internal | 172.100.1.47 | /var/ssh/restnoded/bigipvm-cluster02_10783.pem |
Copy below example of an DO Declaration into a JSON validator. The validator is your IDE (Integrated development environment).
Use the IDE available within the lab environment, click on the Access button of the Ubuntu Lamp Server system and select Visual Studio Code.
You can also use an online tool such as www.jsonschemavalidator.net.
Note
It is recommended to validate your DO declaration against the schema using Microsoft Visual Studio Code.
Make sure all highlighted information are correct (targetHost=Public IP, Private Key filename, Private DNS and IPs).
1 2 3 4 5 6 7 8 9 10 11 12 13 14 15 16 17 18 19 20 21 22 23 24 25 26 27 28 29 30 31 32 33 34 35 36 37 38 39 40 41 42 43 44 45 46 47 48 49 50 51 52 53 54 55 56 57 58 59 60 61 62 63 64 65 66 67 68 69 70 71 72 73 74 75 76 77 78 79 80 81 82 83 84 85 86 87 88 89 90 91 | {
"class": "DO",
"declaration": {
"schemaVersion": "1.5.0",
"class": "Device",
"async": true,
"Common": {
"class": "Tenant",
"myDbVariables": {
"class": "DbVariables",
"configsync.allowmanagement": "enable"
},
"myLicense": {
"class": "License",
"licenseType": "licensePool",
"licensePool": "byol-pool",
"bigIpUsername": "admin",
"bigIpPassword": "u7BnD@4f5"
},
"myProvision": {
"class": "Provision",
"ltm": "nominal",
"asm": "nominal",
"avr": "nominal"
},
"myNtp": {
"class": "NTP",
"servers": [
"169.254.169.123"
],
"timezone": "UTC"
},
"admin": {
"class": "User",
"shell": "bash",
"userType": "regular",
"partitionAccess": {
"all-partitions": {
"role": "admin"
}
},
"password": "u7BnD@4f5"
},
"myConfigSync": {
"class": "ConfigSync",
"configsyncIp": "172.100.1.210"
},
"myFailoverUnicast": {
"class": "FailoverUnicast",
"address": "172.100.1.210"
},
"myDeviceGroup": {
"class": "DeviceGroup",
"type": "sync-failover",
"owner": "ip-172-100-1-210.us-west-2.compute.internal",
"members": [
"ip-172-100-1-210.us-west-2.compute.internal",
"ip-172-100-1-47.us-west-2.compute.internal"
],
"autoSync": true,
"asmSync": true,
"networkFailover": true
},
"myDeviceTrust": {
"class": "DeviceTrust",
"remoteHost": "172.100.1.210",
"localUsername": "admin",
"localPassword": "u7BnD@4f5",
"remoteUsername": "admin",
"remotePassword": "u7BnD@4f5"
},
"hostname": "ip-172-100-1-210.us-west-2.compute.internal"
}
},
"targetUsername": "admin",
"targetHost": "54.218.134.126",
"targetPort": 8443,
"targetSshKey": {
"path": "/var/ssh/restnoded/bigipvm-cluster01_57989.pem"
},
"bigIqSettings": {
"clusterName": "cluster-aws-lab",
"conflictPolicy": "USE_BIGIQ",
"deviceConflictPolicy": "USE_BIGIP",
"failImportOnConflict": false,
"versionedConflictPolicy": "KEEP_VERSION",
"statsConfig": {
"enabled": true
}
}
}
|
- Open Visual Studio Code, then use the Visual Studio code REST client extension and authenticate to BIG-IQ (follow instructions).
- Using Visual Studio Code REST client, use the BIG-IQ AS3 Declaration call and replace the method and URL with
POST https://10.1.1.4/mgmt/shared/declarative-onboarding. Copy/Paste the DO declaration from the validator to the body under the call using the REST client VS code extension.
11. You can use GET to the URI https://10.1.1.4/mgmt/shared/declarative-onboarding/task/e1f88fa7-47c9-4860-95f9-132ca6dbaa28 to track whether a
declaration is successful or get information on why it failed. Note the id will be return when doing the initial POST during previous step.
"result": {
      "class": "Result",
      "code": 202,
      "status": "RUNNING",
      "message": "processing"
   },
You can also check the following logs on BIG-IQ and BIG-IP under /var/log/restjavad.0.log and /var/log/restnoded/restnoded.log
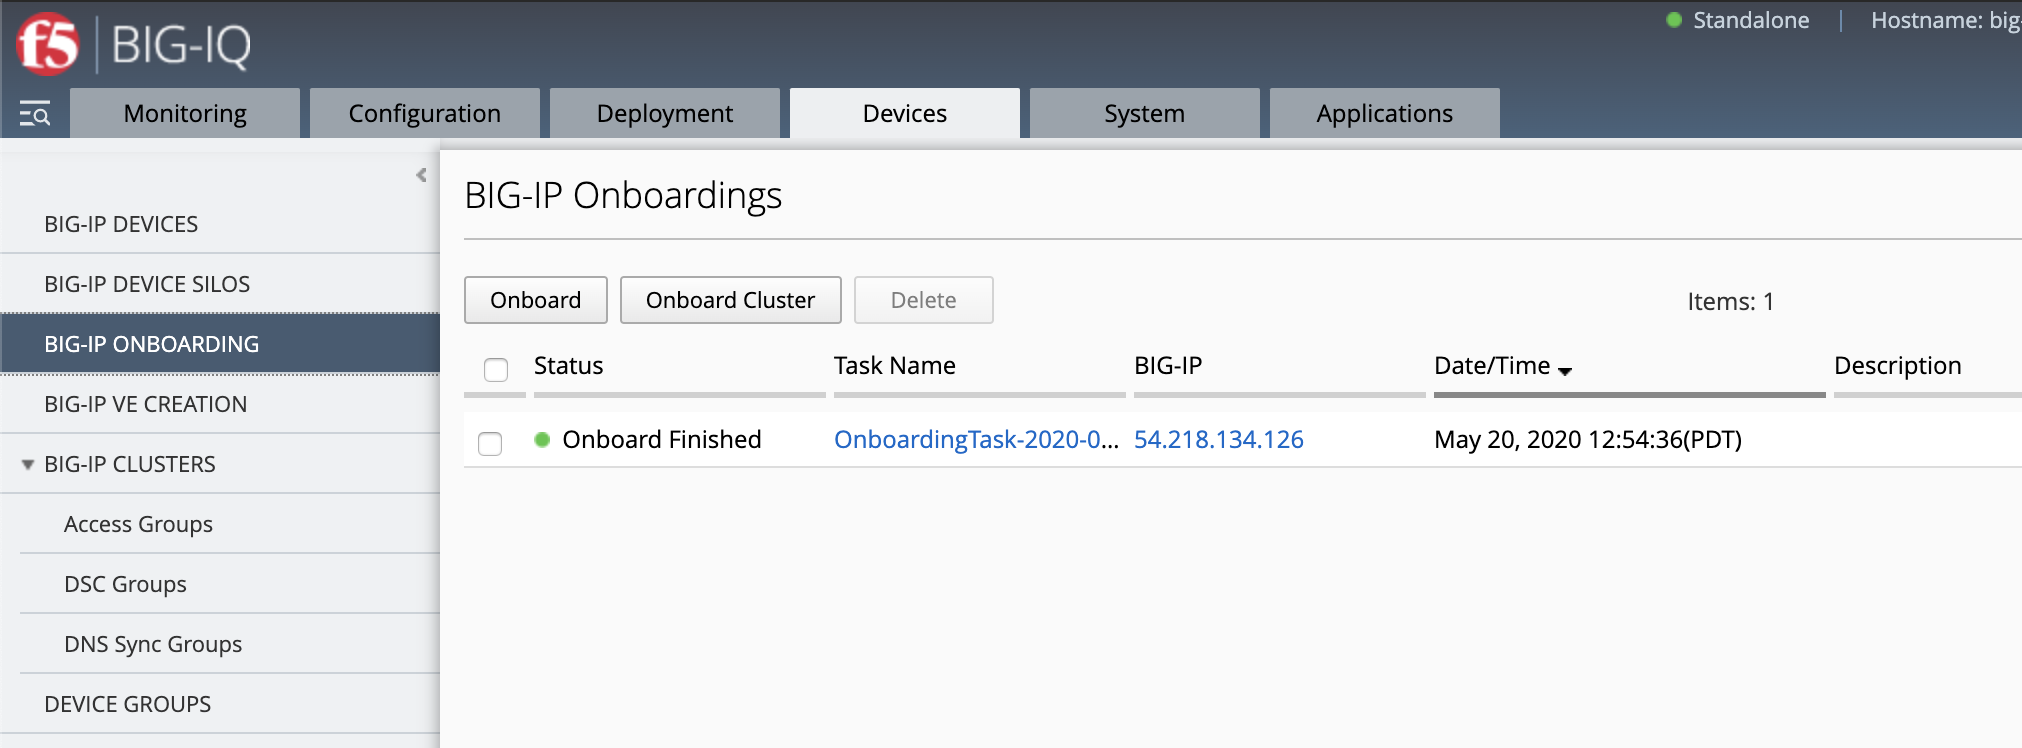
- Login as david and navigate to Devices > BIG-IP Onboarding and see the BIG-IP being provisioned.

When onboarding is completed, you will see the task completed successfuly:
The GET on the URI monitoring the task will also show a success message.
"result": {
    "class": "Result",
    "code": 200,
    "status": "OK",
    "message": "success"
},
Note
In case the onboarding task fails, look at the error message, make necessary fix to the DO declaration and retry.
If the first attempt fails after setting the admin password, you may need to remove the "targetSshKey": { .. },
and "admin": { "class": "User", ... } sections and add "targetPassphrase": "u7BnD@4f5", under targetUsername
to the declaration.
- Repeat the same steps to onboard the 2nd VE. Don’t forget to update all the necessary highlighted values.
1 2 3 4 5 6 7 8 9 10 11 12 13 14 15 16 17 18 19 20 21 22 23 24 25 26 27 28 29 30 31 32 33 34 35 36 37 38 39 40 41 42 43 44 45 46 47 48 49 50 51 52 53 54 55 56 57 58 59 60 61 62 63 64 65 66 67 68 69 70 71 72 73 74 75 76 77 78 79 80 81 82 83 84 85 86 87 88 89 90 91 | {
"class": "DO",
"declaration": {
"schemaVersion": "1.5.0",
"class": "Device",
"async": true,
"Common": {
"class": "Tenant",
"myDbVariables": {
"class": "DbVariables",
"configsync.allowmanagement": "enable"
},
"myLicense": {
"class": "License",
"licenseType": "licensePool",
"licensePool": "byol-pool",
"bigIpUsername": "admin",
"bigIpPassword": "u7BnD@4f5"
},
"myProvision": {
"class": "Provision",
"ltm": "nominal",
"asm": "nominal",
"avr": "nominal"
},
"myNtp": {
"class": "NTP",
"servers": [
"169.254.169.123"
],
"timezone": "UTC"
},
"admin": {
"class": "User",
"shell": "bash",
"userType": "regular",
"partitionAccess": {
"all-partitions": {
"role": "admin"
}
},
"password": "u7BnD@4f5"
},
"myConfigSync": {
"class": "ConfigSync",
"configsyncIp": "172.100.1.47"
},
"myFailoverUnicast": {
"class": "FailoverUnicast",
"address": "172.100.1.47"
},
"myDeviceGroup": {
"class": "DeviceGroup",
"type": "sync-failover",
"owner": "ip-172-100-1-210.us-west-2.compute.internal",
"members": [
"ip-172-100-1-210.us-west-2.compute.internal",
"ip-172-100-1-47.us-west-2.compute.internal"
],
"autoSync": true,
"asmSync": true,
"networkFailover": true
},
"myDeviceTrust": {
"class": "DeviceTrust",
"remoteHost": "172.100.1.210",
"localUsername": "admin",
"localPassword": "u7BnD@4f5",
"remoteUsername": "admin",
"remotePassword": "u7BnD@4f5"
},
"hostname": "ip-172-100-1-47.us-west-2.compute.internal"
}
},
"targetUsername": "admin",
"targetHost": "34.209.122.180",
"targetPort": 8443,
"targetSshKey": {
"path": "/var/ssh/restnoded/bigipvm-cluster02_10783.pem"
},
"bigIqSettings": {
"clusterName": "cluster-aws-lab",
"conflictPolicy": "USE_BIGIQ",
"deviceConflictPolicy": "USE_BIGIP",
"failImportOnConflict": false,
"versionedConflictPolicy": "KEEP_VERSION",
"statsConfig": {
"enabled": true
}
}
}
|
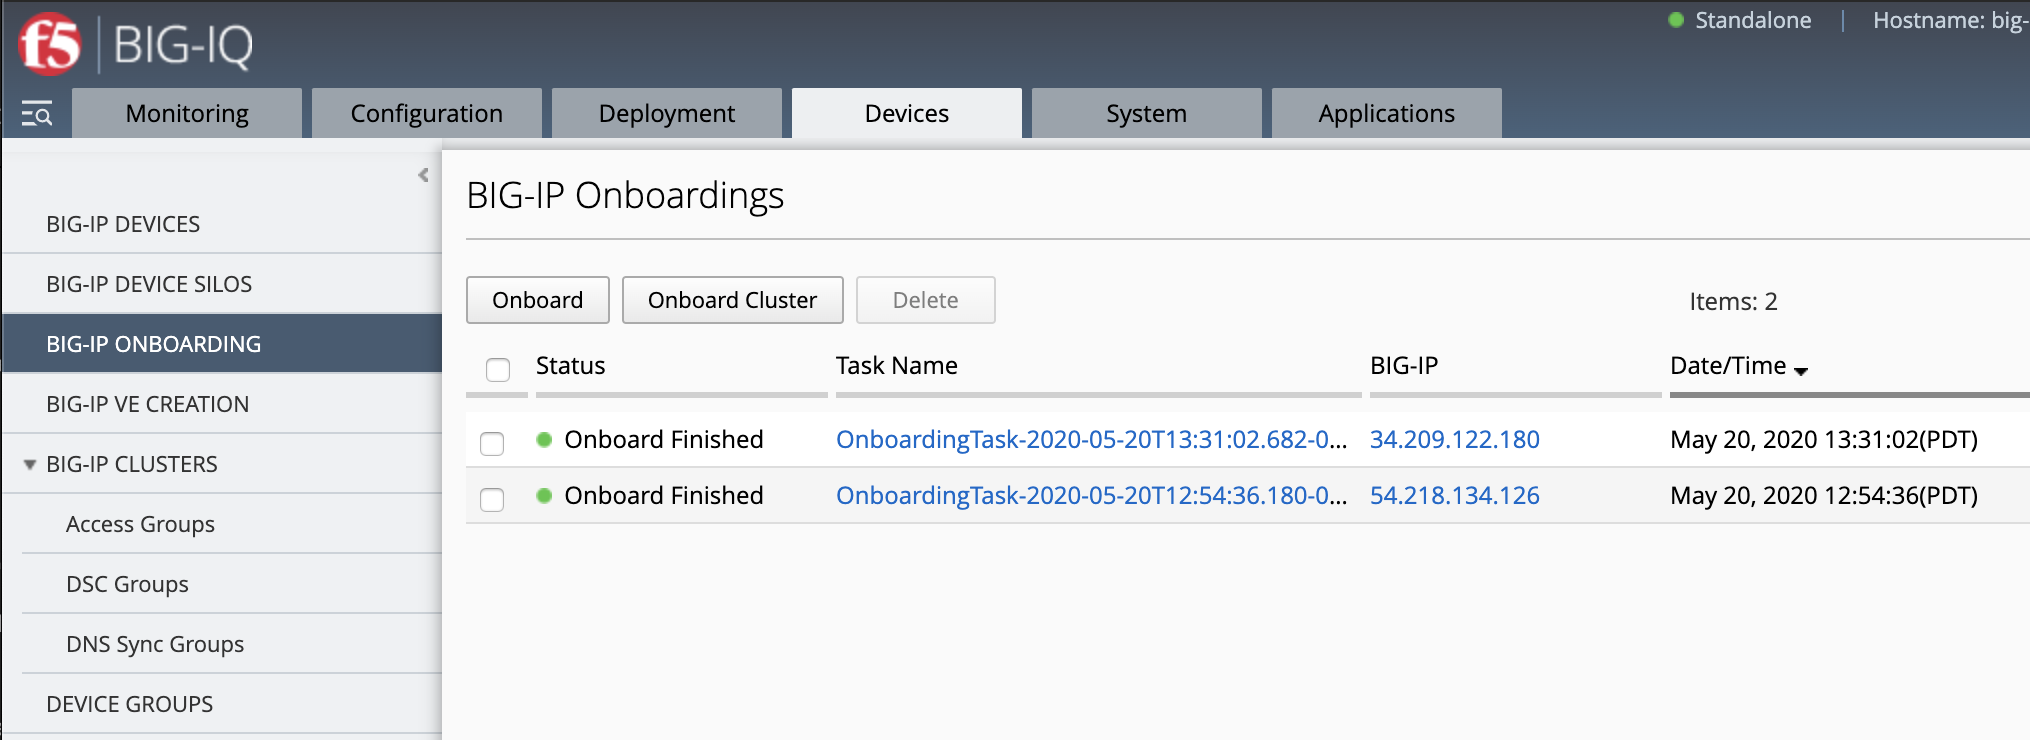
- Login as david and navigate to Devices > BIG-IP Onboarding and see the BIG-IP being provisioned.
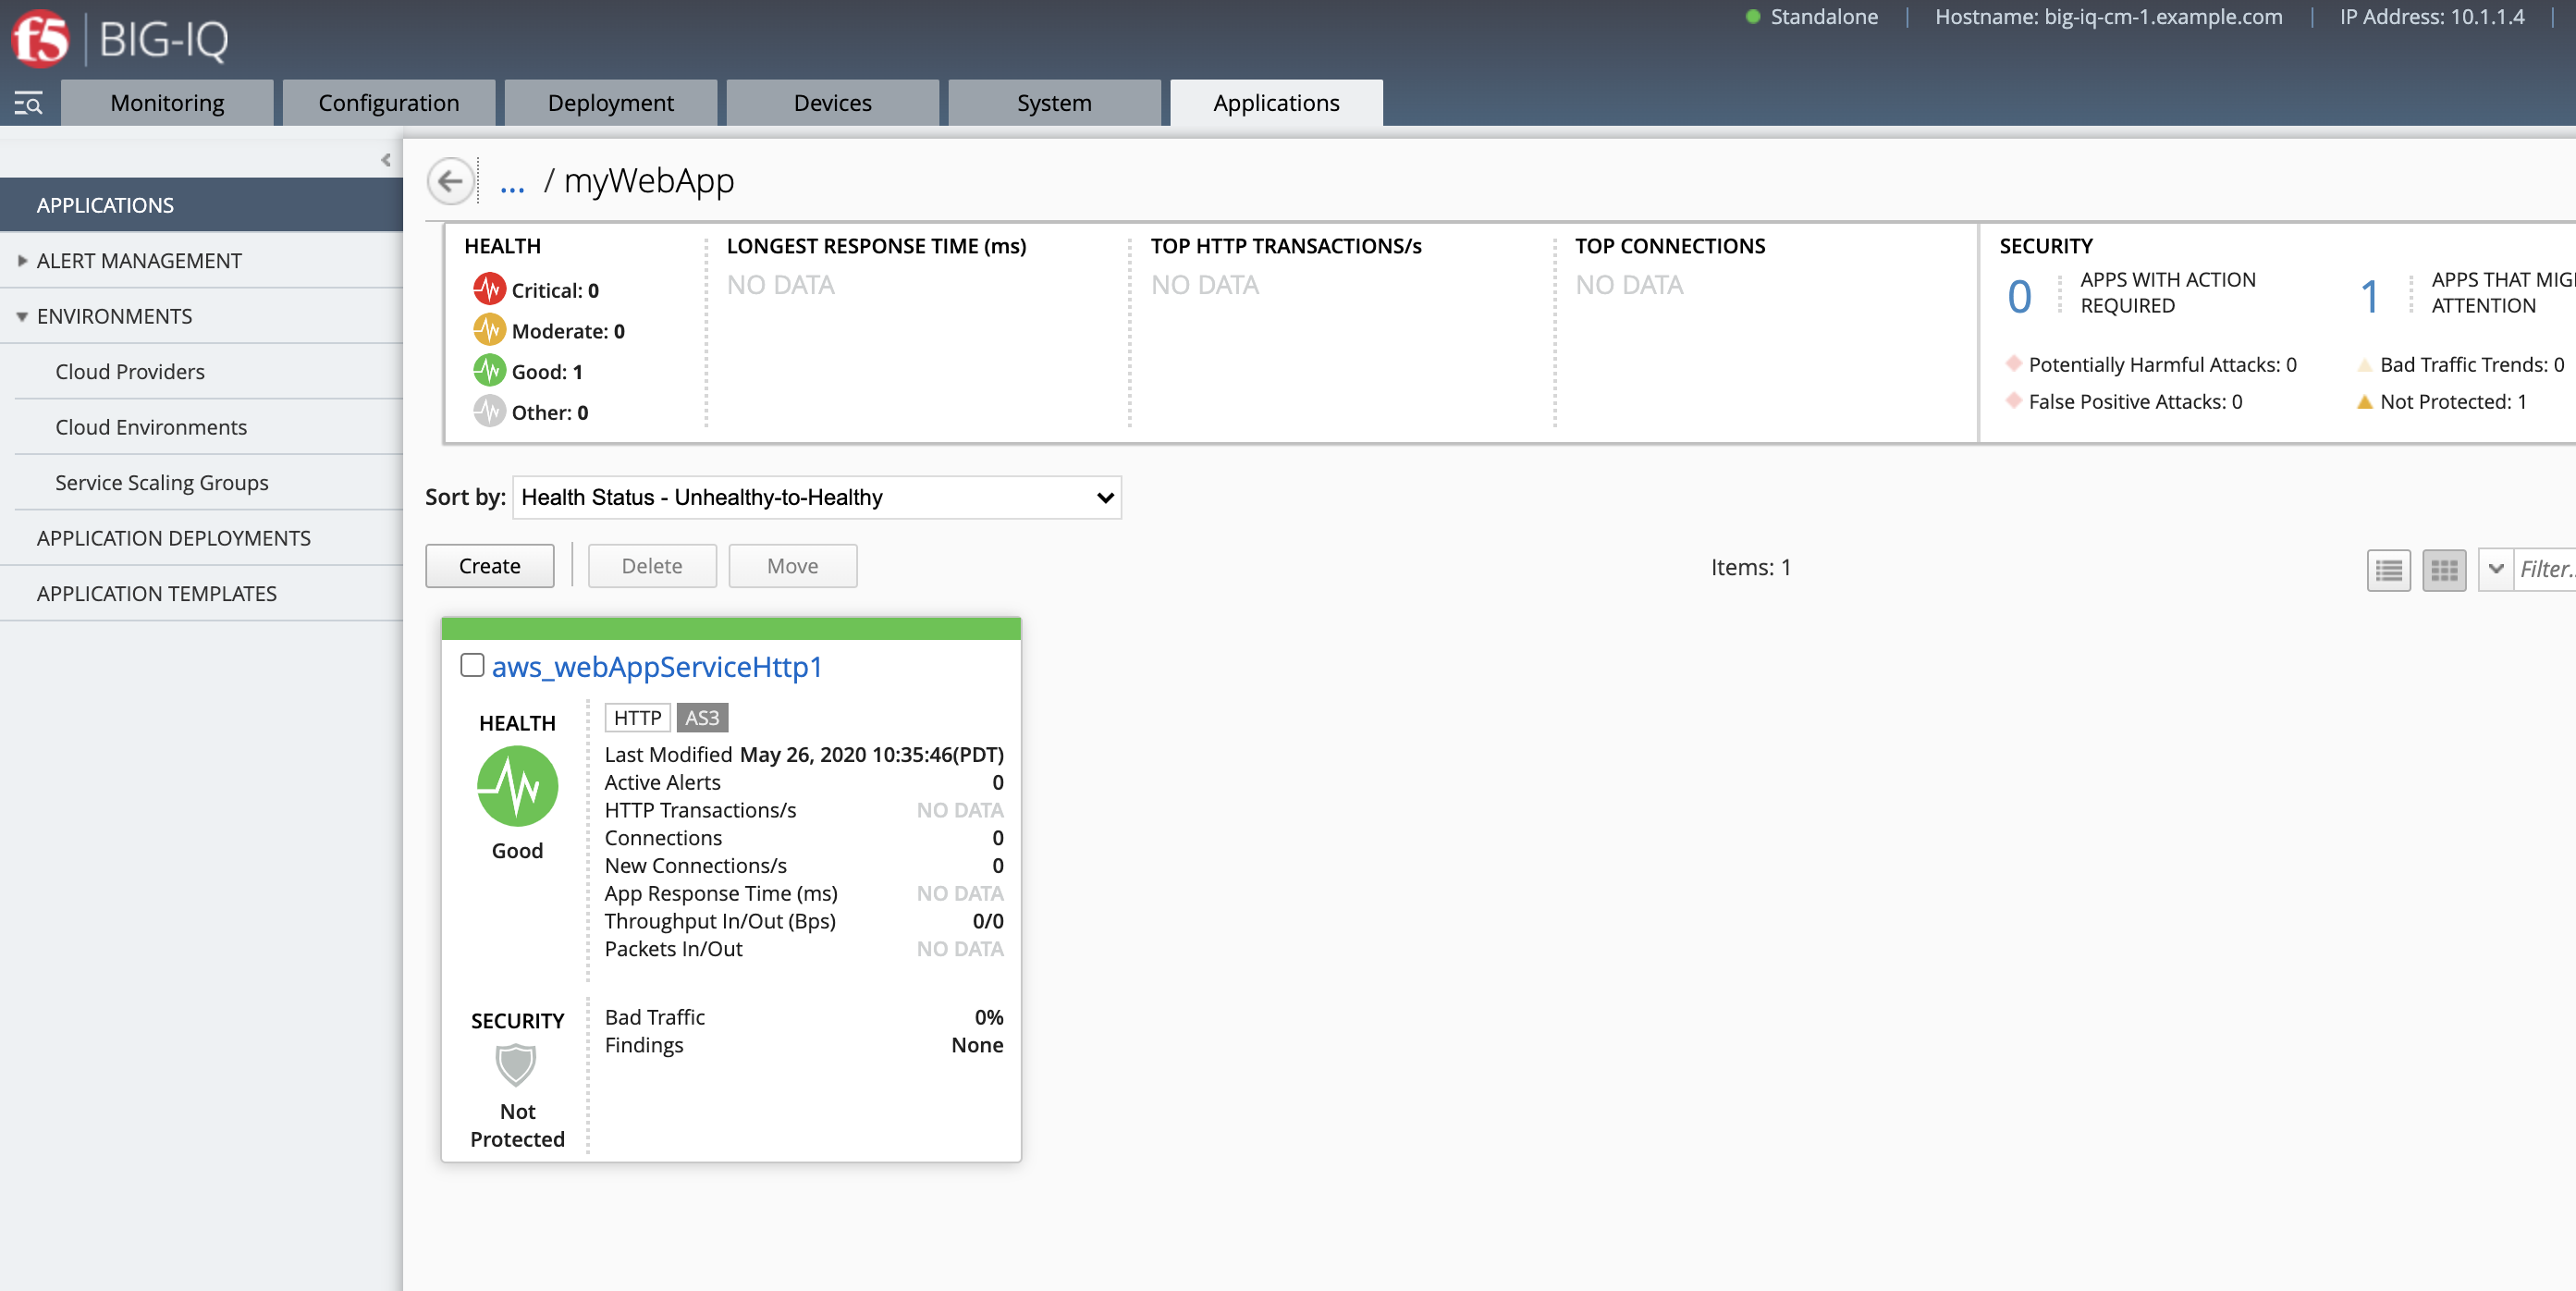
- Login as david and navigate to Devices > Devices see both BIG-IPs have been added to BIG-IQ. They can be now used to deploy application services and security policies.
Using Visual Studio Code REST client, use the BIG-IQ AS3 Declaration call and replace the method and URL with
POST https://10.1.1.4/mgmt/cm/global/tasks/deploy-to-application. Copy/Paste the AS3 declaration below to the body under the call using the REST client VS code extension.Note the target address is one of the BIG-IP public address of the BIG-IQ HA Cluster (you can use either active or standby).
We are using demo backend application server
172.100.2.50running the Hackazon Web App.This AS3 application service will deploy an HTTP application service to optimize HTTP traffic toward the app server(s) on port 8080.
1 2 3 4 5 6 7 8 9 10 11 12 13 14 15 16 17 18 19 20 21 22 23 24 25 26 27 28 29 30 31 32 33 34 35 36 37 38 39 40 41 42 43 44 45 46 47 48 49 50 51 52 53 54 55 56 57 58 59 60 61 62 63 64 65 66 67 68 | {
"applicationDescription": "This is an HTTP AS3 Application service",
"applicationName": "myWebApp",
"appSvcsDeclaration": {
"class": "AS3",
"action": "deploy",
"declaration": {
"class": "ADC",
"schemaVersion": "3.12.0",
"target": {
"address": "54.184.72.42"
},
"aws": {
"class": "Tenant",
"webAppServiceHttp1": {
"class": "Application",
"schemaOverlay": "AS3-F5-HTTP-lb-template-big-iq-default-v1",
"template": "http",
"serviceMain": {
"pool": "Pool",
"enable": true,
"profileHTTP": {
"use": "HTTP_Profile"
},
"virtualPort": 8080,
"profileAnalytics": {
"use": "Analytics_Profile"
},
"virtualAddresses": [
"0.0.0.0"
],
"class": "Service_HTTP"
},
"Pool": {
"members": [
{
"adminState": "enable",
"servicePort": 80,
"serverAddresses": [
"172.100.2.50"
]
}
],
"class": "Pool"
},
"HTTP_Profile": {
"fallbackRedirect": "https://www.example.com/404",
"fallbackStatusCodes": [
404
],
"class": "HTTP_Profile"
},
"Analytics_Profile": {
"collectIp": true,
"collectGeo": true,
"collectUrl": true,
"collectMethod": true,
"collectUserAgent": true,
"collectOsAndBrowser": true,
"collectResponseCode": true,
"collectClientSideStatistics": true,
"class": "Analytics_Profile"
}
}
}
}
}
}
|
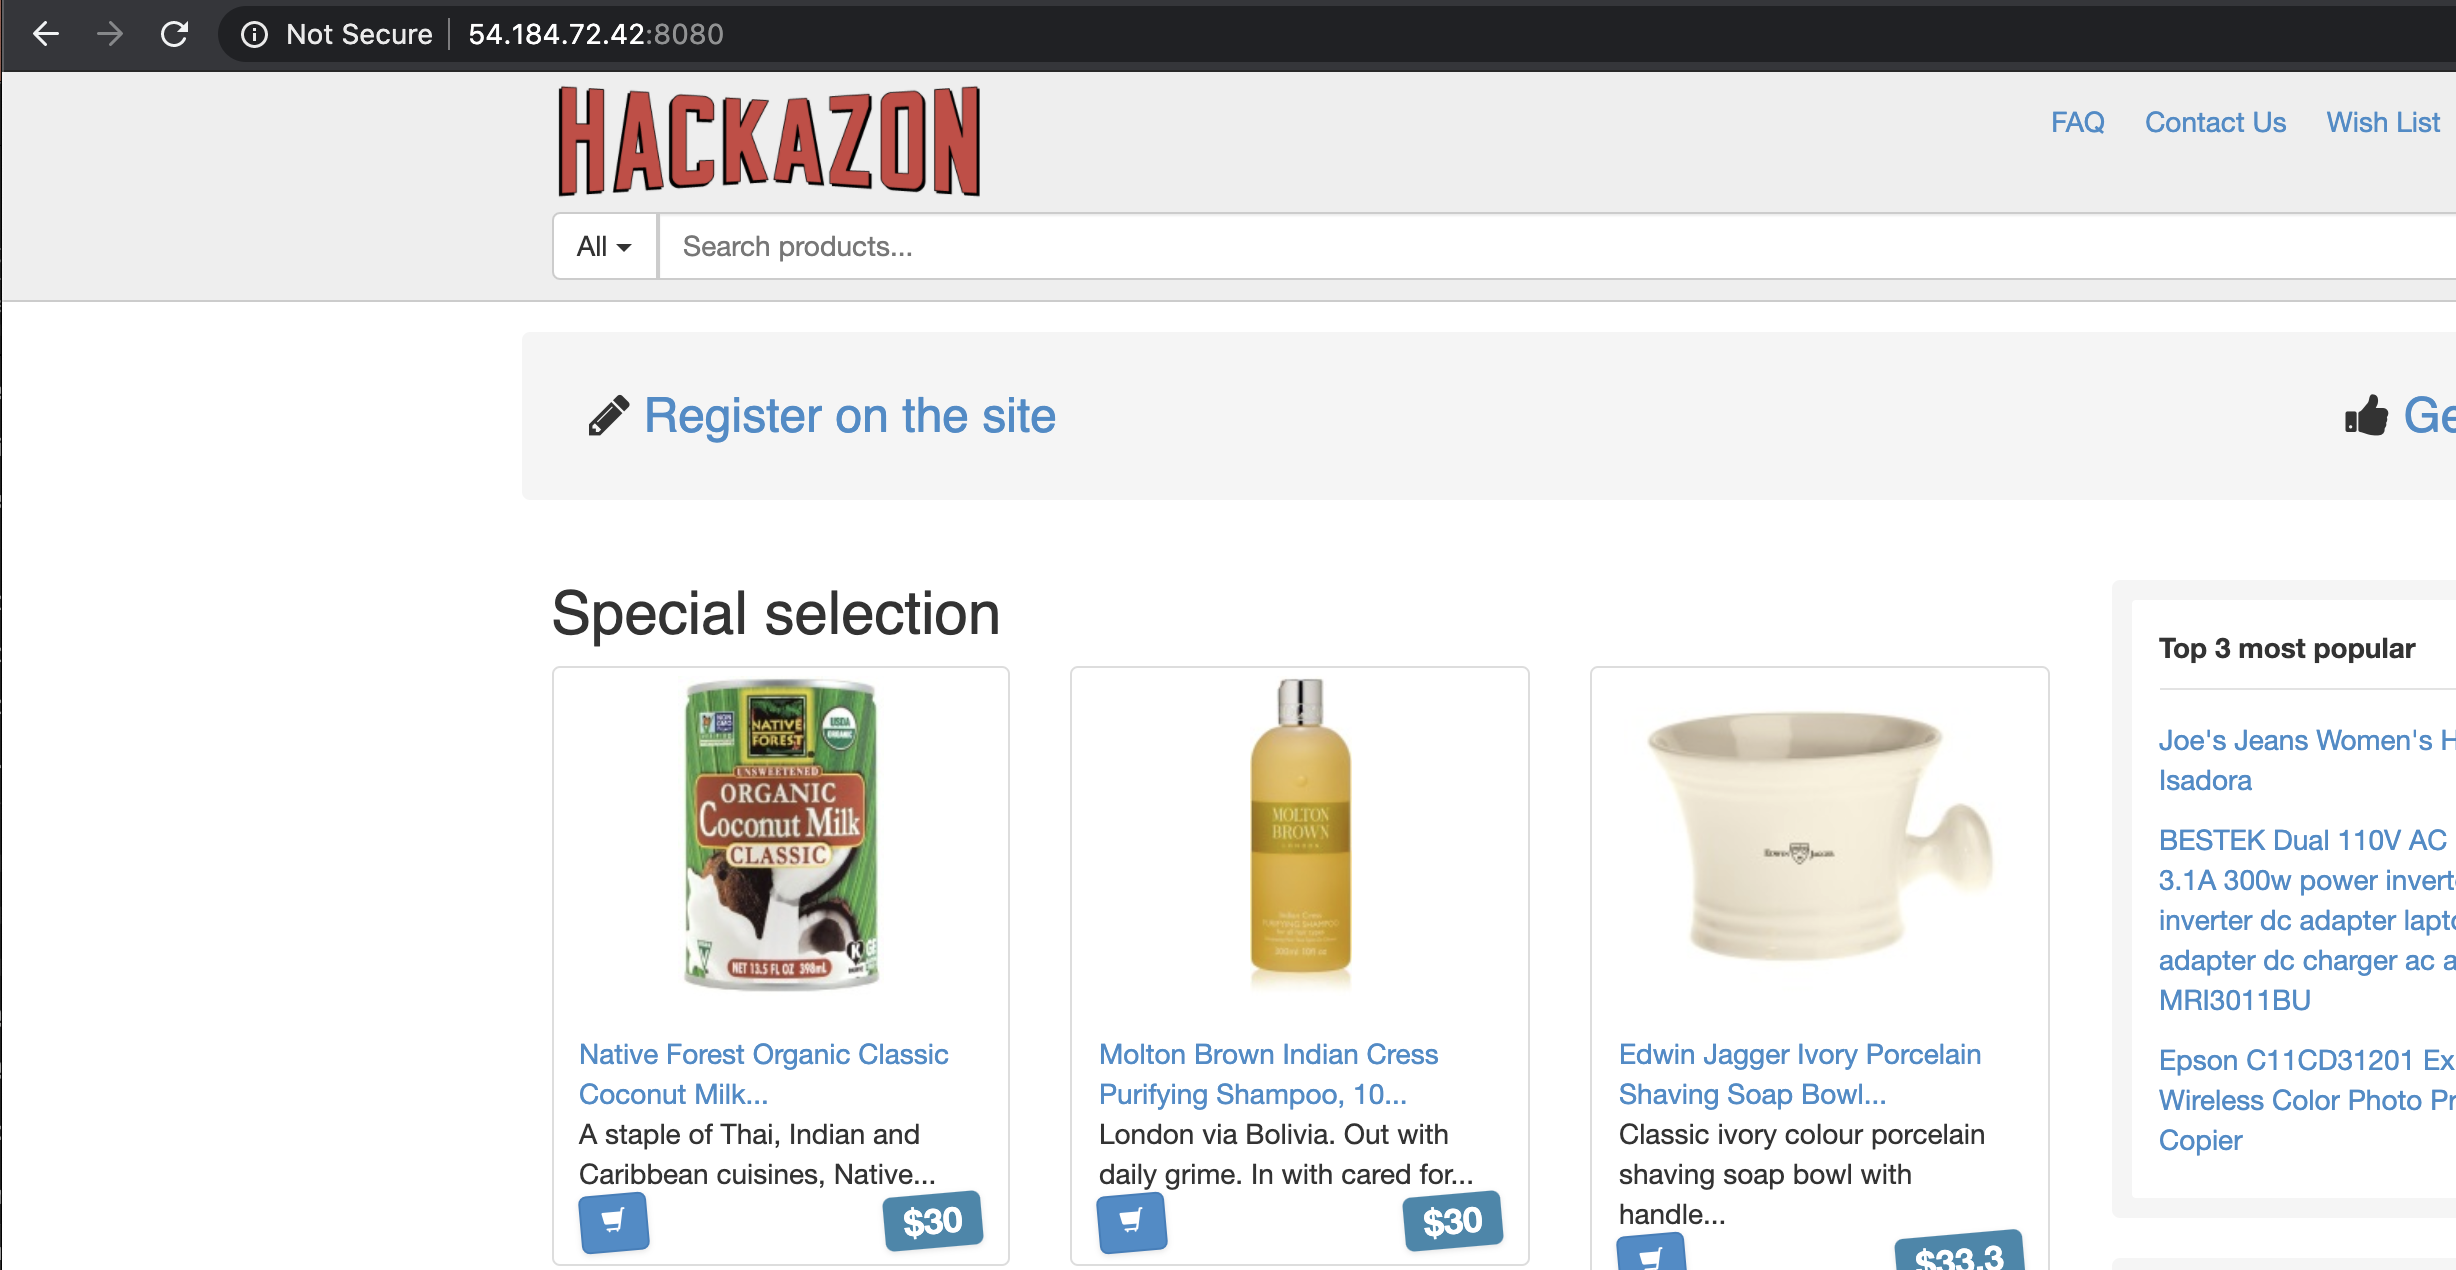
- Test the application service by opening a browser and typing the Virtual Server IP address/port
http://54.184.72.42:8080. You should see the Hello, World website.
- Go back on the BIG-IQ application dashboard and look at the HTTP analytics.