Fluentd Logging
Overview
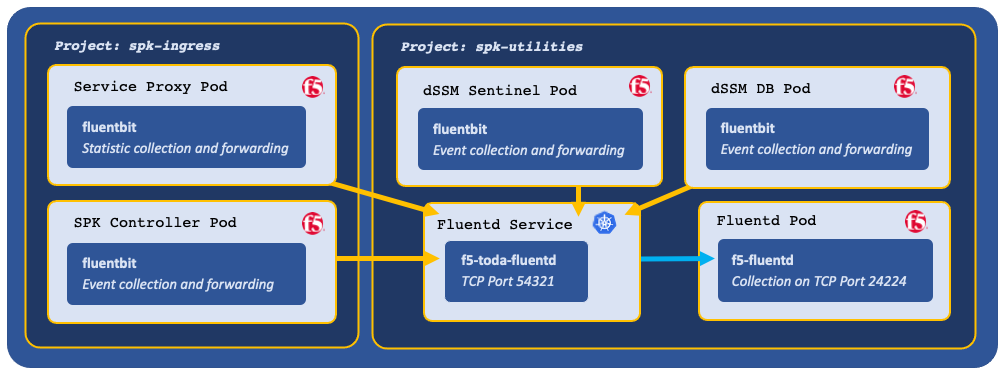
The Service Proxy for Kubernetes (SPK) Fluentd logging Pod is an open source data collector that can be configured to receive logging data from the SPK Controller, Service Proxy Traffic Management Microkernel (TMM), and Distributed Session State Managment (dSSM) Pods. To create log file directories for each of the SPK Pods, Fluentd must bind to a Kubernetes persistence volume.
This document guides you through understanding, configuring and deploying the f5-fluentd logging container.
Fluentd Service
After installing Fluentd, a Service object is created to receive logging data on TCP service port 54321, and forward the data to Fluentd on TCP service port 24224. Ensure the Service port is available, and the cluster has CoreDNS enabled. In this example, the SPK components will need to resolve the f5-toda-fluentd.spk-utilities hostname:
Example Fluentd Service:
Name:              f5-toda-fluentd
Namespace:         spk-utilities
IP:                10.109.102.215
Port:              <unset>  54321/TCP
Endpoints:         10.244.1.75:24224
Example Fluentd integration:
Log file locations
Fluentd collects logging data in the following log files:
| Container | Log file |
|---|---|
| f5-dssm-sentinel | /var/log/f5/f5-dssm-sentinel-0/sentinel.log |
| f5-dssm-db | /var/log/f5/f5-dssm-db-0/dssm.log |
| f5ingress | /var/log/f5/helm_release-f5ingress/pod_name/f5ingress.log |
| f5-tmm | /var/log/f5/f5-tmm/pod_name/f5-fsm-tmm.log |
| f5-tmm-routing | /var/log/f5/f5-tmm/pod_name/f5-tmm-routing.log |
 Note: To modify the TMM logging level, review the bdt_cli section of the Debug Sidecar overview.
Requirements
Prior to installing Fluentd, ensure you have:
- An OpenShift cluster.
- An available persistence volume.
- Installed the SPK software.
- A Linux based workstation with Helm installed.
Procedures
Installation
Use the following steps to the install the f5-fluentd container.
Change into local directory with the SPK files, and list the files in the tar directory:
In this example, the SPK files are in the spkinstall directory:
cd spkinstall
ls -1 tar
In this example, Fluentd Helm chart is named f5-toda-fluentd-7.0.5.tgz:
csrc-v0.4.10.tgz
cwc-v5.0.10.tgz
f5-cert-gen-0.9.2.tgz
f5-cert-manager-0.22.10.tgz
f5-crdconversion-0.4.14.tgz
f5-dssm-4.0.5.tgz
f5-toda-fluentd-7.0.5.tgz
f5ingress-v12.0.35.tgz
log-doc-f5ingress-v12.0.35.tgz
rabbitmq-7.0.2.tgz
spk-docker-images.tgz
Create a new Project for the f5-fluentd container:
Note: This Project can also be used by the dSSM Database Pods in the next integration stage.oc new-project <project>
In this example, a new Project named spk-utilities is created:
oc new-project spk-utilities
Create a Helm values file named fluentd-values.yaml, and set the
image.repositoryand thepersistence.storageClassparameters:image: repository: "<registry>" persistence: enabled: true storageClass: "<name>"
In this example, Helm pulls the f5-fluentd image from registry.com, and the container will bind to the storageClass named managed-nfs-storage:
image:
  repository: "local.registry.com"

persistence:
  enabled: true
  storageClass: "managed-nfs-storage"
In fluentd-values.yaml file set the
serviceAccount.createparameter:Note: The serviceAccount will not be created by default.
serviceAccount:
  create: false
  name: default
Required: Add the following parameters to the values file to collect logging data from the each of the enabled SPK Pods:
 Important: The Fluentbit and Fluentd configurations are mandatory for proper log file recovery in the event of pod or container restarts; without this configuration, the users will not be able to recover their log files.
f5ingress_logs:
  enabled: true
  stdout: true
dssm_logs:
  enabled: true
  stdout: true
dssm_sentinel_logs:
  enabled: true
  stdout: true
cm_logs:
## Enable Cert manager logging
  enabled: true
  stdout: true
Install the f5-fluentd container and reference the fluentd-values.yaml values file. Be certain to save the Fluentd hostname for the Controller installation:
In this example, the Fluentd Pod installs to the spk-utilities Project.
helm install f5-fluentd tar/f5-toda-fluentd-7.0.5.tgz -f fluentd-values.yaml -n spk-utilities
Note: In this example, the Fluentd hostname is f5-toda-fluentd.spk-utilities.svc.cluster.local.:FluentD hostname: f5-toda-fluentd.spk-utilities.svc.cluster.local. FluentD port: "54321"
The f5-fluentd container should now be successfully installed:
oc get pods
In this example, the Fluentd Pod STATUS is Running:
NAME                              READY   STATUS
f5-toda-fluentd-8cf96967b-jxckr   1/1     Running
Fluentd should also be bound to the persistent volume:
oc get pvc
In this example, the Fluentd Pod PVC displays STATUS as Bound:
NAME              STATUS   VOLUME                                     STORAGECLASS
f5-toda-fluentd   Bound    pvc-7d36b530-b718-466c-9b6e-895e8f1079a2   managed-nfs-storage
Viewing logs
After installing the Controller and dSSM Pods, you can use the following steps to view the logs in the f5-fluentd container:
Log in to the fluentd container:
oc exec -it deploy/f5-toda-fluentd -n <project> -- sh
In this example, the container is in the spk-utilities Project:
oc exec -it deploy/f5-toda-fluentd -n spk-utilities -- sh
Change to the main logging directory, and list the subdirectories:
cd /var/log/f5; ls
In this example, logging directories are present for the f5ingress, f5-tmm, f5-dssm-db, and f5-dssm-sentinel Pods:
f5-dssm-db-0  f5-dssm-db-1  f5-dssm-db-2  f5-dssm-sentinel-0
f5-dssm-sentinel-1  f5-dssm-sentinel-2  f5-ingress-f5ingress  f5-tmm
Change into one of the subdirectories, for example f5-dssm-db-0:
cd f5-dssm-db-0
View the logs using the more command:
more -d dssm.log
Kafka Plugin Deployment
Kafka plugin deployment in Fluentd Pod. Kafka plugin is disabled by default. See Helm chart:
 # Configuration of the output kafka plugin to deliver tmmstats to the kafka deployment
  kafkaPlugin:
  enabled: false
 # DNS name of the service for the kafka deployment
 serviceName: kafka
 # TCP port of the service for the kafka deployment
 servicePort: 5656
 # Kafka Topic for tmmstats
 topic: tmmstats
To enable Kafka plugin, set it to enabled by either using the ‘–set’ or adding it to the fluentd values yaml file:
helm install fluentd toda/f5-toda-fluentd --set kafkaPlugin.enabled=true
(or)
helm install f5-toda-fluentd spkinstall/tar/f5-toda-fluentd-6.0.6.tgz -f fluentd-values.yaml
Next step
Continue to one of the following steps listed by installation precedence:
- Optional: Install the dSSM Database to store session-state information.
- Required: Install the SPK Controller and Service Proxy TMM Pods.
Feedback
Provide feedback to improve this document by emailing spkdocs@f5.com.