F5 Fraud Protection Solutions > Class 1: Introduction to Fraud and F5 WebSafe > Module 1: F5 WebSafe Introduction Source | Edit on
Lab 4: Use Application Layer Encryption
In this lab, you will add application layer encryption in addition to several other features that help to protect sensitive web applications.
Task 1 - View the Application Before Enabling Application Layer Encryption
Open a new Chrome window and press the F12 key, then click the Bank bookmark.
Enter the credentials bobsmith / P@ssw0rd1 but do not click Login.
In the inspection window open the Console tab, and in the console, type (or copy and paste) the following and press Enter:
document.forms[0].password.valueThis value hasn’t yet been submitted and is therefore available in cleartext for form grabbing.
In the inspection window open the Network tab and select the Preserve log checkbox.
Log in as bobsmith / P@ssw0rd1.
In the inspection window, click the second Login.php entry, and then in the Headers tab scroll down and examine the Form Data section.
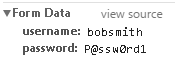
Both the username and the password are in cleartext. They are both currently vulnerable to a hacker or a malware script.
Click Logout, and then right-click inside the Password field and select Inspect.
While you examine the Elements tab, for Password type P@ssw0rd1.
Encryption is not taking place in real-time, making it vulnerable to malware that grabs passwords as they’re typed.
Click the Bank bookmark, then click the Demo Tools bookmark, and from the Demo Tools click Start Keylogger, and then click on the Password field.
For Password type P@ssw0rd1 and examine the top of the Demo Tools window.

The WebSafe application layer encryption keylogging protection adds multiple random characters as the user types their password, which will render the keylogging file useless.
Right-click inside the Username field and select Inspect, and then examine the name value for this input parameter.

You can view the name for this parameter: username. You can also view the name of the password parameter. This makes it easy for the fraudsters to craft targeted malware and create mass attacks.
Right-click the <form method=”POST”> line, and then select Edit as HTML.

The code within the form is static HTML. There are three parameters, the username and password fields and the submit button. This static HTML code makes it very easy for malware to manipulate the page and extract values typed by the victim.
Close the Demo Bank page.
Task 2 - Enable Application Layer Encryption
- In the BIG-IP Configuration Utility, from the left menu panel select Application Layer Encryption.
Notice that most options are currently selected.
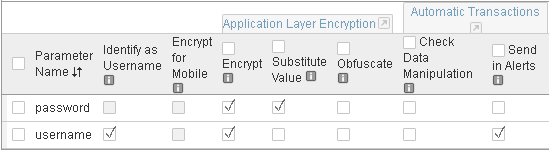
From the left panel select Parameters, and for the username parameter select the Encrypt checkbox.
Create a new parameter named password, and then click Add.
For the password parameter select the Encrypt and the Substitute Value checkboxes, and then click Save.
Task 3 - View the Application After Enabling Application Layer Encryption
Open a new incognito window and press the F12 key, then click the Bank bookmark.
Enter the credentials bobsmith / P@ssw0rd1 but do not click Login.
In the inspection window open the Console tab, and in the console, type (or copy and paste) the following and press Enter:
document.forms[0].password.value;The password value has been masked prior to the user submitting the web form. If the hacker thinks that this user’s password is A@aaa1aa1 they may attempt to log in as the victim.
Change the password BY TYPING A@aaa1aa1 and click Login.
In the BIG-IQ Configuration Utility reload the page, then open the Suspicious Logins > Stolen Credentials page, and then expand the alert.
A Stolen Credentials alert was issued.
In the banking page, right-click inside the Password field and select Inspect.
While you examine the Elements tab, for Password type P@ssw0rd1.

Encryption for the password field is taking place in real-time, as you type.
In the inspection window open the Network page and select the Preserve log checkbox.
Log in as bobsmith / P@ssw0rd1.
In the inspection window click the second Login.php entry, and then in the Headers tab scroll down and examine the Form Data section.
Both the username and password parameter values are now encrypted after submitting the form.
Task 4 - Add Parameter and Form Obfuscation
In the BIG-IP Configuration Utility, from the left panel select Application Layer Encryption.
Select the Add Decoy Inputs checkbox.
Select Parameters, and for both the username and password parameters select the Obfuscate checkboxes, and then click Save.
In the banking page click Logout, and then click the Bank bookmark.
Right-click inside the Username field and select Inspect.
Examine the name value for this input parameter.

The name of the username parameter is now obfuscated. In addition, the obfuscated value changes every few seconds.
Examine the values between the <form method=”POST”> line and the </form> line.
WebSafe adds and removes decoy input fields in the HTML source code dynamically, making it virtually impossible for a fraudster to manipulate the form and/or steal data from it.
In the inspection window select the Network page, and then select the Preserve log checkbox.
Log in as bobsmith / P@ssw0rd1.
The successful login shows that the HTML obfuscation works transparently and does not affect the user experience.
In the inspection window click the newest Login.php entry, and then in the Headers tab scroll down and examine the Form Data section.
There is no longer any mention of the username or password parameters, and it now appears that there are several other parameters on the page.
That concludes the hands-on exercises for the Introduction to Fraud and BIG-IP WebSafe lab session.