Backup and restore guide
Caution
Due to a Python version incompatibility, you cannot restore VNF Manager from a snapshot.
Snapshots capture the VNFM configuration state. Consider performing VNFM snapshots on regular intervals (during off peak hours), and automating this process using the REST API (see the API documentation).
Regularly, you MUST back up the virtual machine on which the F5 VNF Managers run; this is dictated by a backup policy, involving daily, weekly, monthly, and yearly backups, as required. The method and schedule for backing up the F5 VNF Manager virtual machines falls outside the scope of this document.
The following procedures outline the manual snapshot and restore processes, using the VNFM UI and your VIM.
- Create a backup VM for restoration purposes.
- Create a routine snapshot.
- Restore a failed VNF Manager.
Backup and restore overview
A VNFM snapshot should be done on a daily basis (suggest in an off peak time) and can be automated using the REST API as an alternative to an operator manually running the snapshot as shown here in this user guide.
Backing up the virtual machine that the F5 VNF managers run on should be done at regular intervals, this would be dictated by a backup policies and would involve daily, weekly, monthly and yearly backups as required. The method for backing up the F5 VNF Manager virtual machines falls outside the scope of this document.
Create a backup virtual machine for restoration
This procedure assumes you have uploaded, created, and started a VNF Manager in your VIM (see VNFM setup guide for steps), successfully.
Important
You MUST perform this procedure BEFORE updating any secrets, creating any deployments, or executing any workflows in your newly created VNF Manager.
In vSphere ESXi 6.7 and 7.0.X
In vSphere 6.7, clone your existing (VNFM) virtual machine (see, page 32 in the vSphere Virtual Machine Administration Guide for detailed steps). In vSphere 7.0.X, clone your existing (VNFM) virtual machine (see, page 33 in the vSphere Virtual Machine Administration Guide for detailed steps).
Verify that you have a VNFM instance or virtual machine in your VIM, meeting these setup requirements.
OPTIONAL: If prompted to update/replace your external certificates, consult these steps here, and then reboot the VNFM virtual machine.
OPTIONAL: Once the VNFM finishes rebooting, login to the VNFM UI or CLI.
OPTIONAL: If prompted, license the new VNFM using the on-screen wizard.
Do the following BEFORE proceeding with your VNFM:
In vSphere vApp, right-click the VNFM image in your content library that you want to clone, and then select Clone to Virtual Machine option on the popup menu.
Using the Clone Existing VM wizard, enter a Name with a backup label (for example, vnfm[version]_backup), and click Next.
Select a destination Compute Resource for this backup VM, and click Next.
Select a Storage, datacenter for the configuration and disk files, for the VM Storage Policy select the Keep existing VM storage policies option (default setting), and then click Next.
On the Select clone options page, leave ALL options CLEARED (default setting). Doing so, avoids changing parameter settings and avoids powering on the VM.
On the Customize vApp options page, leave ALL default guest.network settings.
Caution
These settings MUST remain exactly the same as the virtual machine you are cloning. Verify that the IP address information remains EXACTLY the same.
Click Finish.
Now that you cloned or created a snapshot of the VNFM to which you can use to restore, you can proceed with updating the secrets for the running VNF Manager, deploying blueprints, and so forth. See the Deployments guide for steps.
In OpenStack v13
In OpenStack 13, create a snapshot of your VNFM instance (see, OpenStack documentation for details).
Important
BEFORE proceeding, verify that you have a working VNF Manager instance from which to copy; otherwise, you will NOT create this snapshot, successfully.
Verify that you have a working VNFM instance or virtual machine in your VIM, meeting these setup requirements.
Important
Be sure you have a management network with an attached network port defined (see setup requirements for details). Doing so, ensures that you can detach the network and port from a failed VNFM and reattach them to a copy of your snapshot for restoration purposes.
OPTIONAL: If prompted to update/replace your external certificates, consult these steps here, and then reboot the VNFM virtual machine.
OPTIONAL: Once the VNFM finishes rebooting, login to the VNFM UI or CLI.
OPTIONAL: If prompted, license the new VNFM using the on-screen wizard.
Do the following BEFORE proceeding with your VNFM:
- To create a VNFM instance in Openstack, click the Instances tab, click Launch Instance, and then complete the Launch Instance form using a “backup” label in the Instance Name and selecting the Network Port you created for the Management network. SKIP setting the Network, as this will be assigned when you set the Network Port.
- Once your instance finishes, find your instance in the table, and then click Create Snapshot. Once your snapshot completes, your backup instance will appear on the Images tab listed in alphabetical order.
Now that you created a snapshot of the VNFM to which you can use to restore, in VNFM, you can proceed with updating the secrets for the running VNF Manager, deploying blueprints, and so forth. See the Deployments guide for steps.
Snapshots
Take Snapshots on regular intervals (suggest daily), which you can automate using the REST-based Service API or done manually using the VNFM CLI.
Create a routine snapshot
F5 recommends establishing a routine backup of the VNF Manager. You can create a snapshot manually using the UI (see following steps) or create an automated schedule using the API (see the API documentation). Decide the frequency for creating these snapshots, ensuring that you capture all recent changes. Store the snapshots off box from the VNFM VM, on an external drive.
Create a snapshot manually
Do the following; alternatively, you can also use the VNFM CLI (for example: vnfm snapshots download [OPTIONS] SNAPSHOT_ID).
In the VNFM UI, in the left menu, expand the System Setup blade, and then select Snapshots.
Click Create.
Name the snapshot, enable the Include Credentials option, and then click Create.
View the snapshot creation task by clicking the System Logs option in the left menu.
When the snapshot finishes, next to the snapshot in the list click Download, and select a directory NOT on the VNFM VM for storing the snapshot. Use an external drive for storage.
Note
Be aware that the VNFM UI or your browser will NOT provide visual feedback of this snapshot download process; however, your download will complete.
Restore a failed VNF Manager
In the event your running VNF Manager fails, do the following to restore the VNFM from the clone (vSphere) or snapshot (OpenStack) created in your VIM.
In vSphere ESXi 6.7 and 7.0.X
Power off the failed VNF Manager.
Create an additional clone of the
vnfm_backupthat you created in step 5 in the previous Create a backup virtual machine for restoration procedure.Name this image accordingly, as this will become your running/restored VNF Manager.
Creating a clone of your backup instance, ensures you always have a solid place from which to restart. F5 recommends always keeping this cloned backup.
Power on the newly cloned VNF Manager (created in Step 2 of this procedure).
Login to the VNFM UI.
Click the System Setup blade, select Snapshots, click Upload, and then browse to the LATEST version of the routine snapshot file (created in the previous Create a routine snapshot procedure).
In the Snapshot row, click
 Restore.
On the popup dialog box, enable the Force restore even if manager is non-empty option, leaving all other options with the default setting.
Click Restore.
In the left menu, click the System Logs option to see the restoration of the snapshot to the VNFM (see Deployment Events and Logs for details).
Once the restore finishes, the VNFM is aware of all deployments and secrets available to it at the time of creating the routine snapshot.
Tip
In the event a Heal or Scale workflow was triggered by the Nagios component while the VNFM VM was offline, the restored VNFM can receive that notification and begin the workflow to remedy the situation, if you trigger the workflow manually using Nagios.
In OpenStack v13
Shut off the failed VNF Manager instance.
To detach the interface (which also detaches the network port), on the tab, select the shut-down VNFM instance in the list, at the end of the row expand the drop-down menu, and select Detach Instance from the list. This detaches the network port, which you will reattach to the copy of your snapshot for restoration purposes.
Create an additional copy of the
vnfm_backupinstance that you created in step 5 in the previous Create a backup virtual machine for restoration procedure, naming this copied image accordingly, as this will become your running/restored VNF Manager. Creating a copy of your backup instance, ensures you always have a solid place from which to restart. F5 recommends always keeping this cloned backup.To launch the backup copy, on the tab, click Launch Instance, complete all the forms including:
- Source tab - expand the Select Boot Source menu, choose Instance Snapshot from the list, and then select the snapshot from the Available list.
- Networks tab - SKIP THIS STEP.
- Network Ports tab - select the port created for the Management network.
Click Launch Instance.
To reattach the Network Port (detached in step 2), on the tab, select the copy of the
vnfm_backupin the list, and then at the end of the row, expand the drop-down menu, select Attach Interface from the list, and define the following:- Expand the To define The way to specify an interface drop-down menu, and select by Network (and IP address) option.
- Expand the Network drop-down menu and from the list select the Management network associated with the Network Port you defined during the setup process.
- Leave all other default settings.
Login to the VNFM UI, and do the following:
- Click the System Setup blade, click the Snapshots option, click Upload, and then browse to the LATEST version of the routine snapshot file (created in the previous Create a routine snapshot procedure).
- In the Snapshot row, click Restore.
- On the popup dialog box, enable the Force restore even if manager is non-empty option, leaving all other options with the default setting.
- Click Restore.
- In the left menu, click the System Logs option to see the restoration of the snapshot to the VNFM (see Deployment Events and Logs for details).
Once the restore finishes, the VNFM is aware of all deployments and secrets available to it at the time of creating the routine snapshot.
Tip
In the event a Heal or Scale workflow was triggered by the Nagios component while the VNFM virtual machine was offline, the restored VNFM can receive that notification and begin the workflow to remedy the situation, if you trigger the workflow manually using Nagios.
Create a snapshot and restore a configuration
Use the CLI to manage snapshots.
Create snapshot of the failed VNFM 1 that has the configuration you want to replicate:
Code Block 1 CLI
vnfm snapshots create —include-metrics —include-credentials SNAPSHOT_IDCode Block 2 REST
curl -X PUT --header "Tenant: <manager-tenant>" -u <manager-username>:<manager-password> "http://<manager-ip>/api/v3.1/snapshots/<snapshot-id>"Parameters specification available in the VNFM REST API.
Create a new instance of VNFM 2 deployment for which you want to apply the VNFM 1 configuration.
Do one of the following to upload the snapshot:
In the left menu, click Admin Operations, and then click Upload, browse to the file created in step 1.
Using the VNFM CLI, transfer the snapshot to the newly created VNFM 2 using
scporrsync, then upload using:vnfm snapshots upload ./snapshot.zip
To restore from the uploaded snapshot, use the System Setup menu.
On the Deployments blade select the VNFM 2 instance, click
 , click Update,
on the form change the
, click Update,
on the form change the manager_mgmt_hostinput to the correct IP address for VNFM 2, DISABLE ALL Actions, and then click Update (see the Deployment maintenance guide).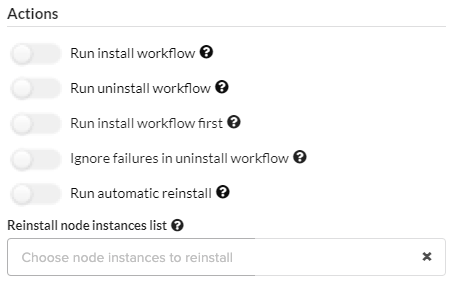
Run the following
internal_ca_certsecret update command to update the secrets for the new VNFM 2:vnfm secret update -f /etc/cloudify/ssl/cloudify_internal_ca_cert.pem internal_ca_certFor the new VNFM 2 deployment, execute the Uninstall workflow, and then once completed, run the Install workflow (see the Deploy local blueprint topic).
Split brain
A split brain situation happens when for a while there is no connectivity between managers. Then each of them thinks that other managers are unhealthy and become primary. After connectivity is back, the primary becomes the only one in the cluster. It’s chosen based on the newest version of PostgreSQL database. All data from other managers will be synced with the active one and others will become standbys. All data/installed deployments/plugins will get lost.
What’s Next?