VNFM deployment guide
To deploy F5 VNF Manager blueprint solutions, do the following:
- Do one of the following to launch an instance in your private cloud environment:
- Launch an instance in OpenStack (use VNFM blueprints for OpenStack)
- Launch an instance in VMware vSphere ESXi (use VNFM blueprints for vSphere)
- Do one of the following to enable external access to the F5 VNF Manager:
- Add a floating IP in OpenStack. This step is optional for VNF Manager version 1.3.0 and later.
- Add an external IP in VMware vSphere
BEFORE continuing, create a snapshot/clone of your working instance in your VIM for backup and restoration purposes.
Define your system secrets. For help defining secrets, see the Secrets reference guide.
If using multiple VIMs for deploying blueprints in multiple data centers, see the grouped secrets section in the Secrets reference guide.
Define parameters in the inputs file. For inputs definitions, see the Blueprint inputs reference guide.
OPTIONAL: Once you deploy a solution, you can update the deployment and associate a new blueprint, change parameters, define additional workflow actions, and make other similar changes.
Once you complete these deployment steps, consult the supporting reference topics for more details about using the F5 VNFM.
Secure access to your F5 VNFM
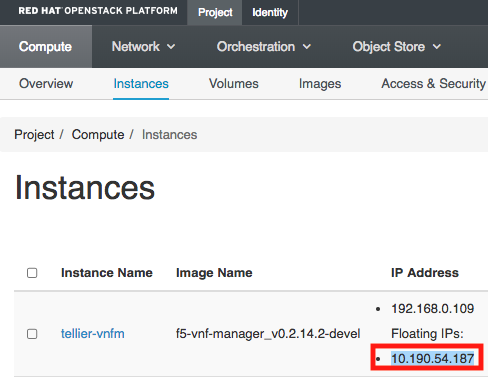
To access your VNFM, using https point your browser to the IP address you created in the previous steps and assigned to your management network.
For example, in OpenStack, find your IP address here:
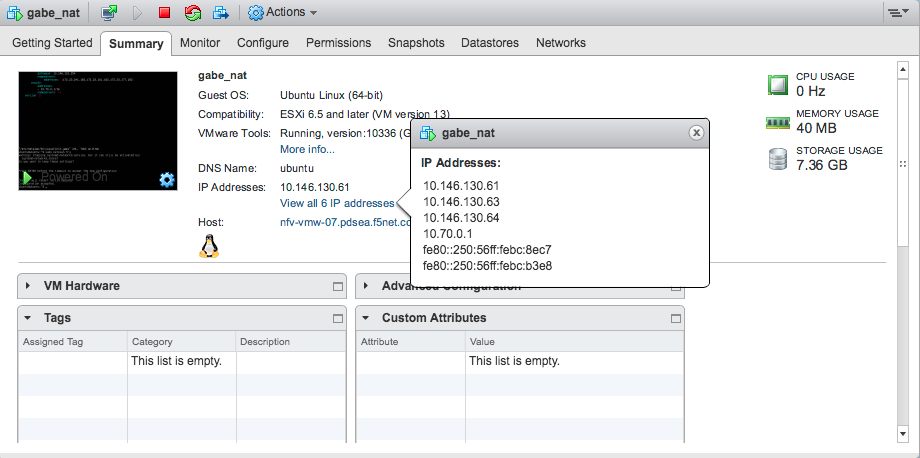
For example, in vSphere ESXi, find your IP address here:
Login to VNFM using username: admin and password: admin.
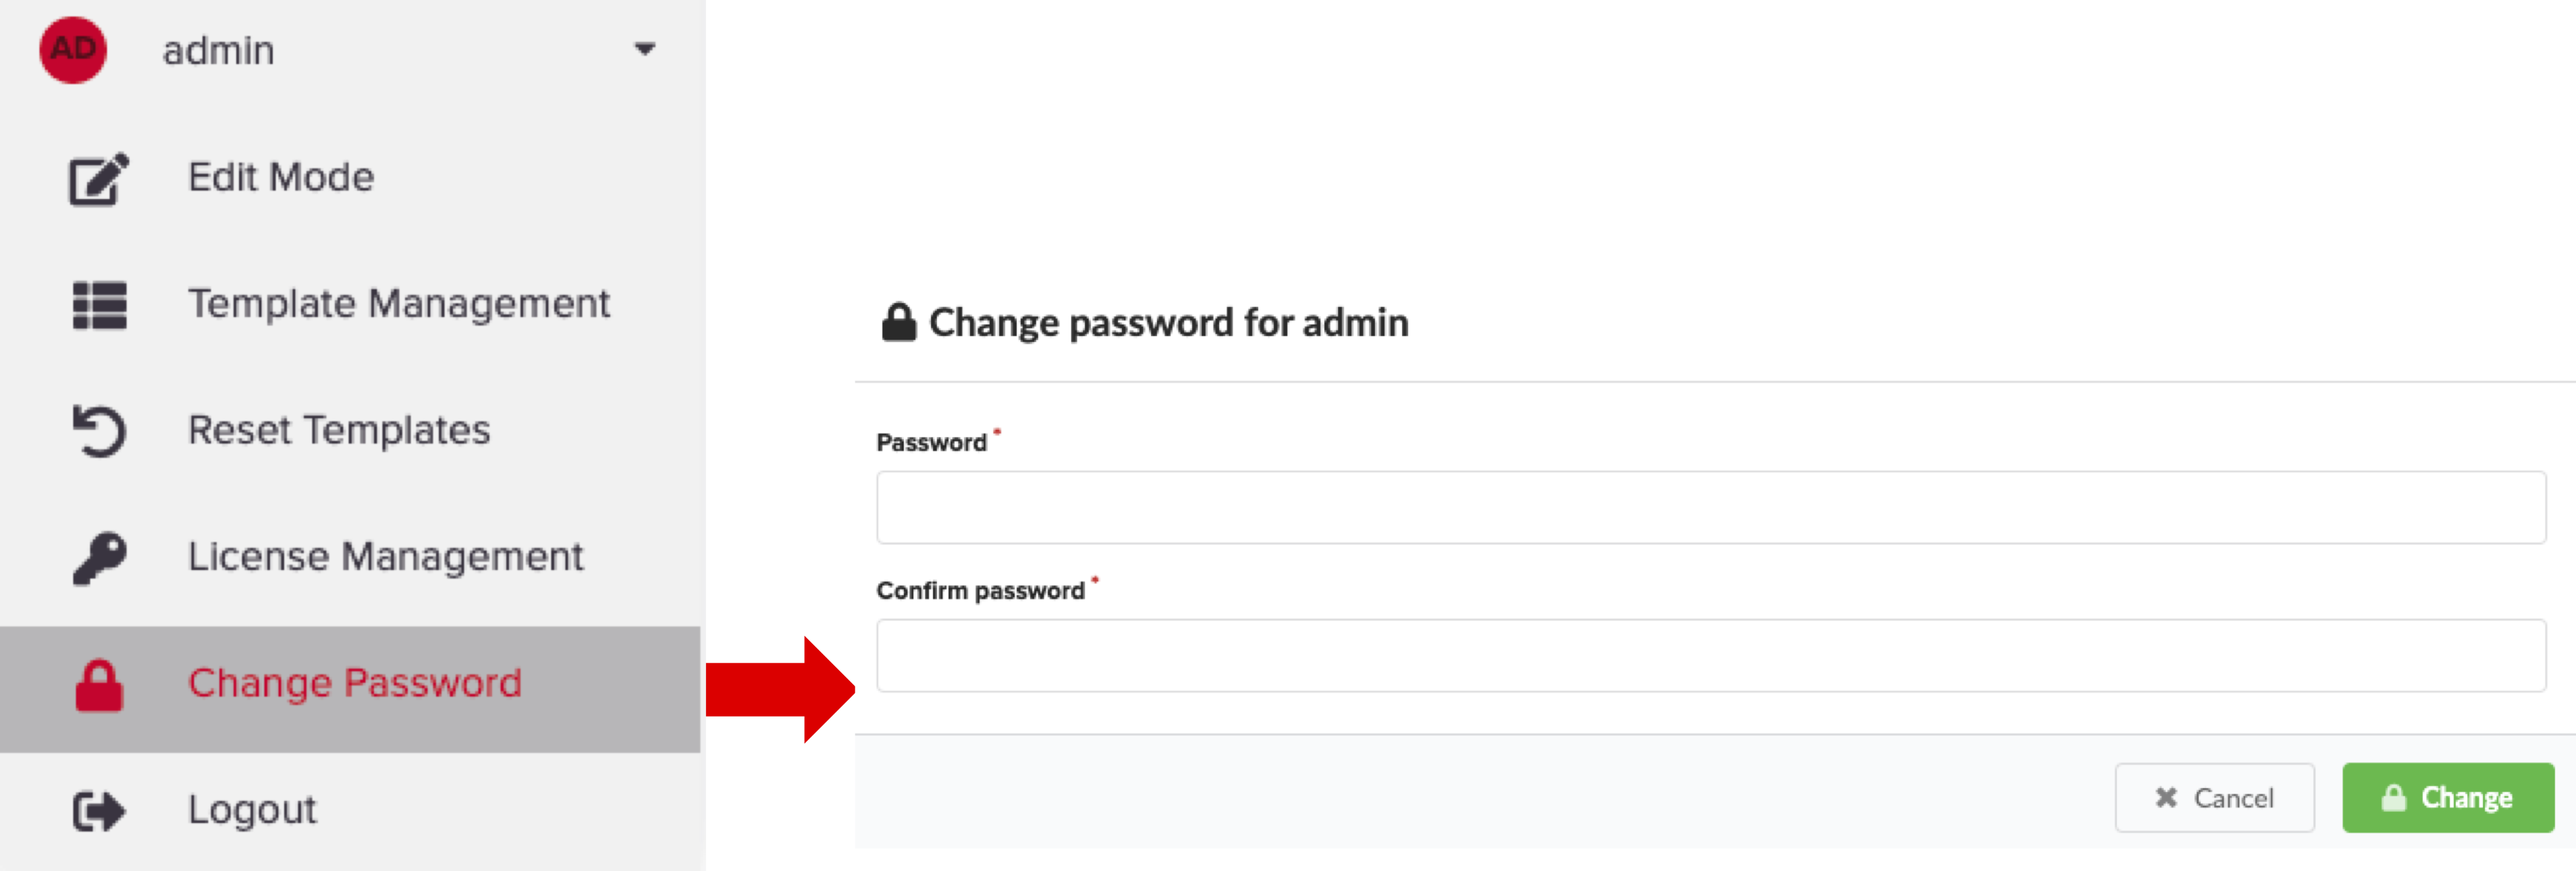
To change the admin password (you cannot change the username), do one of the following:
To update the admin password using the VNF Manager UI, in the left menu, click Admin, select Change Password, and then in the Change password for Admin dialog box enter a complex password.
To update the profile using the CLI type:
[admin@vnfm ~]$ vnfm users set-password admin -p new_admin_password.
MANDATORY: To update the admin profile, using the CLI you MUST do the following:
[admin@vnfm ~]$ vnfm profile set -p new_admin_password
Validating credentials...
Credentials validated
Setting password to <new_admin_password>
Settings saved successfully
[admin@vnfm ~]$ vnfm status
Retrieving Manager services status... [ip=localhost]

Services:
+--------------------------------+--------+
|            service             | status |
+--------------------------------+--------+
| VNFM Console                   | Active |
| AMQP-Postgres                  | Active |
| Manager Rest-Service           | Active |
| RabbitMQ                       | Active |
| Webserver                      | Active |
| Management Worker              | Active |
| PostgreSQL                     | Active |
+--------------------------------+--------+
To learn more, consult the User Management topic, the Server Maintenance CLI guide, and the Tenant Management topic.
Important
F5 recommends managing your VNFM administration account using a role-based access control (RBAC) method, such as LDAP or Active Directory. To learn more, consult the integrating with LDAP topic. At a minimum, set a complex admin password.
Define parameters in the inputs.yaml file
The F5 blueprints use an inputs.yaml file that you must edit, adding your system definitions:
You must configure a BIG-IQ before deploying a VNFM Gi LAN or Gi Firewall solution blueprint. You can do this manually, or use the F5 VNF BIG-IQ blueprint solution to automate the configuration. To use the F5 VNF BIG-IQ blueprint, open one of the following inputs file, copy and paste the sample inputs file into a new file, change the parameter values according to your application and network requirements, and then save the file locally:
VIM VNFM Solution Version YAML (for UI) VNFM Solution Version JSON (for REST API) OpenStack Version 13 or Version 16 VNF-BIG-IQ 1.4.0, 2.0.2, and 4.0.0 VNF-BIG-IQ 1.4.0, 2.0.2, and 4.0.0 VMware vSphere ESXi Version 6.5-7.0.3 VNF-BIG-IQ 1.4.0, 2.0.2, and 4.0.0 VNF-BIG-IQ 1.4.0, 2.0.2, and 4.0.0 OPTIONAL PREVIEW ONLY: If you are using the internal VNF Manager PostrgeSQL database, then proceed to the next step. If you want to use an external database, consult the External database reference guide, copy the required external database inputs into the solution blueprint inputs file that you select in the next step. You have two options for using an external database:
- PostgreSQL database hosted on a Centos VM that VNF Manager auto-deploys for you - define the inputs as discussed for Option A in the external database reference guide.
- PostgreSQL database hosted on a Centos VM for which you deploy and maintain all lifecycle management processes - define the inputs as discussed for Option B in the External database reference guide.
Depending on your blueprint solution, VNFM version, and VIM, open one of the following YAML or JSON blueprint solution inputs files:
VIM VNFM Solution Version YAML (for UI) VNFM Solution Version JSON (for REST API) OpenStack Version 13 or Version 16 Gi LAN 1.4.0, 2.0.2, 4.0.0
Gi Firewall 1.4.0, 2.0.2, and 4.0.0
Base 1.4.0, 2.0.2, and 4.0.0
DNS 1.4.0, 2.0.2, and 4.0.0
DNS Security VNF Service 1.4.0, 2.0.2, and 4.0.0
CGNAT-Offering 2.0.2 and 4.0.0Gi LAN 1.4.0, 2.0.2, and 4.0.0
Gi Firewall 1.4.0, 2.0.2, and 4.0.0
Base 1.4.0, 2.0.2, and 4.0.0
DNS 1.4.0, 2.0.2, and 4.0.0
DNS Security VNF Service 1.4.0, 2.0.2, and 4.0.0
CGNAT-Offering 2.0.2 and 4.0.0VMware vSphere ESXi Version 6.5-7.0.3 Gi LAN 1.4.0, 2.0.2, and 4.0.0
Gi Firewall 1.4.0, 2.0.2, and 4.0.0
Base 1.4.0, 2.0.2, and 4.0.0
DNS 1.4.0, 2.0.2, and 4.0.0
DNS Security VNF Service 1.4.0, 2.0.2, and 4.0.0
CGNAT-Offering 2.0.2 and 4.0.0Gi LAN 1.4.0, 2.0.2, and 4.0.0
Gi Firewall 1.4.0, 2.0.2, and 4.0.0
Base 1.4.0, 2.0.2, and 4.0.0
DNS 1.4.0, 2.0.2, and 4.0.0
DNS Security VNF Service 1.4.0, 2.0.2, and 4.0.0
CGNAT-Offering 2.0.2 and 4.0.0Copy and paste the contents of the sample inputs yaml file into a new file and change the parameter values according to your application and network requirements. Consult the Blueprint inputs reference guide for parameter descriptions to help you define your inputs.YAML file.
Save the inputs file(s) locally. You will upload blueprint YAML file(s) into VNFM in Step 2 of the following Deploy local F5 (Gilan) blueprint procedure.
Deploy F5 blueprint
Once you change all the values in the blueprint inputs file(s) for your VIM and save it locally, upload the file into F5 VNF Manager. The inputs file will define all required parameters for the following blueprint files, depending on the solution you selected and your VIM environment:
- F5-VNF-BIG-IQ.yaml
- F5-VNF-Service-Layer-Base.yaml
- F5-VNF-Service-Layer-Firewall.yaml
- F5-VNF-Service-Layer-GiLAN.yaml
- F5-VNF-Service-Layer-DNS.yaml
- F5-VNF-Service-Layer-Secure-DNS.yaml
- F5-VNF-Service-Layer-CGNAT-Offering.yaml

- Open F5 VNFM, click Blueprints, and then in the F5-BIGIQ blueprint row,
click
 Create Deployment.
Tip
You can manually configure your own BIG-IQ utility; however, F5 recommends automating this process by deploying this F5-VNF-BIG-IQ blueprint. If deploying the F5-VNF-BIG-IQ blueprint from a VMware vSphere ESXi VIM, you must NOT use 192.168.1.200 and 192.168.1.245 IP addresses on the same network the F5 VNF Manager is connected, until AFTER you deploy the F5-VNF-BIG-IQ blueprint and the BIG-IQ HA pair is online. Once the BIG-IQ HA pair is online, those IP addresses become available.
- Enter a name, under Deployment Inputs, click
 Load Values browse for the
 inputs_[solution name].yamlfile you edited, and then click Open. The Deploy blueprint form is completed automatically with the values you entered in theinputs_[solution name].yamlfile.
Tip
Troubleshooting: If you receive an error at this point, then your inputs file is out of date and lacks the correct parameters.
Under Deployment Metadata, do the following;
- Expand Site name, and choose an existing site to which this deployment will be assigned. Use this option to associate a site/location for where you want to run this deployment. You must have defined sites in your environment, before assigning them to individual deployments. Consult the Site Management topic for complete details.
- Expand Labels, and select an existing label (key-value pair) that you want assigned to this deployment.
Under Execution Parameters, do the following:
- ONLY toggle ON Skip plugins validation setting when developing plugins; otherwise set to OFF.
- Toggle ON Runtime only evaluation if you want
get_propertyandget_inputintrinsic functions evaluated on demand at runtime. Set to OFF and these evaluations occur ONLY when the deployment is created.
Expand the Advanced drop-down menu, to specify the Deployment ID for this deployment instance, and designate this instance as a Runtime only evaluation.
Click Install, and then click Deploy. The VNFM uses the configuration node, configuring the BIG-IQ, and the deployment outputs return the BIG-IQ licensing and addressing information required by the other main F5 solution blueprints.
Tip
Troubleshooting: If you receive an error at this point, then it is related to a missing secrets value or a typo in a secrets value.
Once the BIG-IQ blueprint finishes executing, repeat steps 1-5, selecting one of the following blueprints, depending on the solution you selected:
- F5-VNF-Service-Layer-Base.yaml main blueprint file
- F5-VNF-Service-Layer-Firewall.yaml main blueprint file
- F5-VNF-Service-Layer-GiLAN.yaml main blueprint file
- F5-VNF-Service-Layer-DNS.yaml main blueprint file
- F5-VNF-Service-Layer-Secure-DNS.yaml main blueprint file
- F5-VNF-Service-Layer-CGNAT-Offering.yaml main blueprint file
VNFM starts creating BIG-IP VEs according to the parameters you defined for your network. Also installed includes additional, sub-blueprints packaged with the F5 main blueprints.
Once your blueprint install finishes executing, click the Services blade, click a name from the list, in the right-side pane click Details, and then click:
- Last Execution tab to view status, events, and logs of the last workflow run on the deployment.
- Deployment Info tab to view a model of your VNF installation, outputs and capabilities, labels, and deployment input values.
- History tab to view deployment executions and deployment events, and logs.
To view the list of applicable workflows (for example, scale out group, heal VE, etc.) that you can run, on the Services blade, select a blueprint from the list, and then in the right-side pane click
 Execute Workflow.
A list of applicable workflows for your solution appears. To learn more, consult the workflow user guide
and the workflow-deployments type matrix.
Execute Workflow.
A list of applicable workflows for your solution appears. To learn more, consult the workflow user guide
and the workflow-deployments type matrix.
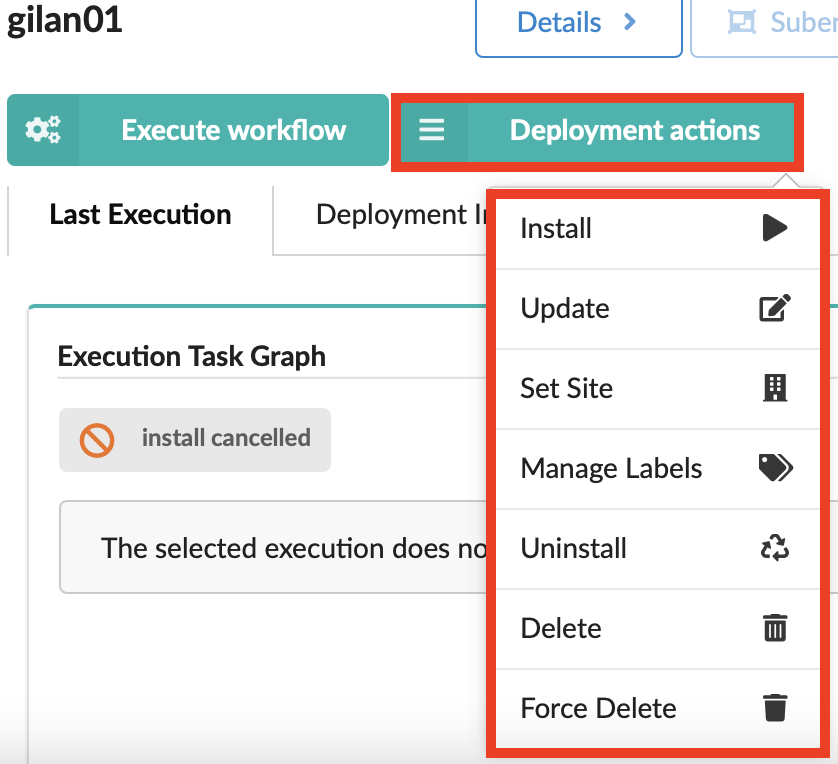
- To view a list of deployment actions you can execute on the selected blueprint, in the right-side pane click
 Deployment actions, and a list of applicable operations appears:
- Consult the Update deployment topic.
Update existing deployment
You can update, delete/force delete, or define a site for any existing deployment using the Deployment actions menu.
You can also run workflows applicable to the selected blueprint using the
Click the Services blade, click deployment name in the list, and then click
Deployment actions.Select the Update option.
The Update Deployment popup widow appears. Do one of the following:
- To edit input values directly in the form, click Show Data Types, to view the JSON or YAML formats for each input.
- Click Load Values, to browse for and upload a new/updated yaml file.
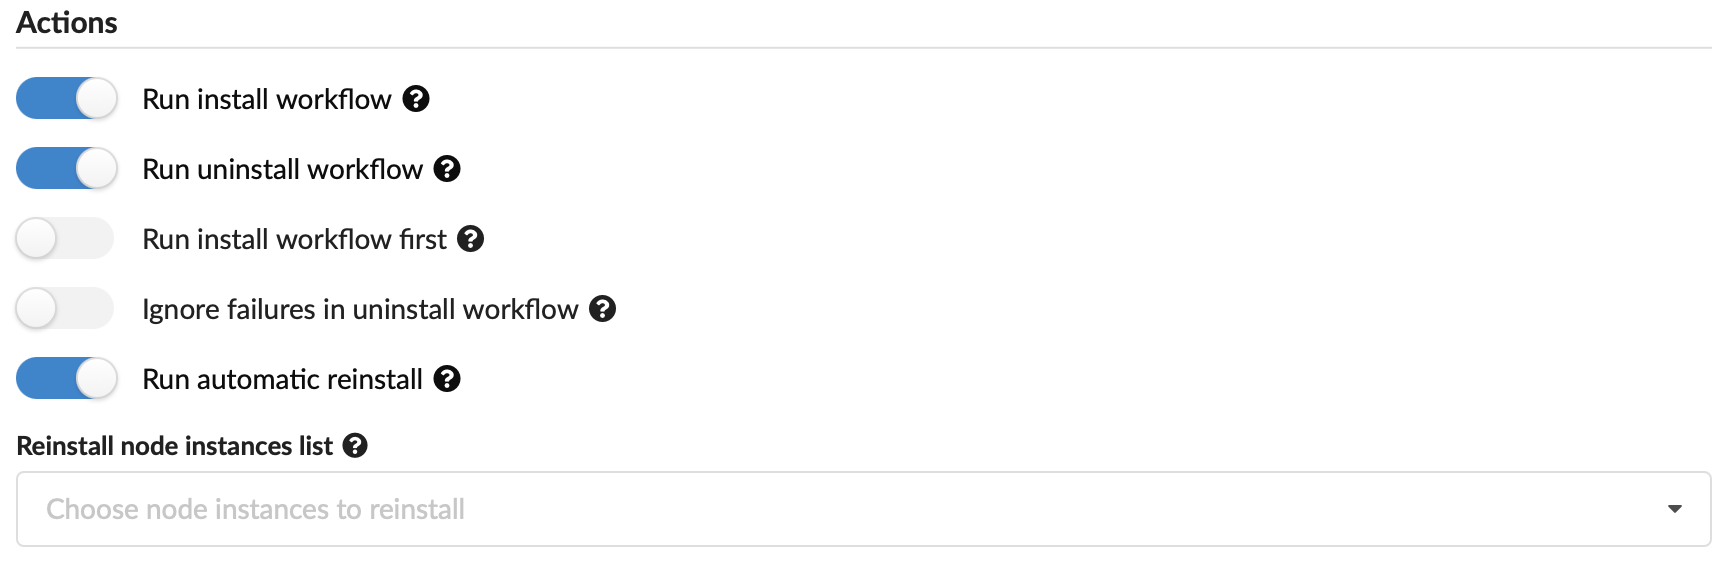
You can set the following actions to occur upon updating the deployment:
- Run install workflow - toggle on/off whether to run install lifecycle operations.
- Run uninstall workflow - toggle on/off whether to run uninstall lifecycle operation.
- Run install workflow first - toggle on/off whether to run install first before uninstall (default is to run uninstall first).
- Ignore failures in uninstall workflow - toggle on/off whether to complete uninstall operation despite failures.
- Run automatic reinstall - Toggle ON to automatically reinstall ALL node instances with their modified properties as part of the deployment update. Toggle OFF, to reinstall only those modified nodes selected in the following Reinstall node instance list.
- Reinstall node instance list - Expand to select the node instance IDs you want auto-installed with this update. The selected node IDs will reinstall even if the previous Run automatic reinstall setting is OFF.
- Force update - Toggle ON to force the update to run, in case a previous update on this deployment has failed.
Scroll to the bottom of the dialog box and click Preview to view a deployment without executing operations, or Update to submit your changes.
Run workflows on deployments
Use the ![]() Execute workflow button to run workflows on existing deployments.
Consult the Workflow User Guide for complete steps and details about each workflow.
Execute workflow button to run workflows on existing deployments.
Consult the Workflow User Guide for complete steps and details about each workflow.
Delete existing deployment
- Click the Services blade, click a deployment name in the list, and then click Deployment actions.
- Click Delete from the list, and then click Yes at the prompt.
What’s Next?