Deploy in VMware vSphere ESXi (vCenter API)
PREREQUISITE: The following lists the VNFM-required administrative VMware vSphere ESXi 6.5, 6.7, and 7.0 vCenter environment components and guidelines that must exist PRIOR to creating a VNFM instance in your VMware project.
Verify that the following networks exist in your VNFM-supported version of ESXi. (Click the following component links to learn more about using VMware vSphere ESXi 7.0 components.)
You must create seven separate networks. You can create them however you want; using Distributed Switch, VLANs, and Distributed Port Group, or create a Standard Virtual Switch, Standard Virtual Switch, and assign as many uplinks as you want. The only requirement is that you create seven, separated networks for the required pre-existing networks.
A network protocol profile contains a pool of IPv4 or IPv6 addresses for use by vApps. When you create a network protocol profile, you set up its IPv4 or IPv6 configuration
Note
The VLAN IDs for the PDN, PGW, and MGMT port groups must use the same VLAN IDs as the corresponding physical networks.
Populate your Content Library by unpacking and uploading the following image files into your VMware Content Library.
Tip
If using vSphere v6.5 and earlier, to avoid errors during deployment, edit the
.ovafile and remove all references to the.nvramfile. Consult this KB article on VMware.com for complete details.- Your VNFM-supported version of BIG-IQ OVA file
- Your VNFM-supported BIG-IP Virtual-Edition OVA file
- F5 VNF Manager OVA file on the F5 Downloads site. Product key provided in the email receipt.
- CentOS-7-x86_64-GenericCloud-1503
You can modify your OVF file and fine tune your instance for Nagios, DAG, and VNF resources. Options include:
- singlecpu - 1 CPU and 2048 MB RAM
- dualcpu - 2 CPUs and 4096 MB RAM (recommended for Nagios)
- quadcpu - 4 CPUs and 8192 MB RAM (recommended for VNF and DAG)
- octalcpu - 8 CPUs and 16384 MB RAM (high-performance configuration)
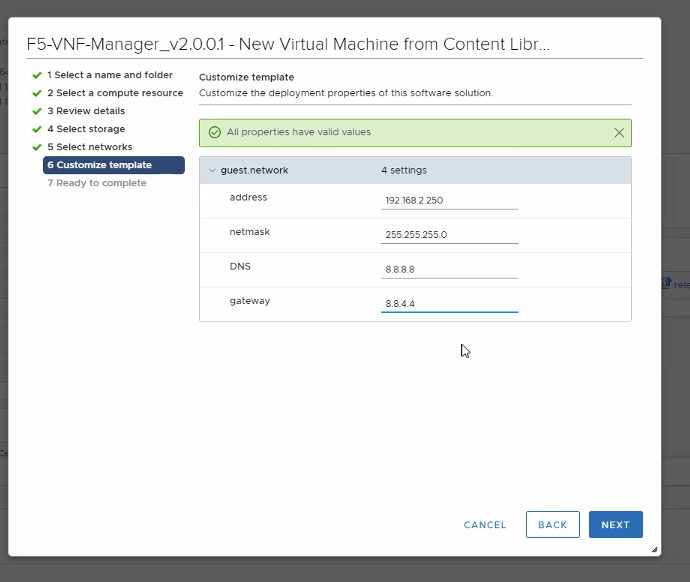
Use the wizard to deploy VM from OVF in content library:
At step 6: Customize template in the wizard, be sure to complete the guest network settings, so you can access the VNF Manager UI.
Access your VNFM
- Using
https, point your browser to the IP address that you assigned to the VNF Manager on the management network, and then login using admin for both username and password. - Secure access to your F5 VNF Manager.
What’s next?