High availability guide
High availability (HA) in the F5 VNF Manager 2.0.2 does NOT meet the requirements for Service Provider HA implementations, as it only supports a nine VM distributed version of an active/active cluster with an added load balancer. F5 will release the “distributed cluster only” solution appropriate for service providers in the next major release of F5 VNF Manager and NFV Solutions.
However, the current backup and restore processes will enable you to maintain working F5 NFV Solutions. F5 designs all NFV Solution blueprints with built-in high availability; therefore, if an F5 VNF Manager fails, the NFV Solutions will continue to operate unhindered. When a failed F5 VNF Manager is restored to service, it picks up where it left off.
Environment
Software prerequisite
F5 VNF Manager is supported for installation on a 64-bit host with RHEL/CentOS 7.9.
There are specific packages that are commonly included in RHEL/CentOS. You must have these packages installed before you install F5 VNFM Manager:
- sudo - Required to run commands with root privileges (note: this is still a requirement even when running with root user)
- openssl-1.0.2k - Required to generate internal/external certificates (for more details, see Manage secure communication certificates)
- openssh-server - Required for creating SSH keys during the sanity check
- logrotate - Required for rotating F5 VNFM log files
- systemd-sysv - Required by PostgreSQL DB
- initscripts - Required by RabbitMQ
- which - Required to install Logstash plugins
- python-setuptools - Required by Python
- python-backports - Required by Python
- python-backports-ssl_match_hostname - Required by Python (for more details, see Manage secure communication certificates)
Note
You can use the CLI vnfm declaration in the F5 VNF Manager ONLY.
Network interfaces
F5 VNF Manager requires the following network interface:
- Private - Dedicated for communication with other F5 VNFM components, including agents and cluster members.
Network ports requirements
VNFM Manager HA cluster
| Source | <-> | Target | Port | Description |
|---|---|---|---|---|
| F5 VNF Manager | <-> | F5 VNF Manager | 8300 | Internal port for the distributed key/value store. |
| F5 VNF Manager | <-> | F5 VNF Manager | 8301 | Internal port for TCP and UDP heartbeats. Must be accessible for both TCP and UDP. |
| F5 VNF Manager | <-> | F5 VNF Manager | 8500 | Port used for outage recovery in the event that half of the nodes in the cluster failed. |
| F5 VNF Manager | <-> | F5 VNF Manager | 22000 | Filesystem replication port. |
| F5 VNF Manager | <-> | F5 VNF Manager | 15432 | Database replication port. |
Create hosts
For High Availability, F5 recommends deploying one or more F5 VNF Managers. Depending on your cloud environment, complete one of the following procedures for creating hosts:
Build F5 VNFM HA cluster
Create a cluster when you completed installing your F5 VNF Managers.
When you run the vnfm cluster start command on a first F5 VNF
Manager, high availability is configured automatically. Use the
vnfm cluster join command, following installation, to add more
F5 VNF Managers to the cluster. The F5 VNF Managers that you join to
the cluster must be in an empty state, otherwise the operation will
fail.
Add profiles of all three F5 VNF Managers on F5 VNFM cli:
vnfm profiles use <Leader IP> -t default_tenant -u admin -p <admin password>
vnfm profiles use <Replica1 IP> -t default_tenant -u admin -p <admin password>
vnfm profiles use <Replica2 IP> -t default_tenant -u admin -p <admin password>
Start cluster:
vnfm profiles use <Leader IP>
vnfm cluster start --cluster-node-name <Leader name>
Switch to second profile:
vnfm profiles use <Replica1 IP>Join the manager to the cluster:
vnfm cluster join --cluster-node-name <Replica1 name> <Leader IP>Switch to third profile:
vnfm profiles use <Replica2 IP>Join the manager to the cluster:
vnfm cluster join --cluster-node-name <Replica2 name> <Leader IP>
F5 VNFM HA cluster management
F5 VNFM HA cluster manages in the same way as a single F5 VNF manager, but there are small differences when a leader is changing.
F5 VNFM CLI profile contains all information about managers of the HA Cluster and if the leader manager does not answer F5 VNFM CLI starts finding new leader.
If new profile is created for existing cluster, or new nodes joined to the cluster the command should be run to retrieve the information about all cluster managers and upgrade the profile:
vnfm cluster update-profile
When using F5 VNFM WEB UI - F5 VNFM HA cluster does not provide out of the box mechanism to update the WEB UI to switch to a new leader due to Security limitations. F5 VNFM WEB UI User should make sure to have a mechanism to be aware which F5 VNF Manager is the current leader. There are well-known mechanisms to achieve this, for example using a Load Balancer, using a Proxy such as HAProxy and configure it to poll the cluster IPs, or using a CNAME instead of explicit IPs.
Using clusters to provide High Availability
If you have a Premium version of F5 VNF Manager, an admin user can
create a cluster of F5 VNF Managers to enable high availability.
It is recommended that you have three F5 VNF Managers in a cluster for the following reasons:
- To ensure resilience in the case of a failure
- To reduce the probability of multiple hot standbys being activated as the active Manager in the event of a network failure (split-brain.)
A F5 VNF Manager cluster is dynamic, meaning that you do not need to specify the size of the cluster in advance.
How High Availability works
One F5 VNF Manager is designated as the active F5 VNF Manager, and the others are designated as hot standbys, that are constant mirrors of the data of the active Manager. In the event that the active F5 VNF Manager health check fails, an automatic fail-over switch activates one of the hot standbys as the new active Manager. Both the CLI and the F5 VNFM Agents will then start contacting the new active Manager. When the previous active Manager is restored to a healthy state, it will become a hot standby node, and will mirror the data of the new active Manager.
Note
The leader election is using a majority-based consensus algorithm, so it is recommended to use three F5 VNF Manager nodes for creating a cluster. The leader election and fail-over mechanisms are orchestrated using Consul. See the article in Consul docs to learn more about the failure tolerance for the given deployment size.
Synchronized data
All F5 VNFM database and filesystem data is mirrored on the cluster hot standby nodes. This includes all objects that are managed using the REST service, such as blueprints and deployments, and management data, such as users and tenants.
Note
Policies are not synchronized between F5 VNF Managers in the cluster.
Health checks
To determine the health of the a F5 VNF Manager node, the following are verified:
- The PostgreSQL database is up (listening on the port)
- The PostgreSQL database responds to a simple
select 1query - The PostgreSQL database follows correct active main (or if it’s a main on an active Manager)
- All F5 VNFM services are running (with the exception of rabbitmq and mgmtworker, which only run on the active Manager, but not on the hot standby Managers)
- A Consul internal health check
- A simple heartbeat is sent every 15 seconds
A F5 VNF Manager that is down remains in the cluster unless you remove
it. To remove a F5 VNF Manager, run vnfm cluster nodes remove.
Failure of the main F5 VNF Manager
In the event that the active F5 VNF Manager fails, it is important to investigate and fix the issues that caused the original main to fail, or add another F5 VNF Manager to the cluster, so that high availability is maintained, and to avoid having a single point of failure.
Note
Because operations cannot be performed on a non-active Manager, you will need to connect to that F5 VNF Manager using the SSH protocol.
Finding the active F5 VNF Manager
To find the active manager in a F5 VNF Manager cluster, you can
either: - From the CLI: run vnfm cluster nodes list. The active
manager has the ‘leader’ value in the ‘state’ column. - If you have the
REST API credentials, get the status of each manager in the cluster. The
active manager returns a 200 response, and all other managers return a
400 response.
curl -u admin:admin ``https://<insert manager address>/api/v3.1/status``
Selecting a new active manager
To manage the situation in which the active F5 VNF Manager fails one
or more health checks, all Managers in the cluster constantly monitor
the Consul next main function. When one of the standby Manager
instances in the cluster detects that next main is pointing to it,
it starts any services that are not running (RabbitMQ and mgmtworker)
and changes PostgreSQL to main state. When the active Manager
changes, the hot standby nodes begin to follow it with filesync and
database.
If the original active F5 VNF Manager was processing a workflow at the time it fails, the newly active Manager does not resume and complete that workflow.
Managing network failure
If there is a loss of connection between the F5 VNF Managers in the
cluster, the cluster can become partitioned into disconnected
parts. The partition that contains the majority will continue to operate
as normal, while the other part - containing the minority of the nodes,
so only one - will enter active minority mode. In this mode, the
node becomes active and responds to requests, but the writes are not
replicated to the majority of the cluster, and are at risk of being
lost. Therefore, it is not recommended to continue using the cluster if
the majority of the nodes are unreachable, as reported by
vnfm cluster nodes list. When the connection is resumed, the F5 VNF
Manager with the most-recently updated database becomes the active
Manager. Data that was accumulated on the other F5 VNF Manager cluster
nodes during the disconnection is not synchronized, so is lost.
Creating a cluster
Create a cluster after you complete installing your F5 VNF Managers.
When you run the vnfm cluster start command on a first F5 VNF
Manager, high availability is configured automatically. Use the
vnfm cluster join command, following installation, to add more
F5 VNF Managers to the cluster. The F5 VNF Managers that you join to
the cluster must be in an empty state, otherwise the operation will
fail.
The data on each F5 VNF Manager mirrors that of the active F5 VNF Manager. Operations can only be performed on the active Manager in the cluster, but are also reflected on the standby Managers. Similarly, upload requests can only be sent to the active F5 VNF Manager.
Within the cluster, F5 VNFM uses the Consul utility and internal health checks to detect when the active F5 VNF Manager is down, and which standby will become active.
Create cluster process
- Complete installing a F5 VNF Manager.
- Run
cluster starton the installed Manager to designate this F5 VNF Manager instance as the active Manager. - Run
cluster joinon two other, clean F5 VNF Manager instances. - (Optional) To remove a F5 VNF Manager from the cluster, run
vnfm cluster nodes remove <node-id>.
vnfm profiles use
vnfm cluster start (on the
Manager that you want to set active)
vnfm profiles use
    vnfm cluster join [–cluster-host-ip ] –cluster-node-name (on a Manager that you want to add to the cluster)
Note
The cluster nodes will try to contact the new node using the IP passed to them by the CLI. By default, this is the IP that is the CLI profile name. Often this is not desirable, because the CLI can use an external IP, while it is preferred for the cluster to be using a private network. In that case, use the --cluster-host-ip parameter, which must be an IP that is visible by other Managers in the cluster. Host names are not supported in --cluster-host-ip.
Cluster node options
When starting the cluster, or joining a node to the cluster, the
--options can be provided, to specify the following configuration
options:
check_ttl_multiplier(default: 1) - a multiplier for the health check timeout. If a health check’s status is not updated for the TTL period - which varies from check to check - the check will be considered failing. This option allows changing that time. For example, setting it to 2 will make health checks take twice as long to timeout, which means it will take longer to detect a node becoming unresponsive, but there will be less chance of short-lived network failures to cause an unnecessary fail-over.check_fail_fast(default: True) - if this setting is True, an error thrown by a health check will immediately mark it as failing, and the failure will be detected immediately, without waiting for the check TTL periodconsul_raft_multiplier- controls the consul raft_multiplier setting.
Note
If the network is unstable, increasing check_ttl_multiplier to 3 and setting check_fail_fast to False will help avoid unnecessary fail-overs, at the cost of taking longer to detect a real failure.
Upgrading clusters
F5 VNF Manager snapshots do not include clusters. If you restore the snapshot of a F5 VNF Manager that was the active Manager in a cluster to a new version, you must join the other F5 VNF Managers to recreate the cluster. Managers in a cluster must all be the same F5 VNFM version.
Upgrade cluster process
Upgrading via Snapshot Restore on a New VM - In this process you create new VMs for all F5 VNF Managers that will be part of the cluster.
Note
This procedure creates a new cluster, with the data from the existing cluster.
- Create snapshot of the active F5 VNF Manager.
- Boostrap three F5 VNF Managers with the upgraded version.
- Restore snapshot to one of the F5 VNF Manager instances.
- Run
cluster starton the Manager with the restored snapshot, to designate this F5 VNF Manager instance as the active Manager. - Run
cluster joinon the two other, installed F5 VNF Manager instances to designate them as hot standbys.
Upgrading via Snapshot Restore on an Existing VM
In this process, you tear down the active F5 VNF Manager and install a new one on the same VM. You create new VMs for the F5 VNF Managers that will become the hot standbys in the cluster.
- Create snapshot of the active F5 VNF Manager.
- Uninstall F5 VNF Manager from the active machine. (run:
sudo cfy_manager remove -f). - Install an updated Manager on the existing machine.
- Restore snapshot to the F5 VNF Manager instance.
- Run
cluster startto designate this F5 VNF Manager instance as the active Manager. - Boostrap two new F5 VNF Manager VMs with the upgraded version.
- Run
cluster joinon the two new installed F5 VNF Manager instances to designate them as hot standbys.
Tearing down clusters
If the active node is reachable and responding, we recommend that you to remove all nodes from the cluster before you uninstall them. This process avoids unnecessary fail-overs that put stress on the network and on the nodes.
Cluster teardown process
- Run
cluster nodes listand note the current active node and the non-active nodes. - For each non-active node, run:
cluster nodes remove <node name> - To remove each node from the cluster, from the command line of each
non-active node run:
cfy_manager remove -f - To tear down the cluster, from the command line of the active node
run:
cfy_manager remove -f
Cluster tools
The following tools are used to facilitate clustering in F5 VNFM.
- Consul - Discovering and configuring services in the infrastructure
- PostgresSQL Cluster mechanism (main/follow states) - the Streaming Replication mechanism is used for replicating the database
- Synchthing - File system replication
Services run with cluster
The cluster function runs the following services:
check-runner- the service which periodically runs the health checks, and updates their status in Consulhandler-runner- the service which reacts to cluster status changes as reported by Consul, and updates the state of the local machine accordinglyconsul-watcher- the service which examines the state of the Consul servers on the other nodes in the cluster, and manages the active minority mode as required
Security
The following security mechanisms are implemented:
- SSL is used internally (for more details, see Manage secure communication certificates).
- The only file that runs with
sudoprivileges is//<your directory path>/sudo_trampoline.py. - All other services are run with users:
cfyuser,cfyuser_consul,postgres, they belong to cluster group
Internal CA certificate
The internal CA certificate, which is used by the agents to verify manager connections, is replicated between all cluster nodes. When joining the cluster, a new replica copies the internal CA certificate (and the key) from the active node, and uses that to sign a new internal certificate, which will be used by servers on that replica. This means that the agents can continue using the same internal CA certificate to access that replica, if it becomes the active node.
Troubleshooting
The primary log file for troubleshooting is /var/log/cloudify/cloudify-cluster.log. All services log to journald. To view their logs, use journalctl:
journalctl -u cloudify-handler-runnerjournalctl -u cloudify-check-runnerjournalctl -u cloudify-consul-watcher
If required, direct access to Consul REST API is also possible from the
Manager machine: it is listening locally on port 8500, and
authentication requires passing the SSL client certificate which is
located at /home/admin/files/ssl/consul_client.crt (with the key
located at /home/admin/files/ssl/consul_client.key).
High Availability cluster upgrade guide
Overview
These instructions explain how to upgrade a F5 VNFM High Availability (HA) cluster from one version to the next, newer version.
Upgrade on new hosts
This is the recommended method. If something occurs during the upgrade process, you still have the old manager, working and functioning.
The key elements of upgrading a F5 VNFM HA cluster on new hosts are:
- Create snapshot and download snapshot, using the Console.
- Save agent ssh keys.
- Install new version for main manager on new host.
- Install new version for standby managers on new host.
- Restore snapshot.
- Reinstall agents.
- Start cluster on main.
- Join standby nodes to the HA cluster.
In-place upgrade
Upgrading F5 VNFM HA Cluster entails tearing down the existing Managers and installing a new version of F5 VNF manager on the same hosts. You can also restore data from your existing instance to new instance.
The key elements of in-place upgrading a F5 VNFM HA cluster are:
- Create snapshot, then download the snapshot.
- Save
/<your directory path>/sslfolder of cluster’s main manager. - Save agent ssh keys.
- Remove standby nodes from the cluster.
- Teardown managers.
- Clean managers after teardown.
- Install new version on main manager’s host (In-place installation).
- Install new version on standby managers’ host (In-place installation).
- Start HA cluster on main manager.
- Restore last snapshot.
- Join standby nodes to the HA cluster.
Upgrade F5 VNFM HA cluster
There are two methods to upgrade F5 VNFM HA cluster to the next version:
Upgrade on new hosts
This is the recommended method. If something occurs during the upgrade process, you still have the old manager, working and functioning.
Next steps allow you to go through upgrade to new hosts:
Create snapshot on old F5 VNFM HA cluster and download it.
Save SSH keys from where you store them.
cp –r /your directory path/.ssh <backup_dir>Install new F5 VNFM HA cluster managers to new hosts.
- Upload and Restore snapshot to new main manager.
Reinstall agents:
vnfm agents install --all-tenantsStart cluster on main manager
Join replicas to the new F5 VNFM HA cluster
Delete old cluster’s hosts
In-place upgrade
This method allows upgrading F5 VNFM HA cluster on the same hosts. You would run the risk of not being able to do a rollback should anything happen. In addition, in-place upgrades only work if the IP, AMQP credentials and certificates are left unchanged. Otherwise, you will not be able to communicate with the existing agents.
- Create snapshot and download it.
Save SSL certificates and SSH key from /home/admin/files/ssl folder.
cp -r /home/admin/files/ssl <backup_dir>
cp –r /home/admin/files/ssl.ssh <backup_dir>``
Save RabbitMQ credentials.
/home/admin/config.yamlopt/mgmtworker/work/broker_config.jsonopt/manager/cloudify-rest.conf/home/admin/cluster
Default credentials:
Username: **admin**
Password: **admin**
Teardown F5 VNF managers. Repeat next steps on each manager.
Remove CLI profiles of deleted hosts.
Reboot hosts.
(Optional) Fix failed services.
sudo systemctl daemon-reload
sudo systemctl reset-failed
Install new managers on the same hosts.
- Put rabbitmq credentials and the path to the certificate files from the old cluster into
/<your directory path>/config.yamlbefore you run thecfy_manager installcommand.
- Create cluster (see Create cluster).
- Join replicas to the cluster (see Create cluster for more details).
Supporting high availability reference topics
Consult the following topics, which provide further discussion and how-to information for the previous High Availability Guide.
Snapshots
The Snapshots table provides a list of all snapshots that have been
uploaded or created. The Snapshots table is only available if you
have admin credentials.
The snapshots creation process captures data in the entire F5 VNF Manager, not just that of a specific tenant. However, the snapshot is created in the context of the current tenant, and therefore must be restored from it.
Note
Snapshots are created as a private resource.
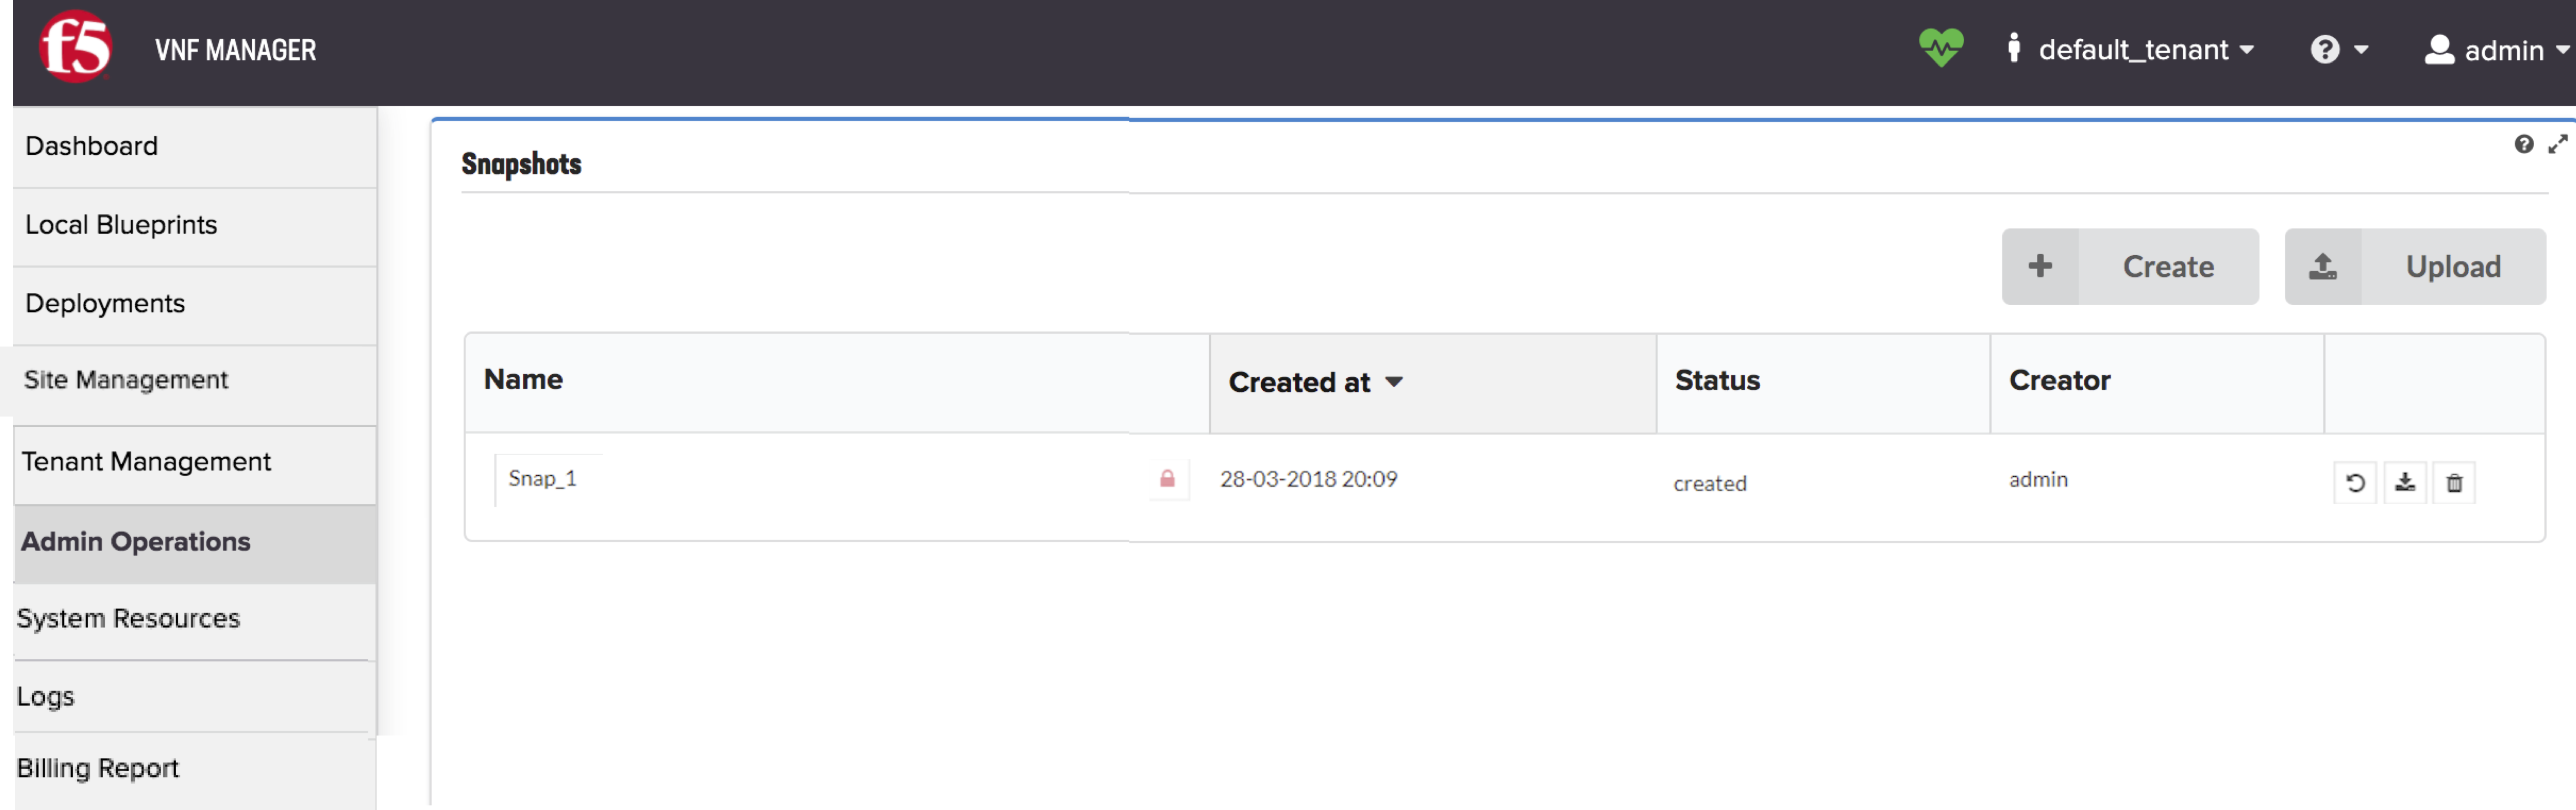
Create a Snapshot
- Click Create above the Snapshots table.
- Specify a unique ID for the snapshot and click Create.
It is good practice to use a name that will help you to easily identify the snapshot later.
The creation process begins. If there are active executions when you attempt to create the snapshot, the process waits until the executions are complete before creating the snapshot. You can see the status of executions in the Deployment executions widget.
The snapshot is saved as a ZIP file and is shown in the Snapshots table with details of its creator, creation date and time, and current status.
Restore a Snapshot
If you restore a snapshot to a VNF Manager instance that already contains data, that data is overwritten. To prevent inadvertent overwriting of existing data, you must explicitly state that you want to force data overwrite.
- Click Upload in the Snapshots widget.
- Either enter the URL of the snapshot or select the snapshot file from your file repository.
- Enter the Snapshot ID.
- Click Upload.
- To restore a snapshot from a tenant-less (legacy) environment, toggle the relevant button. To overwrite all content in the existing VNF Manager, toggle the relevant button.
- The snapshot is restored and its details appear in the Snapshots table.
Delete a Snapshot
- In the Snapshots widget, click
 for the snapshot entry that you want to delete.
 - Click Yes to delete the snapshot from VNF Manager.
Log rotations
All VNFM-related log files on the manager host are managed by logrotate. Log files are configured to rotate when they reach the size of 100MB. At most, seven rotated files are kept for each rotated log file.
Cluster and Manager Status
Displays status of the VNFM cluster divided into three cluster services:
- Manager
- Database
- Message Broker
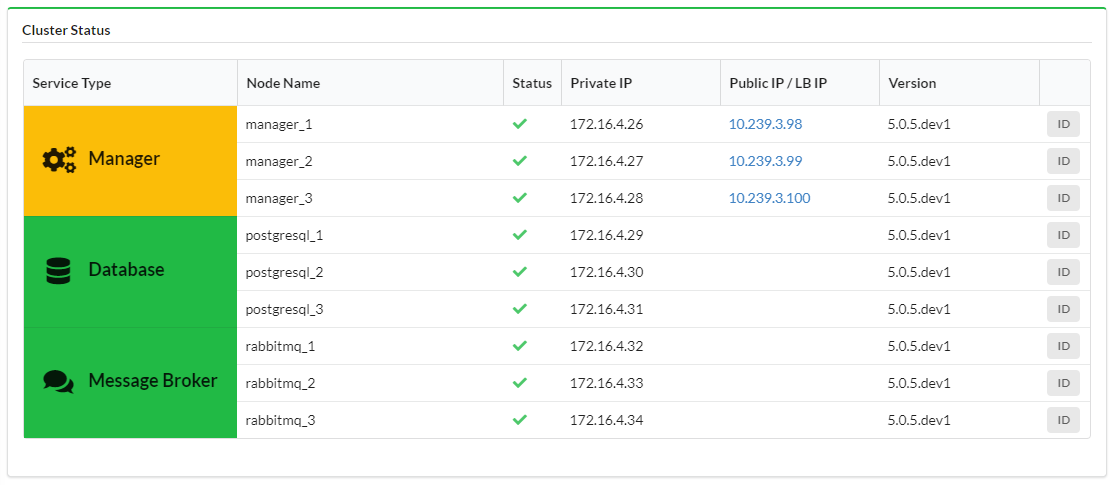
Cluster services can have the following statuses:
- OK - service type cell background is green,
- Degraded - service type cell background is yellow,
- Fail - service type cell background is red.
Each cluster node is presented with:
- Status - on hovering status icon you can see popup with details, you can copy raw info about node status to clipboard to get even more details
- Private IP
- Public IP / Load Balancer IP - in case of Manager node, you can click on the IP to go to Cloudify UI of that specific node
- Version
- ID -hover your mouse over the ID button to display the ID popup menu

What’s Next?