BIG-IP ACC and Docker must be installed prior to the first use. See Installing BIG-IP ACC for instructions.
Running a Conversion
Run the converter by using one of the following commands, replacing the BIG-IP ACC version where necessary:
docker run --rm -v "$PWD":/app/data f5-automation-config-converter:x.x.x -o data/<output-file-name>.json -u data/<input-ucs-file-name>.ucsdocker run --rm -v "$PWD":/app/data f5-automation-config-converter:x.x.x -o data/output.json -u data/myucs.ucsdocker run --rm -v %cd%:/app/data f5-automation-config-converter:x.x.x -o data/<output-file-name>.json -u data/<input-ucs-file-name>.ucsdocker run --rm -v %cd%:/app/data f5-automation-config-converter:x.x.x -o data/output.json -u data/myucs.ucsNote
The source UCS/SCF file must be located in the CURRENT directory to run the command line from the example. The data/myucs.ucs entry refers to a directory inside the container.
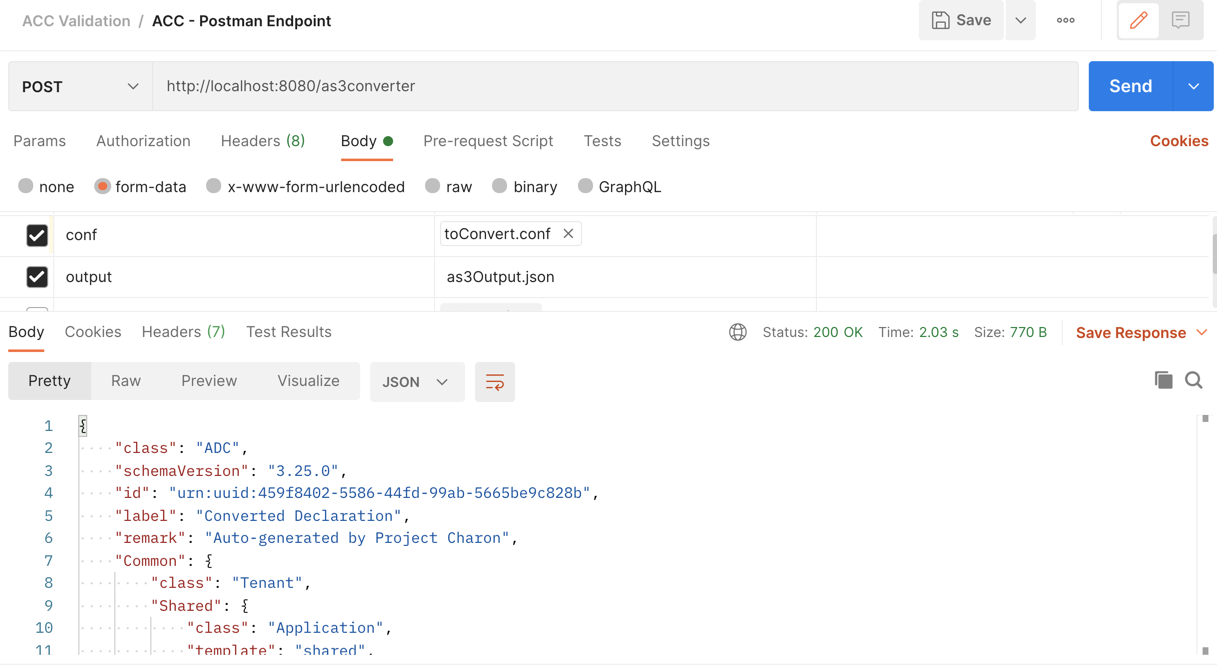
docker run --rm -v "$PWD":/app/data -p 8080:8080 f5-automation-config-converter:1.0.0 servecurl localhost:8080/converter -X POST --form "ucs=@<input-ucs-file-name>.ucs" --form "output=<output-file-name>.json" --form "verbose=true" |jq .Using Postman to POST to BIG-IP ACC Endpoint
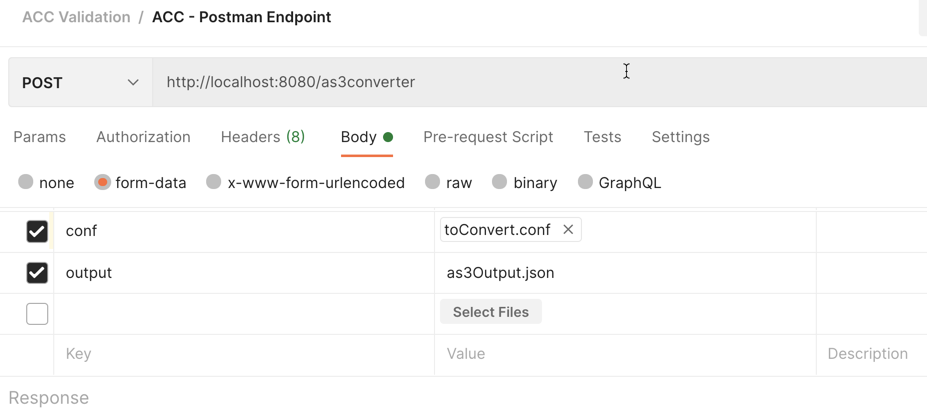
Input is bigip confguration called toConvert.conf. Output is file as3Output.json.
After post:
curl localhost:8080/converter -X POST --form "ucs=@<input-ucs-file-name>.ucs" --form "output=<output-file-name>.json" --form "verbose=true" |jq .
Docker Command Line Options
- docker run portion of the command starts the container.
- –rm option removes the container after it exits from running the application. Without this the container will persist after it exits and you may have to run a command such as docker container prune to remove leftover containers.
- The application is located in the /app directory of the container.
- -v option maps the current directory to the /app/data directory in the container. This is used to read input and write output with the container. In this example we assume the input UCS file and the output JSON file will be read from and written to the current directory.
- -p option maps the tcp port inside container to the local OS port.
BIG-IP ACC command Line Options
- -a option –application-target <application_target> puts the virtual server to specific application . Works only if the -v option is specified. The original VS application is used if this option not specified.
- -c option –conf <path> specifies path to input conf/SCF file.
- -d option –debug logs generated declaration to console.
- -e option –extended shows default values in converted stanzas.
- -o option –output <path> specifies the output file name. You must specify this as being in the data directory (with the Docker -v option). When the output file is written in the container it is written to the /app/data directory of the container which maps back to the current directory outside of the container where output.json will actually be written.
- -t option –tenant-target <tenant_target> puts the virtual server to specific tenant. Works only if -v option specified. The original VS tenant is used if this option not specified.
- -u option –ucs <path> specifies a UCS file for the application to read. For either .conf or SCF files, use the -c flag. This must be specified as being in the data directory (as specified with the -v option). When the input file is read by the application, it is read from the /app/data directory of the container which maps back to the current directory outside of the container where input file is actually read. This flag is required and you must use only one option of -u or -c, depending on your input file.
- -v option -vs-name <tenant/application/vs_name> filters output by the virtual server name.
- –as3-converted logs ACC/AS3-converted tmsh objects to console.
- –as3-not-converted option logs to stdout a list of configuration objects that BIG-IP ACC did not convert.
- –as3-recognized option logs to stdout a list of configuration objects that are recognized by BIG-IP AS3.
- –controls option adds debugging “Controls” stanza to declaration.
- –declarative-onboarding enables DO conversion instead of BIG-IP AS3.
- –disable-analytics option will disable usage reporting. Only conversion metadata is collected and reports are correlated using a pseudonymized uuid. Analytics are enabled by default. All data is collected in accordance with the F5 Privacy Policy.
- –log <file> outputs log to the specified file.
- –safe-mode option allows a user to bypass post-conversion processing, yielding a less-refined declaration. Accepts a boolean parameter, and defaults to false.
- –summary option logs to stdout counts of each generated class.
- REST-API usage related options when the container is started with serve option. –verbose prints more details in the REST-API response.
Enabling safe-mode will bypass the following post-conversion transformations:
- filterByApplication
- removeDefaultValues
- removeInvalidRefs
Note
The 3 options of -v, -a and -t typically work together with -a and -t having the ability to work independently. If -v is used, then all other virtual servers are ignored. If -t is used, then the virtual server will be placed into this tenant name, even if it was originally in /Common/. If -a is used, then the original virtual server will be placed under the application name specified. By default the virtual server name will be used as the application.
Examples
Original VS    /Common/VS1
    1) only -a /Common/VS1 provided:
        "Common": {
            "class": "tenant",
            "VS1": {
                    "class": "application"
                     "VS1": {
                    .........................
                     {
        2) -t My_tenant  in addition to -v
        "My_tenant": {
            "class": "tenant",
            "VS1": {
                    "class": "application"
                     "VS1": {
                    .........................
                    {
        3) -a "My_application"
        "My_tenant": {
            "class": "tenant",
            "My_aplication": {
                    "class": "application"
                     "VS1": {
                    .........................
                    {
Testing the Results
The best way to test the results is to take the output file and POST the BIG-IP AS3 declaration to a BIG-IP. If the declaration fails, look closely at the error messages, which should provide information on the part of the declaration needing attention.
Example
In this section we show a simple BIG-IP configuration from a UCS file, the command to convert, the response from the container, and finally the resulting BIG-IP AS3 declaration output.
The following is the relevant portion of our example UCS file.
TMSH-VERSION: 13.1.0
ltm pool /Common/testACCPool {
    monitor /Common/testACCMonitor
}
ltm virtual /Common/testACCVip {
    destination /Common/192.168.2.14:80
    ip-protocol tcp
    mask 255.255.255.255
    pool /Common/testACCPool
    profiles {
        /Common/tcp { }
        /Common/testACCHTTP { }
    }
    source 0.0.0.0/0
    translate-address enabled
    translate-port enabled
}
ltm virtual-address /Common/192.168.2.14 {
    address 192.168.2.14
    arp enabled
    mask 255.255.255.255
    traffic-group /Common/traffic-group-1
}

ltm monitor http /Common/testACCMonitor {
    adaptive disabled
    defaults-from /Common/http
    destination *:*
    interval 30
    ip-dscp 0
    recv none
    recv-disable none
    send "GET /\r\n"
    time-until-up 0
    timeout 91
}
ltm profile http /Common/testACCHTTP {
    app-service none
    defaults-from /Common/http
    proxy-type reverse
    redirect-rewrite matching
}
This UCS file is put in the same directory from which we are running the container. In the following example, the container is run using a Windows machine:
C:\Users\jordan\Desktop\ACC\dist>docker run --rm -v %cd%:/app/data f5-automation-config-converter:1.0.0 -o data/output.json -u data/acc.ucs --summary
1118 configuration objects detected
31 objects are recognized by BIG-IP AS3
12 objects are supported by BIG-IP ACC
Generated Declaration { Pool: 1,
Monitor: 1,
HTTP_Profile: 1 }
Once it has run through the converter, the resulting BIG-IP AS3 declaration looks like this:
Example by Application
In this section, we show a simple BIG-IP configuration from a UCS file, the command to convert extracting a single virtual server, the response from the container and the resulting BIG-IP AS3 declaration output.
The following is the relevant portion of our example UCS file, the virtual we extract is named f5-big-ip and we place it into a tenant named Ten and an application Appl. If the tenant is not specified, BIG-IP ACC uses the original tenant name; if the application is not specified, the BIG-IP AS3 application uses the virtual name.
TMSH-VERSION: 13.1.0
ltm pool /Common/testACCPool {
    monitor /Common/testACCMonitor
}
ltm virtual /Common/testACCVip {
    destination /Common/192.168.2.14:80
    ip-protocol tcp
    mask 255.255.255.255
    pool /Common/testACCPool
    profiles {
        /Common/tcp { }
        /Common/testACCHTTP { }
    }
    source 0.0.0.0/0
    translate-address enabled
    translate-port enabled
}
ltm virtual-address /Common/192.168.2.14 {
    address 192.168.2.14
    arp enabled
    mask 255.255.255.255
    traffic-group /Common/traffic-group-1
}

ltm monitor http /Common/testACCMonitor {
    adaptive disabled
    defaults-from /Common/http
    destination *:*
    interval 30
    ip-dscp 0
    recv none
    recv-disable none
    send "GET /\r\n"
    time-until-up 0
    timeout 91
}
ltm profile http /Common/testACCHTTP {
    app-service none
    defaults-from /Common/http
    proxy-type reverse
    redirect-rewrite matching
}
ltm virtual /Custom/testACCVip {
    destination /Common/192.168.2.14:80
    ip-protocol tcp
    mask 255.255.255.255
    pool /Common/testACCPool
    profiles {
        /Common/tcp { }
        /Common/testACCHTTP { }
    }
    source 0.0.0.0/0
    translate-address enabled
    translate-port enabled
}
ltm virtual-address /Custom/192.168.2.14 {
    address 192.168.2.14
    arp enabled
    mask 255.255.255.255
    traffic-group /Common/traffic-group-1
}

ltm monitor http /Custom/testACCMonitor {
    adaptive disabled
    defaults-from /Common/http
    destination *:*
    interval 30
    ip-dscp 0
    recv none
    recv-disable none
    send "GET /\r\n"
    time-until-up 0
    timeout 91
}
ltm profile http /Common/testACCHTTP {
    app-service none
    defaults-from /Common/http
    proxy-type reverse
    redirect-rewrite matching
}
This UCS file is put in the same directory from which we are running the container, which in the following example, is running on a Windows machine:
Note
For more information on command line usage, see the BIG-IP ACC command line options: section above.
Once it has run through the converter, the resulting BIG-IP AS3 declaration looks like this:
{
    "class": "ADC",
    "schemaVersion": "3.11.0",
    "id": "urn:uuid:6ebb5310-dcc6-42ba-83ab-3f9524827bae",
    "label": "Converted Declaration",
    "remark": "Auto-generated by Project ACC",
    "Ten": {
        "class": "Tenant",
        "Appl": {
            "class": "Application",
            "template": "http",
            "serviceMain": {
                "layer4": "tcp",
                "pool": "testACCPool",
                "translateServerAddress": true,
                "translateServerPort": true,
                "class": "Service_HTTP",
                "profileTCP": {
                    "bigip": "/Common/tcp"
                },
                "profileHTTP": {
                    "use": "/Common/Shared/testACCHTTP"
                },
                "virtualAddresses": [
                    "192.168.2.14"
                ],
                "virtualPort": 80,
                "snat": "none",
                "remark": "testACCVip"
            },
            "testACCPool": {
                "monitors": [
                    {
                        "use": "/Ten/Appl/testACCMonitor"
                    }
                ],
                "class": "Pool"
            },
            "testACCMonitor": {
                "adaptive": false,
                "interval": 30,
                "dscp": 0,
                "receive": "none",
                "send": "GET /\\r\\n",
                "timeUntilUp": 0,
                "timeout": 91,
                "class": "Monitor",
                "monitorType": "http",
                "targetAddress": "",
                "targetPort": 0
            }
        }
    }
}
Important
- Once a conversion has been completed, all files containing sensitive information such as certificates, keys, and passwords, to name a few, should be deleted or moved to a more secure location. Leaving files of these types unsecured can result in exposure and malicious use of the sensitive data.
- Best practice is to not publicly expose the server mode endpoints as sensitive data from previous conversions may still be present in container memory potentially leaving the system vulnerable.