F5 BIG-IQ Centralized Management Lab > BIG-IQ Test Drive Labs Source | Edit on
Lab 1.4: Integrating Venafi with BIG-IQ for Certificate Management
Note
Estimated time to complete: 20 minutes
F5, Inc and Venafi have partnered to provide a tightly-integrated solution for certificate and key management. Managing Venafi certificate requests through BIG-IQ automates laborious processes and reduces the amount of time you have to spend requesting and distributing certificates and keys to your managed devices.
More information in BIG-IQ Knowledge Center.
See Class 1 Module 2 Lab 2.11 to run the same lab fully automated using Ansible!
Also:
Watch the video from our partner Venafi:
- F5 Solution Overview: The Difference Between Big-IP and Big-IQ | Paul Cleary, Venafi
- F5 New Application Deployed via Big-IQ | Paul Cleary, Venafi
Lab environment access
If you have not yet visited the page Getting Started, please do so.
Workflow
- Configured third-party certificate provider on BIG-IQ
- SSL Certificate & Key creation on BIG-IQ
- AS3 HTTPS template with SSL Key Passphrase creation
- AS3 HTTPS offload application service creation
- Venafi Setup and Microsoft CA
Configured third-party certificate provider on BIG-IQ
- Start the Venafi Trust Protection component (the Windows Server 2019 in the lab). Wait at least 5 min so all the necessary services start.
- Login to BIG-IQ as david ..
Navigate to Configuration > Local Traffic > Certificate Management > Third Party CA Management.
Click Create.
- CA Providers:
Venafi - Name:
Venafi UDF lab - WebSDK Endpoint:
https://ec2amaz-bq0fcmk.f5demo.com/vedsdk - User Name:
admin - Password:
Purple123@123
Note
The Key Passphrase is to specify a password that will be used to encrypt that private key when it’s sent from verified to BIG-IQ.
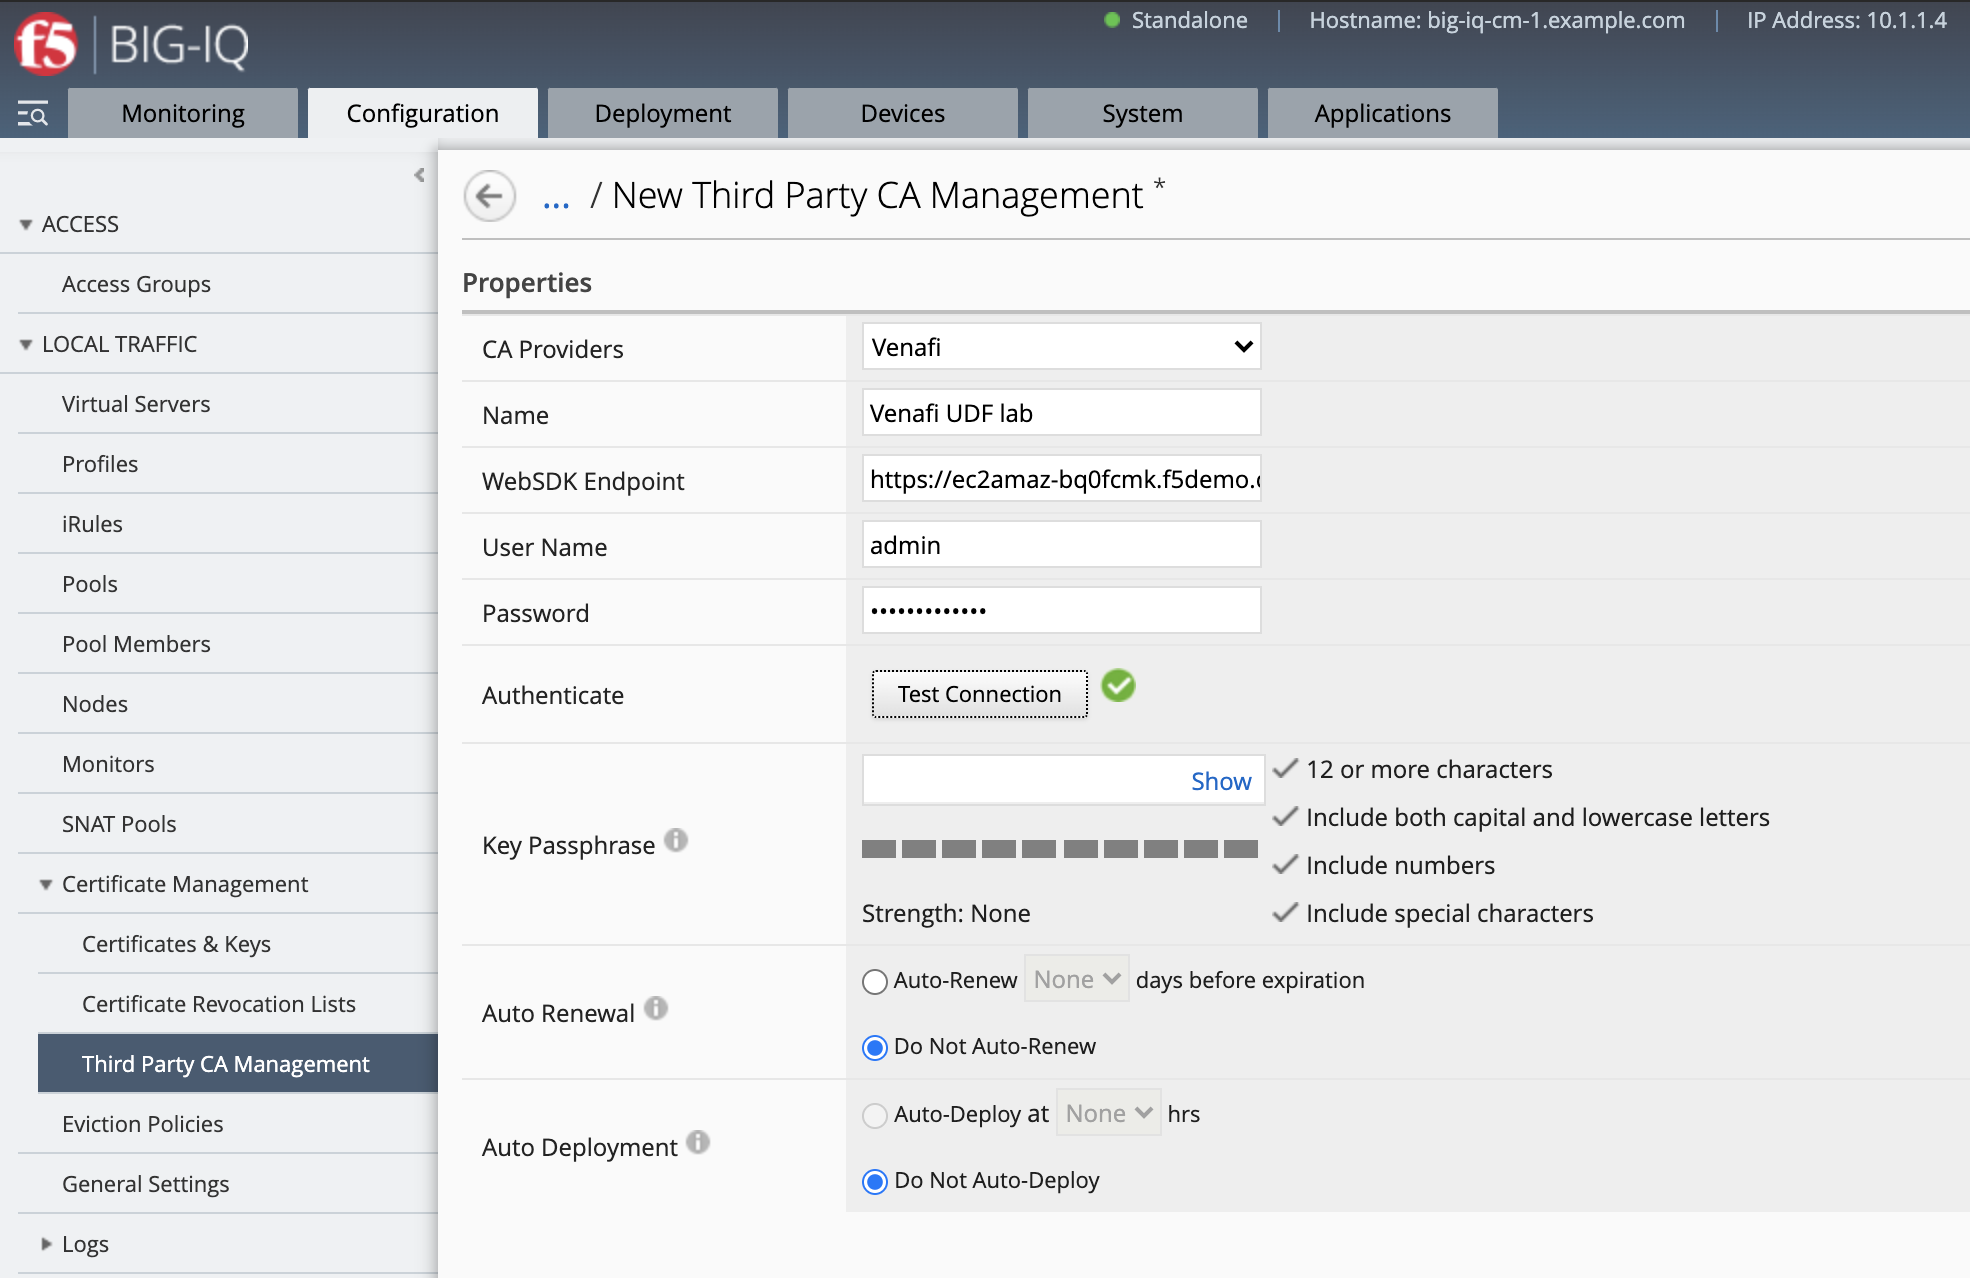
Click on Test Connection.
Save & Close
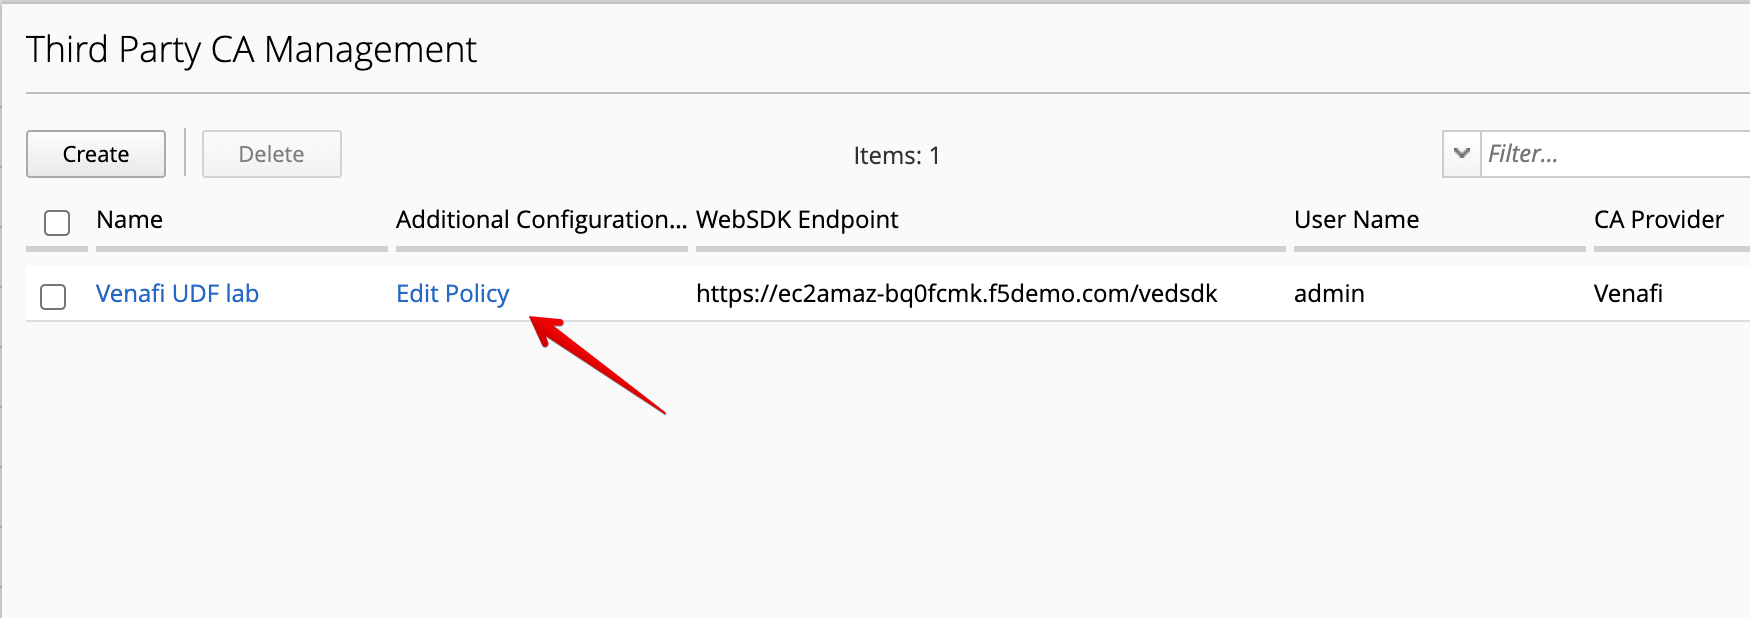
- Then click on Edit Policy under Additional Configuration
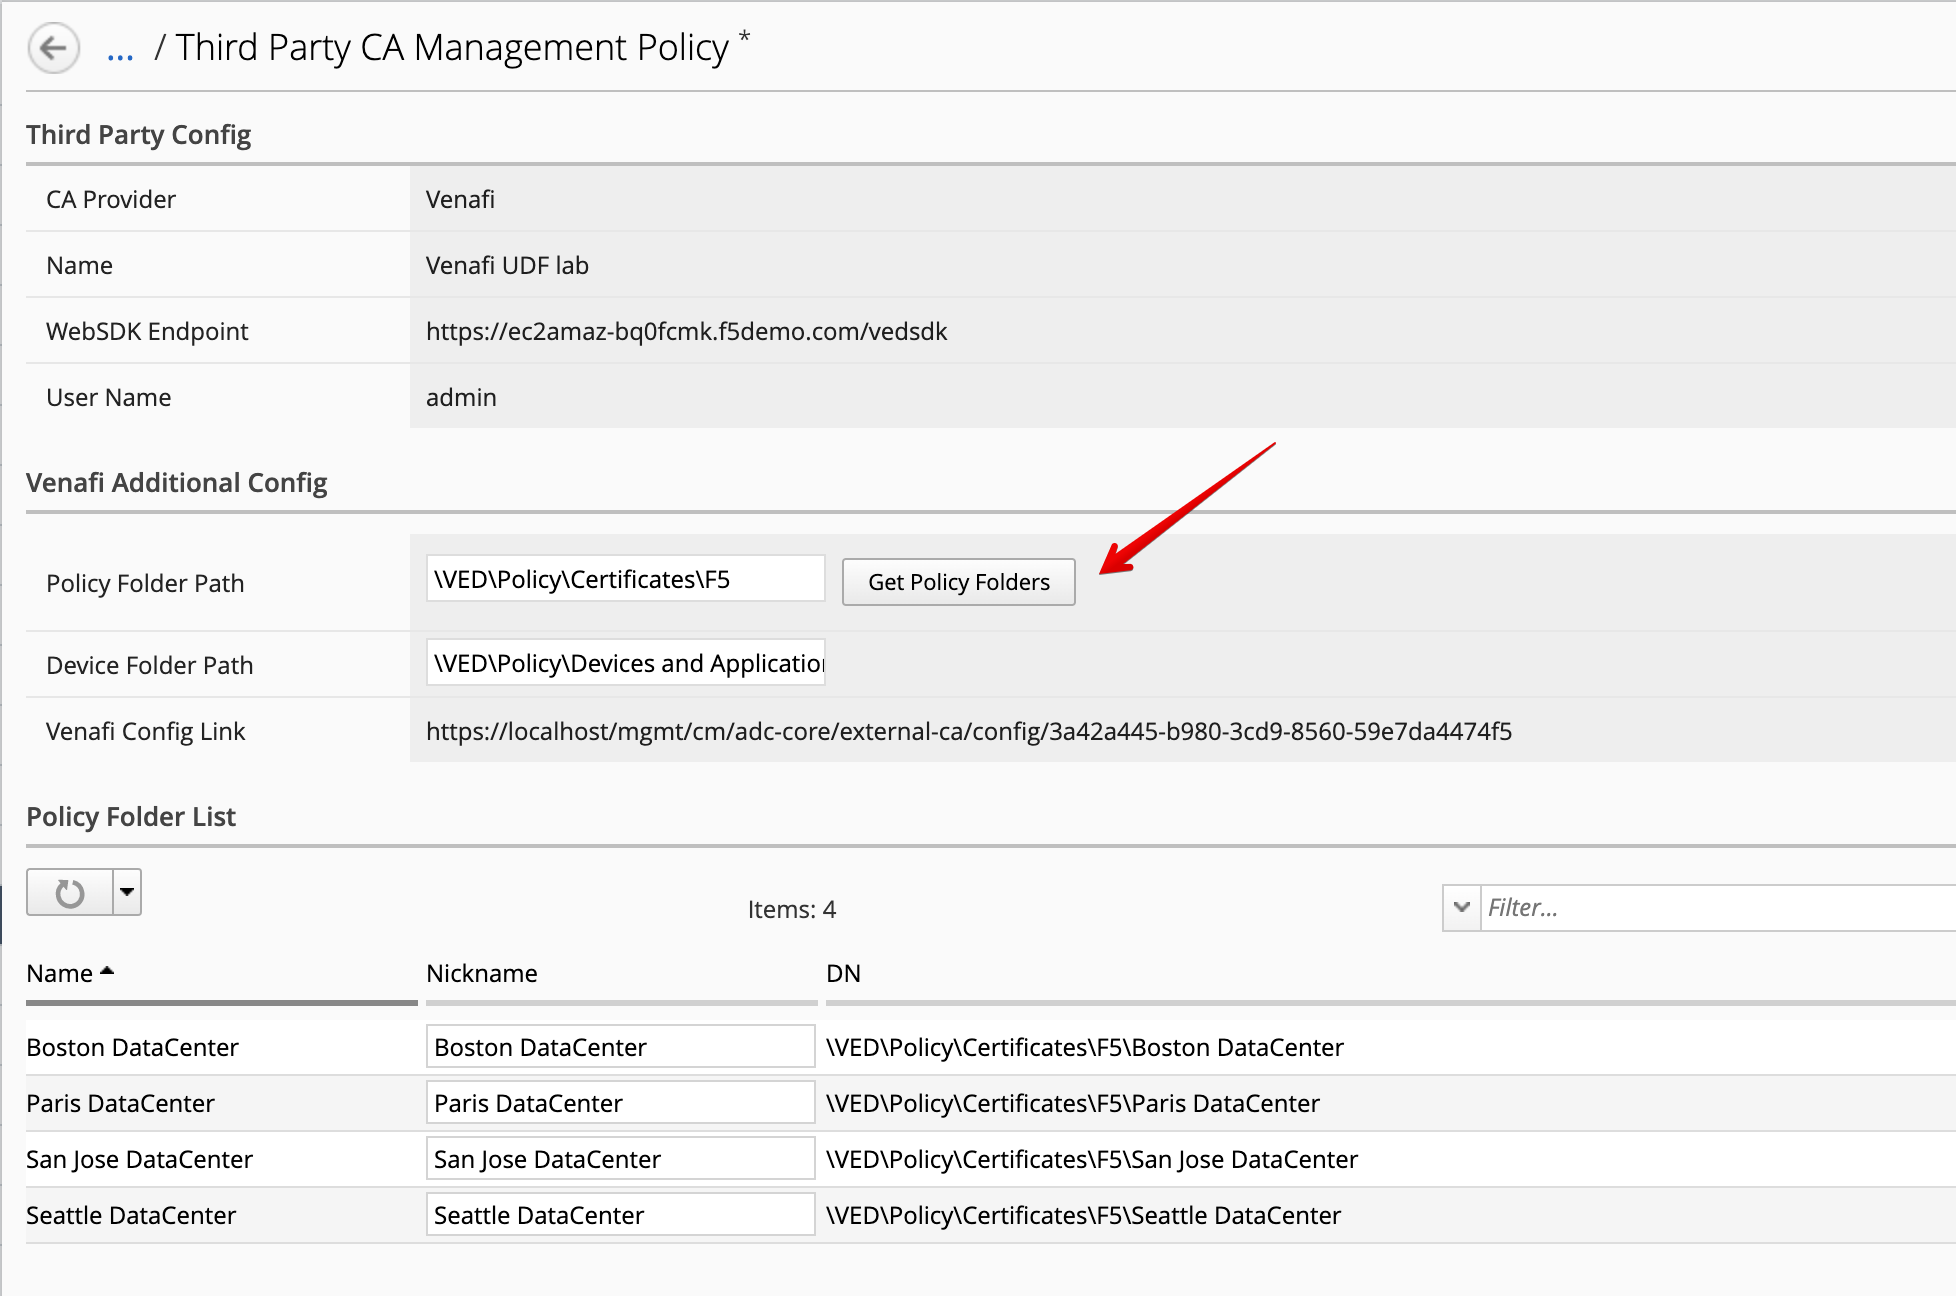
Retrieve the policies available under the Policy Folder Path specified: \VED\Policy\Certificates\F5
Click on Get Policy Folder.
Here, BIG-IQ will retrieve all the policies available under the policy folder specified.
You can look at those policies in Venafi by looking at the last chapter of this lab Venafi Setup and Microsoft CA.
Warning
If you are doing Class 1 Module 2 Lab 2.11, go back to this lab so you can use Ansible to create, deploy the SSL objects and AS3 application service.
SSL Certificate & Key creation on BIG-IQ
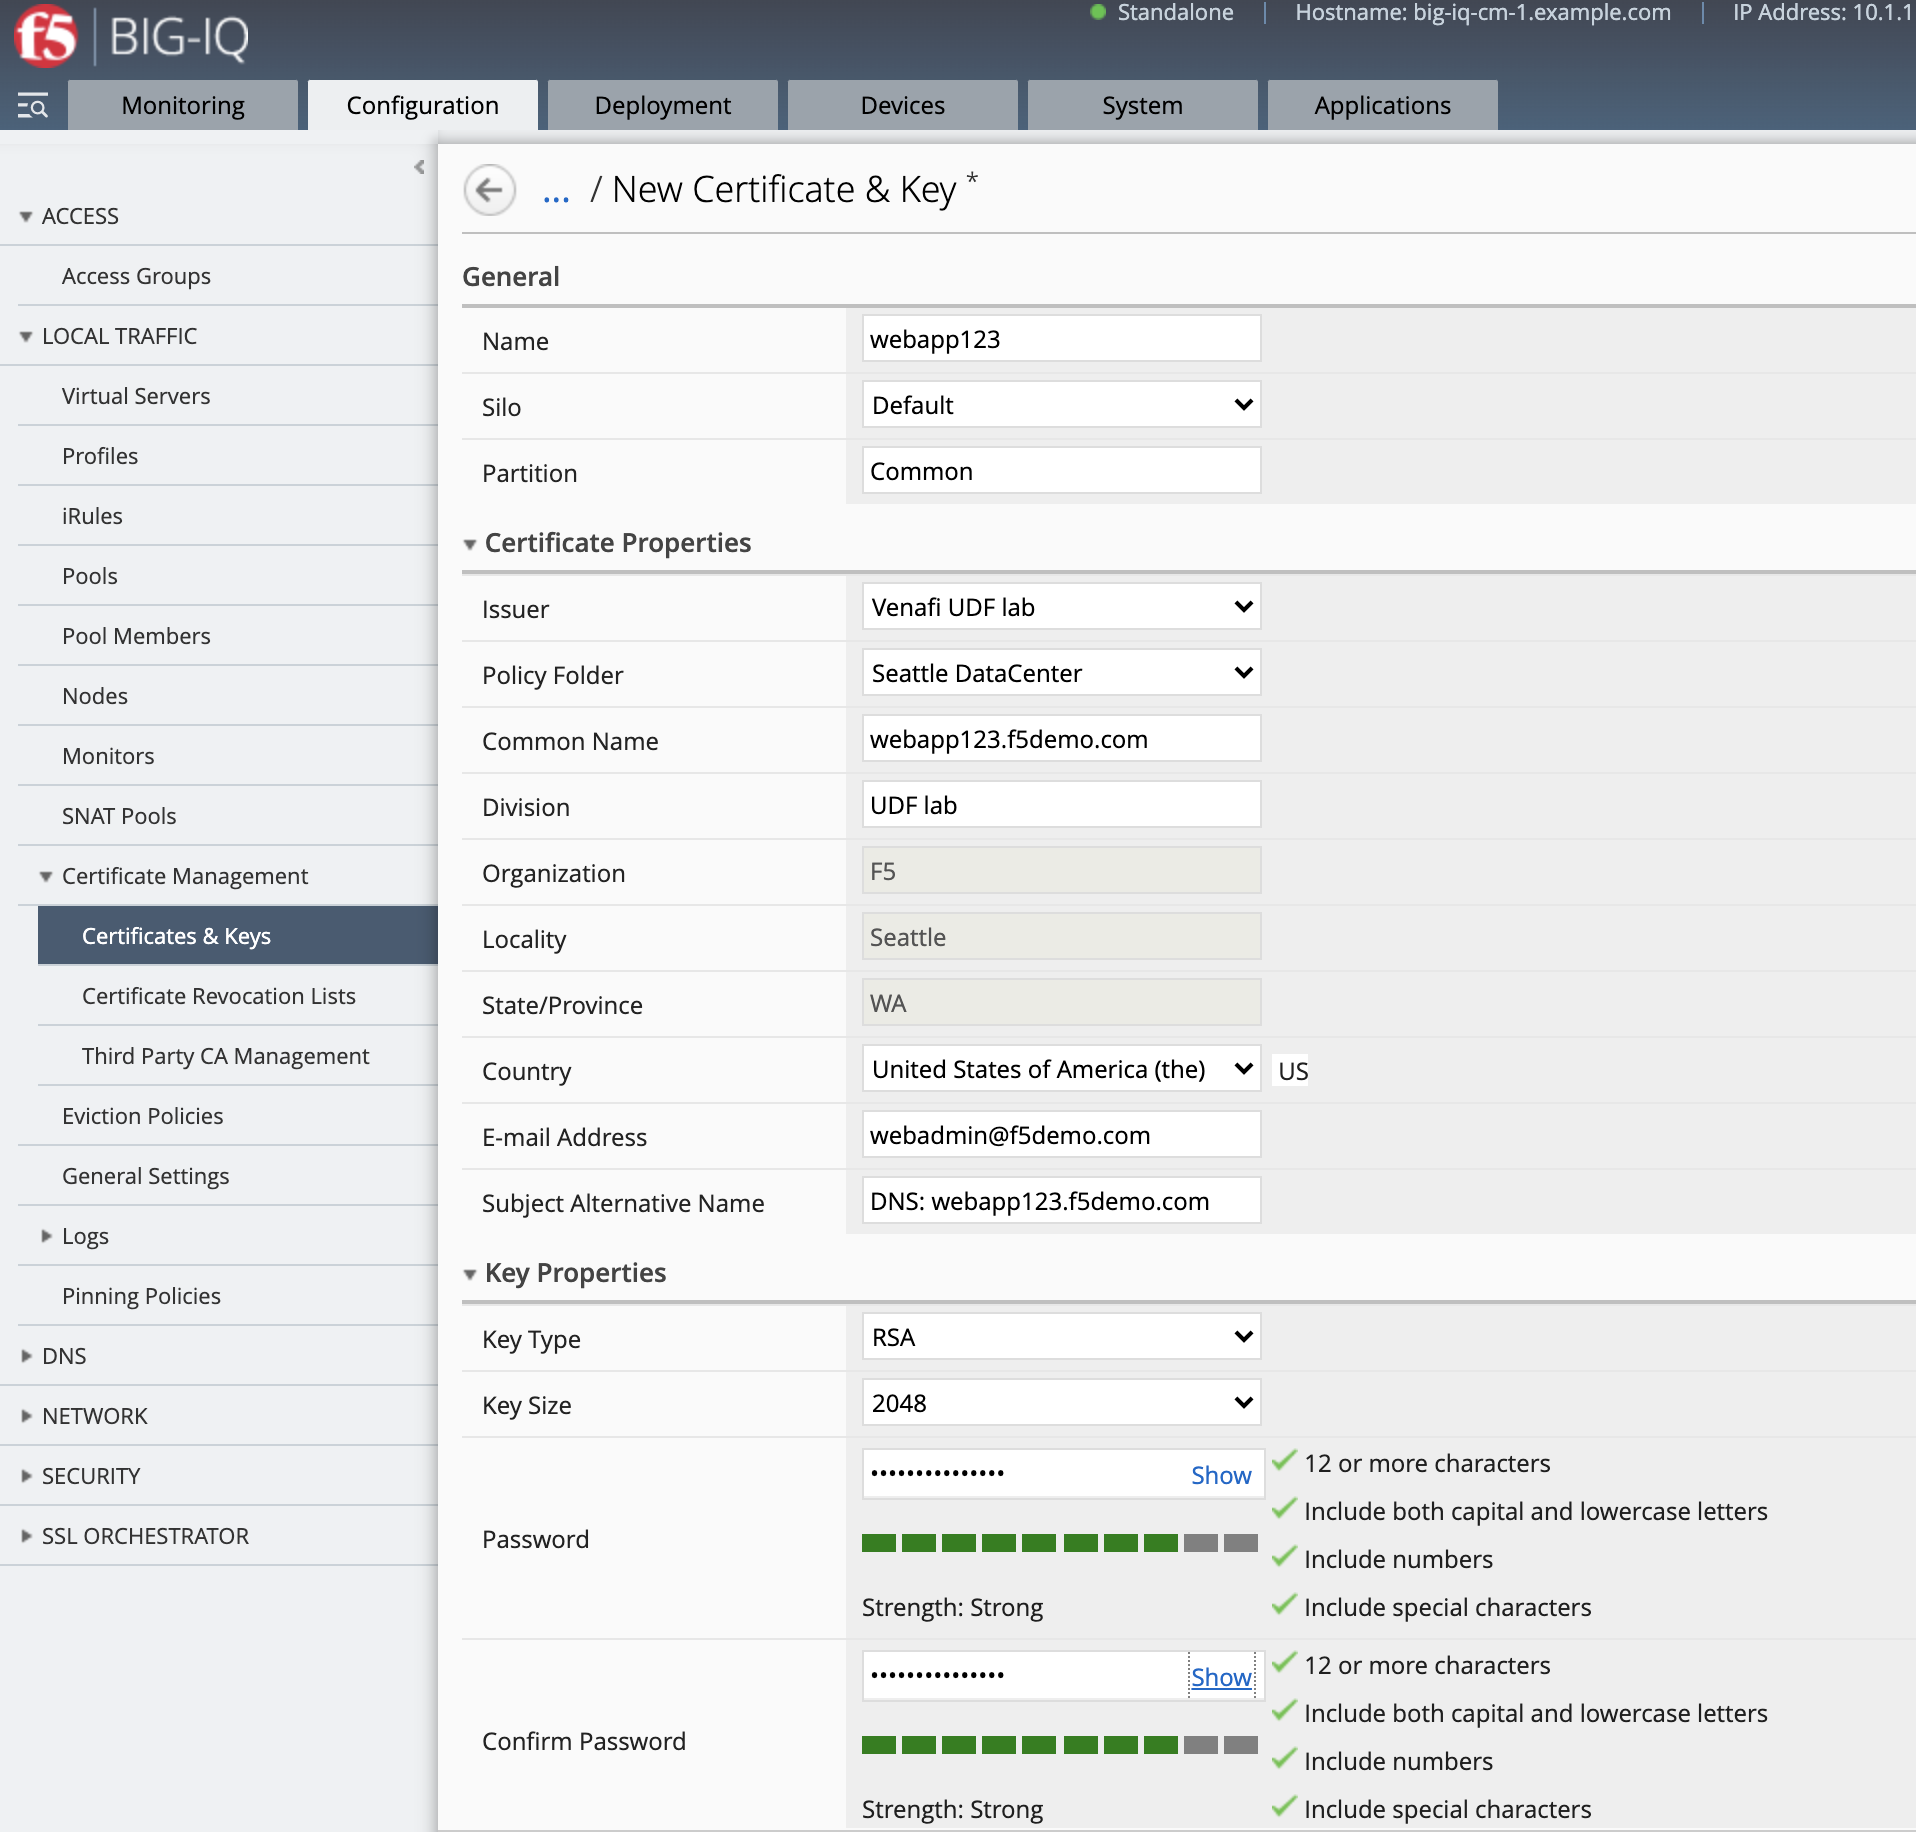
- Navigate to Configuration > Local Traffic > Certificate Management > Certificates & Keys.
Fill all necessary information and click Create. This will generate a certificate request or CSR along with a Private Key. This CSR will be send to Let’s encrypt server which will sign it and send it back to BIG-IQ.
- Name:
webapp123 - Issuer:
Venafi UDF lab - Policy Folder:
Seattle DataCenter - Common Name:
webapp123.f5demo.com - Division:
UDF lab - Organization:
F5 - Locality:
Seattle - State/Province:
WA - Country:
US - E-mail Address:
webadmin@f5demo.com - Subject Alternative Name:
DNS: webapp123.f5demo.com - Key Password:
Password@123456
- After the Certificate Request is signed, it will show Managed on the BIG-IQ and ready to be deploy on the BIG-IP.

- Now, let’s pin both certificate and key to a device. Navigate to Pinning Policies under Local Traffic.
Click on SEA-vBIGIP01.termmarc.com device.
Look for the SSL certificate and add it to the device.
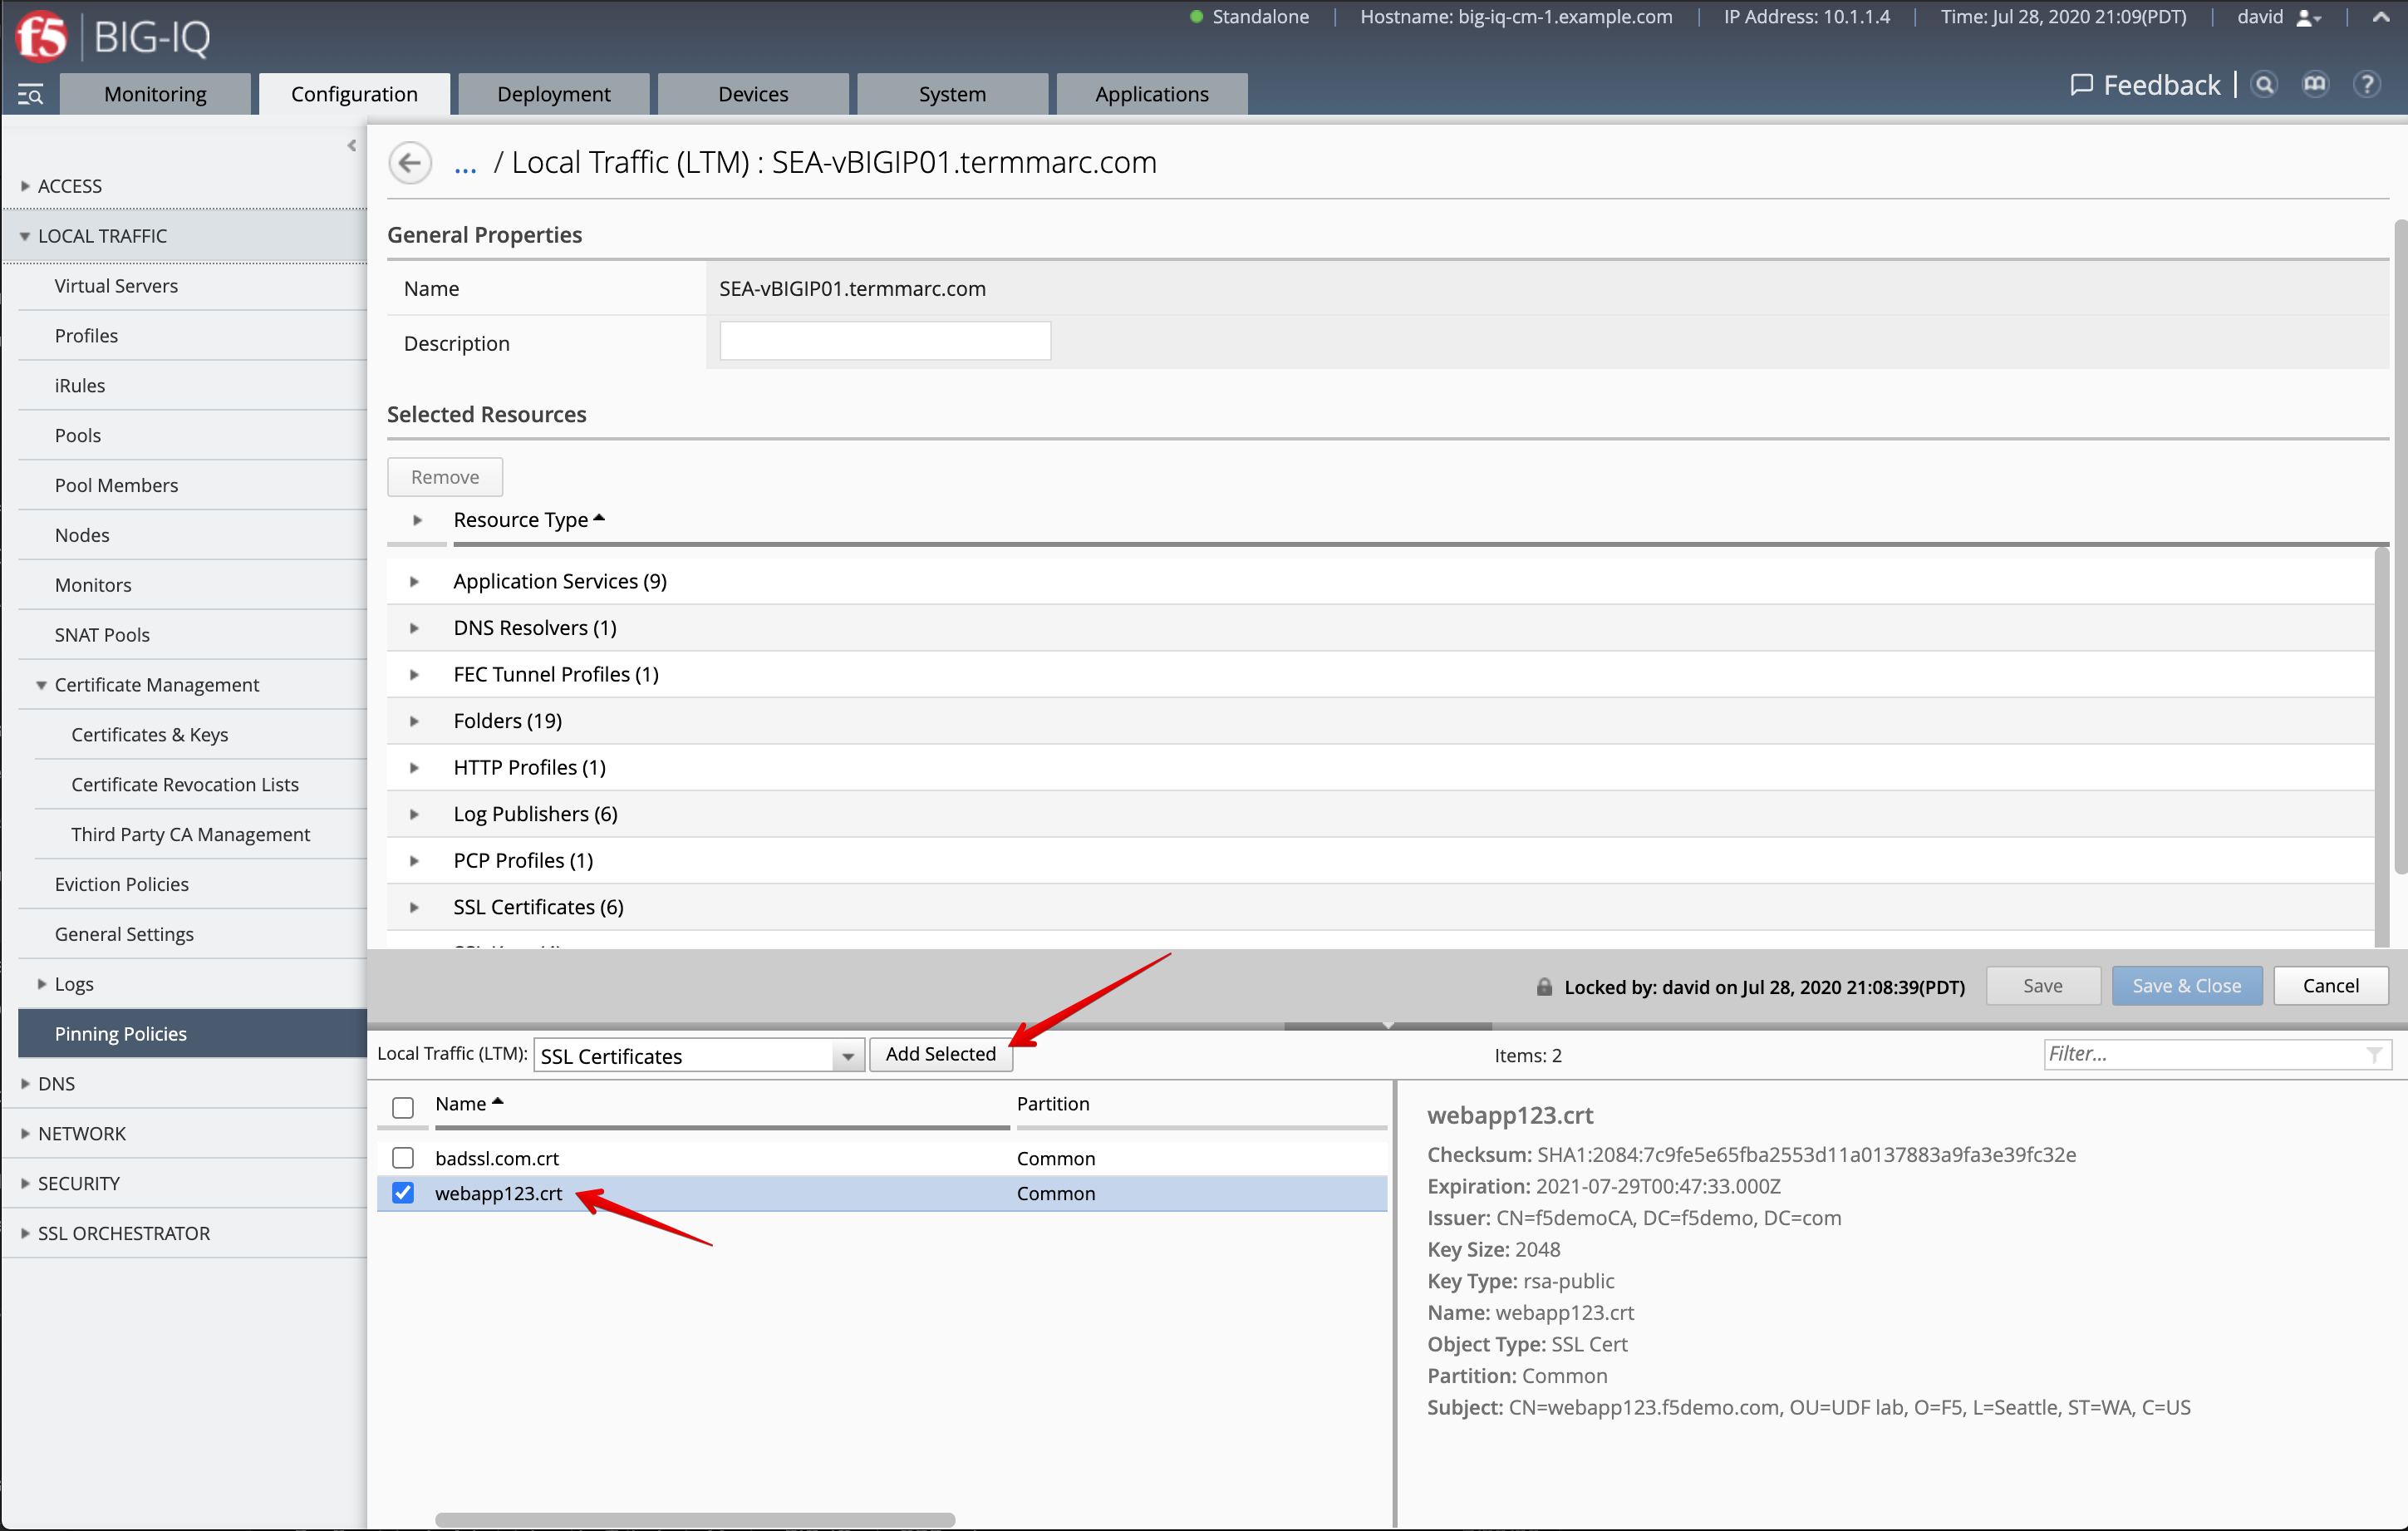
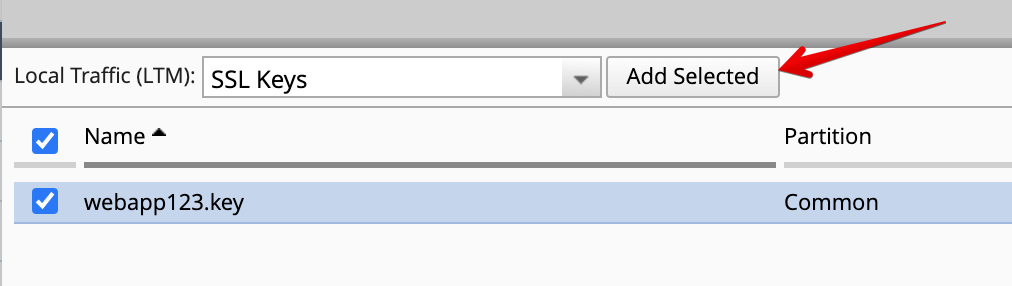
Repeat the same with the SSL Key:
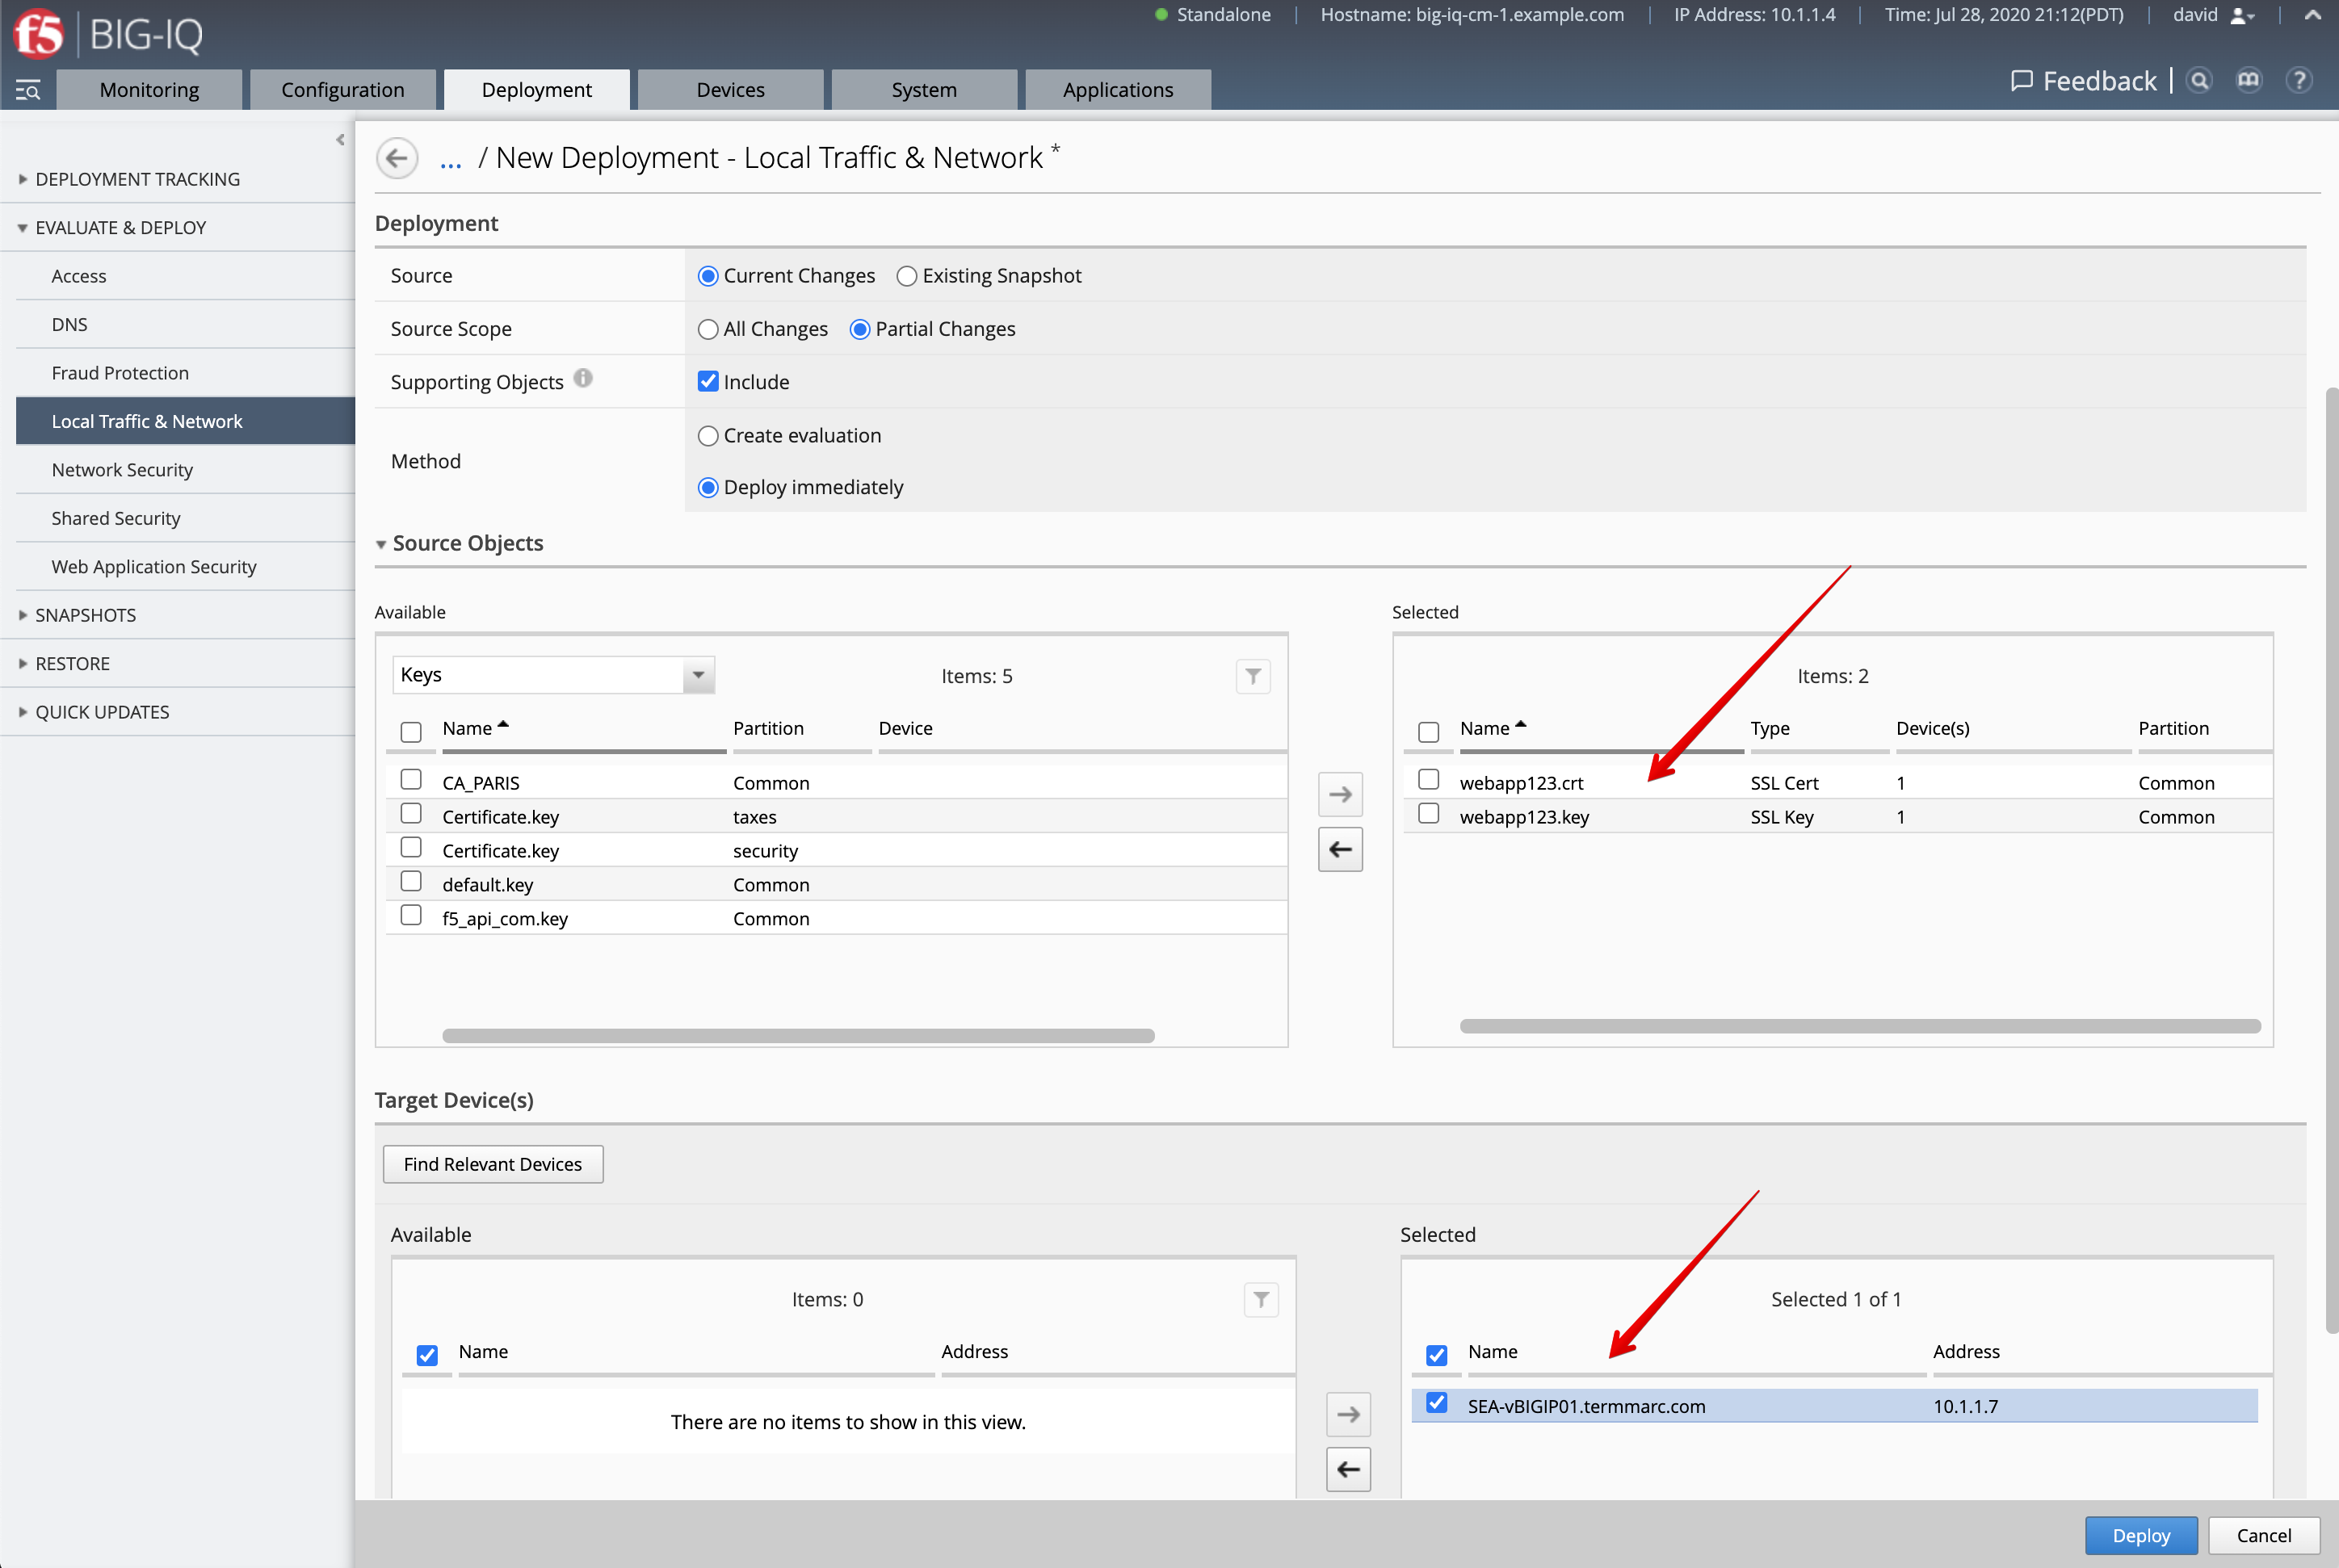
- Deploy the SSL objects to the BIG-IP.
Navigate Deployment > Evaluate & Deploy > Local Traffic & Network.
Create a new deployment:
- Source Scope:
Partial Change - Method:
Deploy Immediately - Source Objects: select both SSL certificate & Key
- Target Device(s):
SEA-vBIGIP01.termmarc.com
Click Deploy.
- Open a RDP session on the Venafi Trust Protection component (the Windows Server 2019 in the lab).
Open Chrome and navigate to the Venafi Web Admin Console https://ec2amaz-bq0fcmk.f5demo.com/vedadmin (admin/Purple123@123)
Note
You can also open directly the Venafi Web Admin Console from the lab, click on the ACCESS button under Venafi Trust Protection.
Then, add /vedadmin at the end of the URL (e.g. https://9077cbc1-a648-4b0c-945e-fd226e4d4133.access.udf.f5.com/vedadmin)
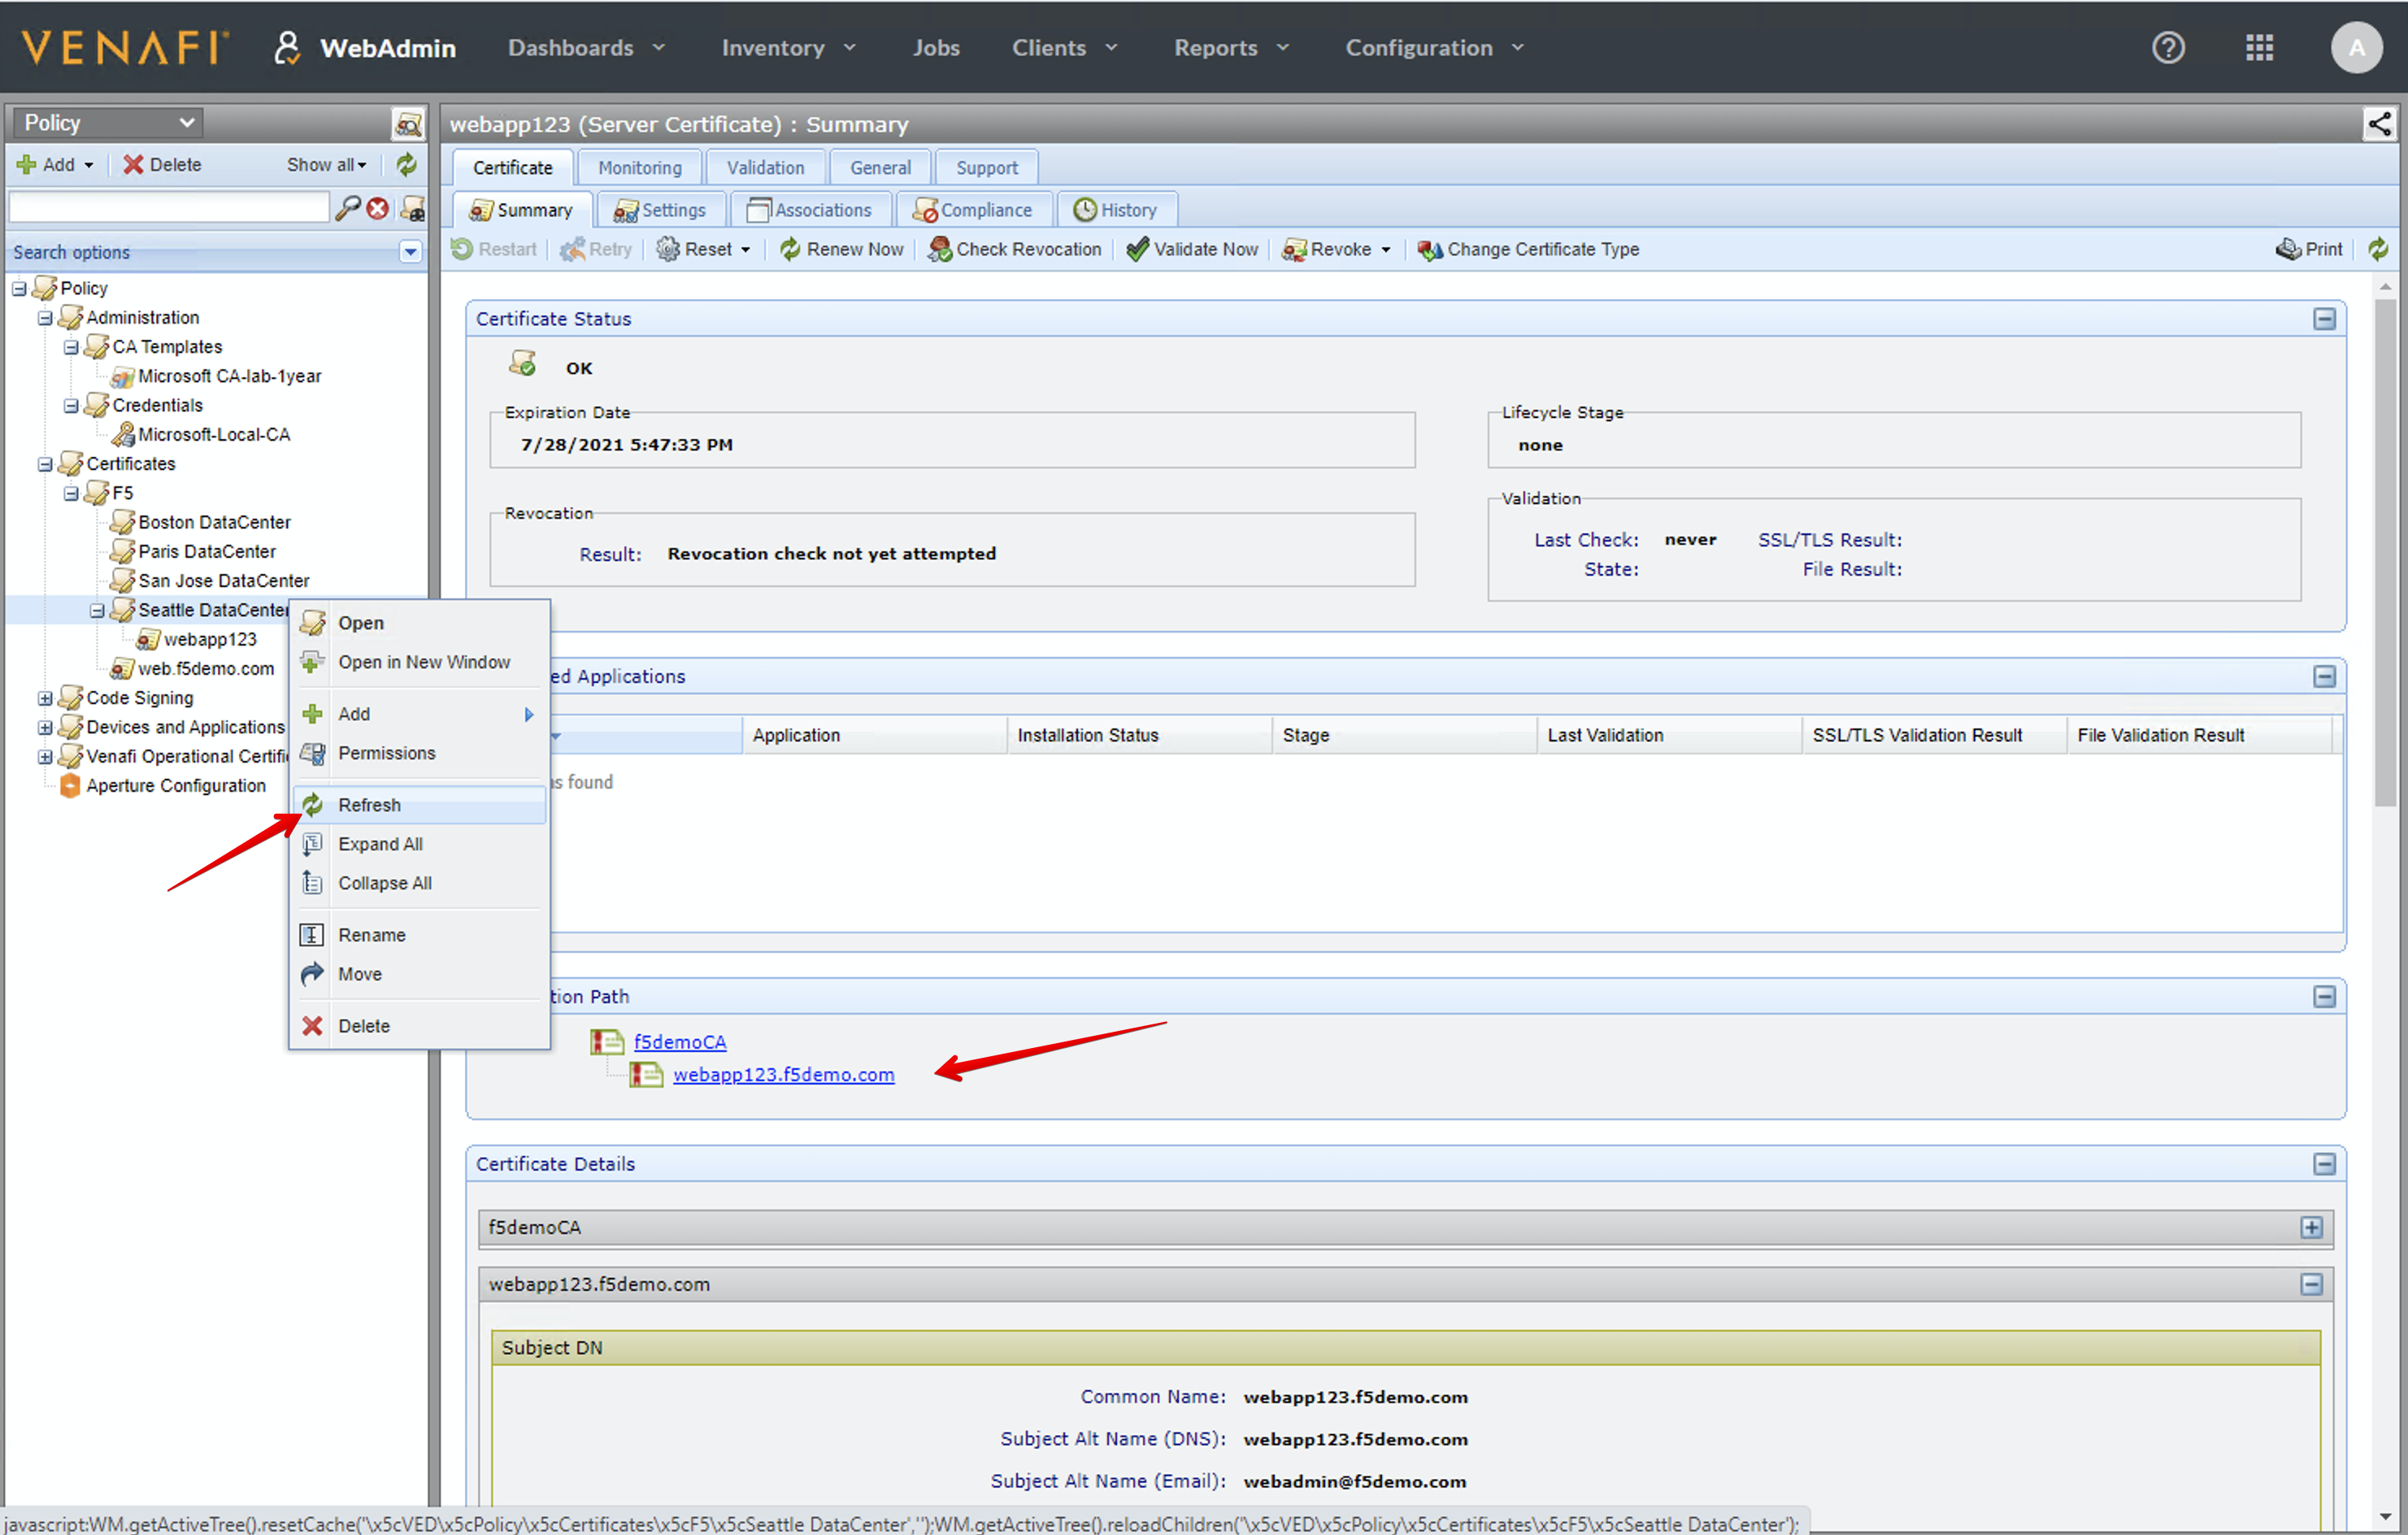
- On the Venafi Web Admin Console, select the Policy in the top menu (if not already selected) and navigate under
Certificates > F5 > Seattle Data Center.
From there, expand the folder and look for the certificate previously generated from BIG-IQ.
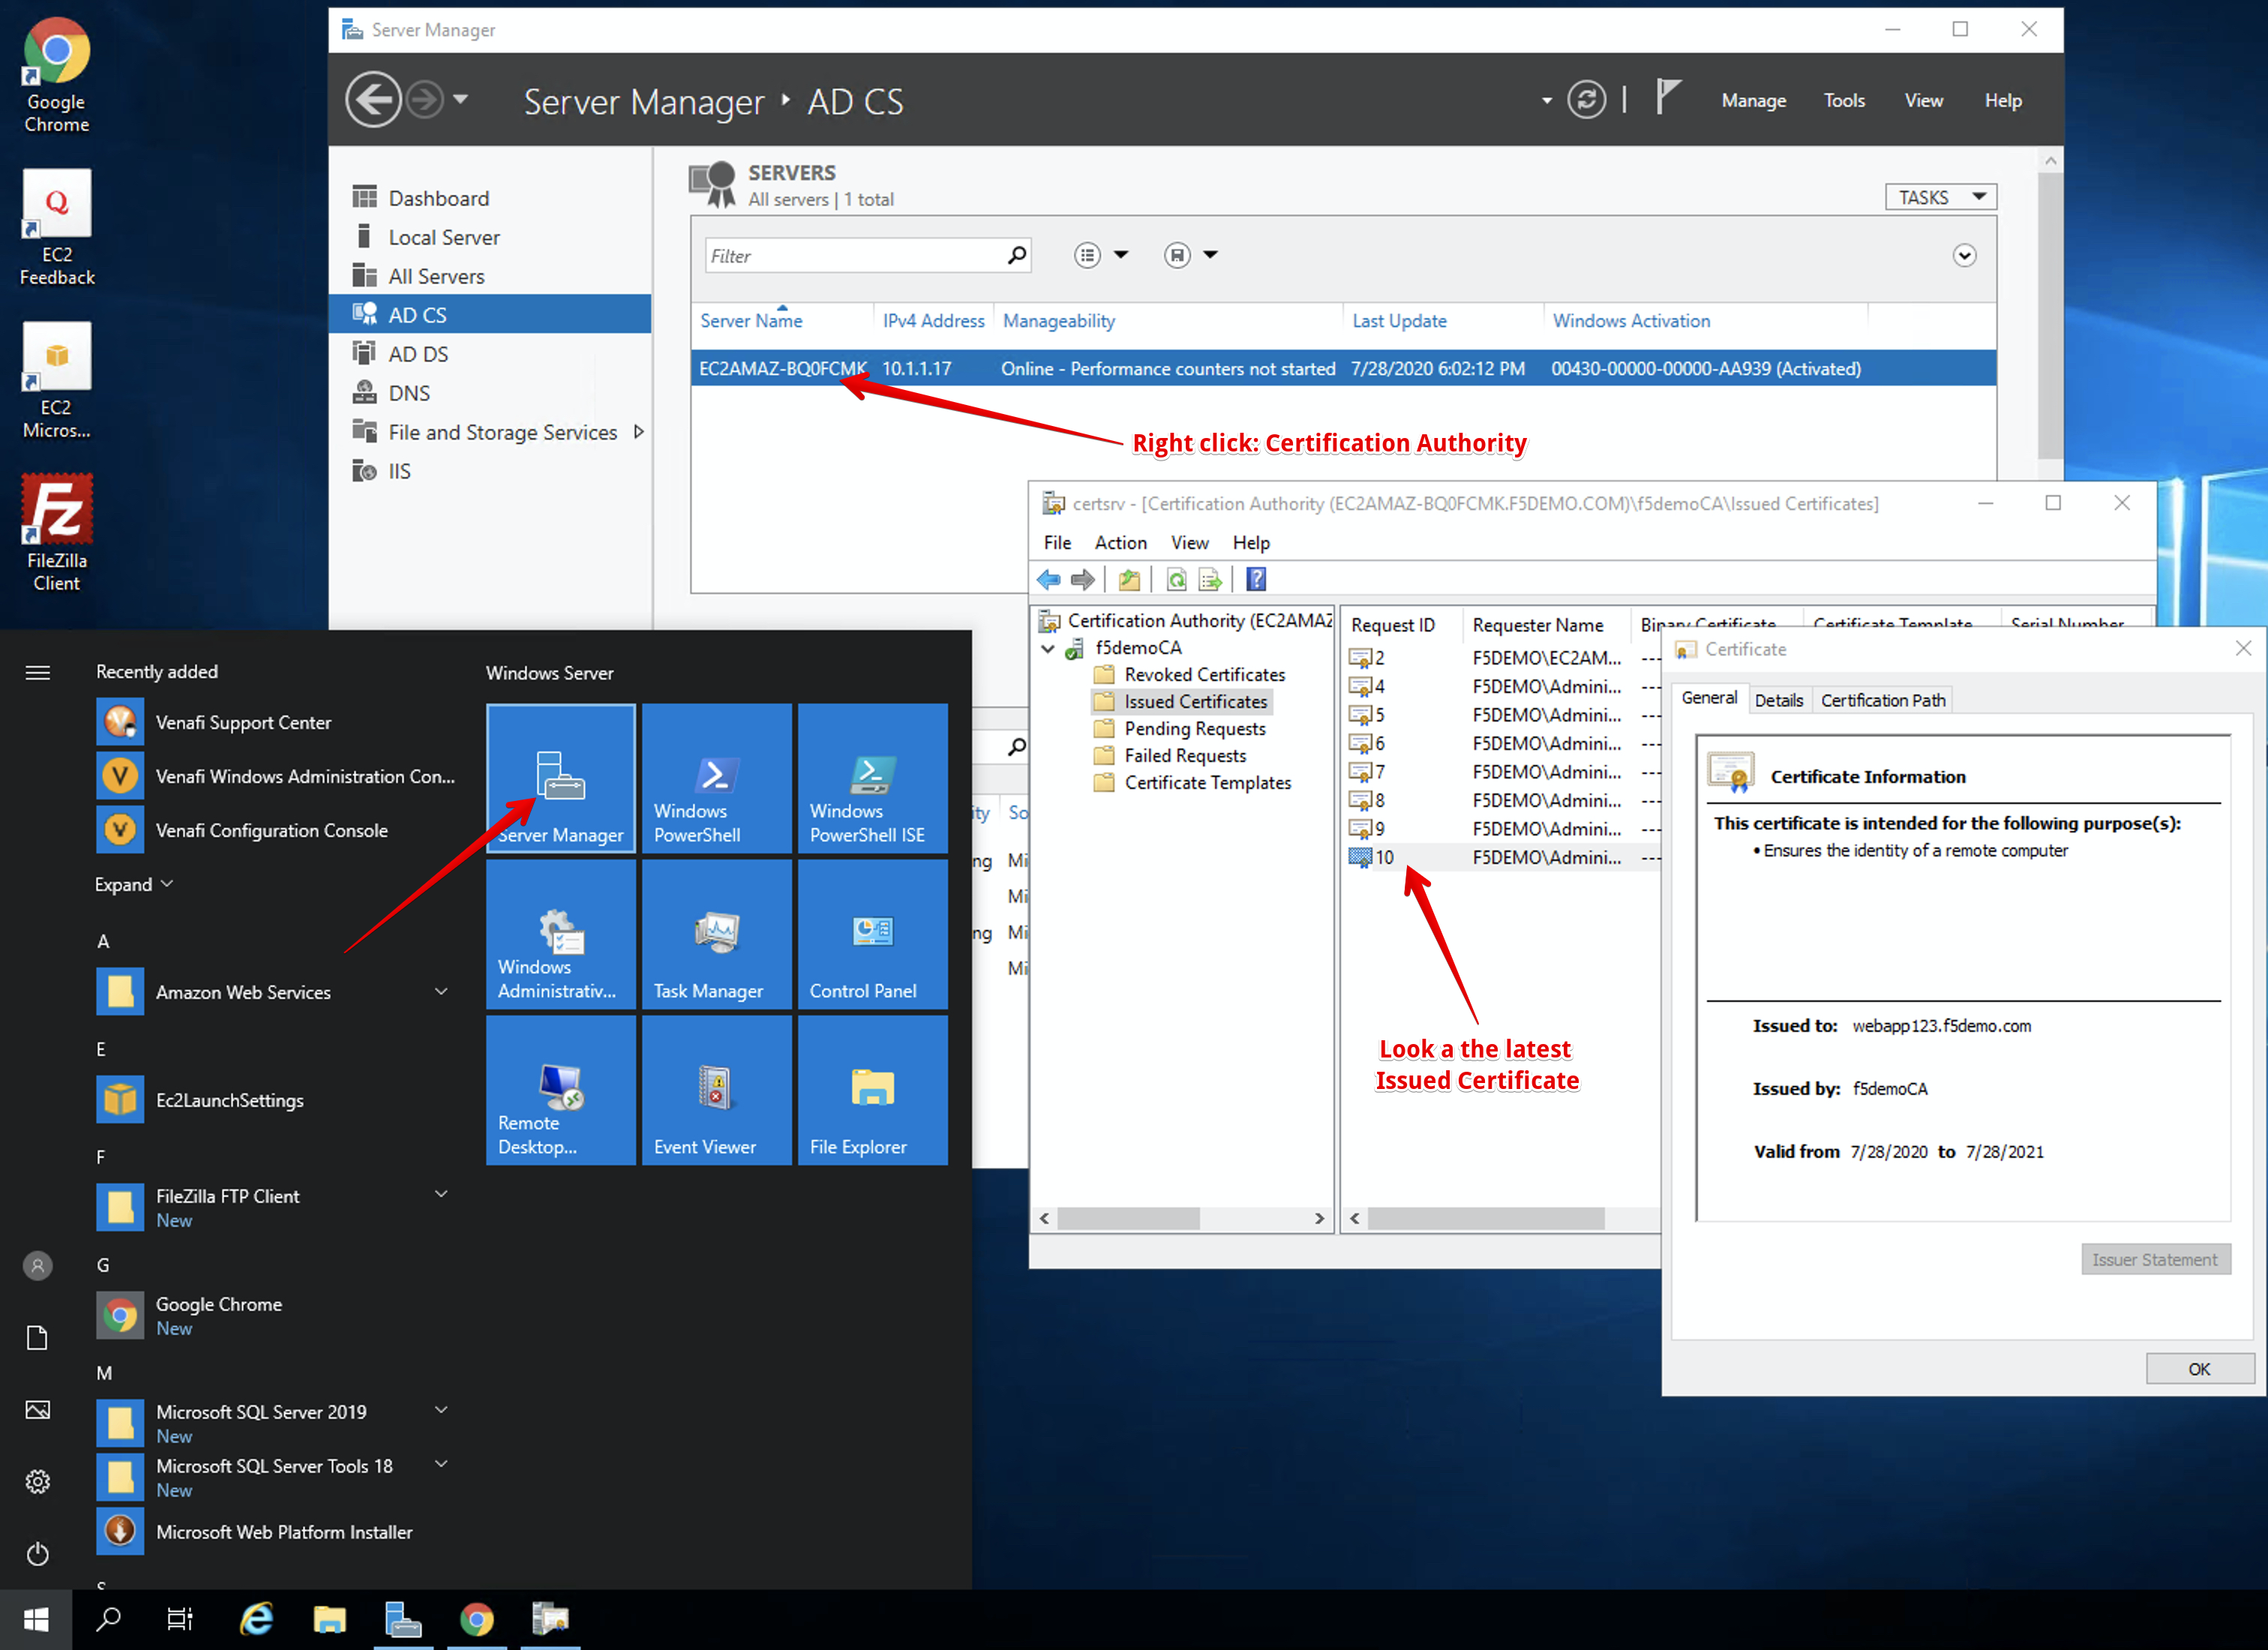
From the Server Manager, open MS CA admin interface and look for the same certificate under Issued Certificates.
- Finally, navigate in the Device Folder Path
\VED\Policy\Devices and Applications\External\Big-IQand notice Seattle BIG-IP has been added in Venafi automatically by BIG-IQ after the certificate has been pushed to the device. This is to help keeping BIG-IQ and Venafi inventory up to date and synchronized.

AS3 HTTPS template with SSL Key Passphrase creation
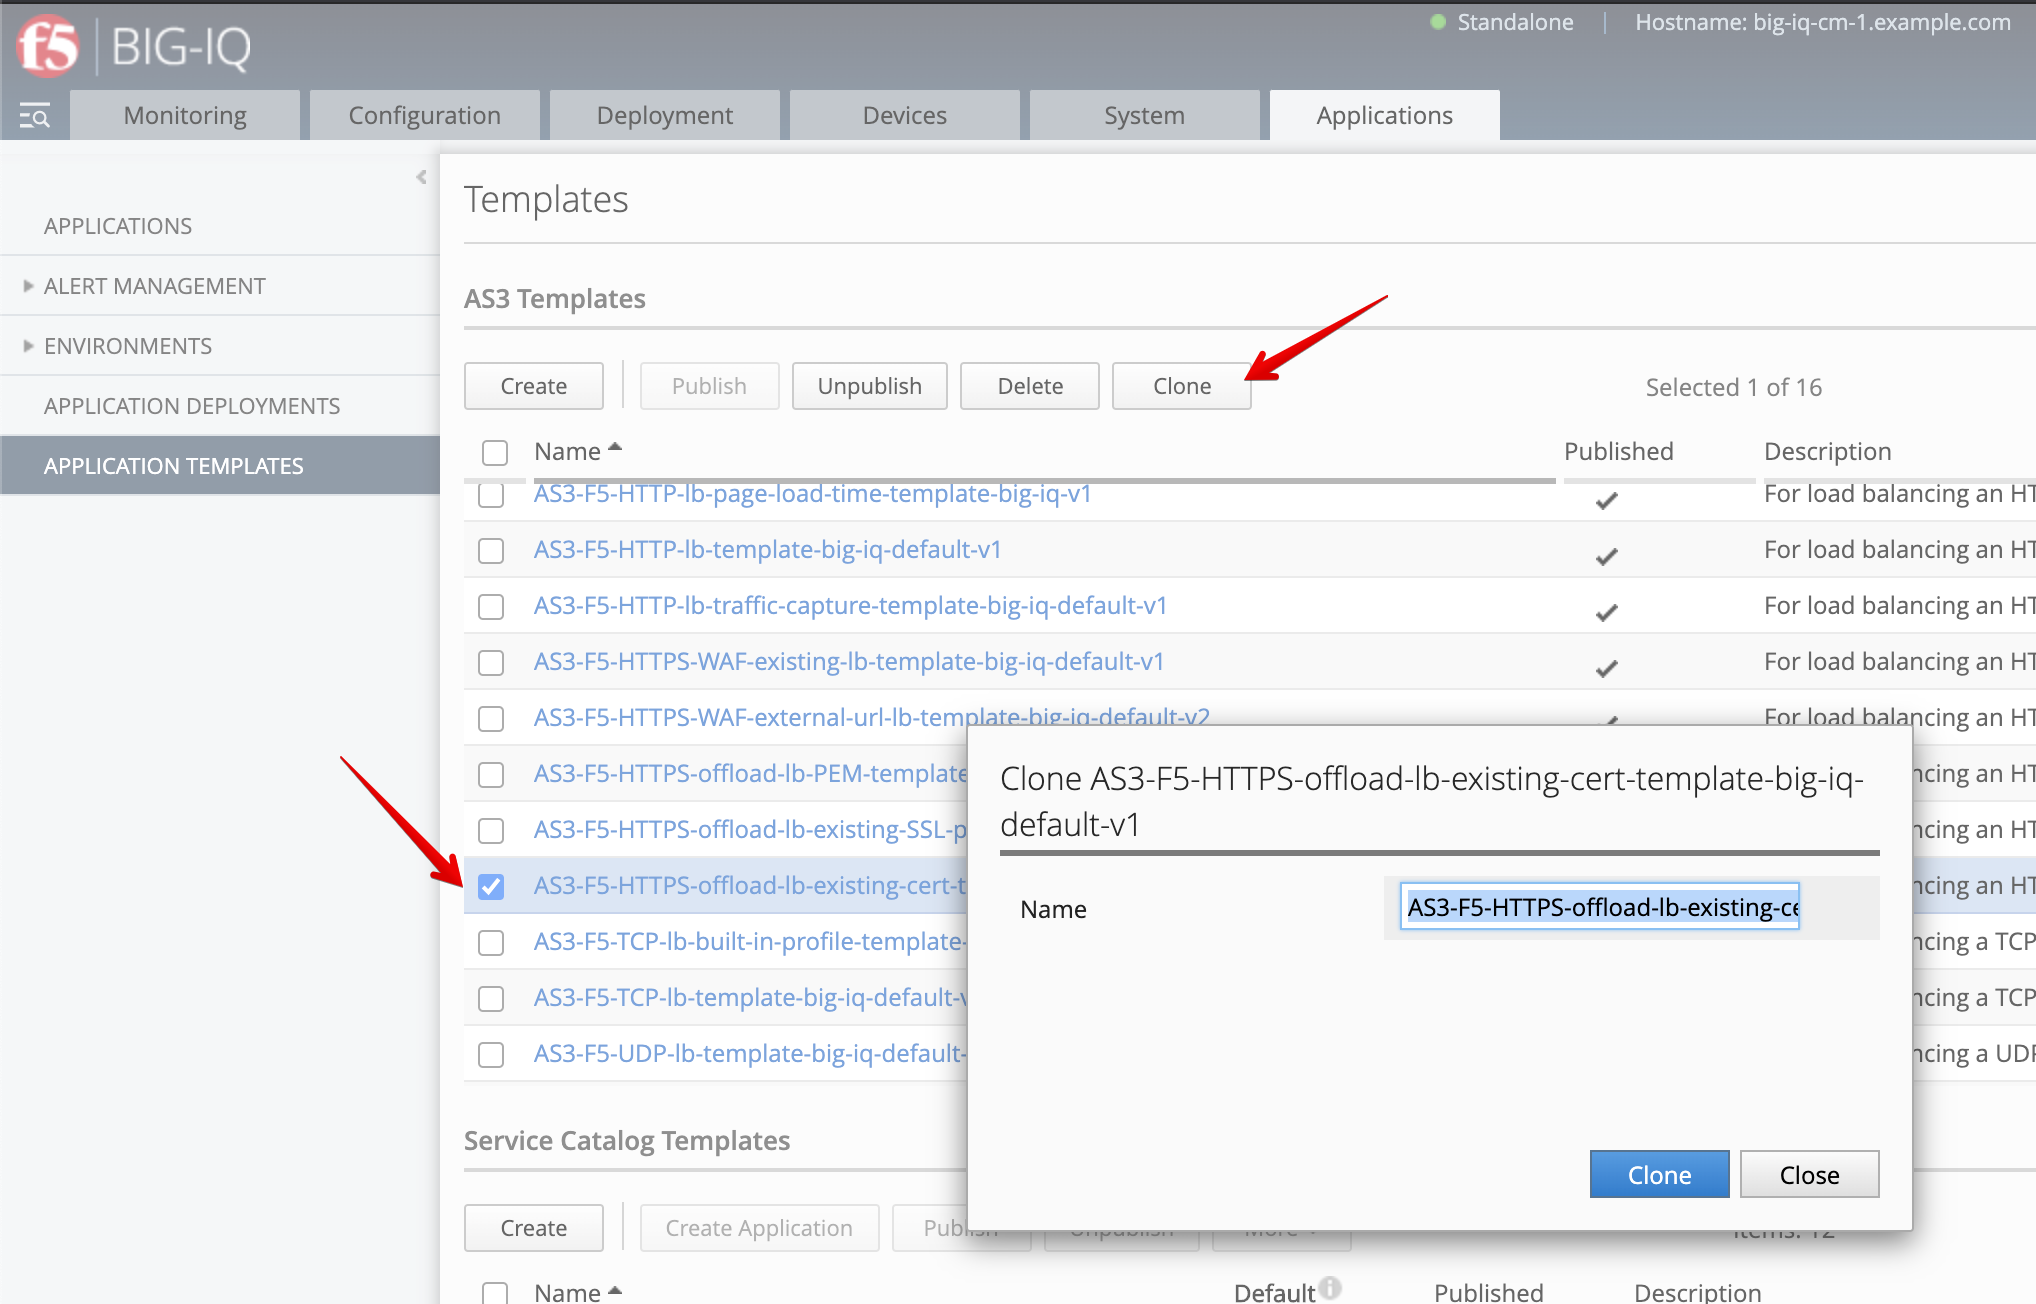
- Go back on BIG-IQ and navigate to the Applications tab > Applications Templates and
select
AS3-F5-HTTPS-offload-lb-existing-cert-template-big-iq-default-<version>and press Clone. - Give the cloned template a name:
AS3-F5-HTTPS-offload-lb-existing-cert-with-passphraseand click Clone.
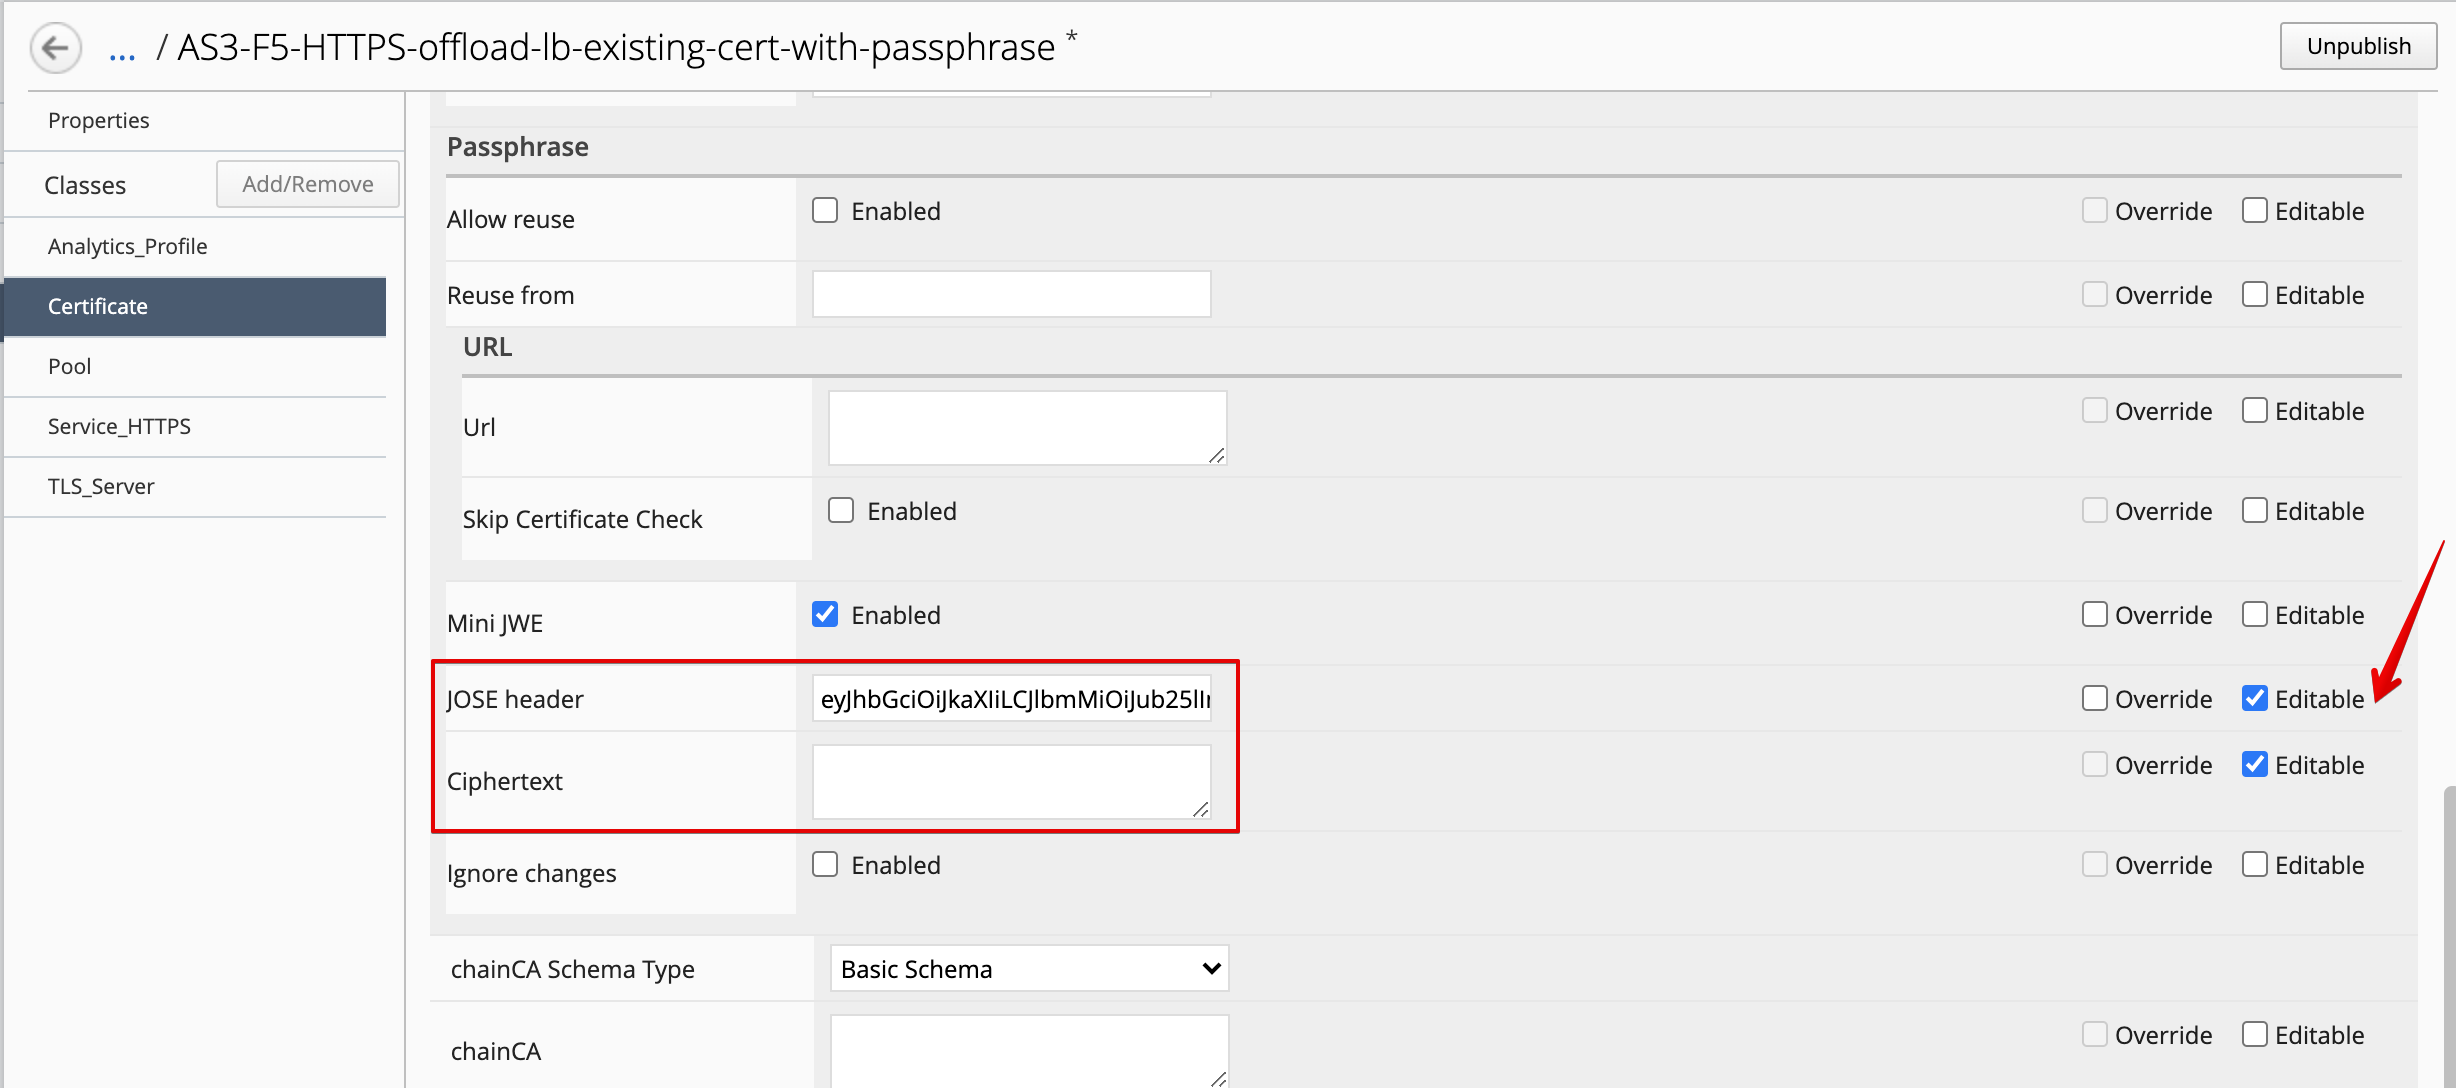
- Open the new templates created and select the AS3 class
Certificateson the left menu of the AS3 template editor.
Check Editable the 2 following attributes: JOSE header and Ciphertext.
- Save & close the template and publish it so it can be used in the next step.
AS3 HTTPS offload application service creation
- Go to the Applications tab > Applications and click Create to create an Application Service:
| Application properties: |
|
| Select an Application Service Template: |
|
| General Properties: |
|
| Analytics_Profile. Keep default. |
| Pool |
|
| TLS_Server. Keep default. |
| Certificate |
|
| Service_HTTPS |
|
Note
In order to get the value of the Ciphertext, we convert the SSL key password (Password@123456) using https://www.url-encode-decode.com/base64-encode-decode/
More details on the AS3 Certificate class here.
- Check the application
LAB_module2has been created along with the application service https_app_service
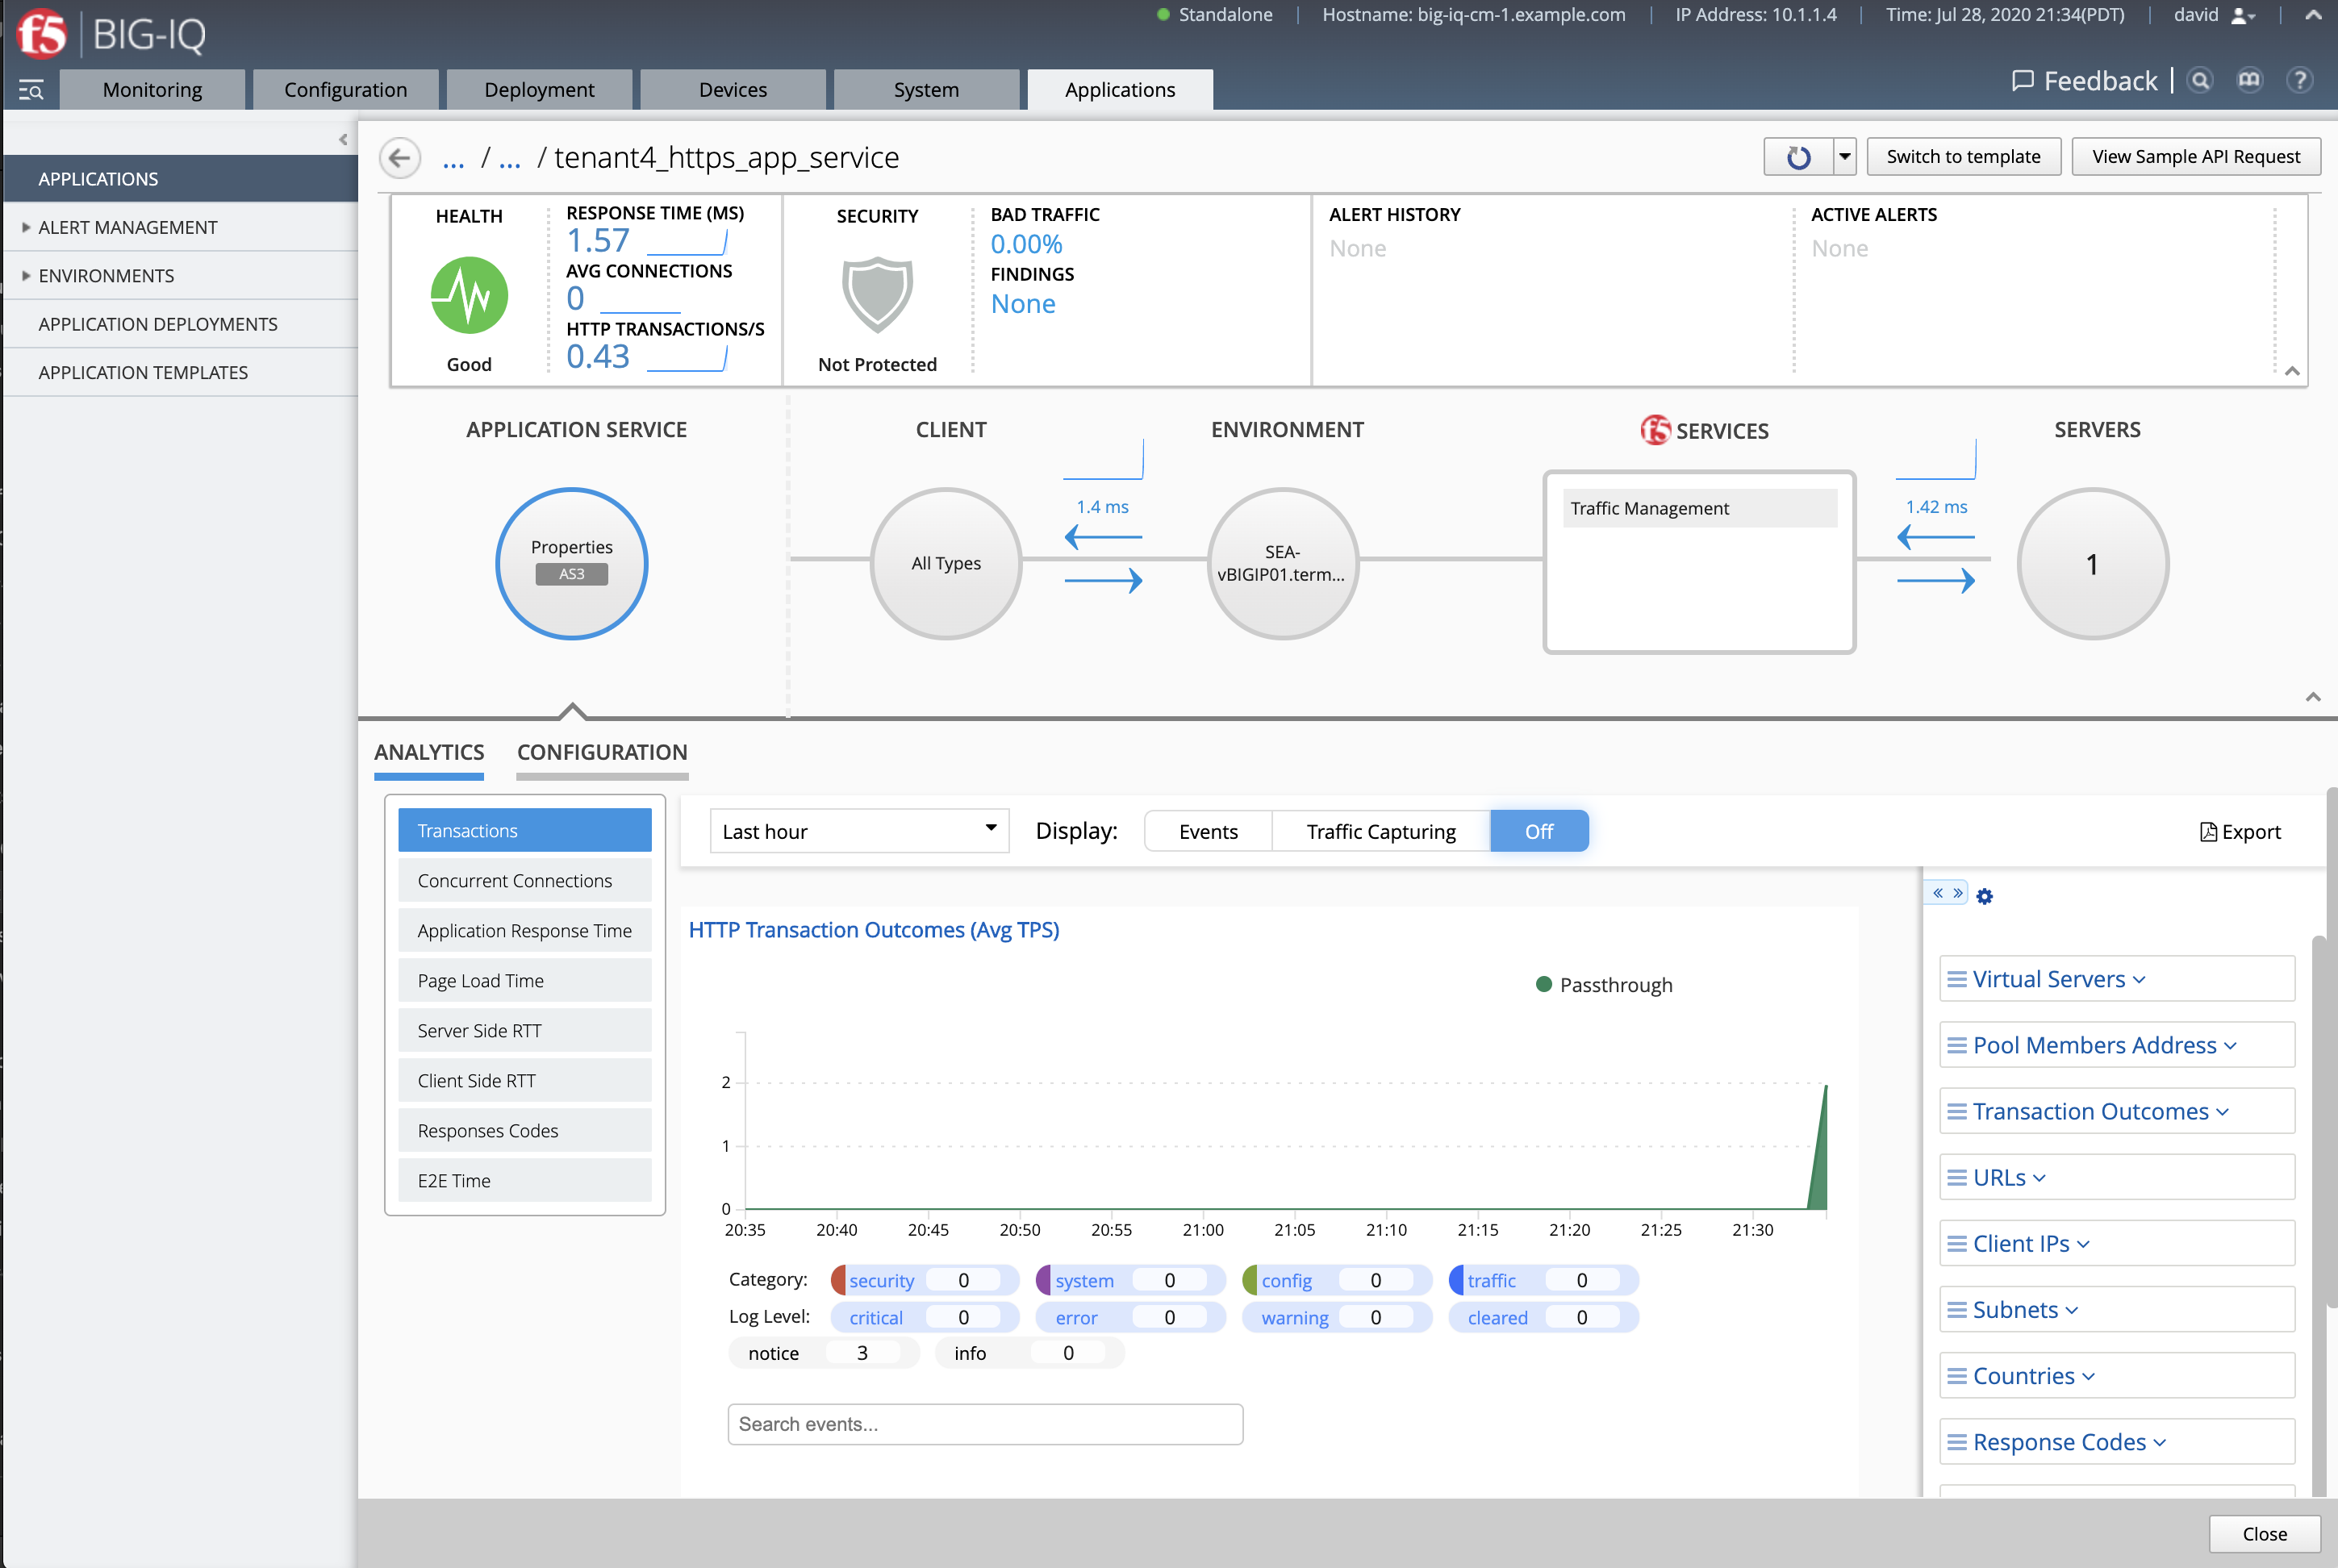
Note
If not visible, refresh the page. It can take few seconds for the application service to appears on the dashboard.
- SSH Ubuntu host in lab environment and add the domain name and Virtual address to the /etc/hosts file.
We are doing this to be able to use the domain name we used in the SSL certificate along with the Virtual IP address created in BIG-IP. This is only for this lab.
f5student@ip-10-1-1-5:~$ sudo su -
root@ip-10-1-1-5:/home/f5student# echo "10.1.10.126 webapp123.f5demo.com" >> /etc/hosts
root@ip-10-1-1-5:/home/f5student# nslookup webapp123.f5demo.com
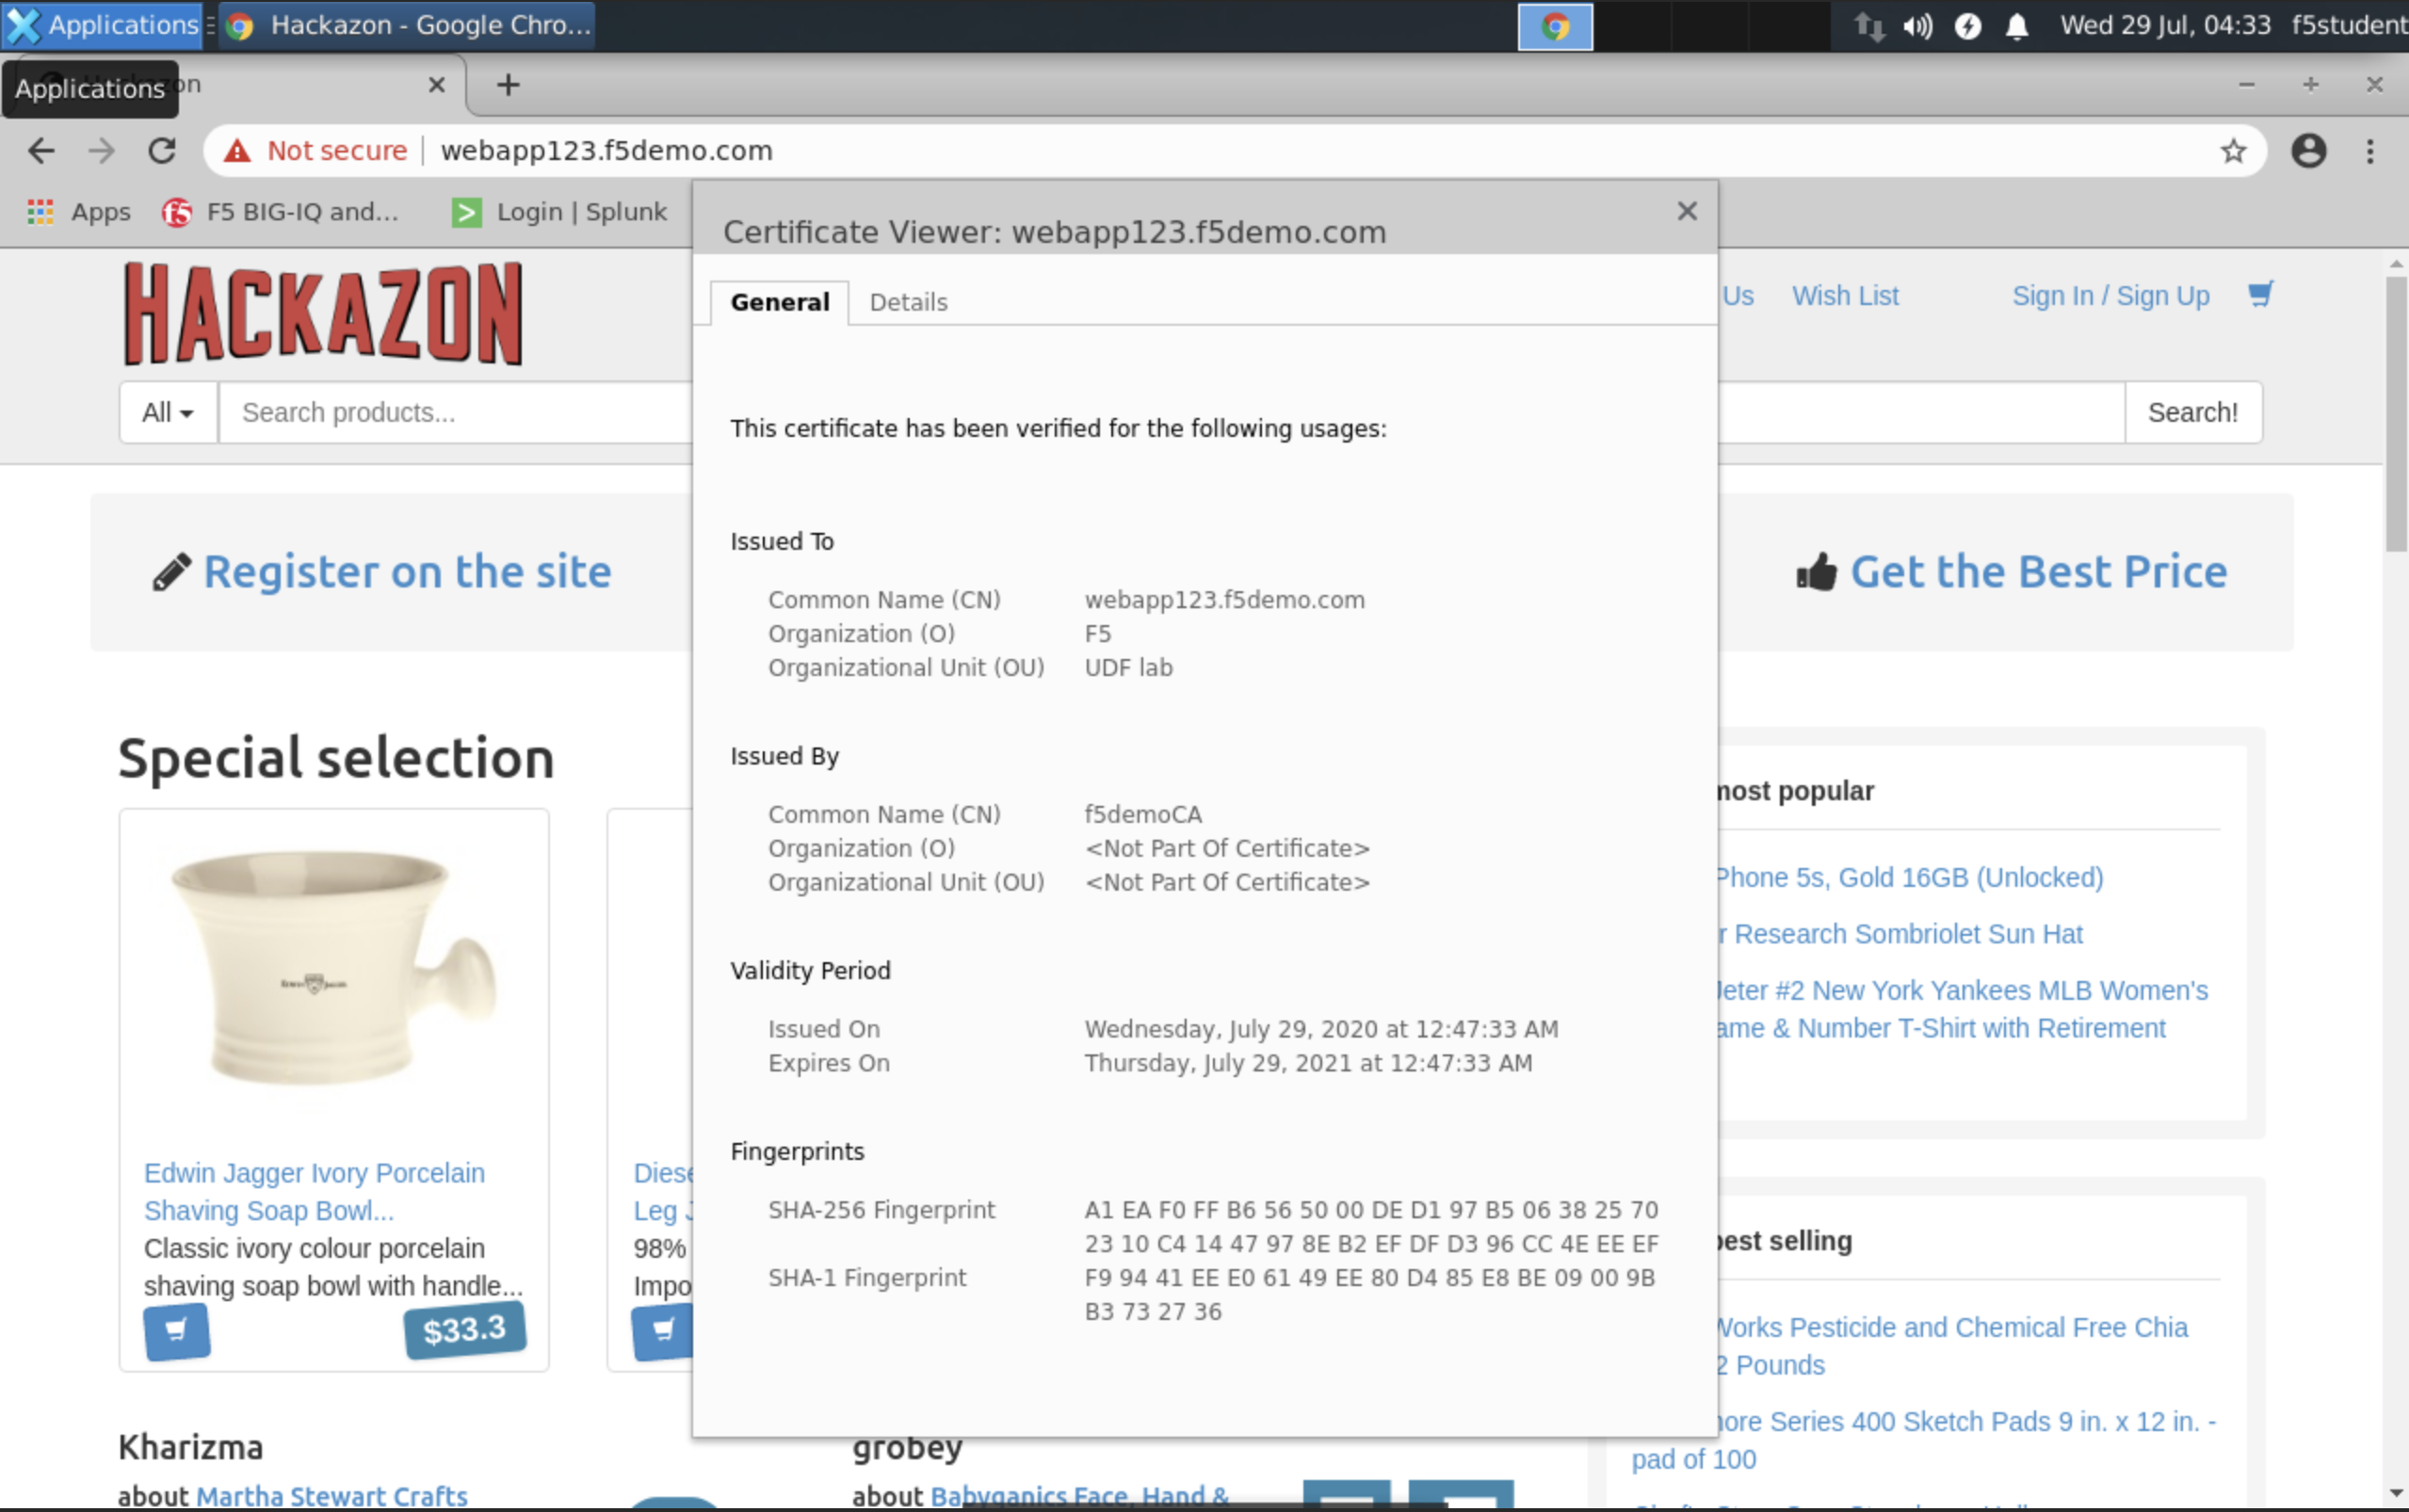
- From the lab environment, launch a remote desktop session to have access to the Ubuntu Desktop.
You can test the application service by opening Google Chrome browser on the Ubuntu Jumphost and type the URL https://webapp123.f5demo.com.
Note
The certificate shows not secure as we are using a demo Root CA not imported in the browser by default.
Venafi Setup and Microsoft CA
In this part, we are going to review some of the Venafi configuration.
- Open a RDP session on the Venafi Trust Protection component (the Windows Server 2019 in the lab).
Open Chrome and navigate to the Venafi Web Admin Console https://ec2amaz-bq0fcmk.f5demo.com/vedadmin (admin/Purple123@123)
Note
You can also open directly the Venafi Web Admin Console from the lab, click on the ACCESS button under Venafi Trust Protection.
Then, add /vedadmin at the end of the URL (e.g. https://9077cbc1-a648-4b0c-945e-fd226e4d4133.access.udf.f5.com/vedadmin)
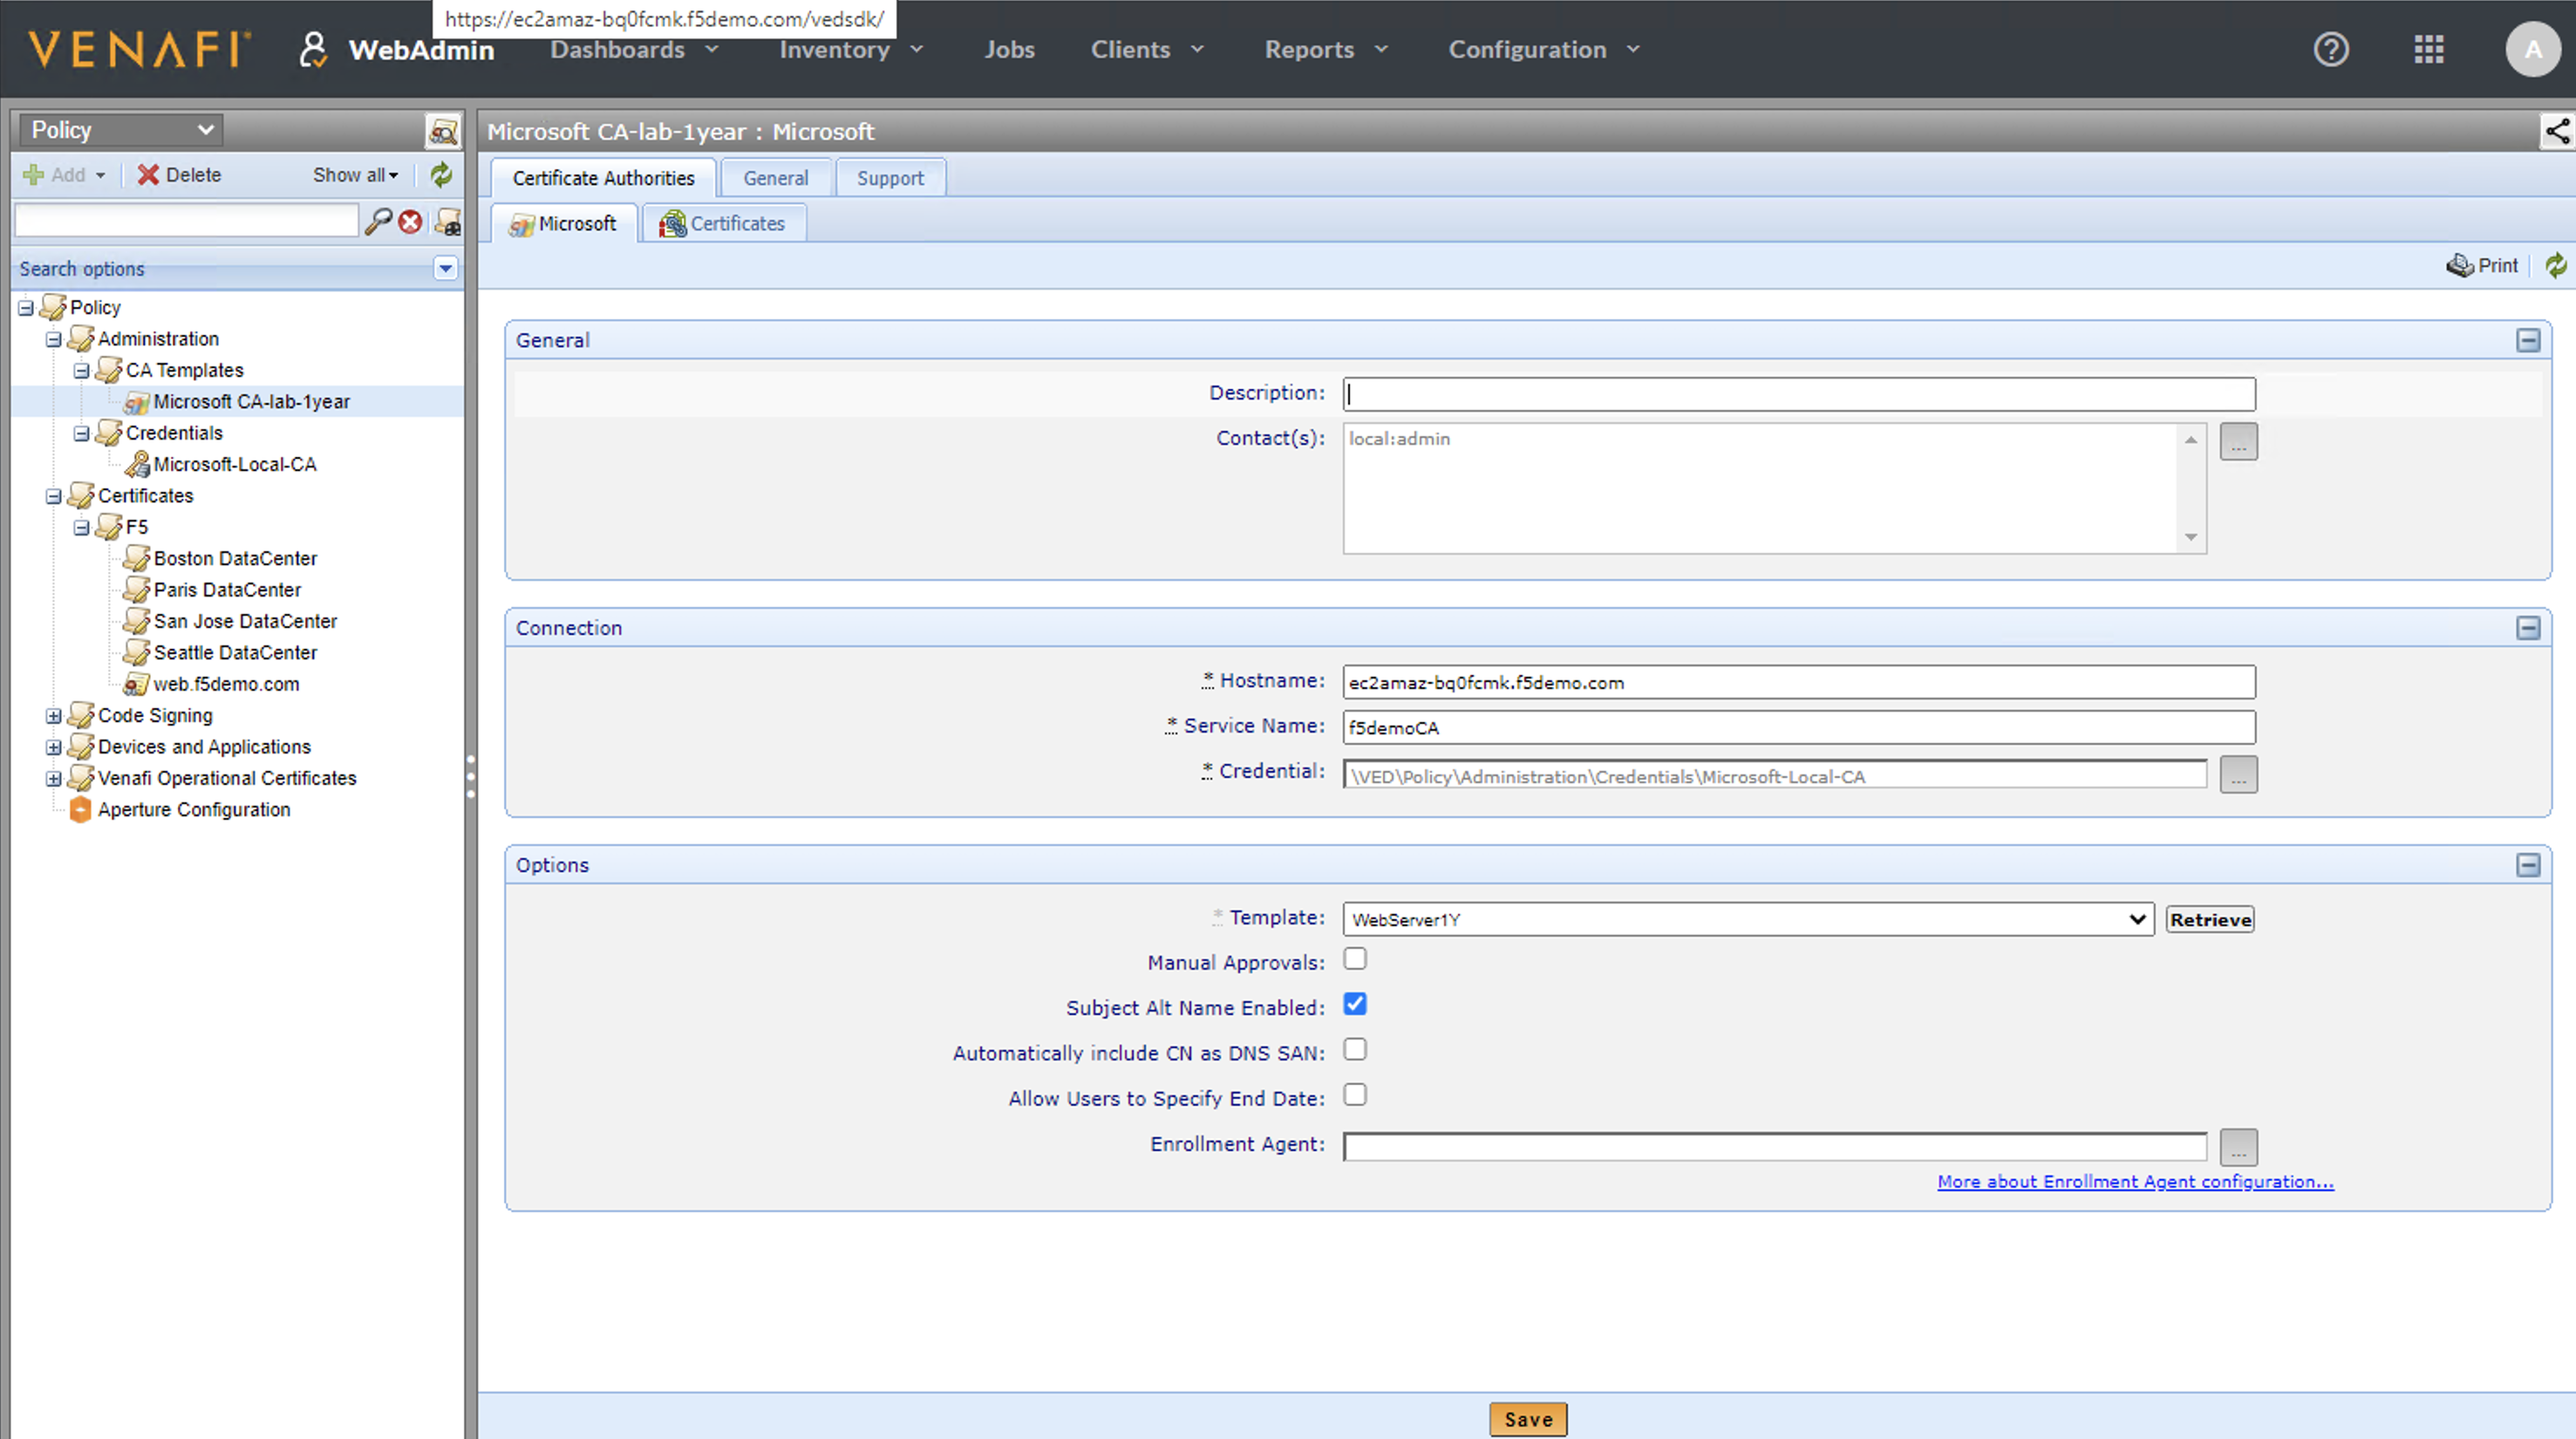
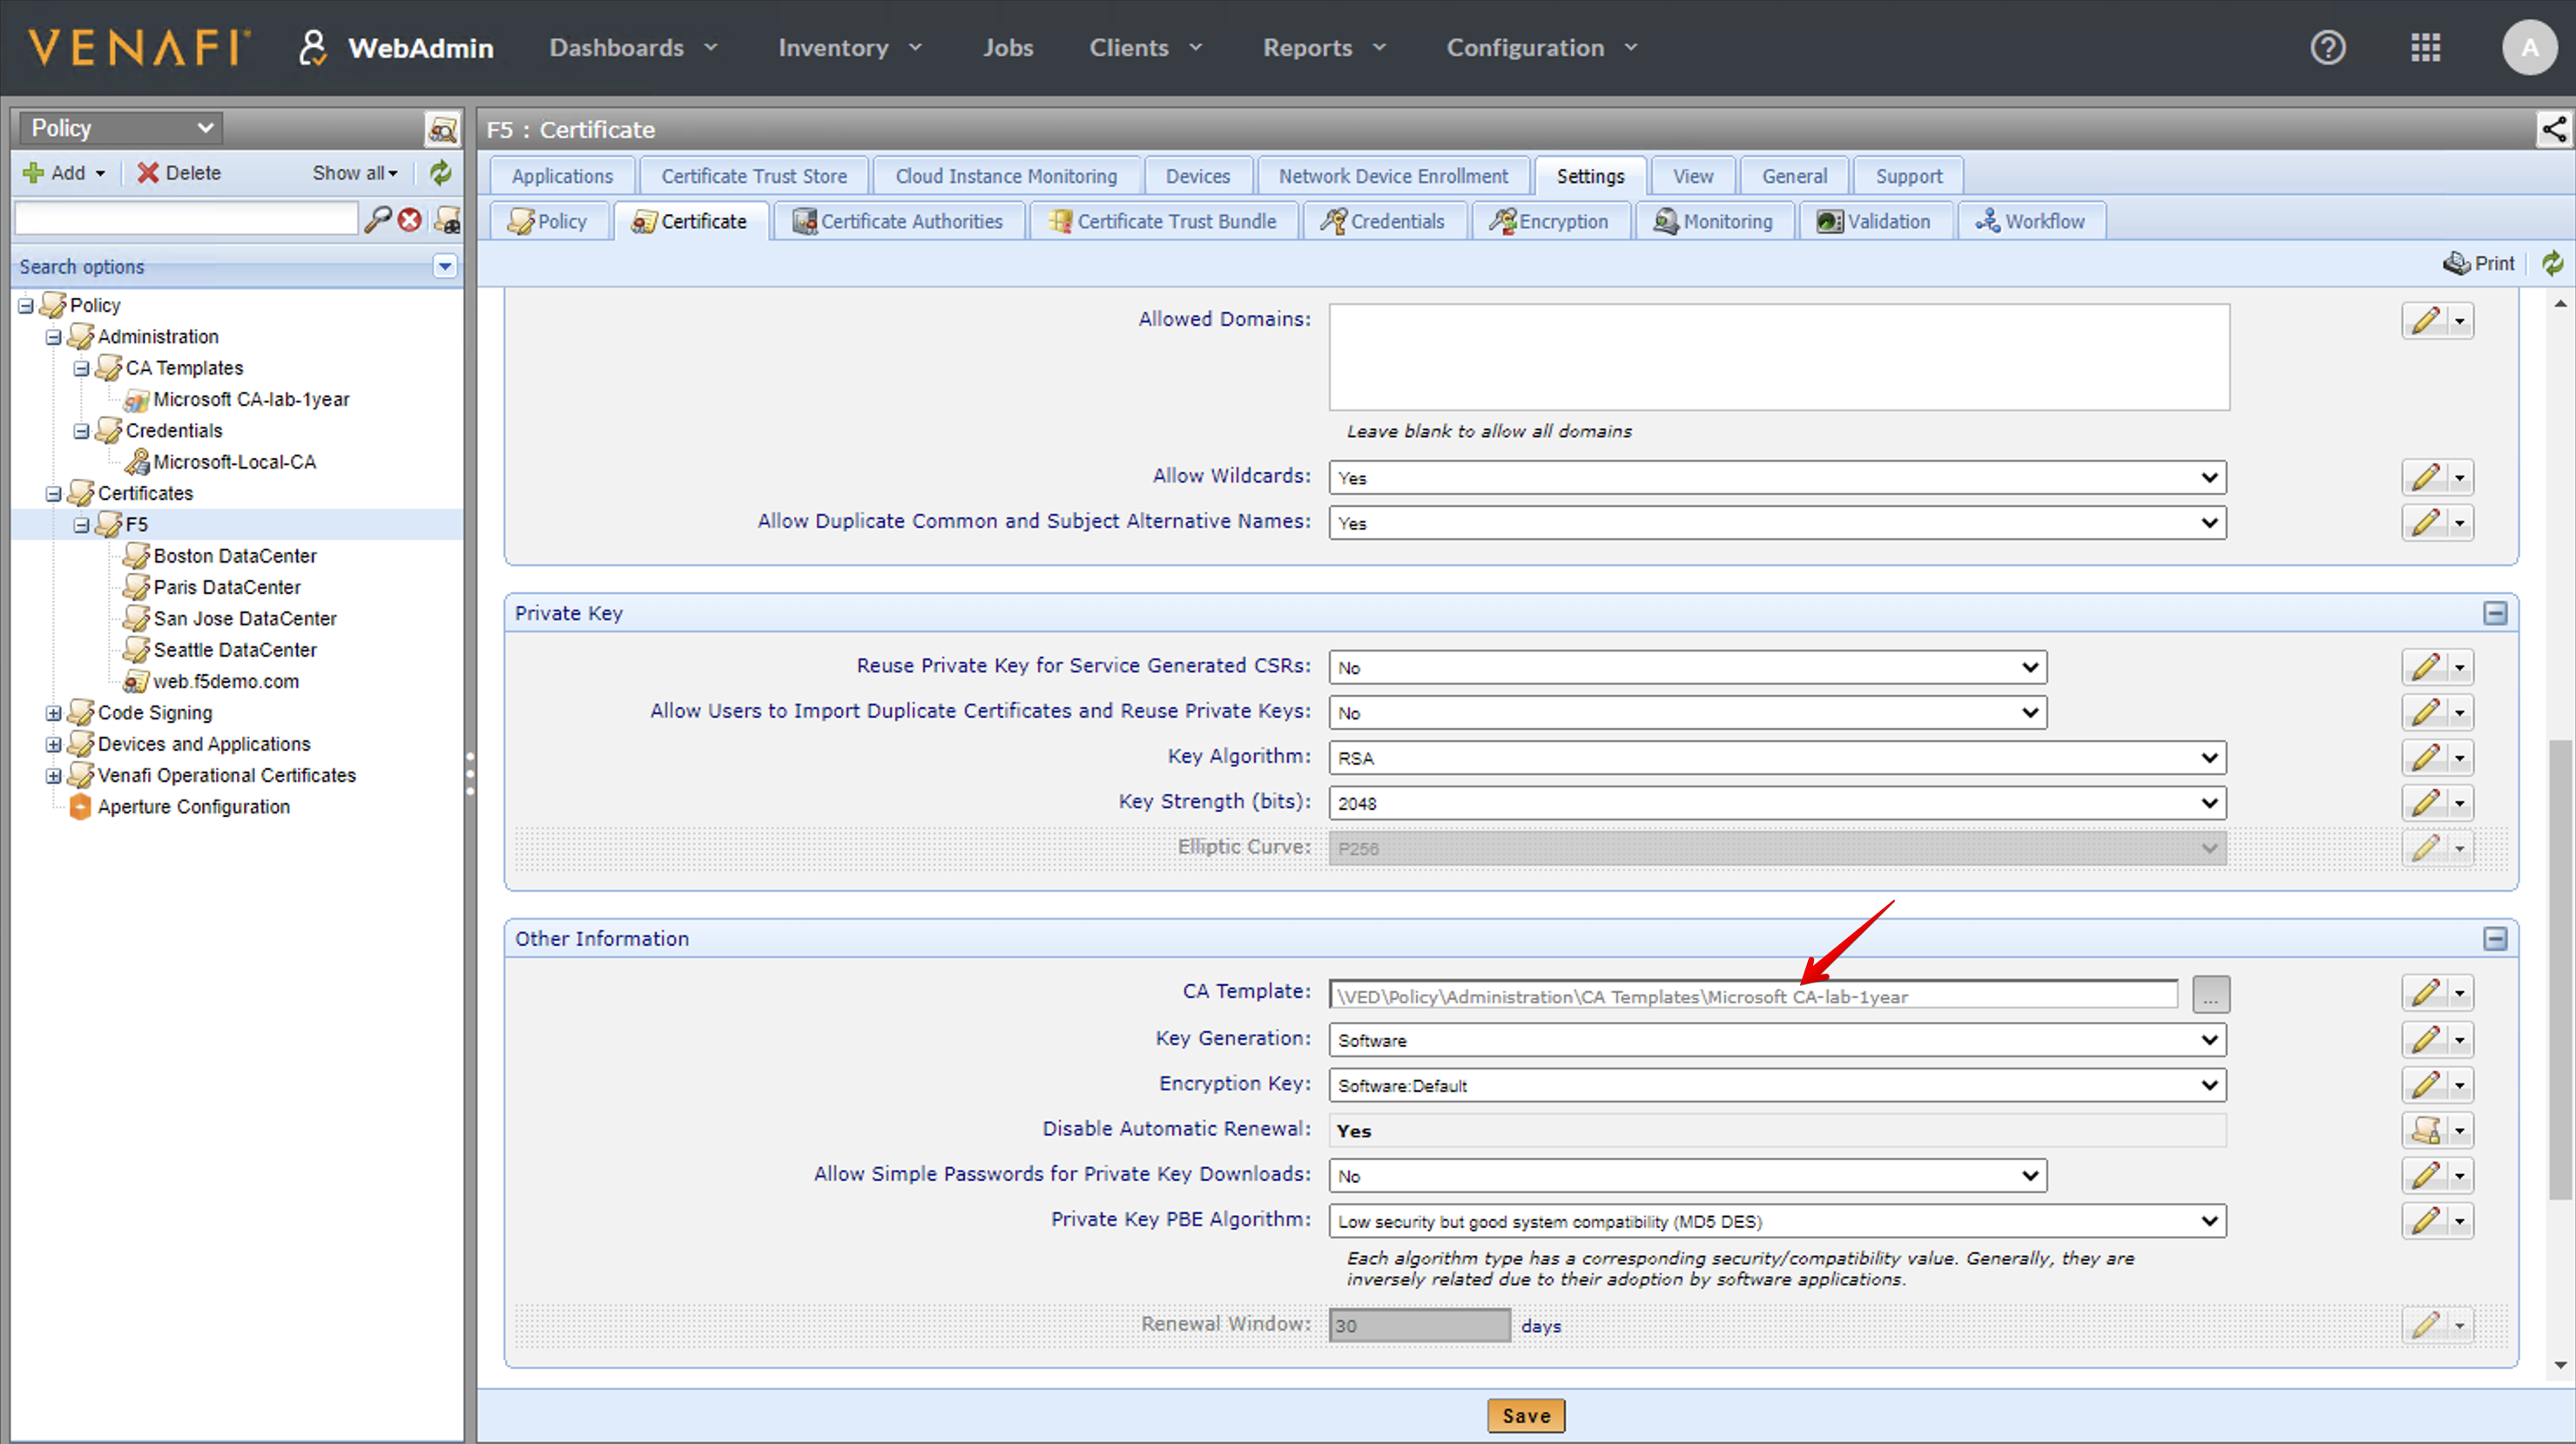
- Under the Policy menu, navigate under Policy > Administration > CA Templates and select the Microsoft CA-lab-1year.
This is where is defined the connection between Venafi and Microsoft Certification Authority. The Credentials below will contain the username and password to access the MS CA.
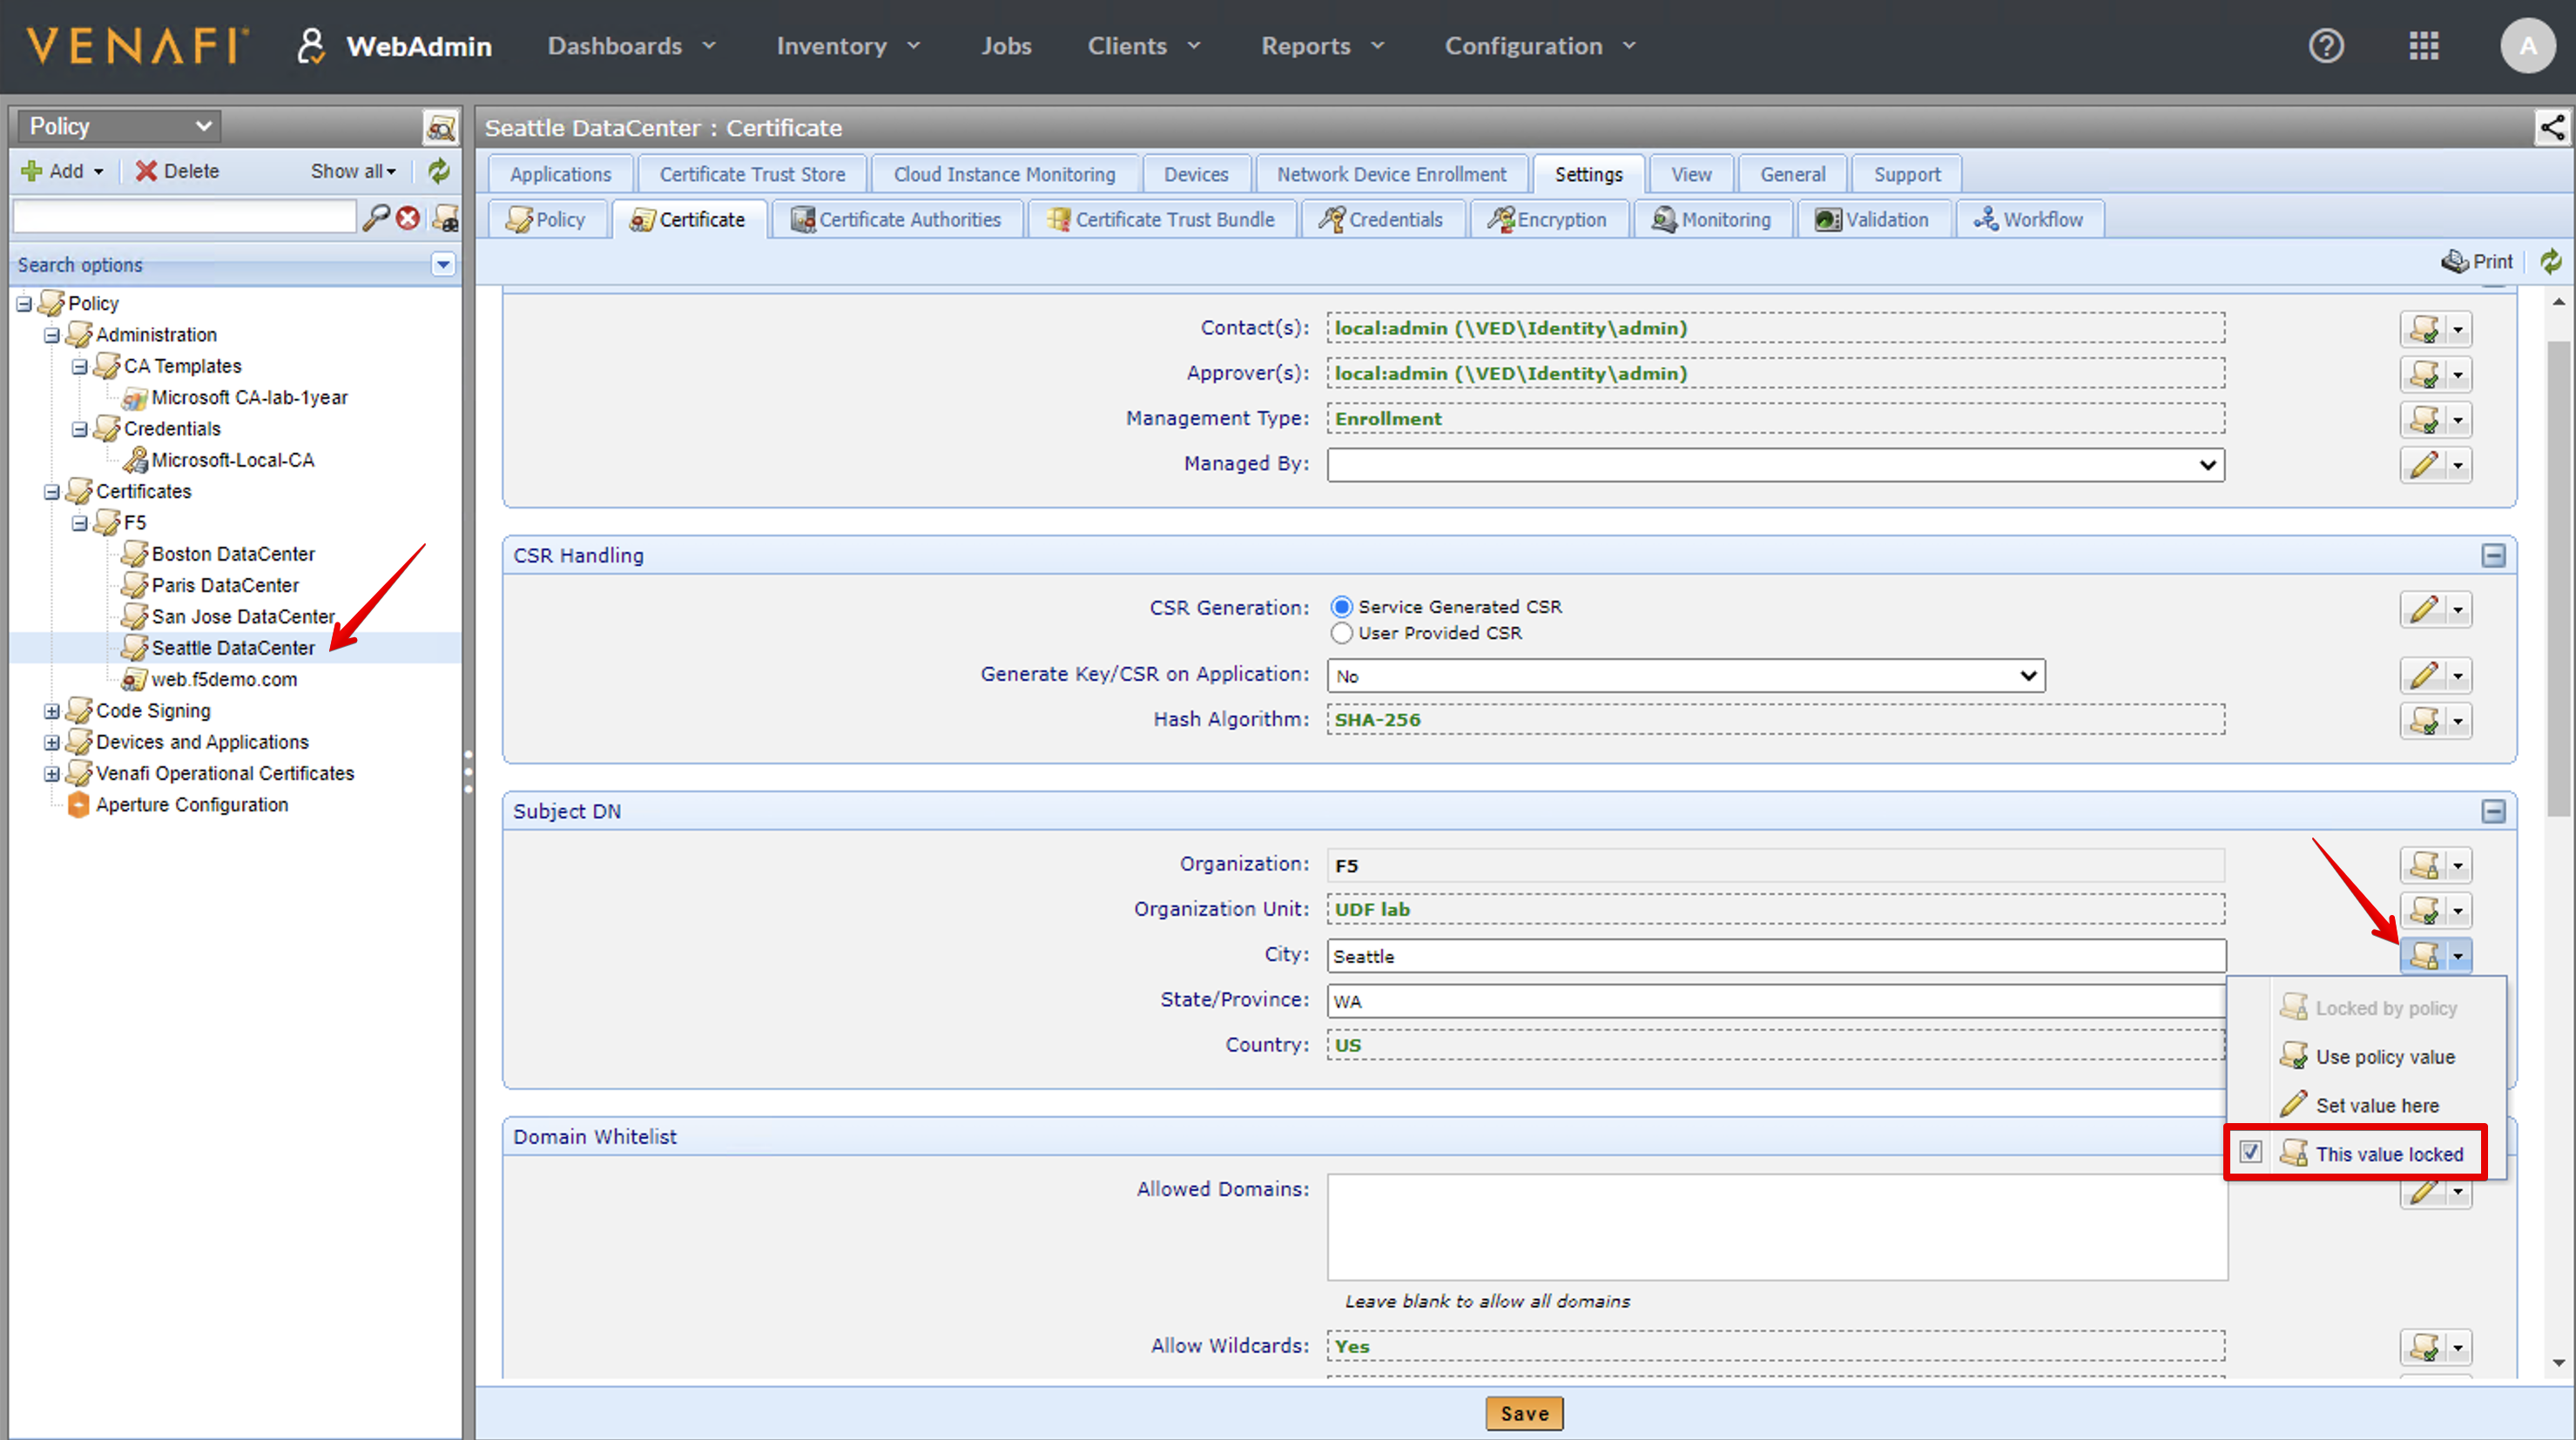
- Then, navigate under Policy > Certificates and select the policy folder called F5, then click on the Certificates tab.
We can set default values in the F5 Policy Parent folder and anything that isn’t set on one of the sub folders in the Boston, San Jose, Paris or Seattle folders gets defaulted to the F5 values.
In this lab, we have changed the Management Type to Enrollment. The Organization Name and Unit have been set as locked values and we are letting the user to change the country but default value is US.
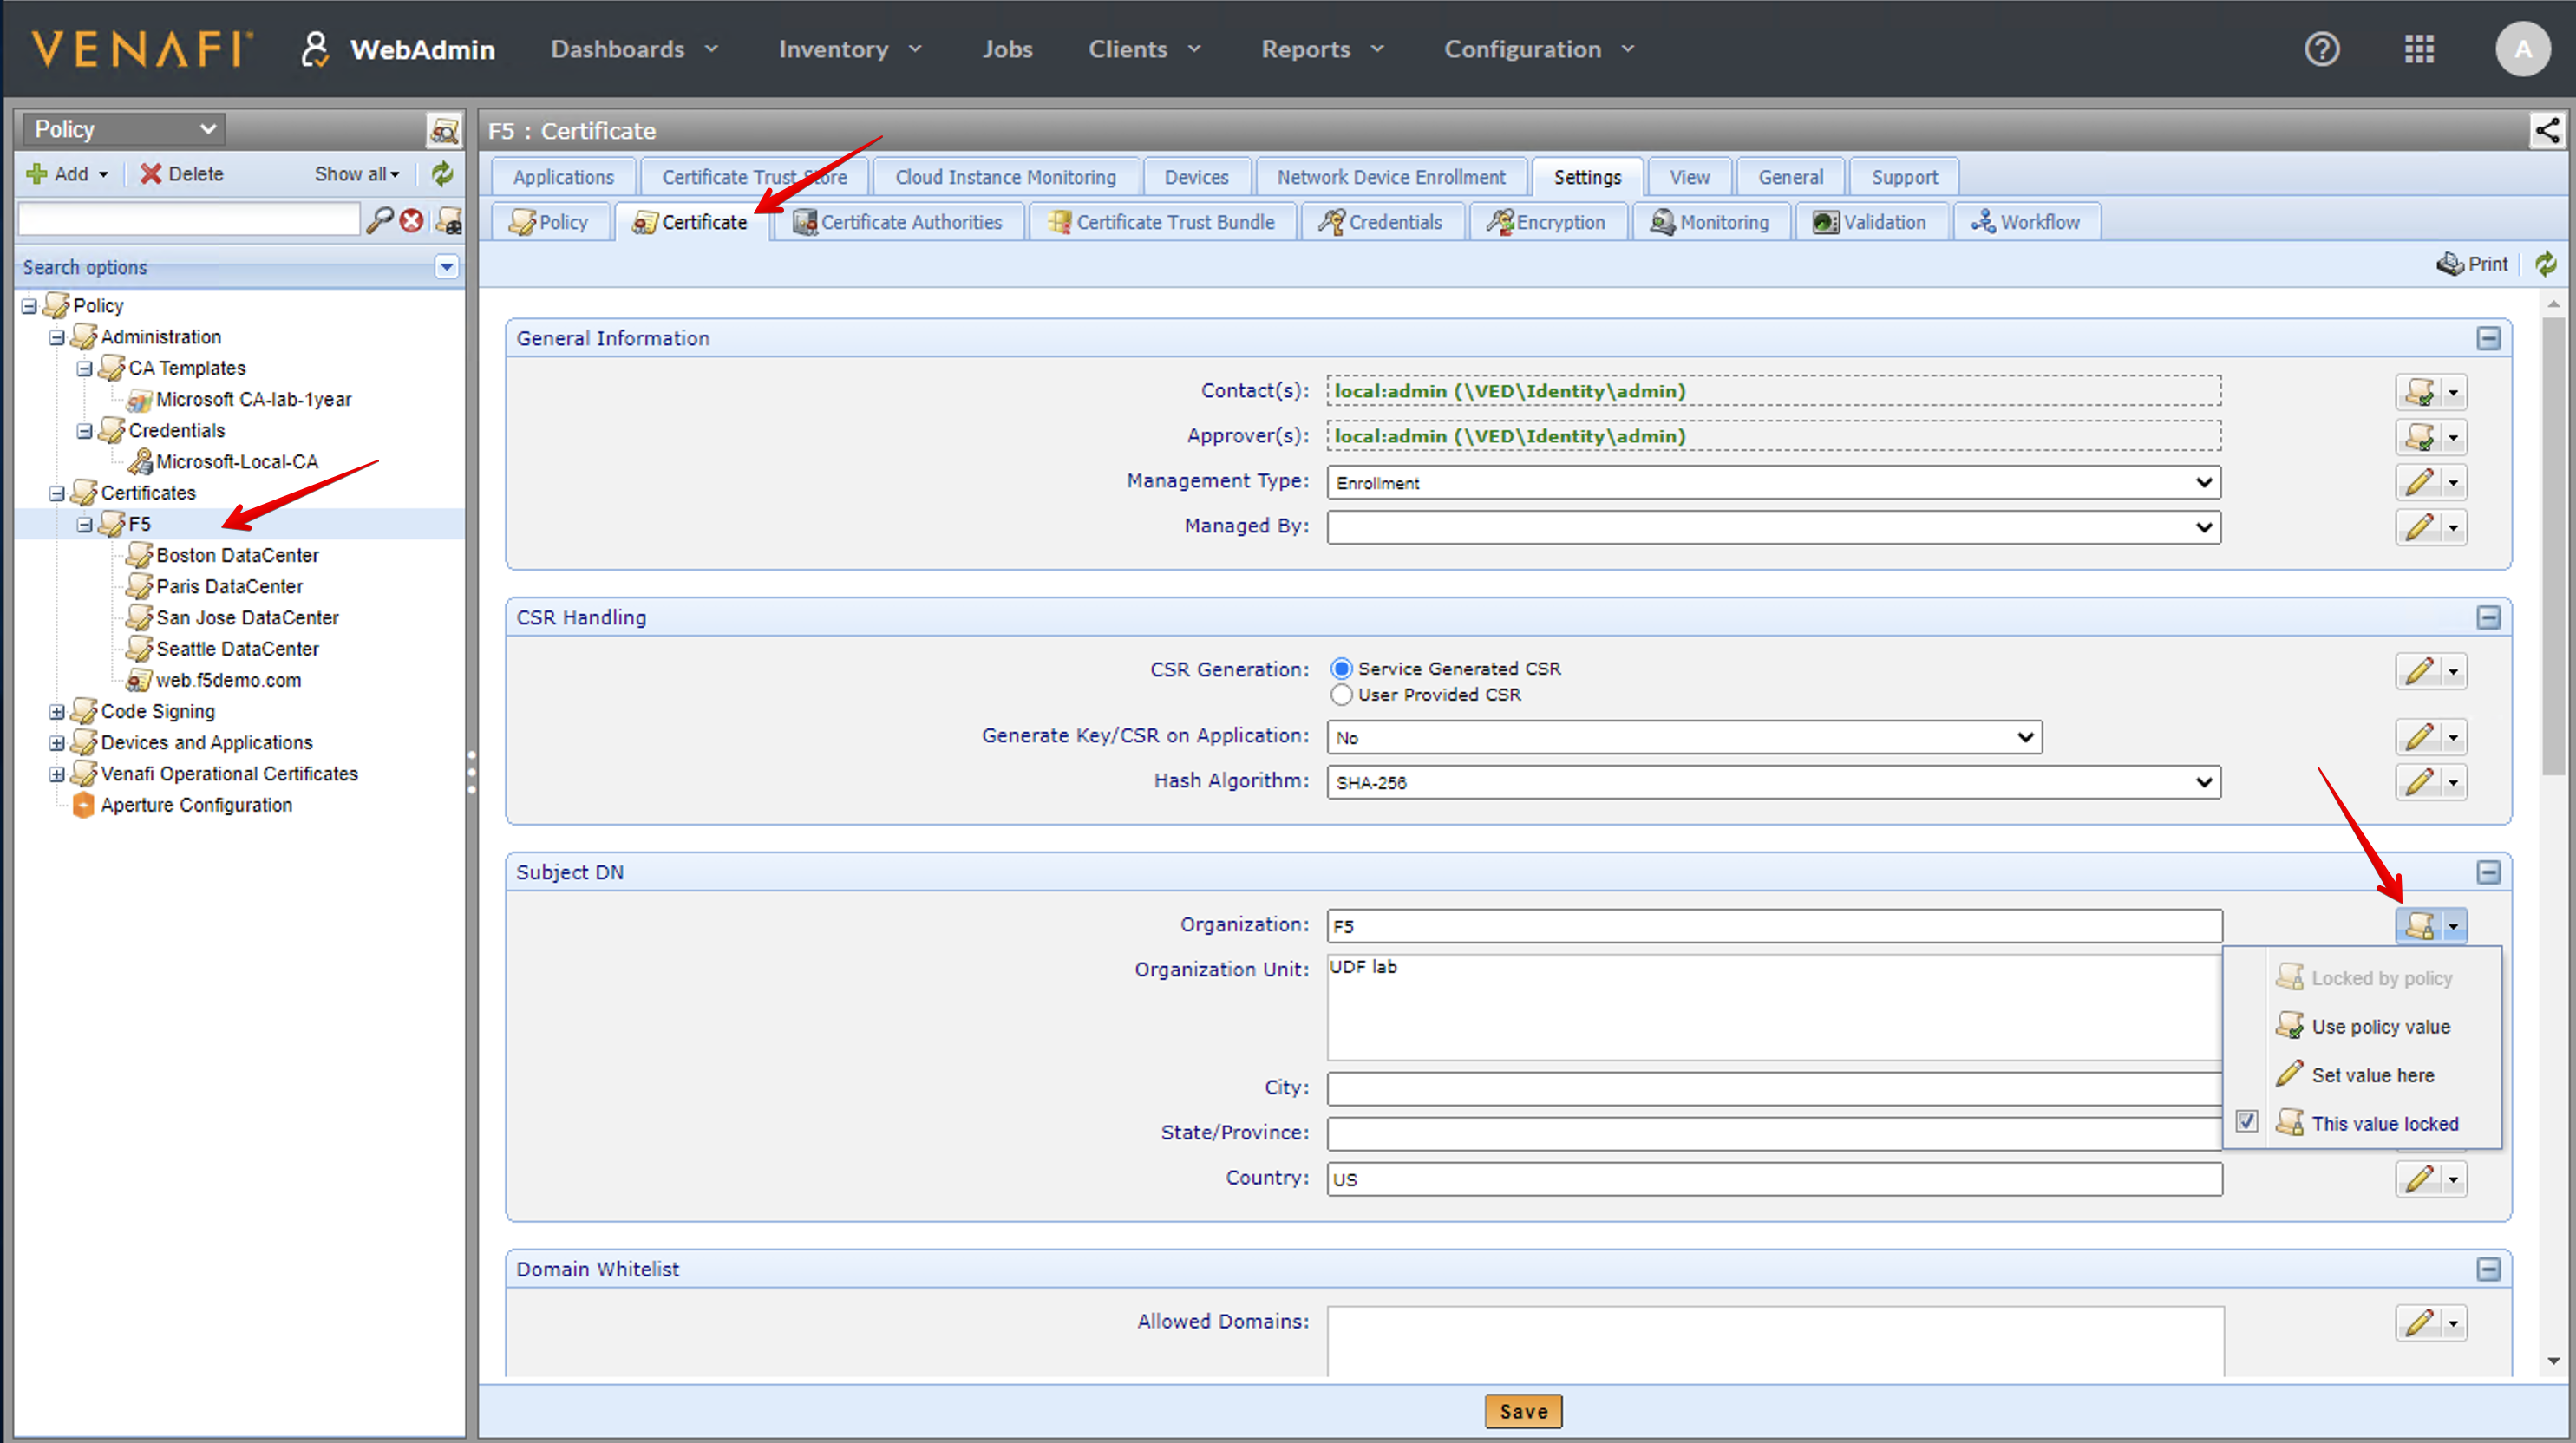
- Note we also assign the CA template from MS CA in the F5 policy.
- Finally, going down a level where you can see we have set a policy per data center, we lock the values for the city and state.