F5 Identity and Access Management Solutions > 300 Series: Advanced Use Cases & Solutions Source | Edit on
Lab 1: Deploy PUA with Client Certificate Authentication
Overview
In this lab, we will focus on configuring and testing MFA (Multifactor Authentication) with F5 APM (Access Policy Manager).
We will be leveraging a client certificate for authentication to the webtop (HTML webpage) and creating ephemeral authentication (one-time password) to the endpoint (router, switch, management UI).
Users will begin the lab by starting the PUA containers and it’s dependencies. We will then access the PUA UI and deploy PUA Smartcard.
The lab will commence with testing and validating user access.
Solution Design
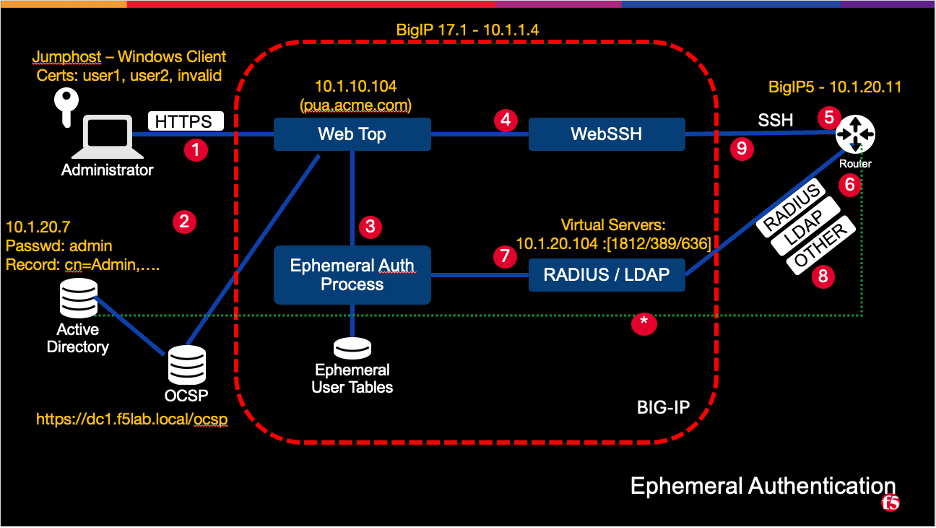
- The User logs into the APM Virtual Server using their Smartcard or with another credential method
- The APM policy checks the provided credentials against AD, OCSP, CRL and retrieves their AD/LDAP group membership information
- An APM iRule event generates the ephemeral password, and inserts the username and password hash into the ephemeral auth table
- When the user selects a resource the APM Policy makes a connection to the WebSSH Virtual Sever and inserts the Ephemeral Auth credentials using the APM SSO profile
- The WebSSH Virtual Server, using the WebSSH ILX app, makes an SSH connection to the Router/Server with Ephemeral Auth credentials
- Upon receiving the login information, the Router/Server will make an authentication request to the remote login resource (RADIUS/LDAP)
- RADIUS Auth Requests are sent to the BIG-IP RADIUS Virtual Server (ILX RADIUS server)
- LDAP(S) Auth Requests are sent to the BIG-IP LDAP or LDAPS Virtual Server (ILX LDAP or LDAPS server)
- Both the RADIUS ILX server and the LDAP(S) ILX server check the Ephemeral auth table and compare the hash of the provided password with the hash of the stored password
- The ILX server will return a result to the Router/Server (Access-Accept / Access-Reject) a. Optional authorization attribute, if defined, will be pull directly from the RADIUS/LDAP server (The ILX Virtual Servers will have Pools with the real RADIUS/LDAP servers configured as pool members for pass through attribute checking and verification [only attributes not authentication])
- The SSH session is established or denied depending on outcome of step 8
Ressources
The following resources will be defined for the lab environment:
| Resource | Description | Value |
|---|---|---|
| WebSSH_proxy_vs_IP | Virtual server IP Address of WebSSH2 service. | 10.1.10.104 |
| APM_Portal_vs_IP | Virtual server IP Address of APM portal for authentication | 10.1.20.104 |
| RADIUS_proxy_vs_IP | Virtual server IP address of RADIUS proxy service | 10.1.20.104 |
| LDAP_proxy_vs_IP | Virtual server IP address of LDAP proxy service | 10.1.20.104 |
| LDAPS_proxy_vs_IP | Virtual server IP address of LDAPS proxy service | 10.1.20.104 |
| LDAP_server_IP | IP Address of site LDAP or AD server (required for LDAP use) | 10.1.20.7 |
| RADIUS_server_IP | IP Address of site RADIUS server (if RADIUS bypass is used) | 10.1.20.7 |
Expected time to complete: 30 minutes
Access the Environment
To access your dedicated student lab environment, you will need a web browser and Remote Desktop Protocol (RDP) client software. The web browser will be used to access the Unified Demo Framework (UDF) Training Portal. The RDP client will be used to connect to the jumphost, where you will be able to access the BIG-IP management interfaces (HTTPS, SSH).
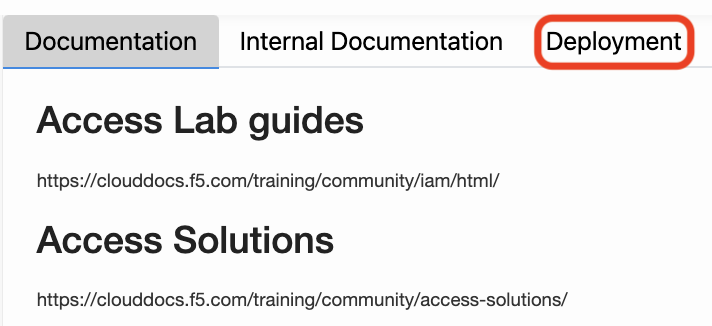
Click Deployment located on the top left corner to display the environment
Task 1 - Start PUA
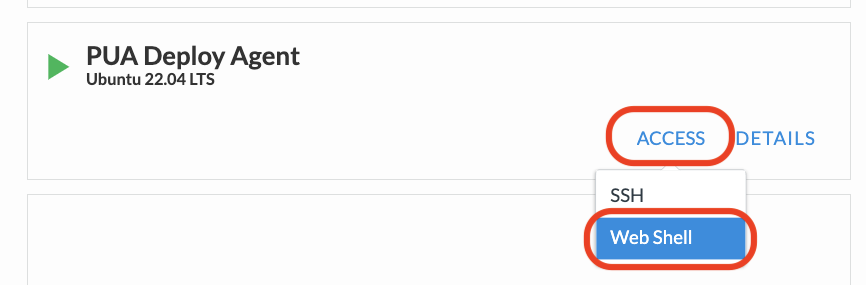
Access PUA Deploy Agent
Click ACCESS next to PUA Deploy Agent
Select Web Shell from the lists
In the new browser Tab, execute the following shell commands to launch the PUA containers and it dependencies :
cd /opt/puav3.0
docker compose up --detach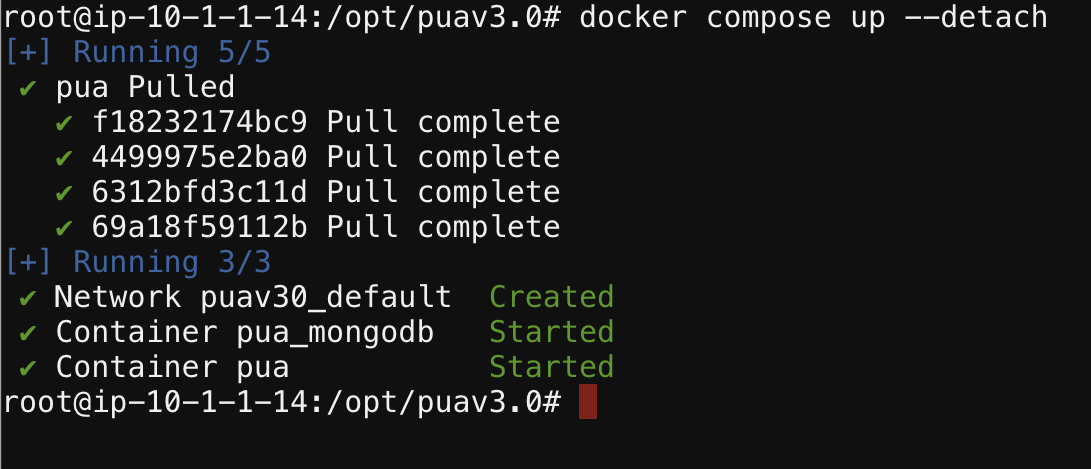
docker logs --follow pua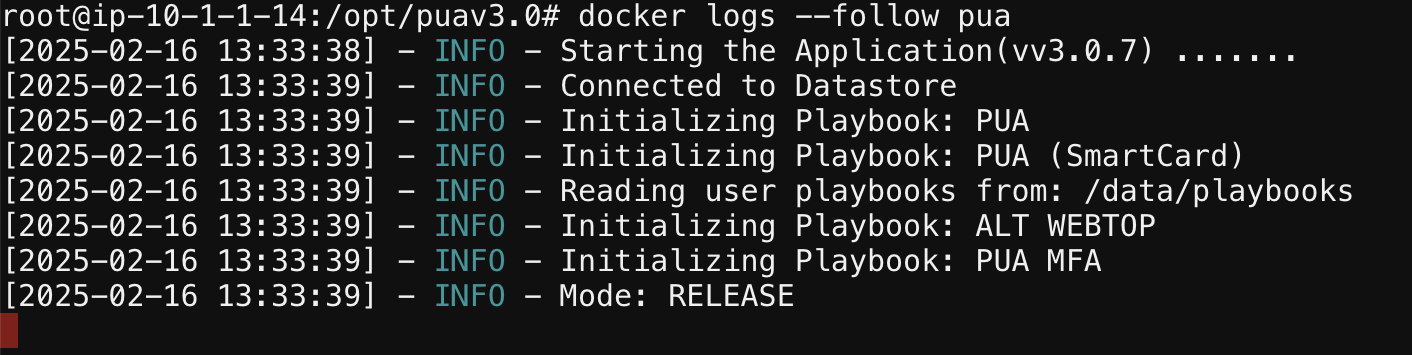
Note
docker logs –follow pua command will continuously display the log output for the container named pua. This is particularly useful for monitoring the container’s activity and debugging issues, as you can see log messages in real-time as they occur.
Important
Please ensure that the commands were executed without generating any errors before moving to the next task.
Task 2 - Access Lab Environment
Note
Many corporate environments restrict access to open RDP connections to enhance network security and prevent unauthorized remote access; therefore if the next method doesn’t work, we include an alternate method for secure remote access.
RDP Access to the Lab Environment
Click ACCESS next to jumpbox.f5lab.local

Select your RDP resolution.
The RDP client on your local host establishes a RDP connection to the Jump Host.
Login with the following credentials:
- User: f5lab\user1
- Password: user1
Alternate Access Method to the Lab Environment
Note
If you have successfully connected to the lab environment using RDP, you may proceed with Access PUA.
Click ACCESS next to superjump
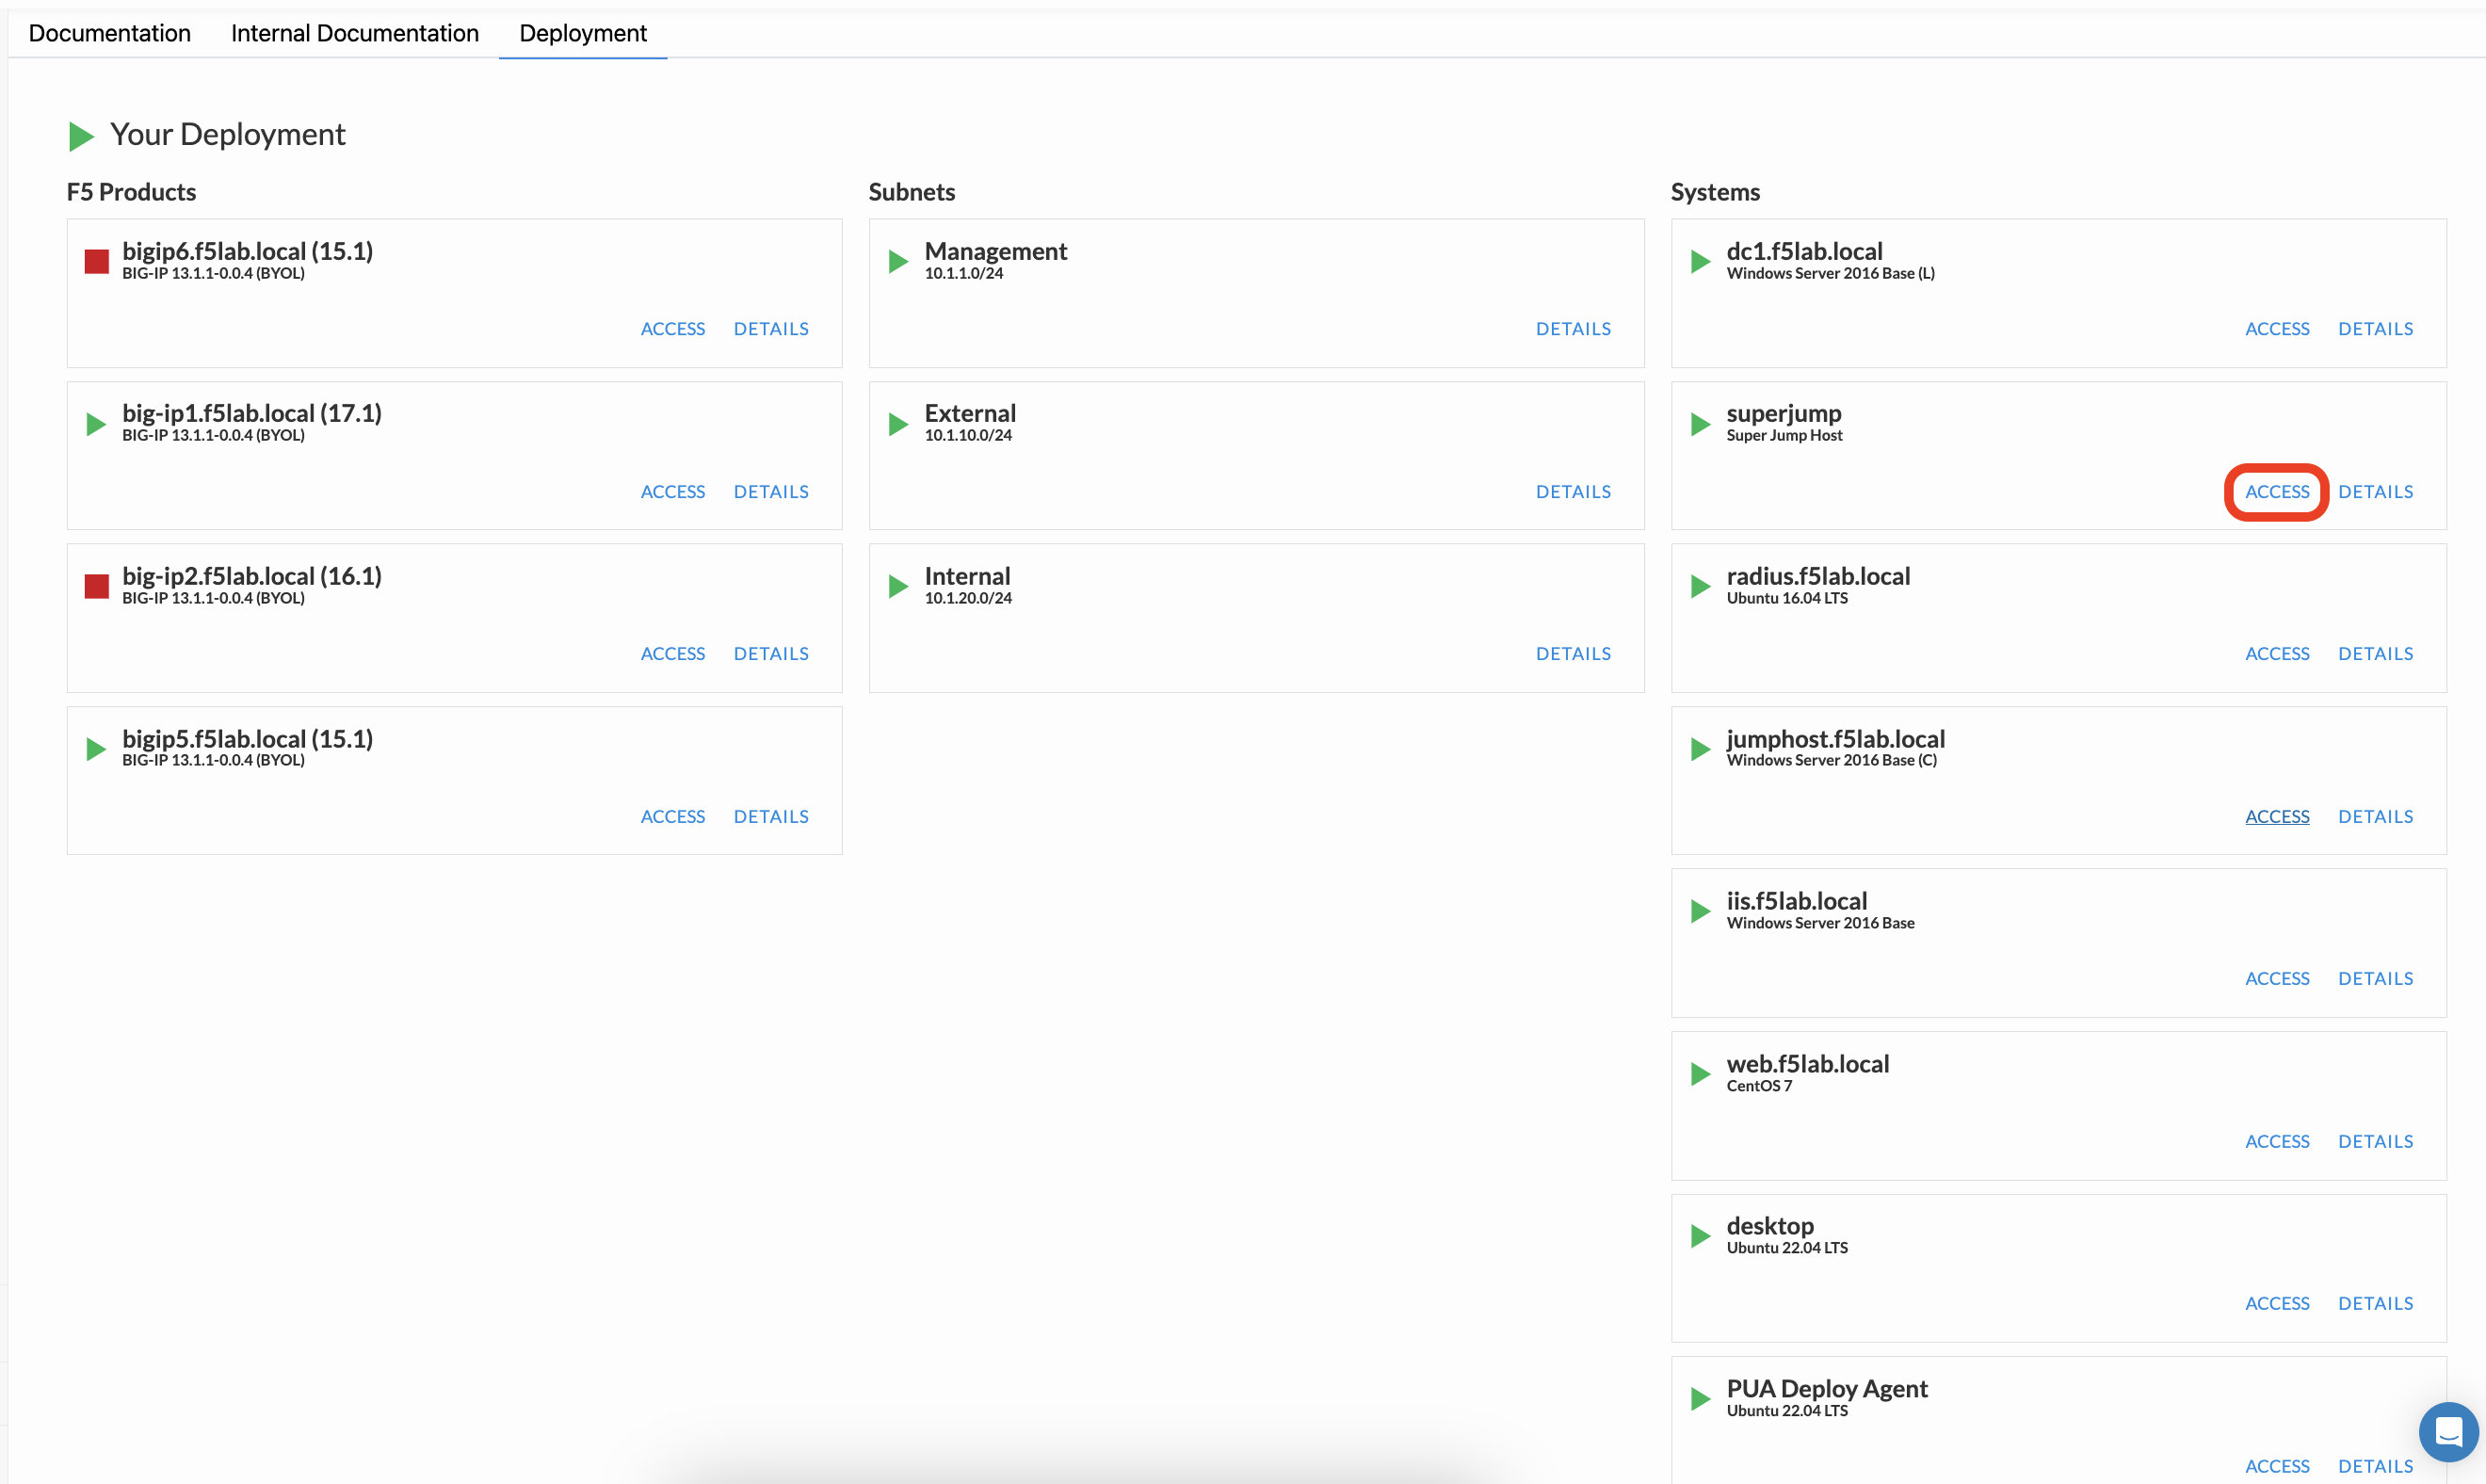
Select Guacamole from the lists
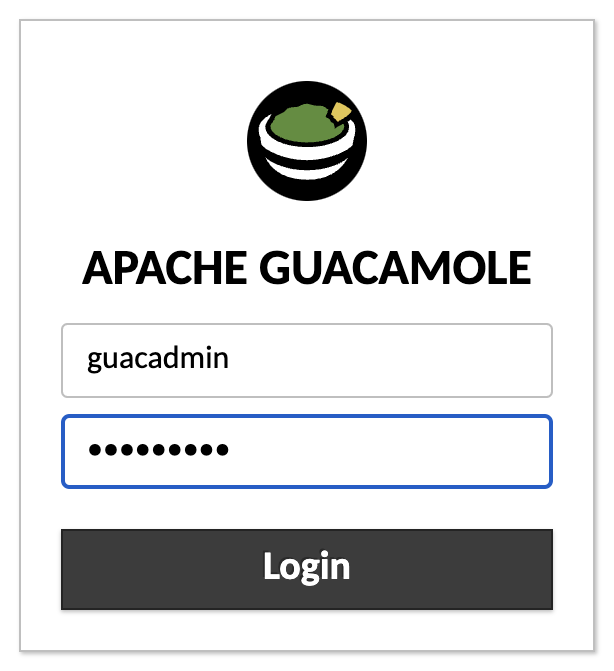
In the new browser Tab, Login with the following credentials:
- User: guacadmin
- Password: guacadmin
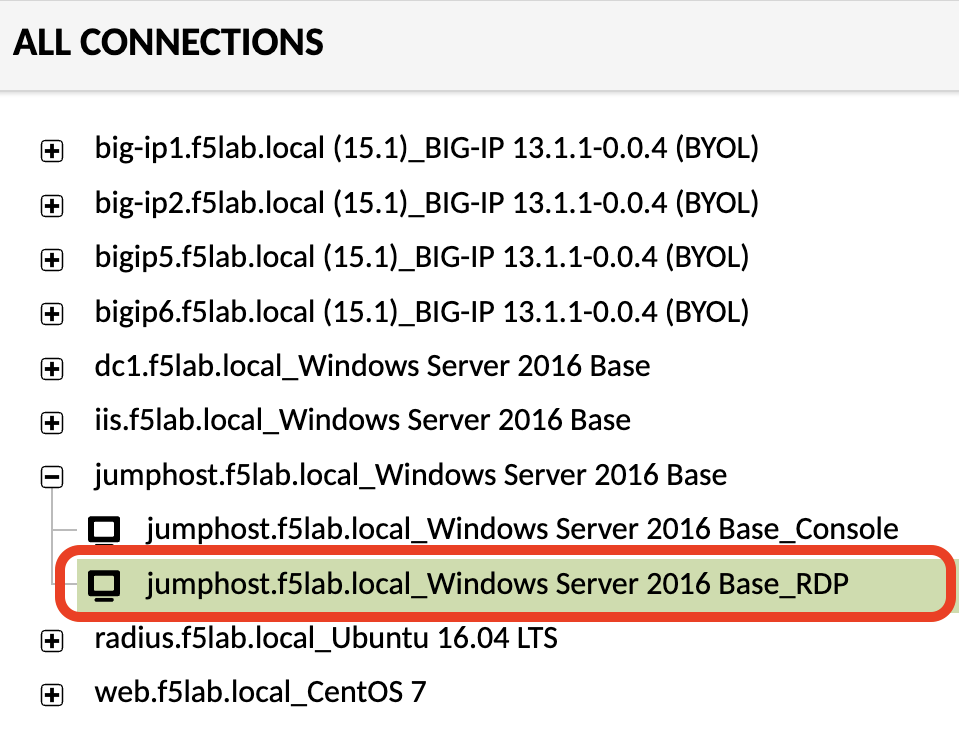
Click jumphost.f5lab.local_Windows Server 2016 Base
Select jumphost.f5lab.local_Windows Server 2016 Base_RDP from the list
After successful logon the Chrome browser will auto launch opening the site about:blank. This process usually takes 30 seconds after logon.
Task 3 - Access PUA
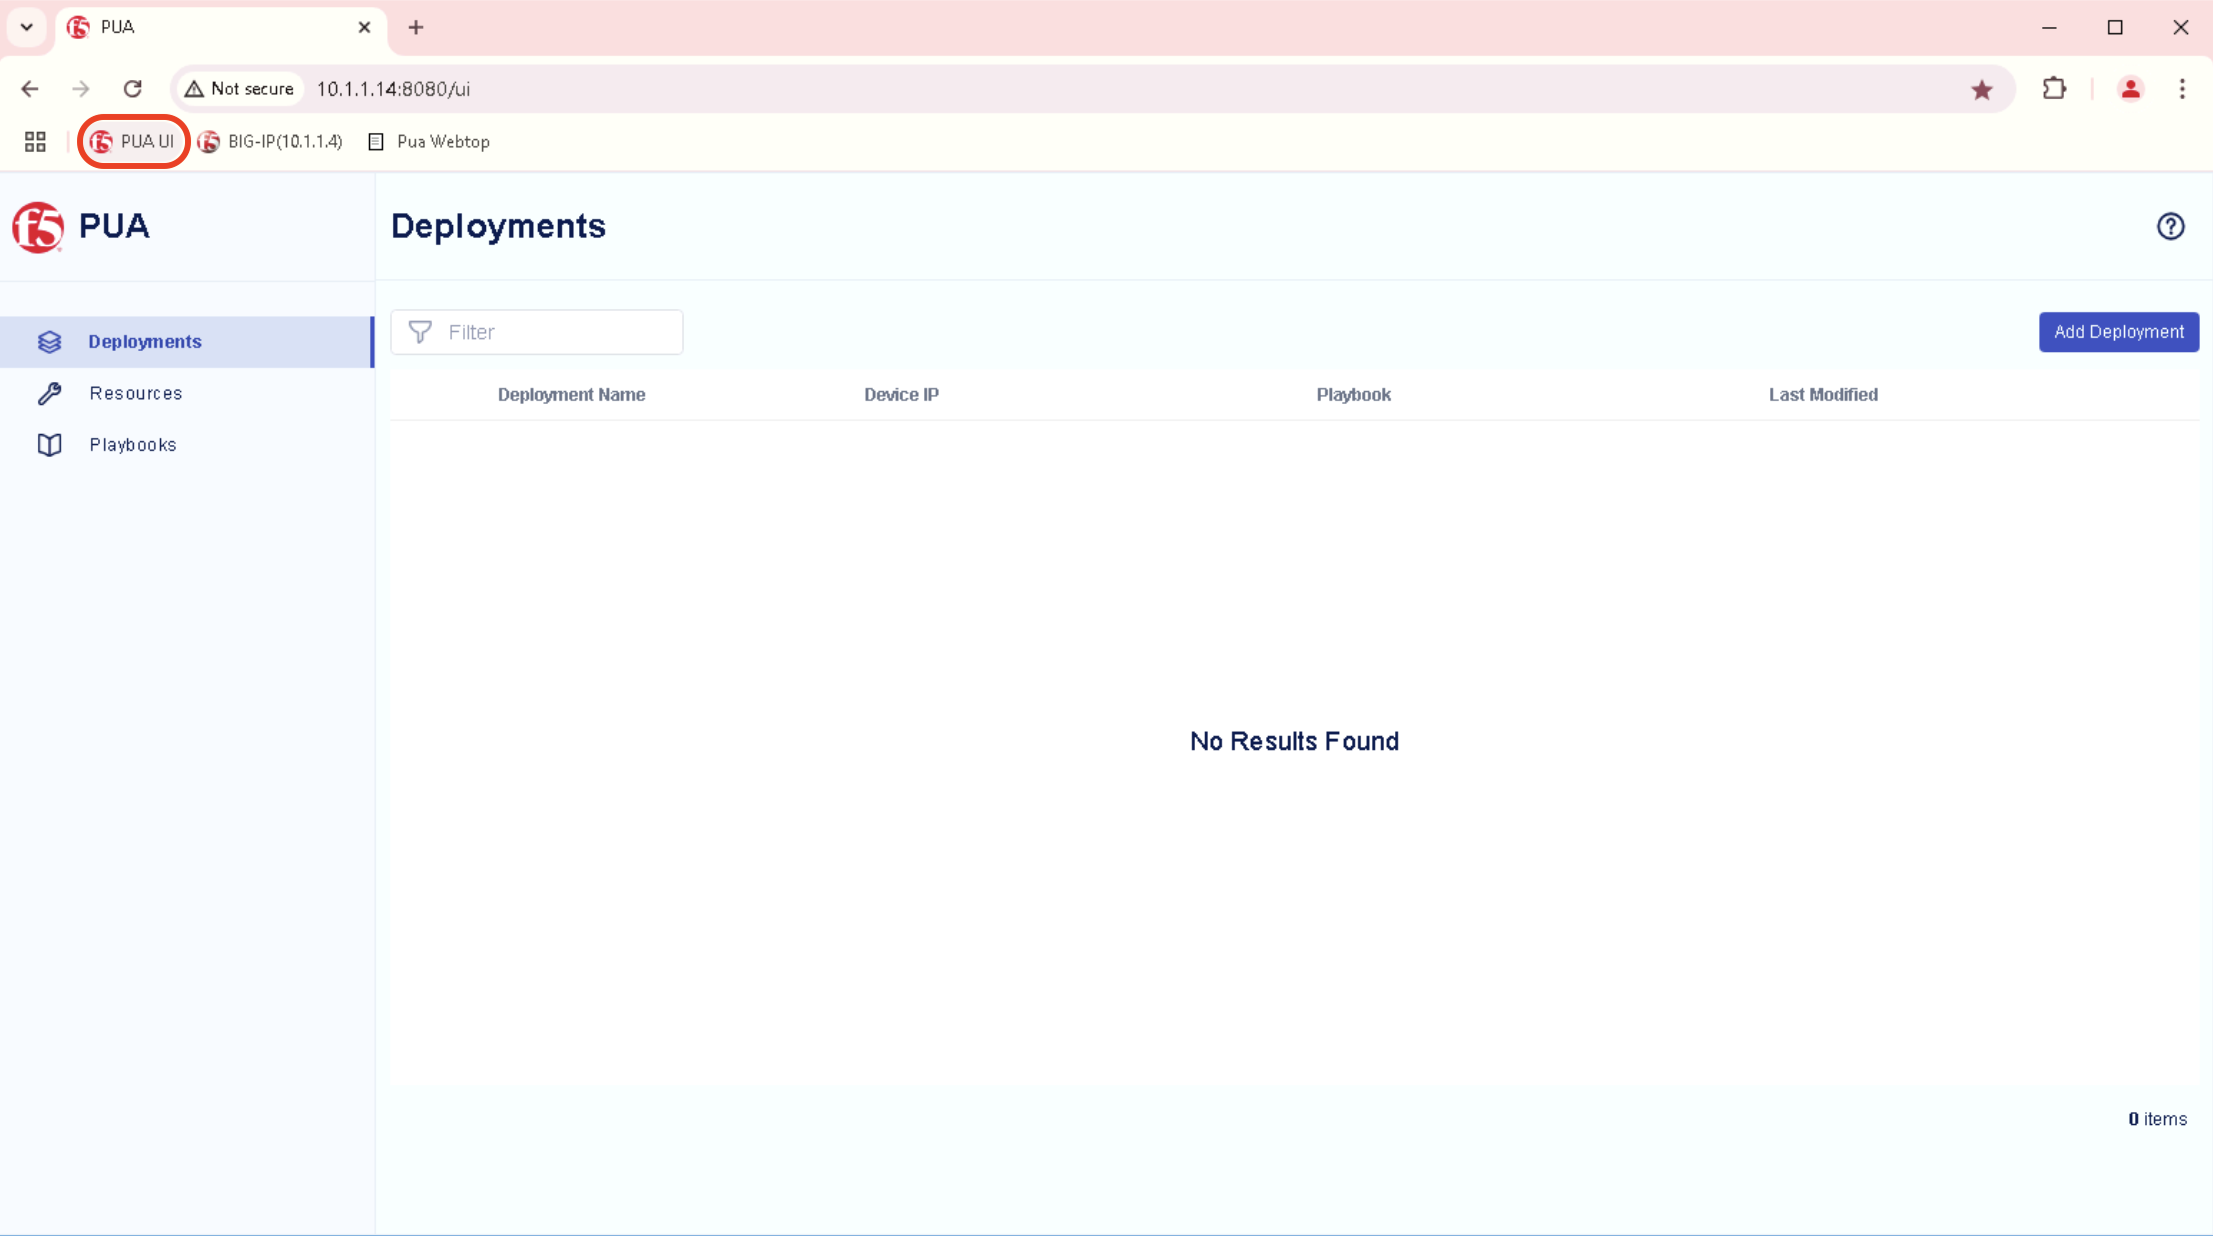
In Chrome browser, Click the bookmark PUA UI
This should launch the PUA Web UI http://10.1.1.14:8080/ui
Warning
If your not seeing the PUA Web UI as shown, Please review Task 1 - Start PUA
Deploy PUA Smart Card
Task 1 - Add Deployment
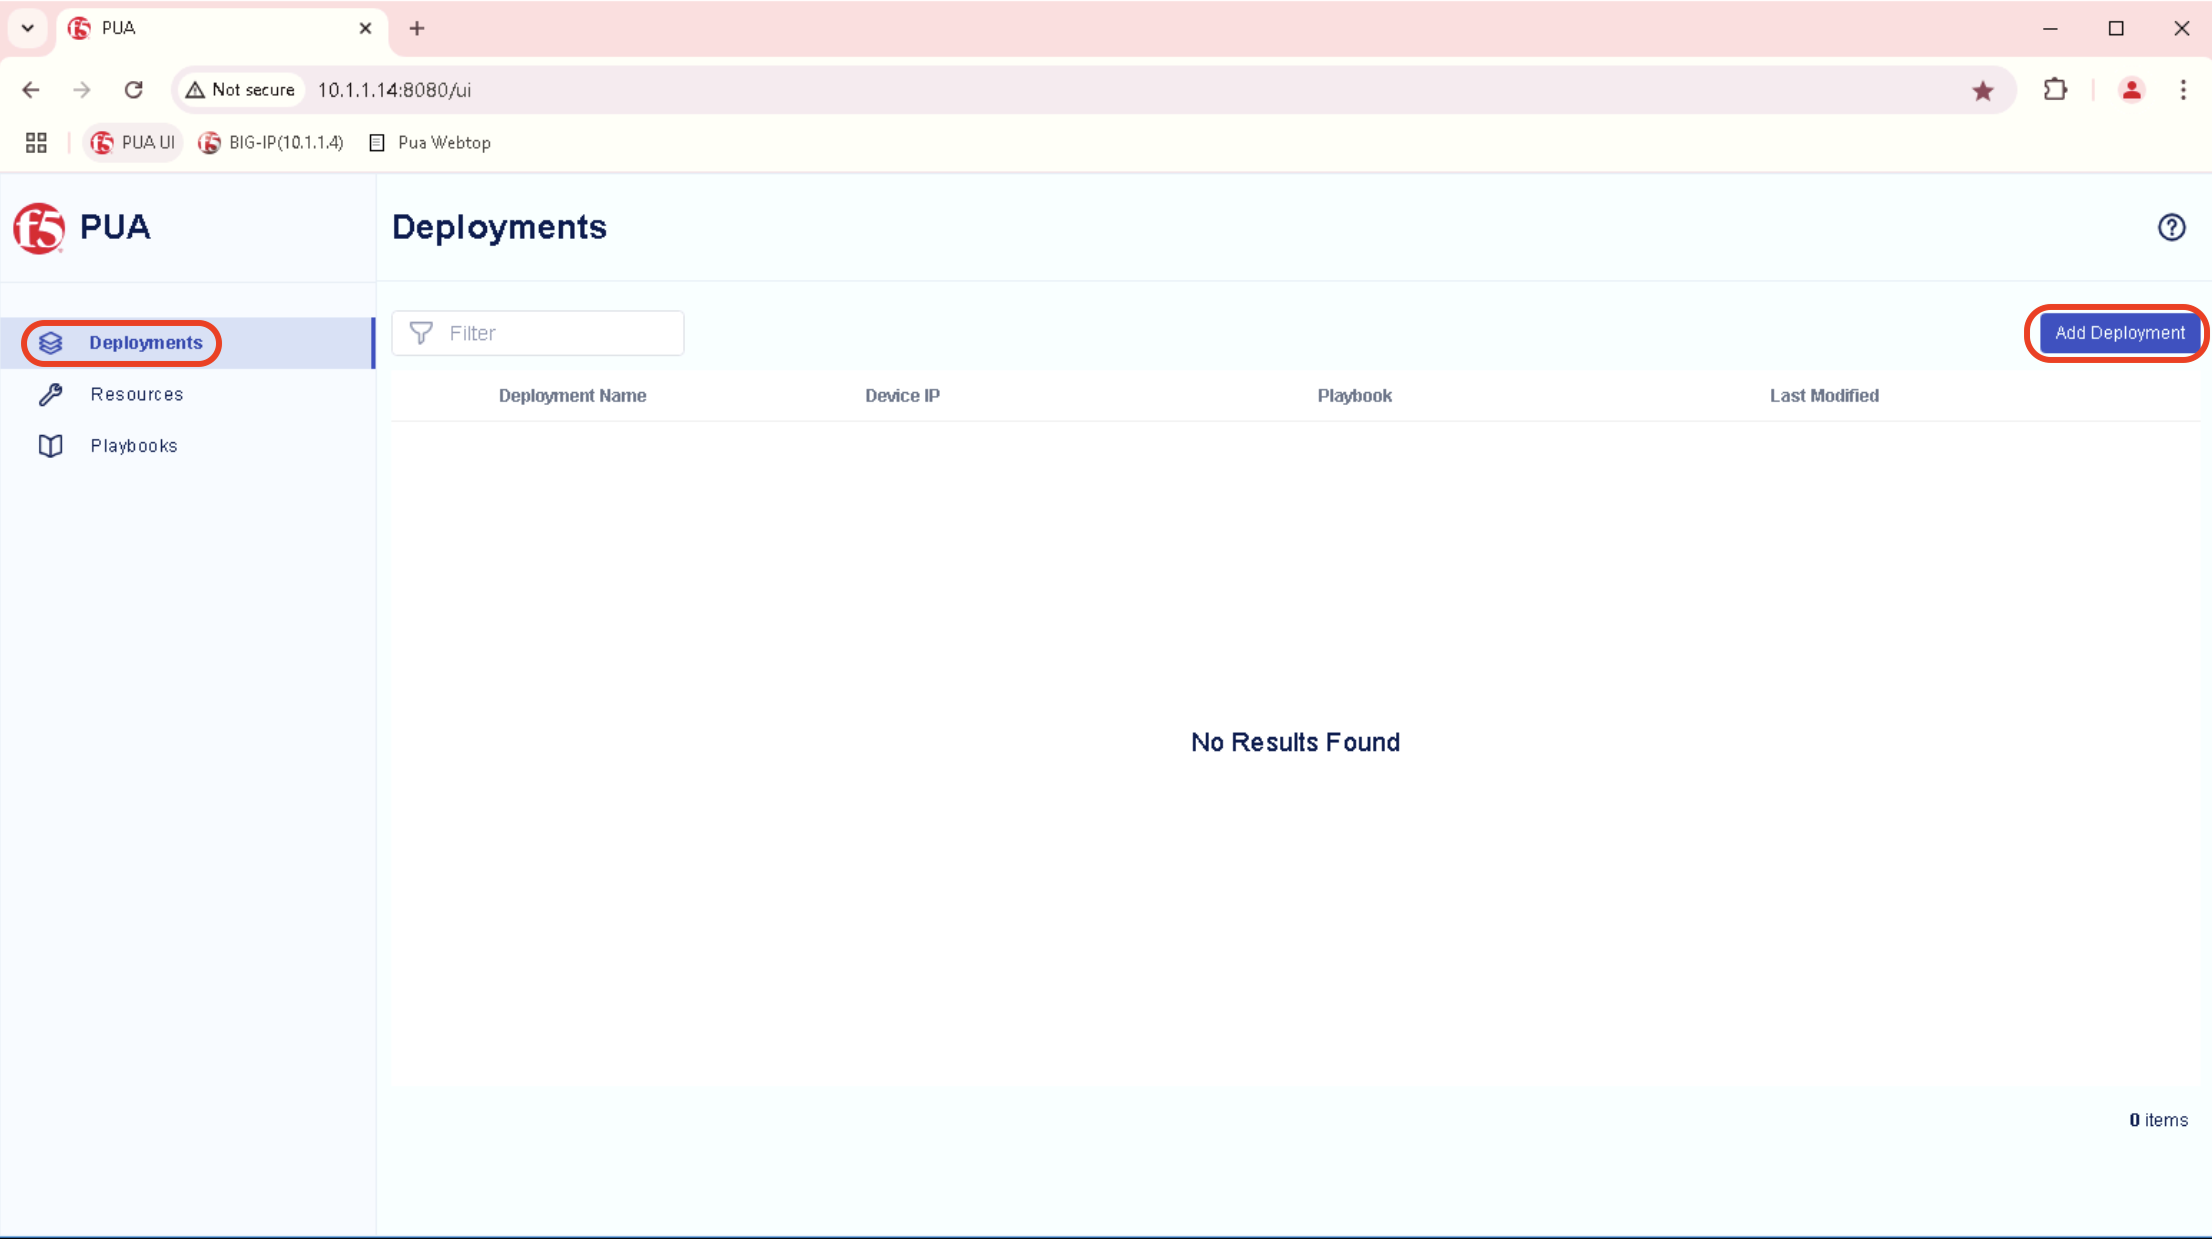
In PUA UI, Click Deployments in left hand navigation bar and in the main panel, Click Add Deployment button.
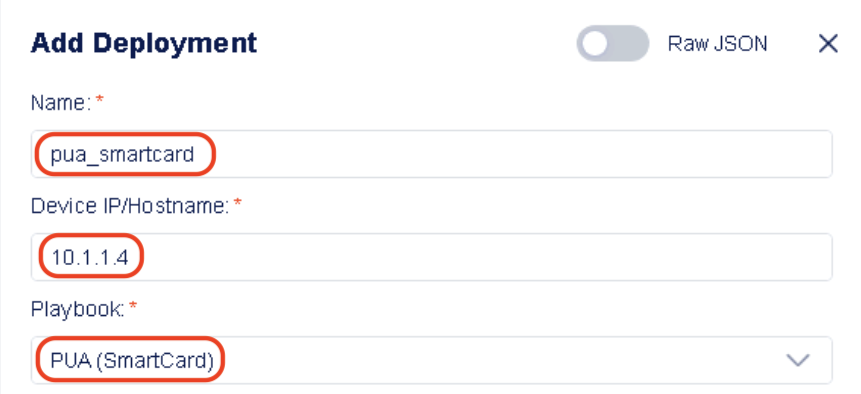
In the resulting window, enter the following data:
- Add Deployment
- Name : pua_smartcard
- Device IP/Hostname : 10.1.1.4
- Playbook: PUA (SmartCard)
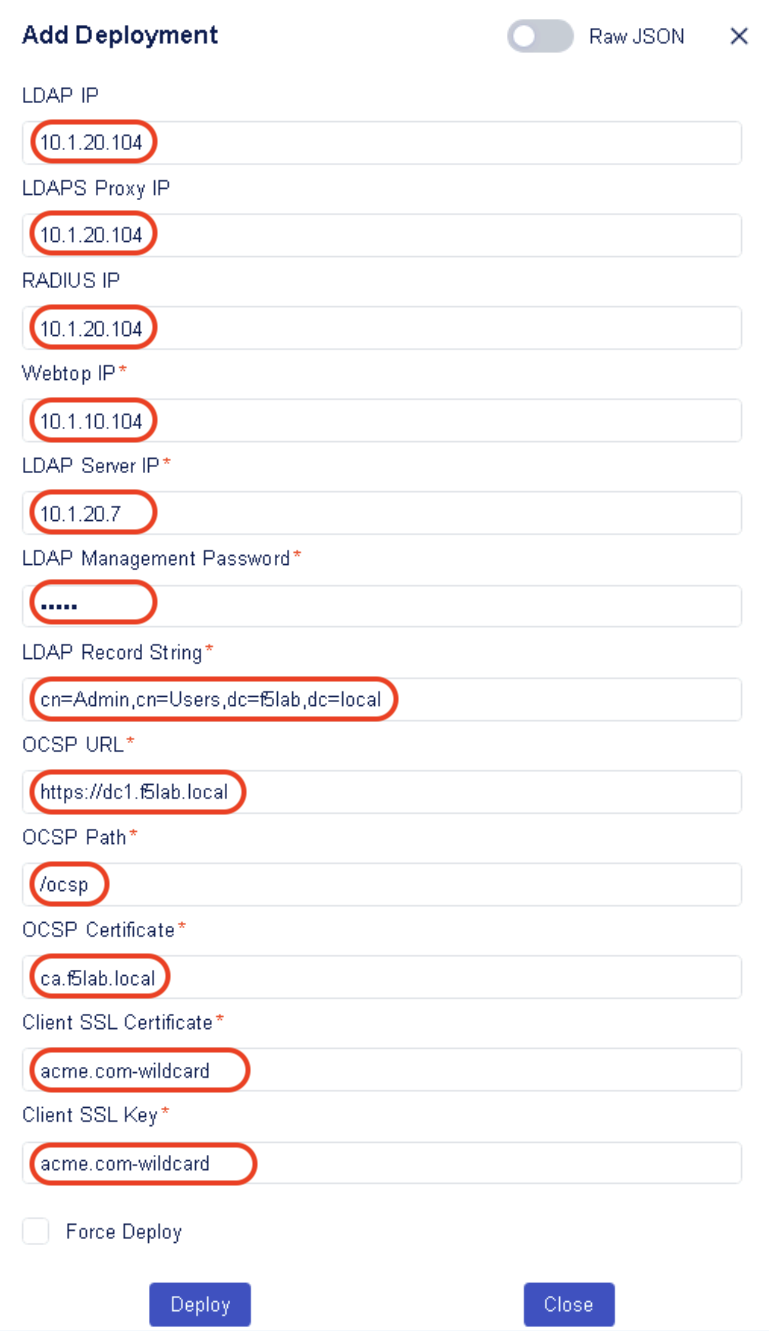
Task 2 - Enter Deployment details
- When the PUA (SmartCard) playbook is selected, the editor values are updated to show the following inputs (Enter the associated values as specified below)
- Add Deployment
- LDAP IP: 10.1.20.104
- LDAPS Proxy IP: 10.1.20.104
- RADIUS IP: 10.1.20.104
- Webtop IP: 10.1.10.104
- LDAP Server IP: 10.1.20.7
- LDAP Management Password: admin
- LDAP Record String: cn=Admin,cn=Users,dc=f5lab,dc=local
- OCSP URL: https://dc1.f5lab.local
- OCSP Path: /ocsp
- OCSP Certificate: ca.f5lab.local
- Client SSL Certificate: acme.com-wildcard
- Client SSL Key: acme.com-wildcard
Note
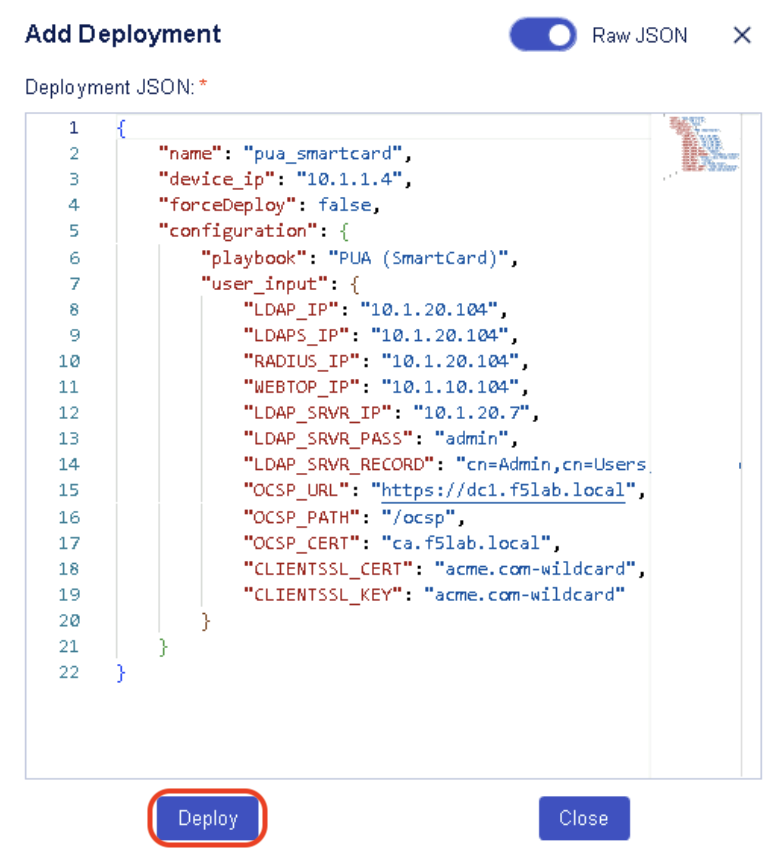
You can also switch to Raw JSON input and paste this JSON object to get the input fields populated.

{
  "name": "pua_smartcard",
  "device_ip": "10.1.1.4",
  "forceDeploy": false,
  "configuration": {
      "playbook": "PUA (SmartCard)",
      "user_input": {
          "LDAP_IP": "10.1.20.104",
          "LDAPS_IP": "10.1.20.104",
          "RADIUS_IP": "10.1.20.104",
          "WEBTOP_IP": "10.1.10.104",
          "LDAP_SRVR_IP": "10.1.20.7",
          "LDAP_SRVR_PASS": "admin",
          "LDAP_SRVR_RECORD": "cn=Admin,cn=Users,dc=f5lab,dc=local",
          "OCSP_URL": "https://dc1.f5lab.local",
          "OCSP_PATH": "/ocsp",
          "OCSP_CERT": "ca.f5lab.local",
          "CLIENTSSL_CERT": "acme.com-wildcard",
          "CLIENTSSL_KEY": "acme.com-wildcard"
      }
  }
}
Task 3 - Review Deployment details and Deploy
Review Deployment details and Click Deploy
Task 4 - Track Deployment progress
If you go back to the PUA Deploy Agent WebSSH tab in your local browser, you should see the logs generated by the deployment of the PUA (SmartCard) Playbook.
Confirm that the deployment is successful by looking for Playbook deployed successfully log.
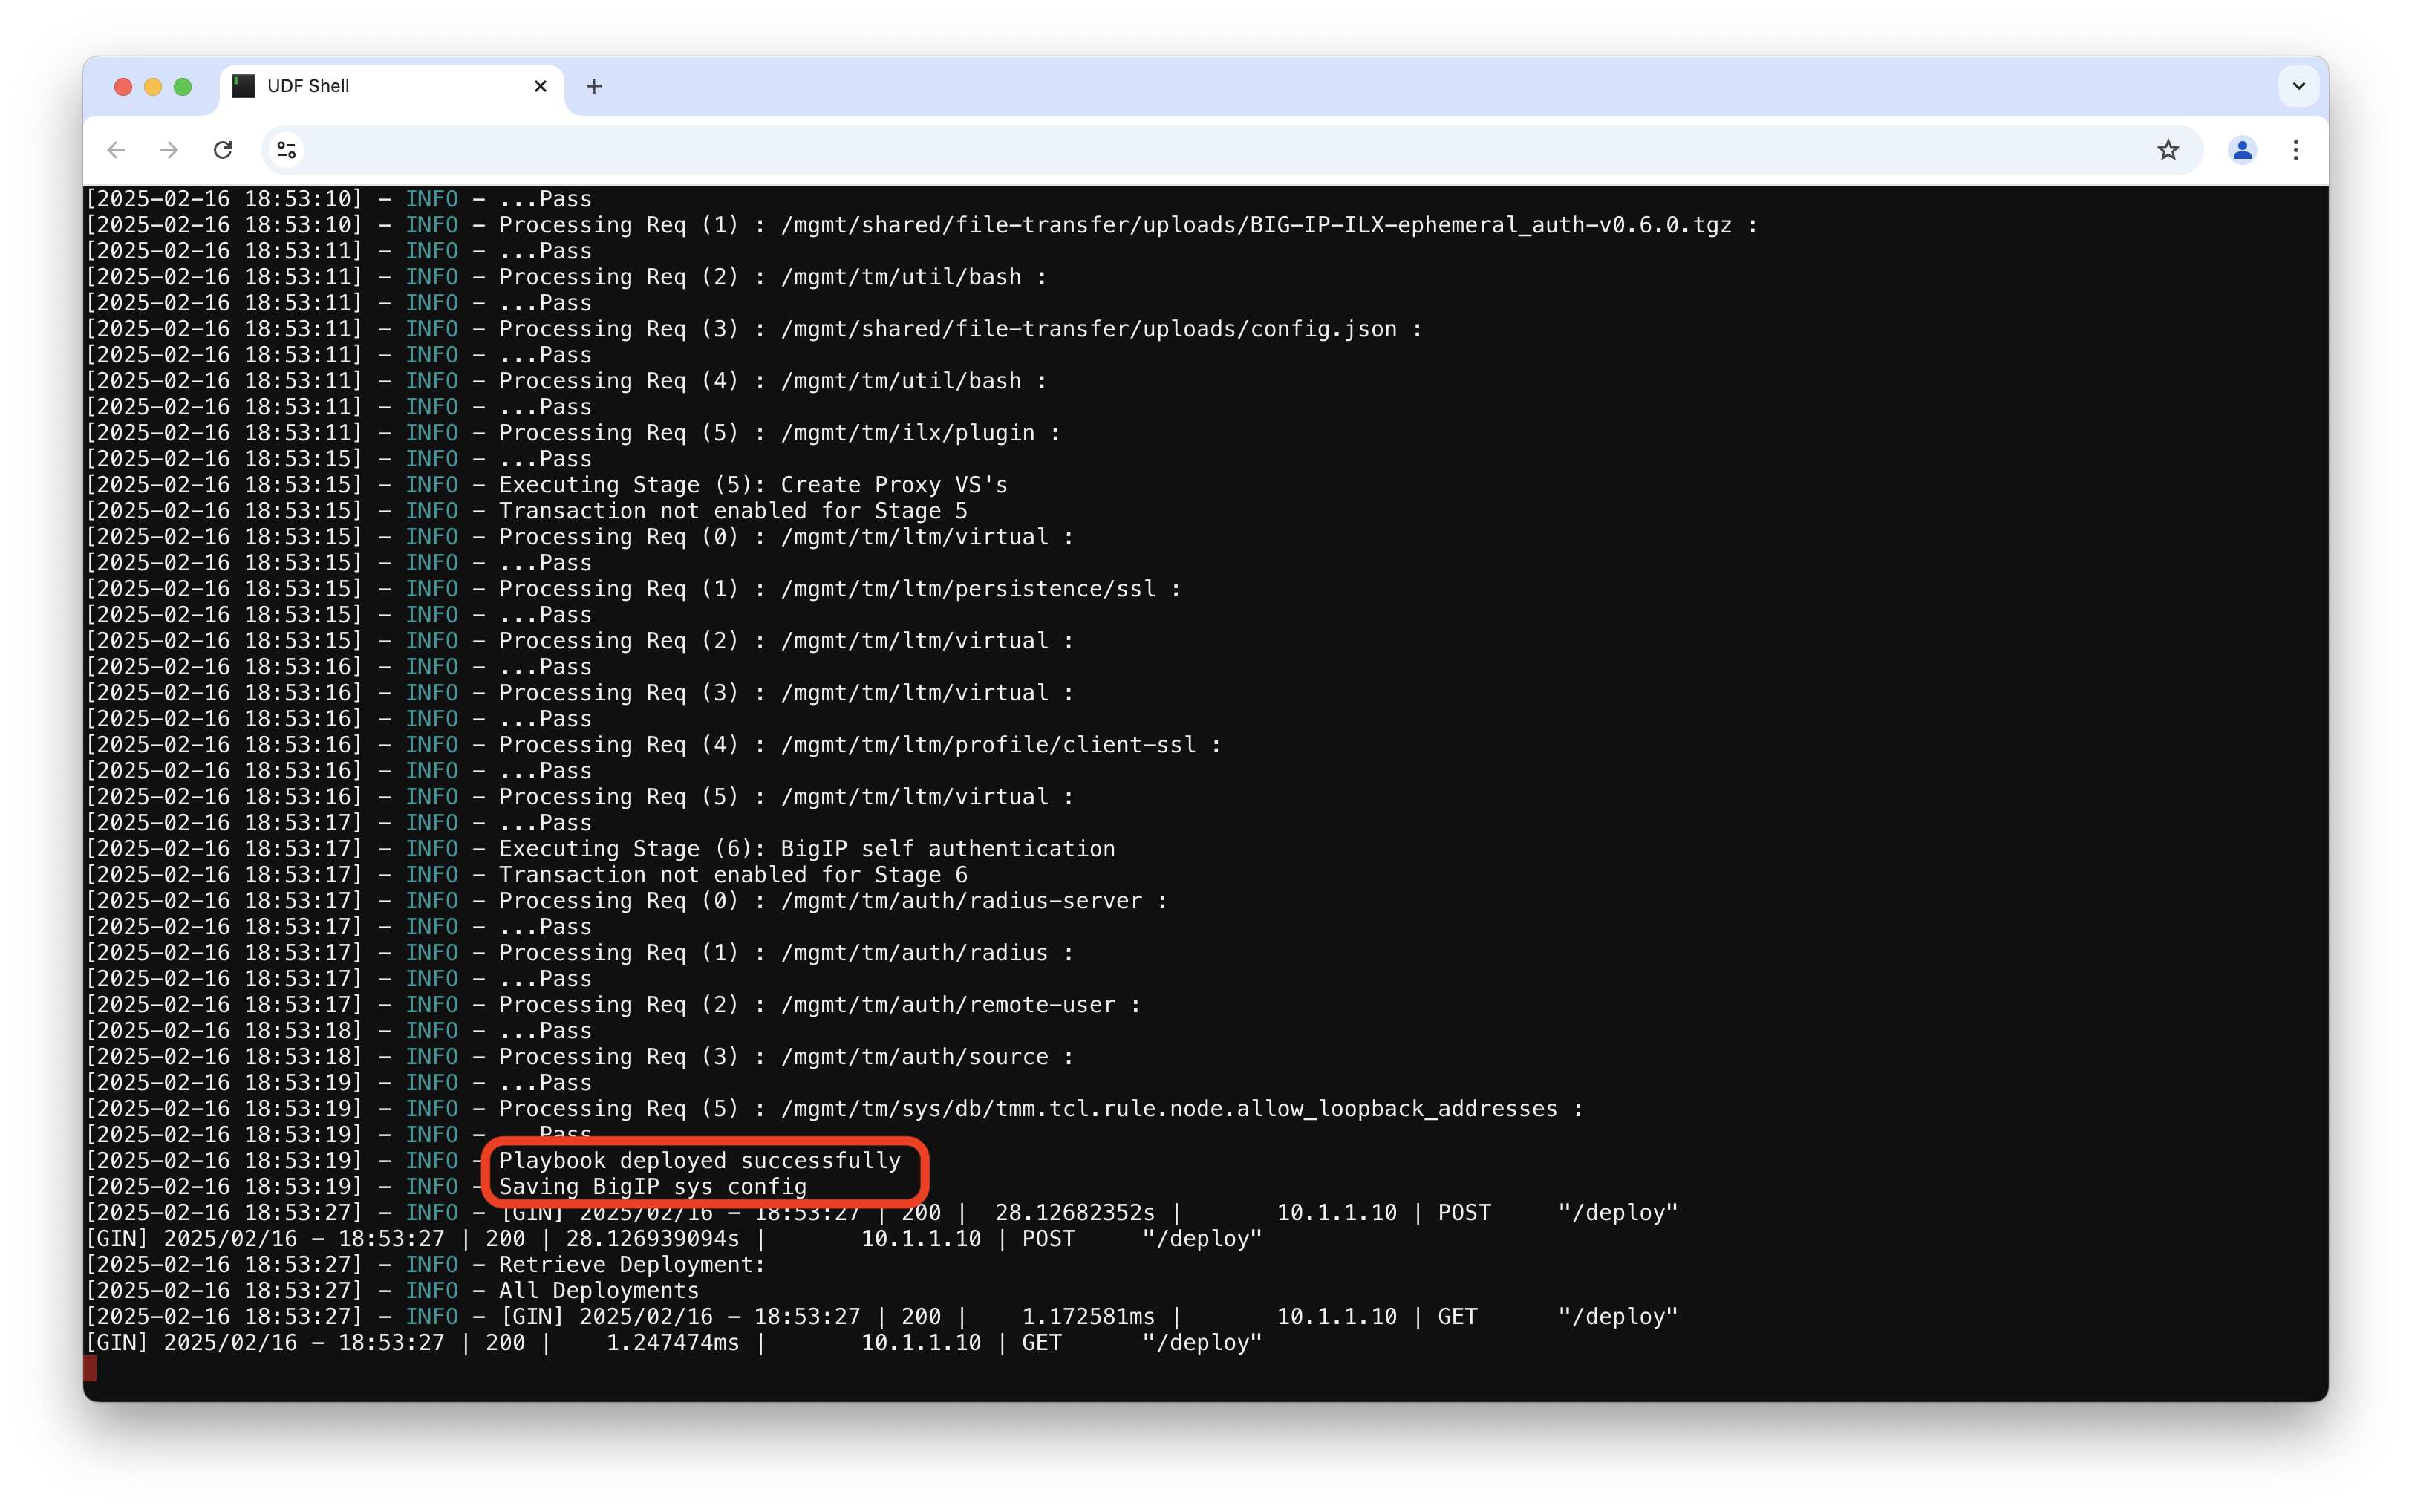
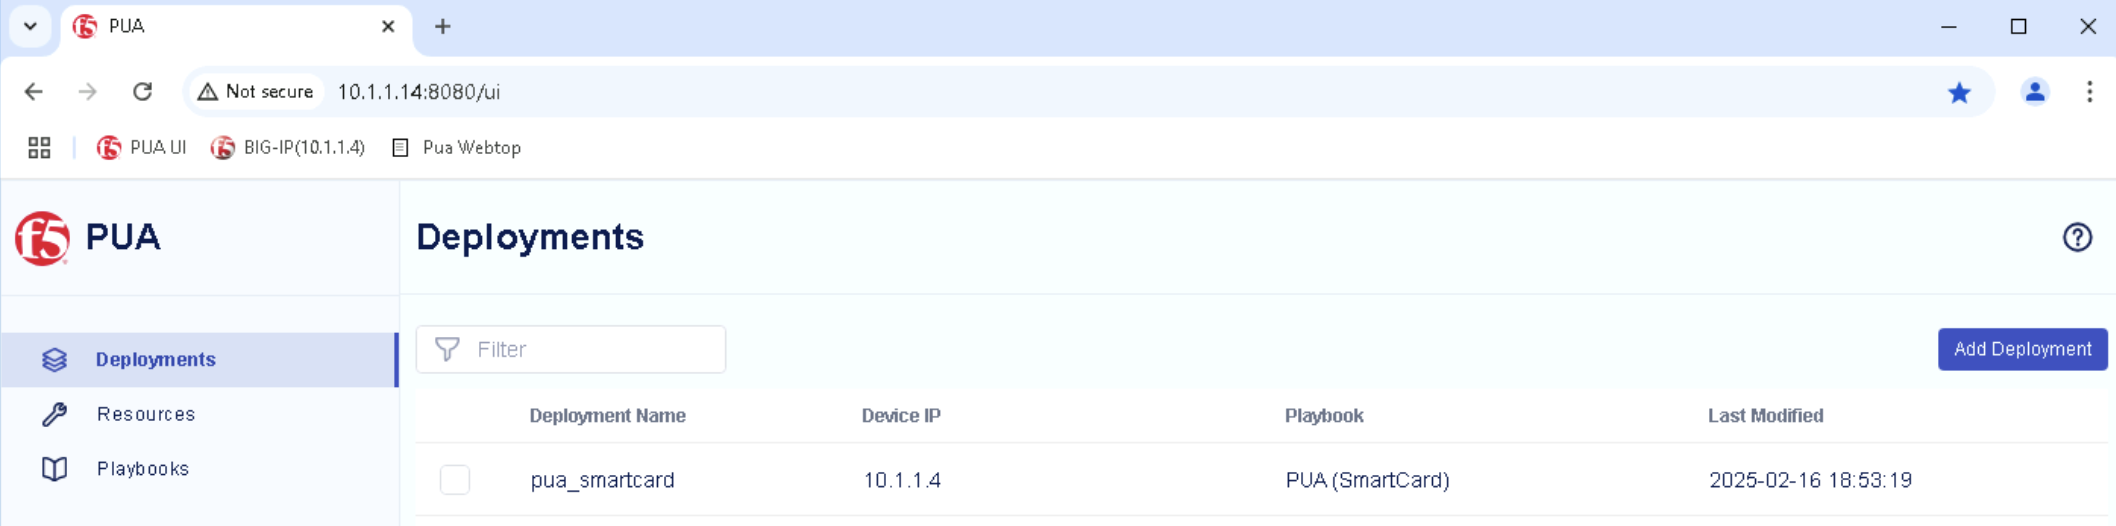
Confirm that pua_smartcard is listed in the PUA UI Deployments.
Warning
If you don’t see the Playbook deployed successfully in the logs and the pua_smartcard does not appear in PUA UI Deployments go back to Task 2 - Enter Deployment details.
Test PUA Smart Card
Task 1 - Acces PUA Webtop as user1
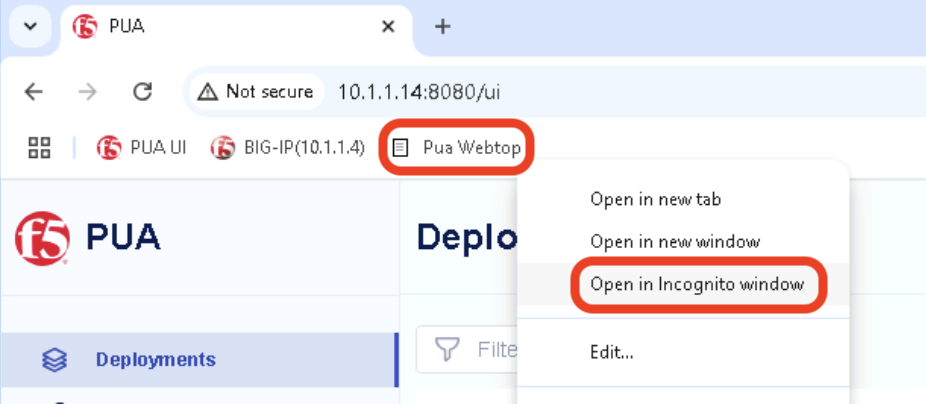
Right click on the PUA Webtop Bookmark and click on Open in Incognito window
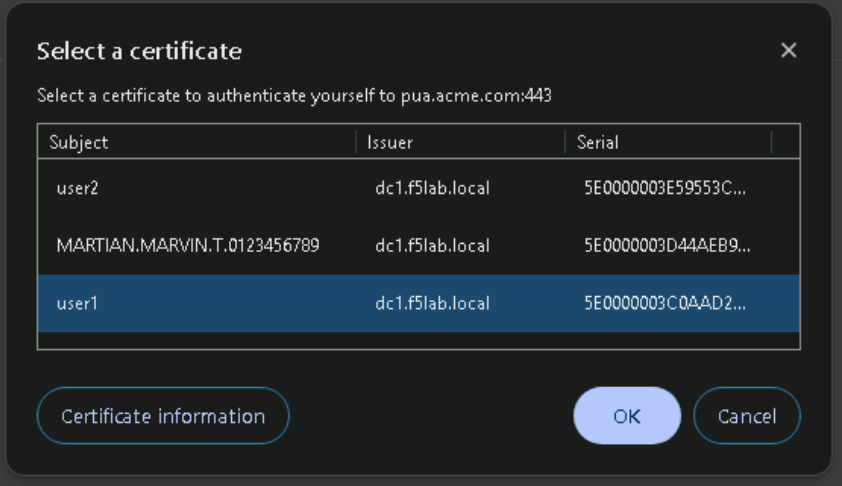
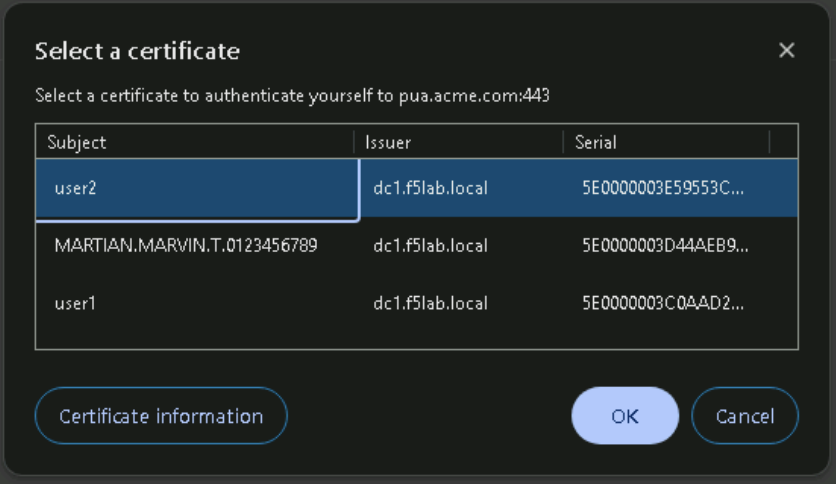
Select certificate associated with User1 in the Select a certificate dialog box and Click Ok.
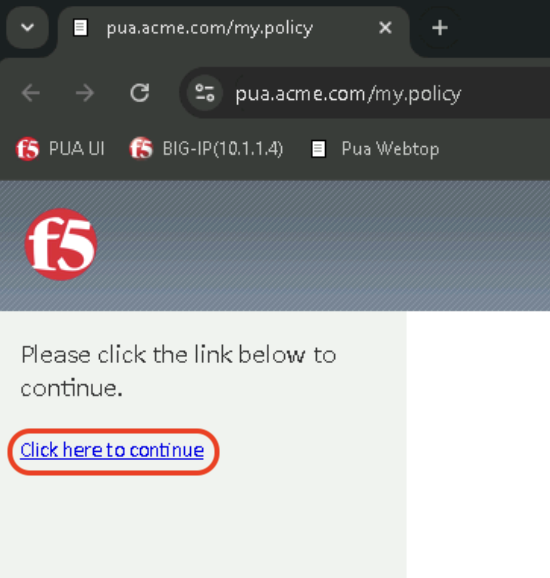
Click Click here to continue
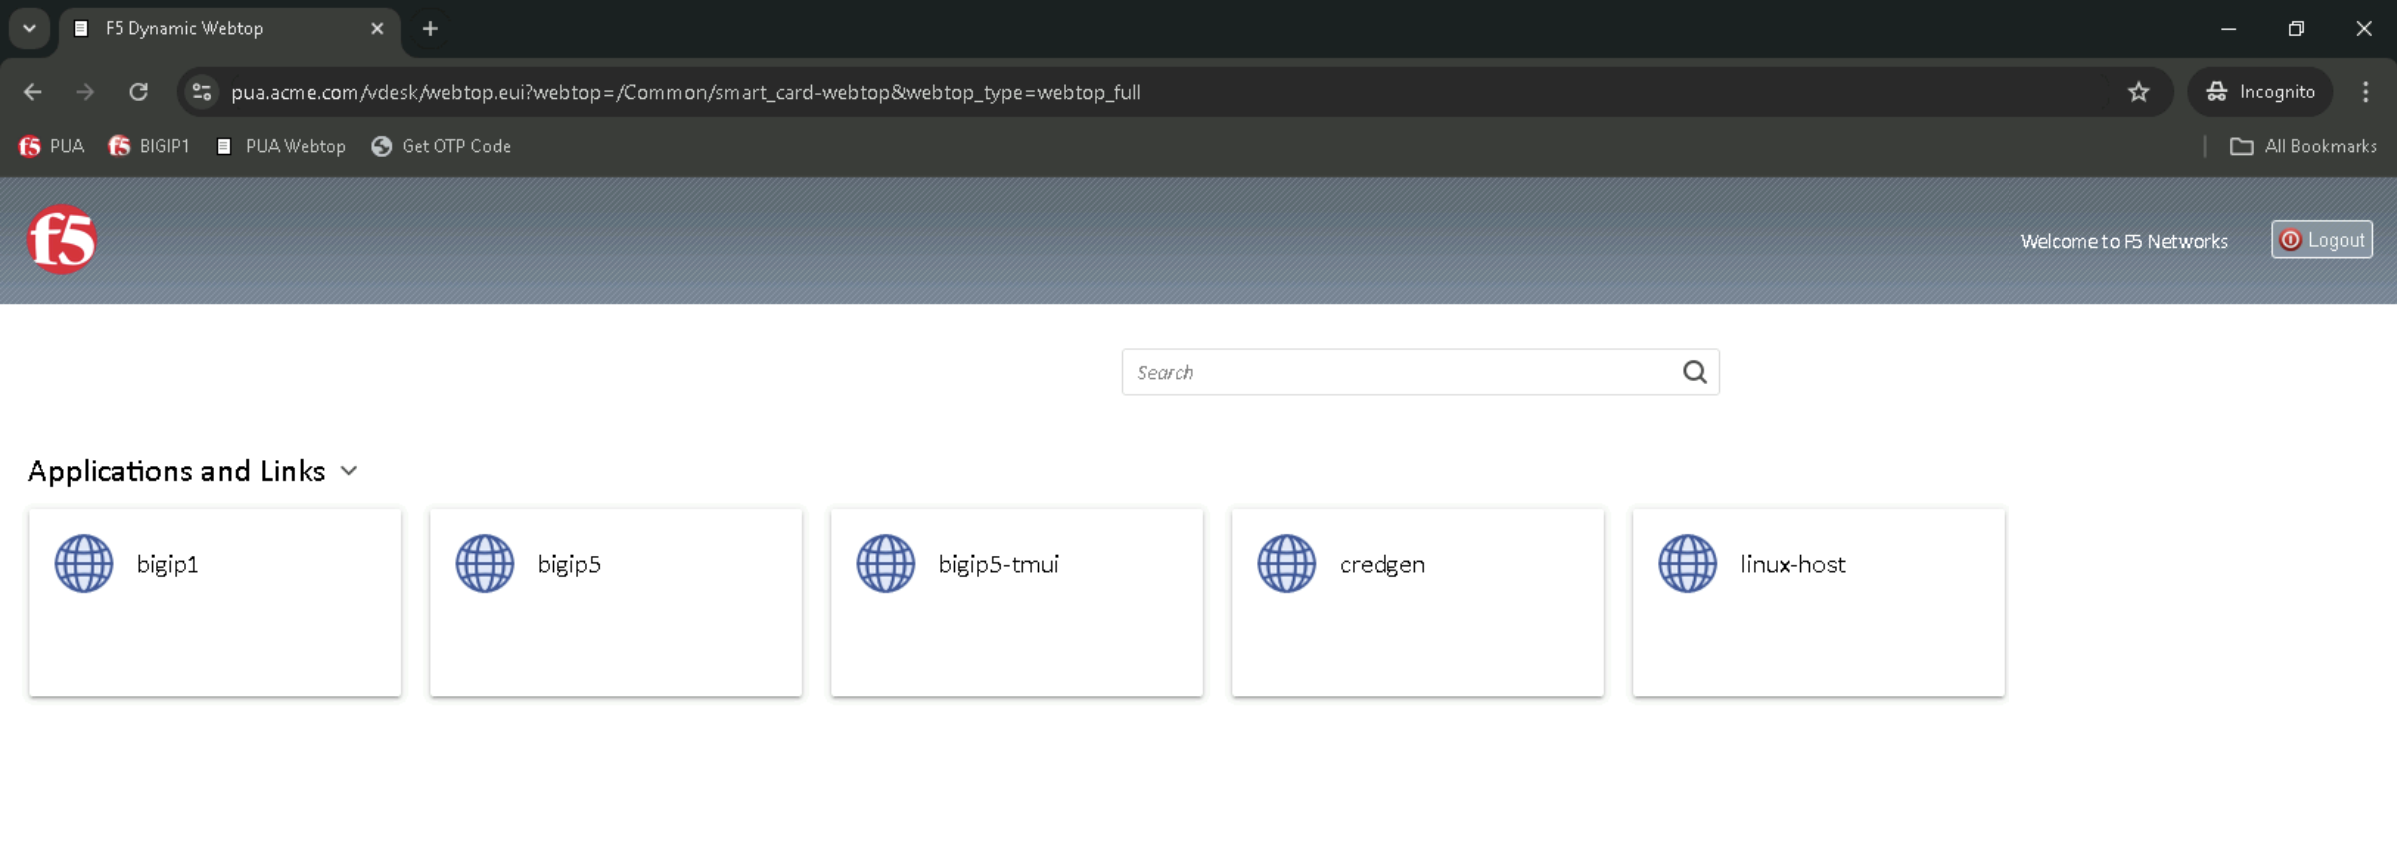
Webtop should now be available
Task 2 - Validate user1 Access
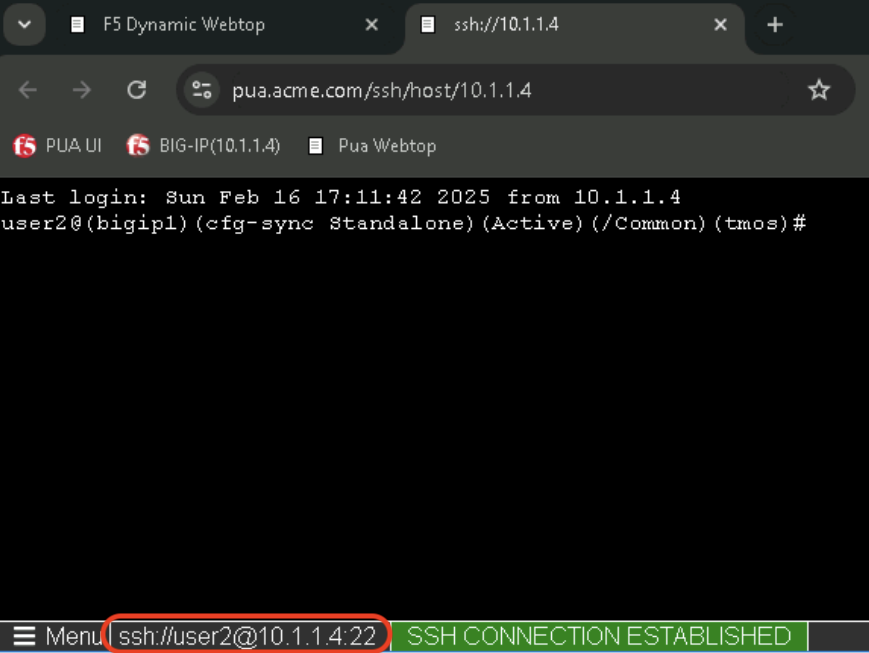
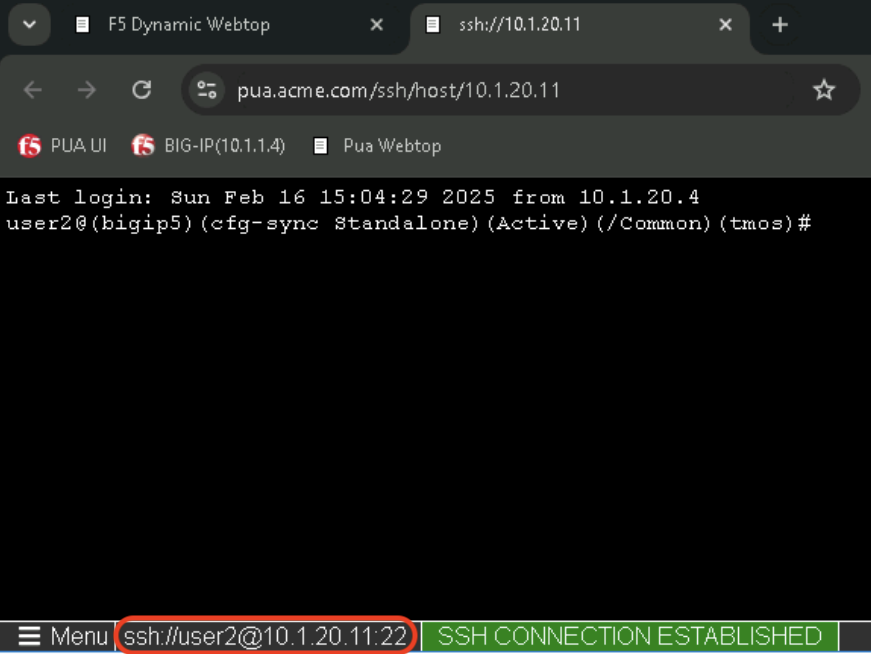
In the Applications and Links section of the Webtop
Click on bigip1 and observe the username at the bottom left corner
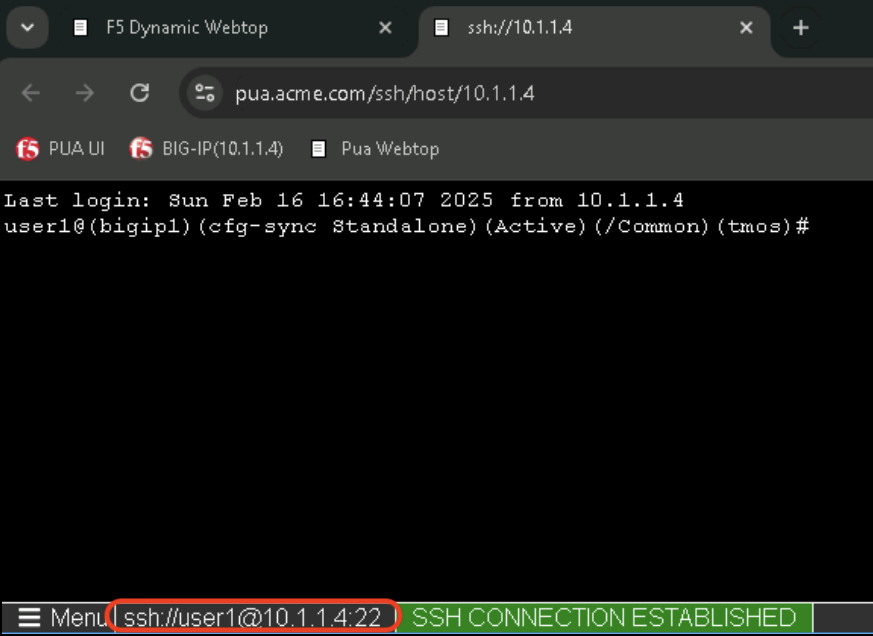
Click on bigip5 and observe the username at the bottom left corner
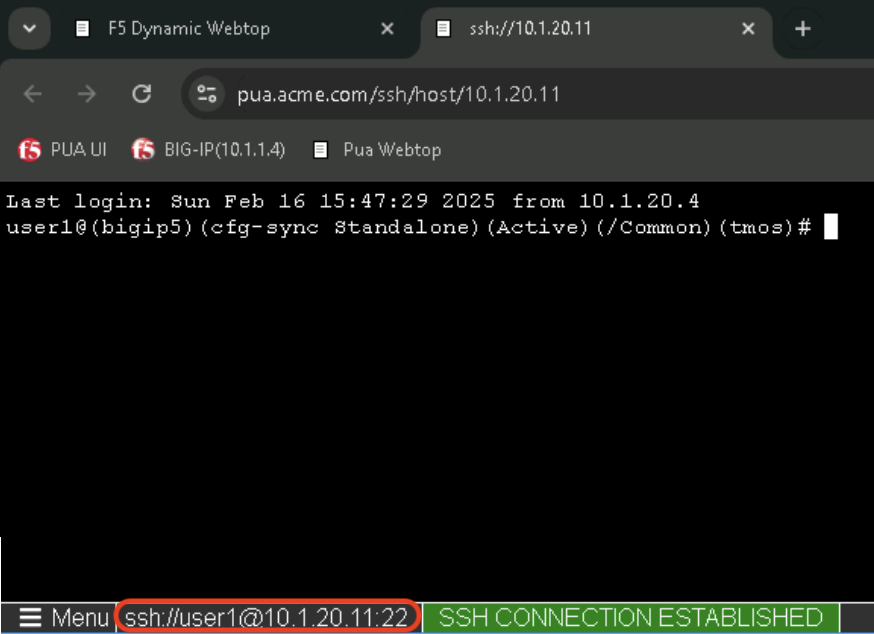
In the bigip5 tab, Confirm that user1 received the admin [All] role by typing the following command:
show auth user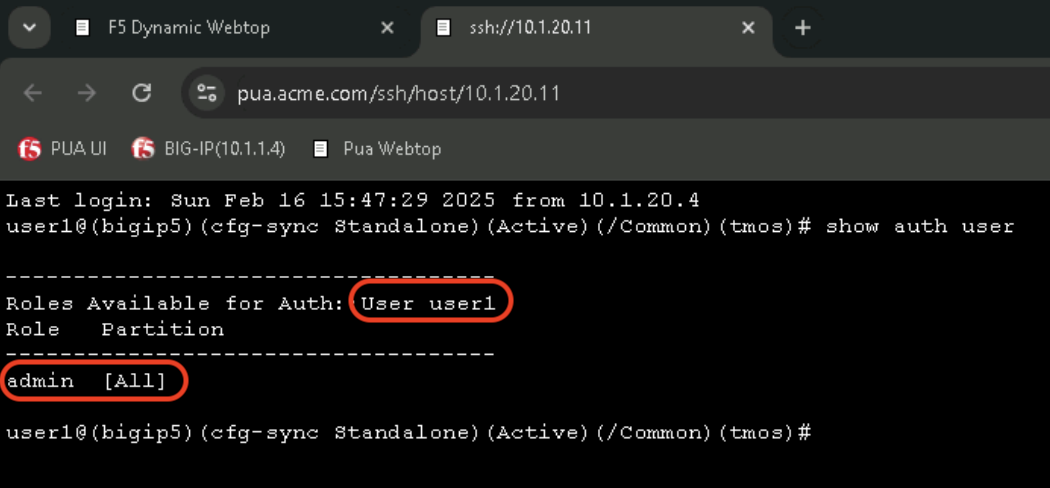
Warning
Close the Incognito window before going to the next task
Task 3 - Acces PUA Webtop as user2
Right click on the PUA Webtop Bookmark and click on Open in Incognito window
Select certificate associated with User2 in the Select a certificate dialog box and Click Ok.
Click Click here to continue
Webtop should now be available
Task 4 - Validate user2 Access
In the Applications and Links section of the Webtop
Click on bigip1 and observe the username at the bottom left corner
Click on bigip5 and observe the username at the bottom left corner
In the bigip5 tab, Confirm that user2 received the guest [All] role by typing the following command:
show auth user
Warning
Close the Incognito window before going to the next task
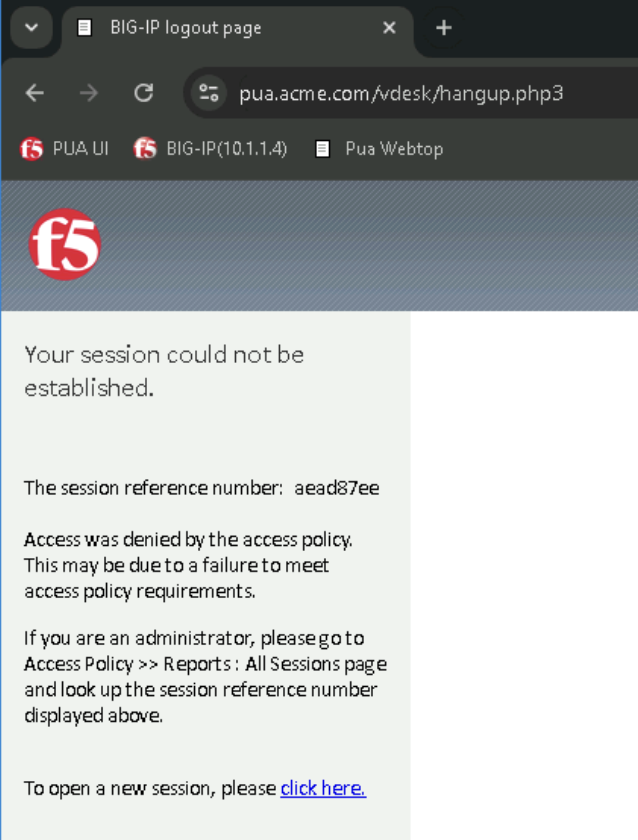
Task 5 - Acces PUA Webtop using an invalid certificate
Right click on the PUA Webtop Bookmark and click on Open in Incognito window
Select certificate associated with MARTIAN.MARVIN.T.0123456789 in the Select a certificate dialog box and Click Ok.
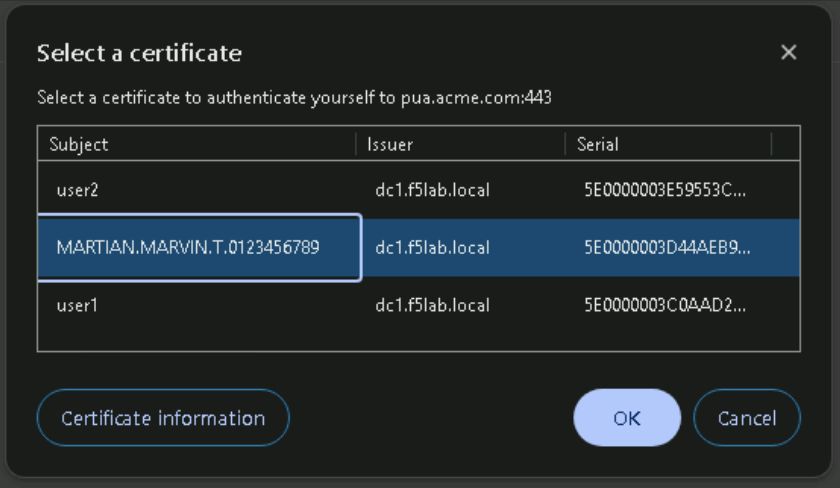
Click Click here to continue
Observe that the Webtop access has been denied when invalid certificate is provided.
Warning
Close the Incognito window before going to the next task
Optional Tasks
Task 1 - Access PUA Webtop as user1
Right click on the PUA Webtop Bookmark and click on Open in Incognito window
Select certificate associated with User1 in the Select a certificate dialog box and Click Ok.
Click Click here to continue
Webtop should now be available
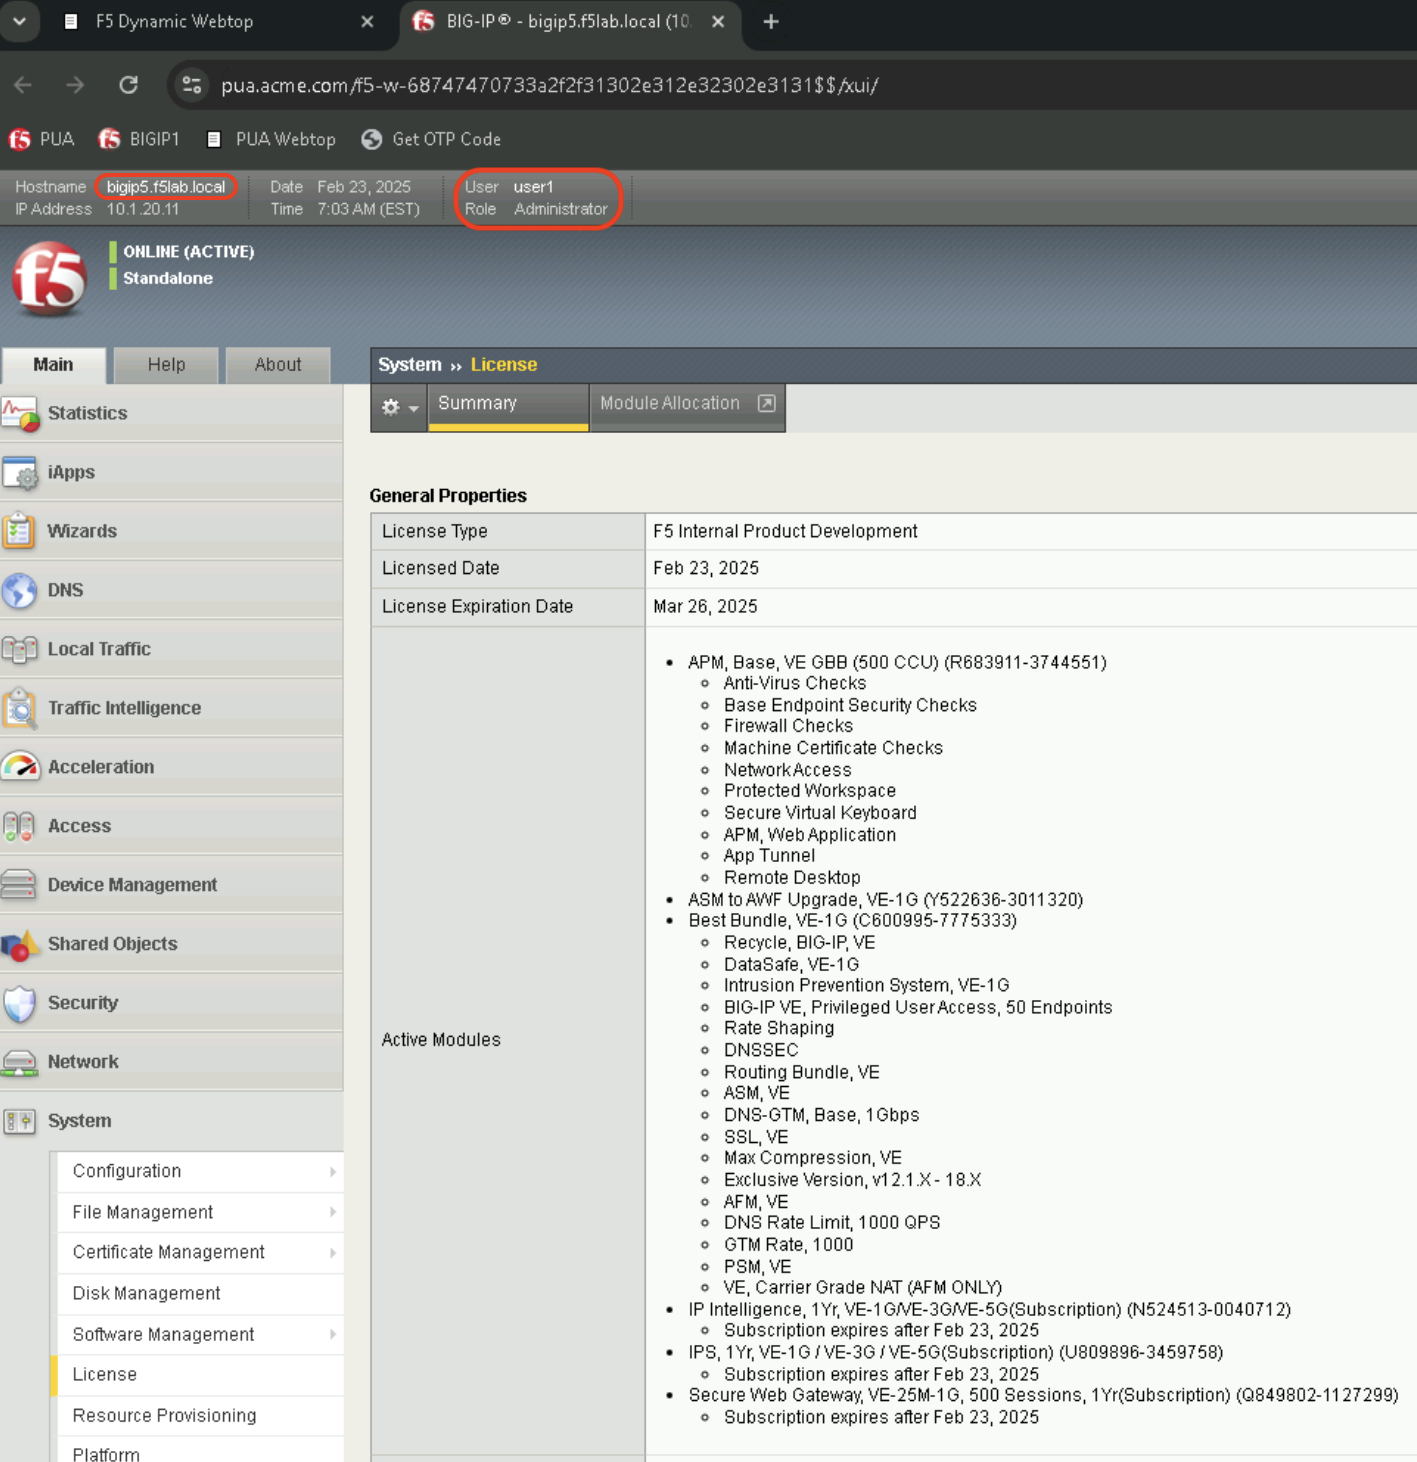
Task 2 - Validate user1 Access to BIG-IP 5 TMUI
In the Applications and Links section of the Webtop
Click on bigip5-tmui and observe at the top of the newly open browser tab that your are connected to the bigip5.f5lab.local as user1 with the Administrator role.
Task 3 - Validate user1 Access to a Linux Host
In the Applications and Links section of the Webtop
- Click on linux-host and observe the username at the bottom left corner
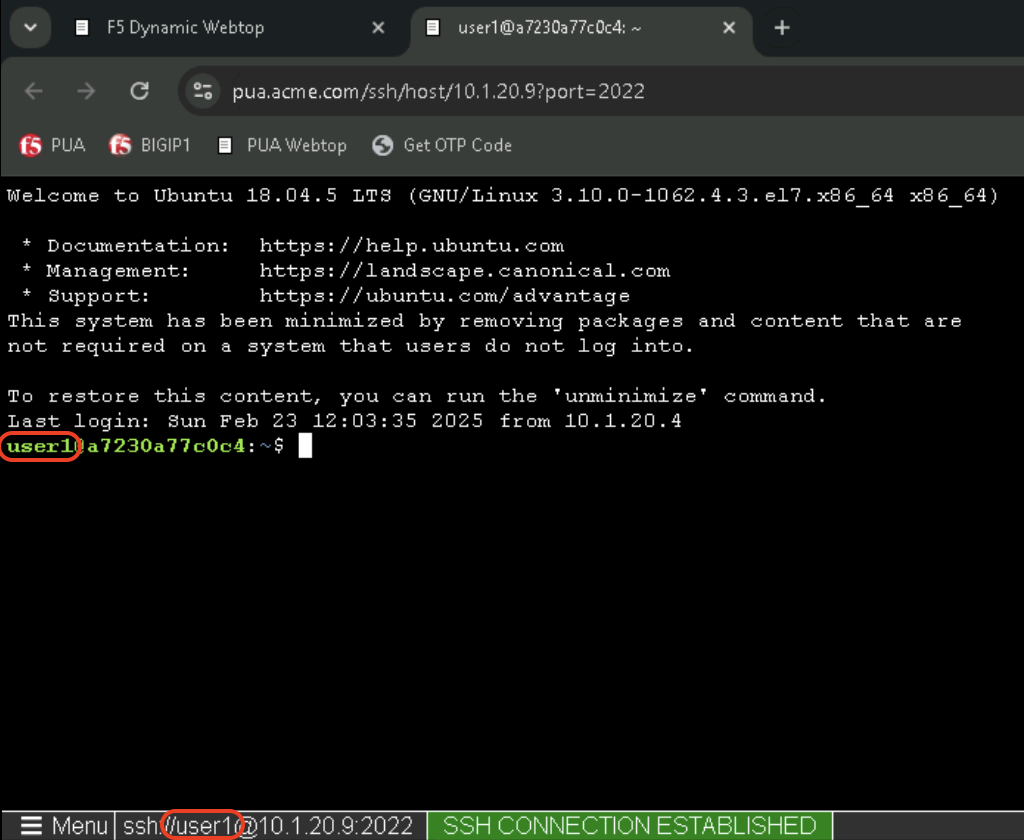
In the linux-host tab, elevate access to root by typing the following command:
sudo -i
Click on Menu at the bottom left of the screen and select Credentials when prompted with [sudo] password for user1:
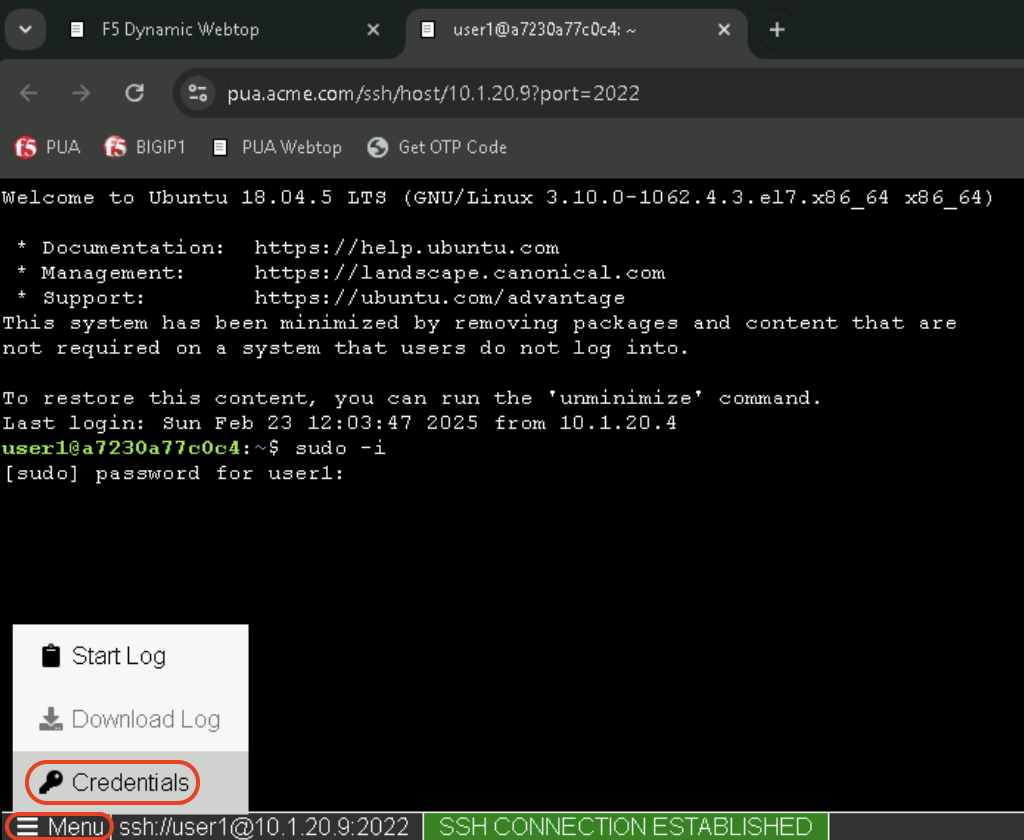
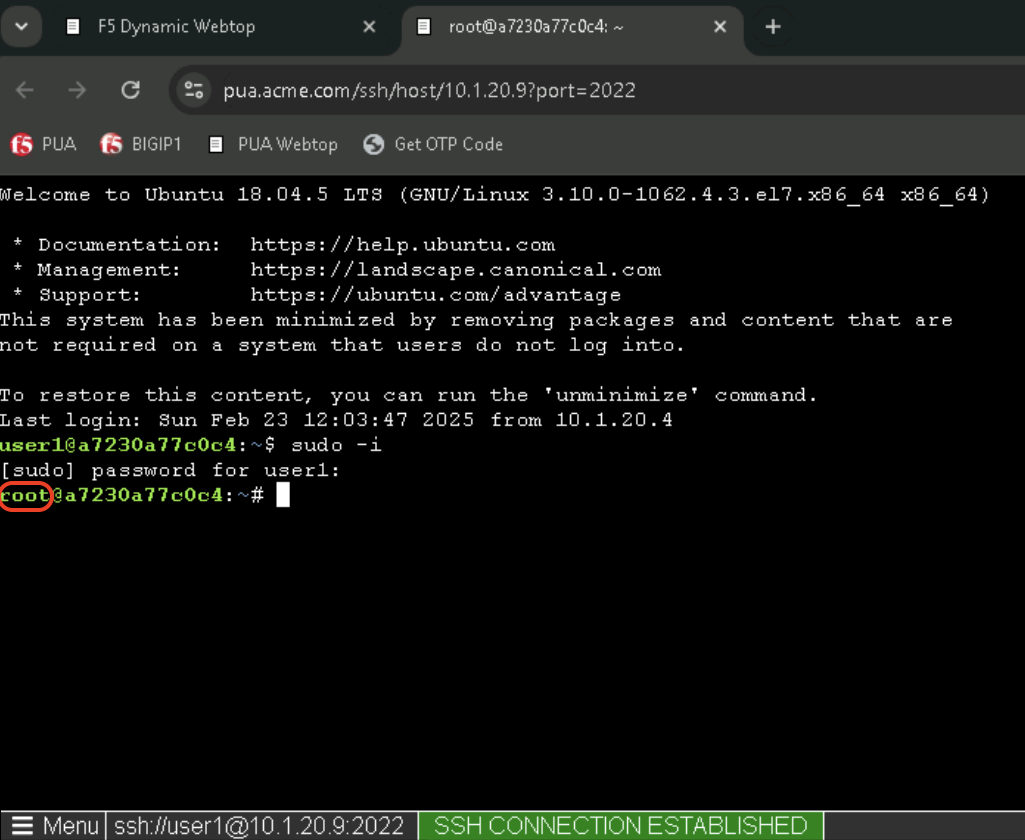
This will automatically type the ephemeral password for user1 and the linux prompt should now display root
Warning
You successfully completed this lab Close the Incognito window before going to the next lab.