OpenShift 4.8 and F5 BIG-IP Container Ingress Services (CIS) User-Guide for Cluster BIG-IP using OVN-Kubernetes Advanced Networking
Note
OVN-Kubernetes hybrid overlay iCNIv1 feature has been removed from Openshift v4.13+, hence we recommend using OVN-Kubernetes with static routes. For more information, see OVN hybridOverlay ICNIv1 feature on Openshift.
This user guide documents OpenShift 4.8 integration of CIS and Cluster BIG-IP using OVN-Kubernetes advanced networking. This user guide provides the configuration for a Cluster BIG-IP with the OVN-Kubernetes hybrid overlay feature(VxLAN). OVN-Kubernetes hybrid overlay uses the GENEVE protocol for EAST/WEST traffic within the OpenShift Cluster and VxLAN tunnels to network BIG-IP devices.
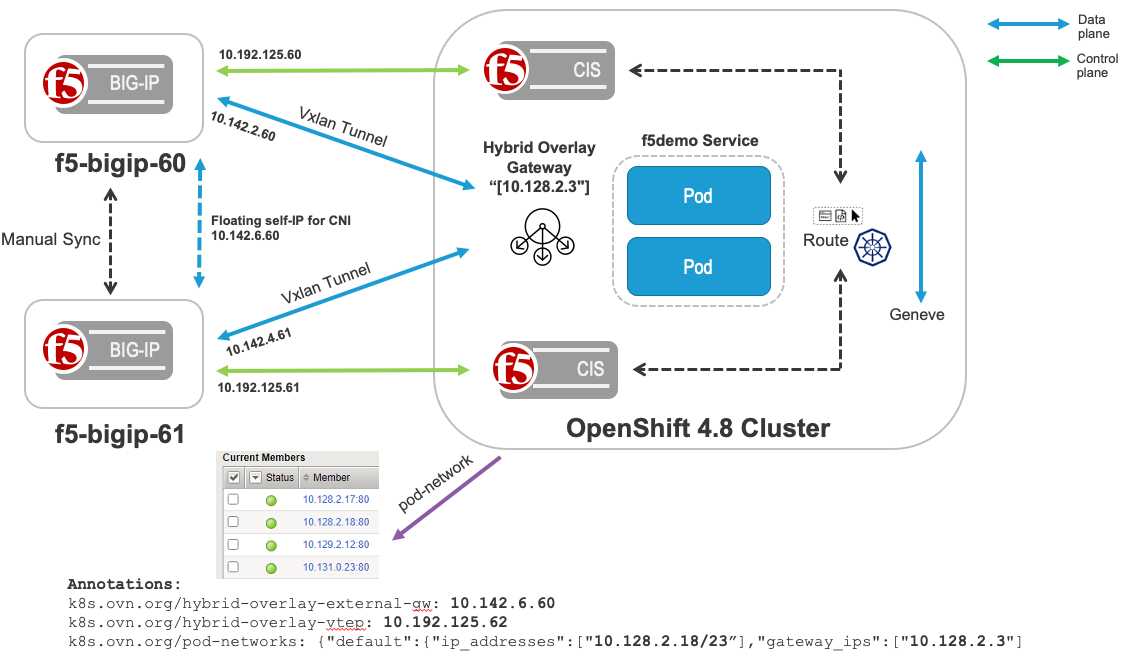
Configuration Steps
You can watch a demonstration of these steps in this video:
RedHat documents the installation of OVN-K8S advanced networking in the specifying advanced network configuration sections of the install process. Based on the following note from RedHat, its very important to follow the installation of OVN-Kubernetes Hybrid Overlay Feature when installing OpenShift. Modification, migration cannot be applied once OpenShift is already installed.

Prerequisites
You have created the install-config.yaml file with the required modifications. When creating the install-config.yaml, change the default networkType: OpenShiftSDN to networkType: OVNKubernetes.
Step 1: Create install-config.yaml
Create install-config.yaml:
# ./openshift-install create install-config --dir=ipi
? Platform vsphere
? vCenter vcsa7-pme.f5demo.com
? Username administrator@f5demo.com
? Password [? for help] *********
INFO Connecting to vCenter vcsa7-pme.f5demo.com
? Datacenter PME-LAB
? Cluster OCP-PM
? Default Datastore datastore1 (3)
? Network VM Network
? Virtual IP Address for API 10.192.125.101
? Virtual IP Address for Ingress 10.192.125.102
? Base Domain f5demo.com
? Cluster Name ocp-pm
? Pull Secret [? for help] ......
INFO Install-Config created in: ipi
1 2 3 4 5 6 7 8 9 10 11 12 13 14 15 16 17 18 19 20 21 22 23 24 25 26 27 28 29 30 31 32 33 34 35 36 37 38 39 40 41 | # cat install-config.yaml apiVersion: v1 baseDomain: f5demo.com compute: - architecture: amd64 hyperthreading: Enabled name: worker platform: {} replicas: 3 controlPlane: architecture: amd64 hyperthreading: Enabled name: master platform: {} replicas: 3 metadata: creationTimestamp: null name: ocp-pm networking: clusterNetwork: - cidr: 10.128.0.0/14 hostPrefix: 23 machineNetwork: - cidr: 10.0.0.0/16 networkType: OVNKubernetes serviceNetwork: - 172.30.0.0/16 platform: vsphere: apiVIP: 10.192.125.101 cluster: OCP-PM datacenter: PME-LAB defaultDatastore: datastore1 (3) ingressVIP: 10.192.125.102 network: VM Network password: secret username: administrator@f5demo.com vCenter: vcsa7-pme.f5demo.com publish: External pullSecret: removed # |
Step 2: Create manifests
# ./openshift-install create manifests --dir=ipi
INFO Consuming Install Config from target directory
INFO Manifests created in: ipi/manifests and ipi/openshift

# ls
04-openshift-machine-config-operator.yaml  cluster-infrastructure-02-config.yml  cluster-proxy-01-config.yaml     kube-system-configmap-root-ca.yaml
cloud-provider-config.yaml                 cluster-ingress-02-config.yml         cluster-scheduler-02-config.yml  machine-config-server-tls-secret.yaml
cluster-config.yaml                        cluster-network-01-crd.yml            cvo-overrides.yaml               openshift-config-secret-pull-secret.yaml
cluster-dns-02-config.yml                  cluster-network-02-config.yml         kube-cloud-config.yaml           openshift-kubevirt-infra-namespace.yaml
Step 3: Copy cluster-network-03-config.yaml to manifests directory
See also
RedHat documentation for Configuring hybrid networking with OVN-Kubernetes
Create a stub manifest file for the advanced network configuration that is named cluster-network-03-config.yml in the <installation_directory>/manifests/ directory. The defaultNetwork: hybridOverlayConfig: {} is required.
# cat cluster-network-03-config.yaml
apiVersion: operator.openshift.io/v1
kind: Network
metadata:
  name: cluster
spec:
  clusterNetwork:
  - cidr: 10.128.0.0/14
    hostPrefix: 23
  serviceNetwork:
  - 172.30.0.0/16
  defaultNetwork:
    ovnKubernetesConfig:
      hybridOverlayConfig: {}
    type: OVNKubernetes

# cp cluster-network-03-config.yaml /openshift/ipi/manifests/
1 2 3 4 5 6 7 8 9 10 11 12 13 14 | apiVersion: operator.openshift.io/v1 kind: Network metadata: name: cluster spec: clusterNetwork: - cidr: 10.128.0.0/14 hostPrefix: 23 serviceNetwork: - 172.30.0.0/16 defaultNetwork: ovnKubernetesConfig: hybridOverlayConfig: {} type: OVNKubernetes |
Step 4: Create Cluster
Create the OpenShift cluster:
# ./openshift-install create cluster --dir=ipi
INFO Consuming Worker Machines from target directory
INFO Consuming OpenShift Install (Manifests) from target directory
INFO Consuming Openshift Manifests from target directory
INFO Consuming Master Machines from target directory
INFO Consuming Common Manifests from target directory
INFO Creating infrastructure resources...
INFO Waiting up to 20m0s for the Kubernetes API at https://api.ocp-pm.f5demo.com:6443...
INFO API v1.21.1+8268f88 up
INFO Waiting up to 30m0s for bootstrapping to complete...
INFO Destroying the bootstrap resources...
INFO Waiting up to 40m0s for the cluster at https://api.ocp-pm.f5demo.com:6443 to initialize...
INFO Waiting up to 10m0s for the openshift-console route to be created...
INFO Install complete!
INFO To access the cluster as the system:admin user when using 'oc', run 'export KUBECONFIG=/openshift/ipi/auth/kubeconfig'
INFO Access the OpenShift web-console here: https://console-openshift-console.apps.ocp-pm.f5demo.com
INFO Login to the console with user: "kubeadmin", and password: "secret"
INFO Time elapsed: 26m50s
#
Step 5: Validate
Validate defaultNetwork: hybridOverlayConfig was configured correctly during OpenShift installation:
# oc --kubeconfig /openshift/ipi/auth/kubeconfig get networks.operator.openshift.io cluster -o yaml
apiVersion: operator.openshift.io/v1
kind: Network
metadata:
  annotations:
    networkoperator.openshift.io/ovn-cluster-initiator: 10.192.125.160
  creationTimestamp: "2021-08-03T06:50:15Z"
  generation: 53
  name: cluster
  resourceVersion: "22347"
  uid: 8942ef7d-31e7-4dde-8873-685d9231b891
spec:
  clusterNetwork:
  - cidr: 10.128.0.0/14
    hostPrefix: 23
  defaultNetwork:
    ovnKubernetesConfig:
      genevePort: 6081
      hybridOverlayConfig: {} --- Shows the correct configuration for hybrid networking
      mtu: 1400
      policyAuditConfig:
        destination: "null"
        maxFileSize: 50
        rateLimit: 20
        syslogFacility: local0
    type: OVNKubernetes
  deployKubeProxy: false
  disableMultiNetwork: false
  disableNetworkDiagnostics: false
  logLevel: Normal
  managementState: Managed
  observedConfig: null
  operatorLogLevel: Normal
  serviceNetwork:
  - 172.30.0.0/16
  unsupportedConfigOverrides: null
  useMultiNetworkPolicy: false
Create a VXLAN tunnel for OVN-Kubernetes Advanced Networking on the BIG-IP devices
Step 1: Create tunnel profile on bigip-01 and bigip-02
On the active device and manually sync:
(tmos)# create net tunnels vxlan vxlan-mp flooding-type multipoint
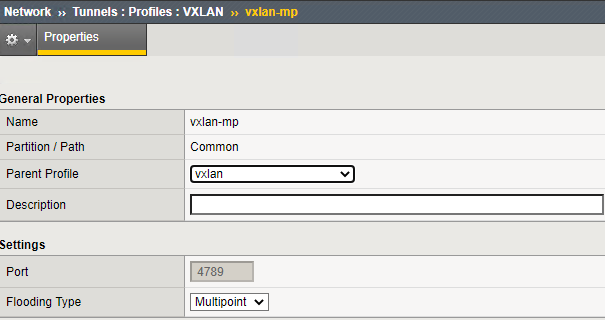
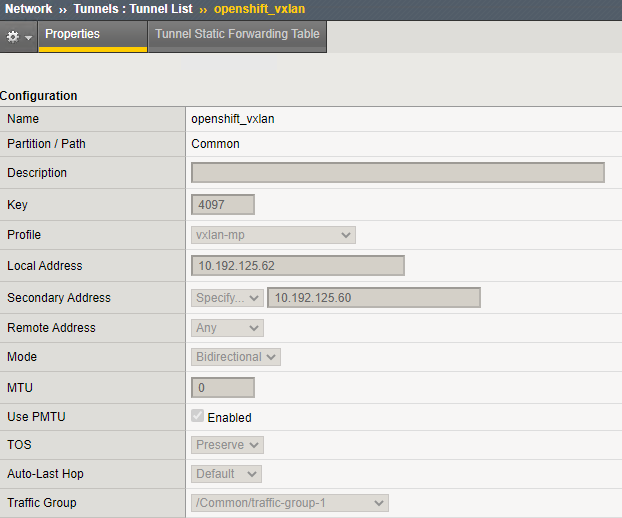
On bigip-01:
(tmos)# create net tunnels tunnel openshift_vxlan key 4097 profile vxlan-mp local-address 10.192.125.62 secondary-address 10.192.125.60 traffic-group traffic-group-1
Note
OpenShift uses 4097(VNI) for VxLAN communication.
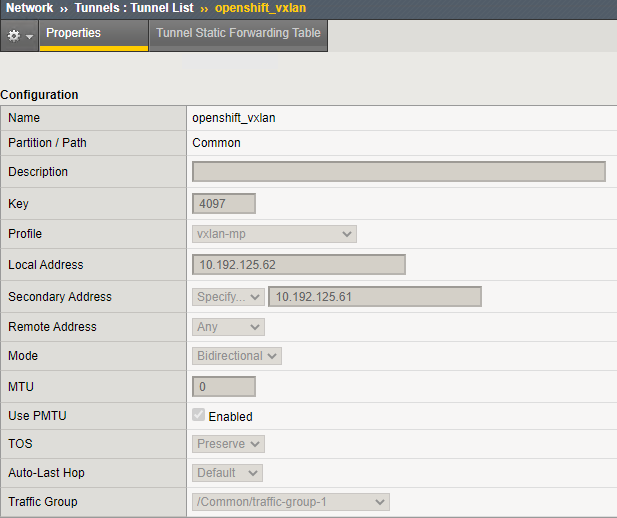
On bigip-02:
(tmos)# create net tunnels tunnel openshift_vxlan key 4097 profile vxlan-mp local-address 10.192.125.62 secondary-address 10.192.125.61 traffic-group traffic-group-1
Note
OpenShift uses 4097(VNI) for VxLAN communication.
Step 2: Create Self IP for CNI IP Addresses on the BIG-IP devices
On bigip-01:
(tmos)# create net self 10.142.2.60/12 allow-service all vlan openshift_vxlan
Note
Use the self IP range (10.142.2.60/12) which supernets the OpenShift cluster network (i.e. 10.128.0.0/14) to differentiate the VxLAN and GENEVE communication.
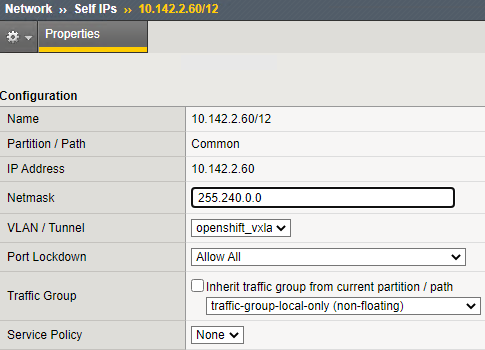
On bigip-02:
(tmos)# create net self 10.142.4.61/12 allow-service all vlan openshift_vxlan
Note
Use the self IP range (10.142.4.61/12) which supernets the OpenShift cluster network (i.e. 10.128.0.0/14) to differentiate the VxLAN and GENEVE communication.
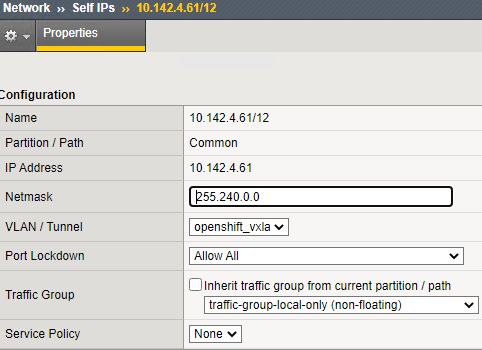
Diagram of all the BIG-IP self IP addresses on the BIG-IP devices.
Step 3: Create floating Self IP for CNI IP Addresses on the BIG-IP devices
active device and manually sync:
On the active device, create a floating IP in the network which supernets the OpenShift cluster network. Make sure to specify a floating traffic group (traffic-group-1).
(tmos)# create net self 10.142.6.60/12 allow-service all traffic-group traffic-group-1 vlan openshift_vxlan
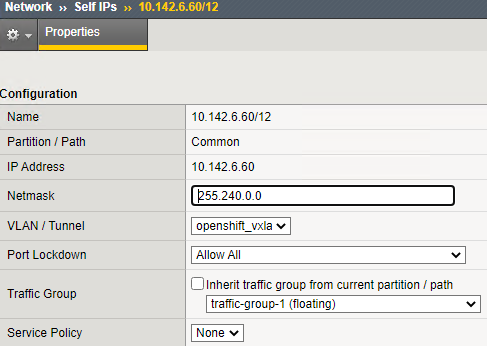
Diagram of selp IP addresses on the BIG-IP devices.
On bigip-01

On bigip-02

Create a partition on BIG-IP for CIS to manage
(tmos)# create auth partition OpenShift
Note
This needs to match the partition in the controller configuration created by the CIS Operator.
Create CIS Controller, BIG-IP credentials, and RBAC Authentication
Since CIS is using the AS3 declarative API, you need the AS3 extension installed on BIG-IP. Follow the link to install AS3.
Create f5-bigip-deployment manifests for both BIG-IP devices:
# oc create secret generic bigip-login --namespace kube-system --from-literal=username=admin --from-literal=password=<secret>
# oc create serviceaccount bigip-ctlr -n kube-system
# oc create -f f5-openshift-clusterrole.yaml
# oc create -f f5-bigip-01-deployment.yaml
# oc create -f f5-bigip-02-deployment.yaml
# oc adm policy add-cluster-role-to-user cluster-admin -z bigip-ctlr -n kube-system
Validate that both CIS POD are running. You can use the OpenShift dashboard to view the deployments.

Add OVN-Kubernetes advanced networking CNI specific annotations
You need to add OVN-Kubernetes advanced networking CNI specific annotations to all namespace that CIS is monitoring and configuring on BIG-IP. This user guide uses the namespace default.
apiVersion: v1
kind: Namespace
metadata:
  name: default
  annotations:
    k8s.ovn.org/hybrid-overlay-external-gw: 10.142.6.60 #self ip of Vxlan tunnel
    k8s.ovn.org/hybrid-overlay-vtep: 10.192.125.62 #BIG-IP interface address rotatable to the OpenShift nodes
# oc apply -f ocp-exgw.yaml
1 2 3 4 5 6 7 | apiVersion: v1 kind: Namespace metadata: name: default annotations: k8s.ovn.org/hybrid-overlay-external-gw: 10.142.6.60 #self ip of Vxlan tunnel k8s.ovn.org/hybrid-overlay-vtep: 10.192.125.62 #BIG-IP interface address rotatable to the OpenShift nodes |
Installing the Demo App in OpenShift and validate the OVN-Kubernetes advanced networking annotations
Deploy demo app in OpenShift:
# oc create -f demo-app/Validate deployed demo apps in OpenShift:
# oc get pod
NAME                      READY   STATUS    RESTARTS   AGE
f5-demo-9498f95fc-5fnj5   1/1     Running   0          34s
f5-demo-9498f95fc-62g4l   1/1     Running   0          34s
f5-demo-9498f95fc-qdl8b   1/1     Running   0          34s
f5-demo-9498f95fc-zswjd   1/1     Running   0          34s
Validate OVN-Kubernetes advanced networking annotations applied to the deployed application pod. As you can see below, the deployed pod has added annotations for k8s.ovn.org/hybrid-overlay-external-gw: 10.142.2.60 using the BIG-IP vtep k8s.ovn.org/hybrid-overlay-vtep: 10.192.125.60.
[root@ocp-installer openshift]# oc describe pod f5-demo-9498f95fc-5fnj5
Name:         f5-demo-9498f95fc-5fnj5
Namespace:    default
Priority:     0
Node:         ocp-pm-2zxp2-worker-9bn9s/10.192.125.165
Start Time:   Tue, 03 Aug 2021 00:27:45 -0700
Labels:       app=f5-demo
              pod-template-hash=9498f95fc
Annotations:  k8s.ovn.org/hybrid-overlay-external-gw: 10.142.6.60
              k8s.ovn.org/hybrid-overlay-vtep: 10.192.125.62
              k8s.ovn.org/pod-networks:
                {"default":{"ip_addresses":["10.128.2.18/23"],"mac_address":"0a:58:0a:80:02:12","gateway_ips":["10.128.2.3"],"routes":[{"dest":"10.128.0.0...
              k8s.v1.cni.cncf.io/network-status:
                [{
                    "name": "ovn-kubernetes",
                    "interface": "eth0",
                    "ips": [
                        "10.128.2.18"
                    ],
                    "mac": "0a:58:0a:80:02:12",
                    "default": true,
                    "dns": {}
                }]
              k8s.v1.cni.cncf.io/networks-status:
                [{
                    "name": "ovn-kubernetes",
                    "interface": "eth0",
                    "ips": [
                        "10.128.2.18"
                    ],
                    "mac": "0a:58:0a:80:02:12",
                    "default": true,
                    "dns": {}
                }]
Status:       Running
IP:           10.128.2.18
Create Route for Ingress traffic to Demo App
Create a basic route for Ingress traffic from BIG-IP to Demo App:
# oc create -f f5-demo-route-basic.yamlValidate the route via the OpenShift UI under the Networking/Routes:

Validate the route via the BIG-IP:
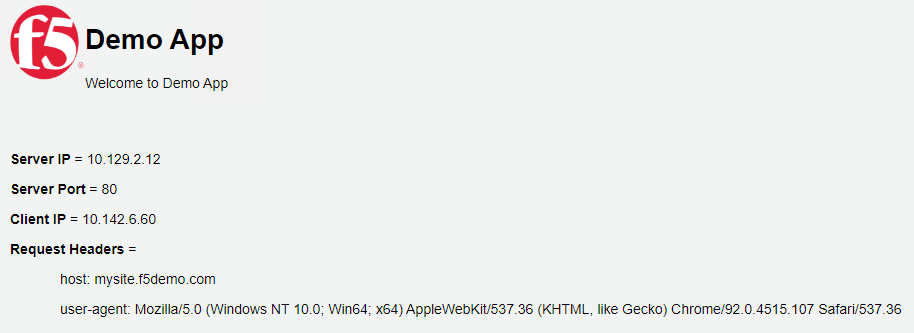
Note
To provide feedback on Container Ingress Services or this documentation, please file a GitHub Issue.